PatchMon Application Documentation
- Welcome to PatchMon
- Installation
- Installing PatchMon Server on Docker
- PatchMon Environment Variables Reference
- Installation of the PatchMon Agent
- First time setup admin page
- Installing PatchMon Server on K8S with Helm
- Nginx example configuration for PatchMon
- Draft: Uninstallation / removal of the Agent
- Integrations
- Integration API documentation (scoped credentials)
- Proxmox LXC Auto-Enrollment Guide
- Auto-enrolment api documentation
- Ansible Dynamic Library
- GetHomepage Integration Guide
- Setting up OIDC SSO Single Sign-on integration
- Release Notes Docs
- 2.0.0 (Major)
- 1.4.1
- 1.4.0 (Major)
- 1.3.7
- 1.3.6
- 1.3.5
- 1.3.4
- 1.3.3
- 1.3.2
- 1.3.0 (Major)
- 1.2.8 to 1.3.0 - Upgrade
- Agent Side Management
- Known issues & troubleshooting
- Software Architecture
- General Information
- Migration docs
- _Archive
- Web Application User Guide
- Users, Roles & SSO
- Alerts & Notifications
- Compliance
- Remote Access
- PatchMon Admin Guide
Welcome to PatchMon
PatchMon is an open-source Linux patch management system that gives system administrators centralised visibility over patches and packages across their infrastructure.
It works with standard Linux package managers - apt, yum, and dnf - and requires no inbound ports on your monitored hosts.
Contributing to documentation
Documentation is an area where we need help :)
- You can signup with your email or use SSO using your github account
- After which we will enable your account to be a contributor so you can edit
- Please send us a message on Discord or email for your role to change to a contributor
How PatchMon Works
PatchMon uses a lightweight agent model with three simple steps:
- Deploy the Server - Self-host PatchMon using Docker or the native installer, or use our managed Cloud version.
- Install the Agent - Add a host in the dashboard and run the one-liner install command on your Linux server.
- Monitor - The agent sends system and package data outbound to PatchMon on a schedule. No inbound ports need to be opened on your servers.
Network requirements: Agents only need outbound access on port 443 (HTTPS). If your systems are behind firewalls that inspect SSL/DNS traffic or are air-gapped, adjust your rules accordingly.
Key Features
| Area | Details |
|---|---|
| Dashboard | Customisable per-user card layout with fleet-wide overview |
| Host Management | Host inventory, grouping, and OS detail tracking |
| Package Tracking | Package and Repo inventory, outdated package counts, and repository tracking per host |
| Agent System | Lightweight GO agents with outbound-only communication connected via Web Sockets |
| Users & Auth | Multi-user accounts with roles, permissions, and RBAC |
| OIDC SSO | Single Sign-On via external identity providers |
| API & Integrations | REST API for managing hosts and data, templates for getHomepage and others available |
| Proxmox Integration | Auto-enrollment for LXC containers from Proxmox hosts |
| BETA - Security Compliance | OpenSCAP CIS Benchmarks and Docker Bench for Security with scheduled and on-demand scans |
| Docker Inventory | Container discovery and tracking across your hosts |
| SSH Terminal | In-browser SSH terminal with AI assistance |
| Extensive Configuration | Configurable parameters using .env variables |
Quick Links
Architecture
End Users (Browser)  ──HTTPS──▶  nginx (frontend + API proxy)
                                        │
                                        ▼
                                Backend (Node.js / Express / Prisma)
                                        │
                                        ▼
                                   PostgreSQL
                                        ▲
Agents on your servers  ──HTTPS──▶  Backend API (/api/v1)
     (outbound only)
- Backend: Node.js, Express, Prisma ORM
- Frontend: Vite + React
- Database: PostgreSQL
- Reverse Proxy: nginx
- Service Management: systemd
Support
- Discord: patchmon.net/discord
- Email: support@patchmon.net
- GitHub Issues: Report a bug
License
PatchMon is licensed under AGPLv3.
Installation
This chapter is dedicated to the Installation of PatchMon Server and the Agent
Installing PatchMon Server on Docker
Overview
PatchMon is a containerised application that monitors system patches and updates. The application consists of four main services:
- Database: PostgreSQL 17
- Redis: Redis 7 for BullMQ job queues and caching
- Server: Go API server with embedded frontend (serves both API and static files)
- guacd: Apache Guacamole daemon for in-browser RDP (Windows hosts)
Images
- Server: ghcr.io/patchmon/patchmon-server
Tags
latest: The latest stable release of PatchMonx.y.z: Full version tags (e.g.1.2.3) - Use this for exact version pinning.x.y: Minor version tags (e.g.1.2) - Use this to get the latest patch release in a minor version series.x: Major version tags (e.g.1) - Use this to get the latest minor and patch release in a major version series.edge: The latest development build in main branch. This tag may often be unstable and is intended only for testing and development purposes.
Quick Start
Production Deployment
Automated (recommended)
Run the setup script from an empty directory. It will download docker-compose.yml and env.example, generate all required secrets, and walk you through configuring your URL and timezone interactively:
mkdir patchmon && cd patchmon
curl -fsSL https://raw.githubusercontent.com/PatchMon/PatchMon/refs/heads/main/docker/setup-env.sh | bash
Once the script finishes, start PatchMon:
docker compose up -d
Access the application at the URL you configured (default: http://localhost:3000).
Manual
-
Download the Docker Compose file and environment example:
mkdir patchmon && cd patchmon curl -fsSL -o docker-compose.yml https://raw.githubusercontent.com/PatchMon/PatchMon/refs/heads/main/docker/docker-compose.yml curl -fsSL -o env.example https://raw.githubusercontent.com/PatchMon/PatchMon/refs/heads/main/docker/env.example -
Create your
.envfile from the example:cp env.example .env -
Generate and insert the required secrets:
sed -i "s/^POSTGRES_PASSWORD=.*/POSTGRES_PASSWORD=$(openssl rand -hex 32)/" .env sed -i "s/^REDIS_PASSWORD=.*/REDIS_PASSWORD=$(openssl rand -hex 32)/" .env sed -i "s/^JWT_SECRET=.*/JWT_SECRET=$(openssl rand -hex 64)/" .env sed -i "s/^SESSION_SECRET=.*/SESSION_SECRET=$(openssl rand -hex 64)/" .env sed -i "s/^AI_ENCRYPTION_KEY=.*/AI_ENCRYPTION_KEY=$(openssl rand -hex 64)/" .env -
Edit
.envand configure the required variables. Seeenv.examplefor the full list and docs.patchmon.net for detailed explanations. -
Start the application:
docker compose up -d -
Access the application at
http://localhost:3000
The docker-compose.yml reads all configuration from your .env file. You do not need to edit the compose file itself.
Updating
By default, the compose file uses the latest tag for the server image.
This means you can update PatchMon to the latest version as easily as:
docker compose pull
docker compose up -d
This command will:
- Pull the latest images from the registry
- Recreate containers with updated images
- Maintain your data and configuration
Version-Specific Updates
If you'd like to pin your Docker deployment of PatchMon to a specific version, you can do this in the compose file.
When you do this, updating to a new version requires manually updating the image tags in the compose file yourself:
-
Update the image tag in
docker-compose.yml. For example:services: server: image: ghcr.io/patchmon/patchmon-server:1.2.3 # Update version here ... -
Then run the update command:
docker compose pull
docker compose up -d
[!TIP] Check the releases page for version-specific changes and migration notes.
Configuration
All configuration is managed through the .env file.
For the full list of available variables, see env.example in this directory.
For detailed explanations of each variable (defaults, usage, and examples), see the PatchMon Environment Variables Reference at docs.patchmon.net.
Volumes
The compose file creates two Docker volumes:
postgres_data: PostgreSQL's data directory.redis_data: Redis's data directory.
Agent binaries are included in the server image at /app/agents and served read-only. Deploy or pull a new image to update agents.
Frontend assets (JS, CSS, default logos) are embedded in the server binary. Custom logos are stored in the database and served via the API.
If you wish to bind any of their respective container paths to a host path rather than a Docker volume, you can do so in the Docker Compose file.
Docker Swarm Deployment
[!NOTE] This section covers deploying PatchMon to a Docker Swarm cluster. For standard Docker Compose deployments on a single host, use the production deployment guide above.
Network Configuration
When deploying to Docker Swarm with a reverse proxy (e.g., Traefik), proper network configuration is critical. The default docker-compose.yml uses an internal bridge network that enables service-to-service communication:
networks:
  patchmon-internal:
    driver: bridge
All services (database, redis, and server) connect to this internal network, allowing them to discover each other by service name.
Important: If you're using an external reverse proxy network (like traefik-net), ensure that:
- All PatchMon services remain on the
patchmon-internalnetwork for internal communication - The server service can be configured to also bind to the reverse proxy network if needed
- Service names resolve correctly within the same network
Service Discovery in Swarm
In Docker Swarm, service discovery works through:
- Service Name Resolution: Service names resolve to virtual IPs within the same network
- Load Balancing: Requests to a service name are automatically load-balanced across all replicas
- Network Isolation: Services on different networks cannot communicate directly
Configuration for Swarm with Traefik
If you're using Traefik as a reverse proxy:
- Keep the default
patchmon-internalnetwork for server services - Configure Traefik in your Swarm deployment with its own network
- Ensure the server service is reachable through the internal network
Example modification for Swarm:
services:
  server:
    image: ghcr.io/patchmon/patchmon-server:latest
    networks:
      - patchmon-internal
    deploy:
      replicas: 1
      labels:
        - "traefik.enable=true"
        - "traefik.http.routers.patchmon.rule=Host(`patchmon.my.domain`)"
        # ... other Traefik labels
Traefik routes external traffic to the server service, which serves both the API and frontend.
Troubleshooting Network Issues
Error: host not found in upstream "server"
This typically occurs when:
- Services are on different networks
- Services haven't fully started (check health checks)
- Service names haven't propagated through DNS
Solution:
- Verify all services are on the same internal network
- Check service health status:
docker ps(production) ordocker service ps(Swarm) - Wait for health checks to pass before accessing the application
- Confirm network connectivity:
docker exec <container> ping server
Development
This section is for developers who want to contribute to PatchMon or run it in development mode.
Development Setup
For development with live reload and source code mounting:
-
Clone the repository:
git clone https://github.com/PatchMon/PatchMon.git cd PatchMon -
Start development environment:
docker compose -f docker/docker-compose.dev.yml upSee Development Commands for more options.
-
Access the application:
- Application (API + frontend):
http://localhost:3000 - Database:
localhost:5432 - Redis:
localhost:6379
- Application (API + frontend):
Development Docker Compose
The development compose file (docker/docker-compose.dev.yml):
- Builds images locally from source using development targets
- Enables hot reload with Docker Compose watch functionality
- Exposes database and backend ports for testing and development
- Mounts source code directly into containers for live development
- Supports debugging with enhanced logging
Building Images Locally
Both Dockerfiles use multi-stage builds with separate development and production targets.
Note: When using locally-built images (e.g. patchmon-server:dev), do not run docker compose pull for the full stack—Compose will try to pull that name from Docker Hub and fail (it exists only on your machine). Use docker compose up -d so Compose uses your local image, or run docker compose pull database redis if you only want to refresh Postgres/Redis.
Server agent binaries: The server image includes agent scripts and prebuilt binaries. To build locally, run make build-all-for-docker in agent-source-code/ first so agents-prebuilt/ is populated.
# Build development image
docker build -f docker/server.Dockerfile --target development --provenance=false --sbom=false -t patchmon-server:dev .

# Build production image (default target)
docker build -f docker/server.Dockerfile --provenance=false --sbom=false -t patchmon-server:latest .
Development Commands
Hot Reload Development
# Attached, live log output, services stopped on Ctrl+C
docker compose -f docker/docker-compose.dev.yml up

# Attached with Docker Compose watch for hot reload
docker compose -f docker/docker-compose.dev.yml up --watch

# Detached
docker compose -f docker/docker-compose.dev.yml up -d

# Quiet, no log output, with Docker Compose watch for hot reload
docker compose -f docker/docker-compose.dev.yml watch
Rebuild Services
# Rebuild specific service
docker compose -f docker/docker-compose.dev.yml up -d --build server

# Rebuild all services
docker compose -f docker/docker-compose.dev.yml up -d --build
Development Ports
The development setup exposes additional ports for debugging:
- Database:
5432- Direct PostgreSQL access - Redis:
6379- Direct Redis access - Backend:
3001- API server with development features - Frontend:
3000- React development server with hot reload
Development Workflow
-
Initial Setup: Clone repository and start development environment
git clone https://github.com/PatchMon/PatchMon.git cd PatchMon docker compose -f docker/docker-compose.dev.yml up -d --build -
Hot Reload Development: Use Docker Compose watch for automatic reload
docker compose -f docker/docker-compose.dev.yml up --watch --build -
Code Changes:
- Frontend/Backend Source: Files are synced automatically with watch mode
- Package.json Changes: Triggers automatic service rebuild
- Prisma Schema Changes: Backend service restarts automatically
-
Database Access: Connect database client directly to
localhost:5432 -
Redis Access: Connect Redis client directly to
localhost:6379 -
Debug: If started with
docker compose [...] up -dordocker compose [...] watch, check logs manually:docker compose -f docker/docker-compose.dev.yml logs -fOtherwise logs are shown automatically in attached modes (
up,up --watch).
Features in Development Mode
- Hot Reload: Automatic code synchronization and service restarts
- Enhanced Logging: Detailed logs for debugging
- Direct Access: Exposed ports for database, Redis, and API debugging
- Health Checks: Built-in health monitoring for services
- Volume Persistence: Development data persists between restarts
PatchMon Environment Variables Reference
This document provides a comprehensive reference for all environment variables available in PatchMon. These variables can be configured in your backend/.env file (bare metal installations) or in the .env file alongside docker-compose.yml (Docker deployments using env_file).
Database Configuration
PostgreSQL database connection settings.
| Variable | Description | Default | Required | Example |
|---|---|---|---|---|
DATABASE_URL |
PostgreSQL connection string | - | Yes | postgresql://user:pass@localhost:5432/patchmon_db |
PM_DB_CONN_MAX_ATTEMPTS |
Maximum database connection attempts during startup | 30 |
No | 30 |
PM_DB_CONN_WAIT_INTERVAL |
Wait interval between connection attempts (seconds) | 2 |
No | 2 |
Usage Notes
- The
DATABASE_URLmust be a valid PostgreSQL connection string - Connection retry logic helps handle database startup delays in containerized environments
- Format:
postgresql://[user]:[password]@[host]:[port]/[database] - In Docker deployments,
DATABASE_URLis constructed automatically in the compose file - you do not set it in.env
Database Connection Pool (Prisma)
Connection pooling configuration for optimal database performance and resource management.
| Variable | Description | Default | Required | Example |
|---|---|---|---|---|
DB_CONNECTION_LIMIT |
Maximum number of database connections per instance | 30 |
No | 30 |
DB_POOL_TIMEOUT |
Seconds to wait for an available connection before timeout | 20 |
No | 20 |
DB_CONNECT_TIMEOUT |
Seconds to wait for initial database connection | 10 |
No | 10 |
DB_IDLE_TIMEOUT |
Seconds before closing idle connections | 300 |
No | 300 |
DB_MAX_LIFETIME |
Maximum lifetime of a connection in seconds | 1800 |
No | 1800 |
Sizing Guidelines
Small Deployment (1-10 hosts):
DB_CONNECTION_LIMIT=15
DB_POOL_TIMEOUT=20
Medium Deployment (10-50 hosts):
DB_CONNECTION_LIMIT=30  # Default
DB_POOL_TIMEOUT=20
Large Deployment (50+ hosts):
DB_CONNECTION_LIMIT=50
DB_POOL_TIMEOUT=30
Connection Pool Calculation
Use this formula to estimate your needs:
DB_CONNECTION_LIMIT = (expected_hosts * 2) + (concurrent_users * 2) + 5
Example: 20 hosts + 3 concurrent users:
(20 * 2) + (3 * 2) + 5 = 51 connections
Important Notes
- Each backend instance maintains its own connection pool
- Running multiple backend instances requires considering total connections to PostgreSQL
- PostgreSQL default
max_connectionsis 100 (ensure your pool size doesn't exceed this) - Connections are reused efficiently - you don't need one connection per host
- Increase pool size if experiencing timeout errors during high load
Detecting Connection Pool Issues
When connection pool limits are hit, you'll see clear error messages in your backend console:
Typical Pool Timeout Error:
Host creation error: Error: Timed out fetching a new connection from the connection pool.
DATABASE CONNECTION POOL EXHAUSTED!
Current limit: DB_CONNECTION_LIMIT=30
Pool timeout: DB_POOL_TIMEOUT=20s
Suggestion: Increase DB_CONNECTION_LIMIT in your .env file
If you see these errors frequently, increase DB_CONNECTION_LIMIT by 10-20 and monitor your system.
Monitoring Connection Pool Usage
You can monitor your PostgreSQL connections to determine optimal pool size:
Check Current Connections:
# Connect to PostgreSQL
psql -U patchmon_user -d patchmon_db

# Run this query
SELECT count(*) as current_connections,
       (SELECT setting::int FROM pg_settings WHERE name='max_connections') as max_connections
FROM pg_stat_activity
WHERE datname = 'patchmon_db';
Recommended Actions:
- If
current_connectionsfrequently approachesDB_CONNECTION_LIMIT, increase the pool size - Monitor during peak usage (when multiple users are active, agents checking in)
- Leave 20-30% headroom for burst traffic
Database Transaction Timeouts
Control how long database transactions can run before being terminated.
| Variable | Description | Default | Required | Example |
|---|---|---|---|---|
DB_TRANSACTION_MAX_WAIT |
Maximum time (ms) to wait for a transaction to start | 10000 |
No | 10000 |
DB_TRANSACTION_TIMEOUT |
Maximum time (ms) for a standard transaction to complete | 30000 |
No | 30000 |
DB_TRANSACTION_LONG_TIMEOUT |
Maximum time (ms) for long-running transactions (e.g. bulk operations) | 60000 |
No | 60000 |
Usage Notes
- These prevent runaway queries from holding database locks indefinitely
- Increase
DB_TRANSACTION_LONG_TIMEOUTif bulk import or migration operations are timing out - All values are in milliseconds
Authentication & Security
JWT token configuration and security settings.
| Variable | Description | Default | Required | Example |
|---|---|---|---|---|
JWT_SECRET |
Secret key for signing JWT tokens | - | Yes | your-secure-random-secret-key |
JWT_EXPIRES_IN |
Access token expiration time | 1h |
No | 1h, 30m, 2h |
JWT_REFRESH_EXPIRES_IN |
Refresh token expiration time | 7d |
No | 7d, 3d, 14d |
Generating Secure Secrets
# Linux/macOS
openssl rand -hex 64
Time Format
Supports the following formats:
s: secondsm: minutesh: hoursd: days
Examples: 30s, 15m, 2h, 7d
Recommended Settings
Development:
JWT_EXPIRES_IN=1h
JWT_REFRESH_EXPIRES_IN=7d
Production:
JWT_EXPIRES_IN=30m
JWT_REFRESH_EXPIRES_IN=3d
High Security:
JWT_EXPIRES_IN=15m
JWT_REFRESH_EXPIRES_IN=1d
Password Policy
Enforce password complexity requirements for local user accounts.
| Variable | Description | Default | Required | Example |
|---|---|---|---|---|
PASSWORD_MIN_LENGTH |
Minimum password length | 8 |
No | 8, 12, 16 |
PASSWORD_REQUIRE_UPPERCASE |
Require at least one uppercase letter | true |
No | true, false |
PASSWORD_REQUIRE_LOWERCASE |
Require at least one lowercase letter | true |
No | true, false |
PASSWORD_REQUIRE_NUMBER |
Require at least one number | true |
No | true, false |
PASSWORD_REQUIRE_SPECIAL |
Require at least one special character | true |
No | true, false |
PASSWORD_RATE_LIMIT_WINDOW_MS |
Rate limit window for password changes (ms) | 900000 |
No | 900000 (15 min) |
PASSWORD_RATE_LIMIT_MAX |
Maximum password change attempts per window | 5 |
No | 5 |
Recommended Settings
Standard (default):
PASSWORD_MIN_LENGTH=8
PASSWORD_REQUIRE_UPPERCASE=true
PASSWORD_REQUIRE_LOWERCASE=true
PASSWORD_REQUIRE_NUMBER=true
PASSWORD_REQUIRE_SPECIAL=true
High Security:
PASSWORD_MIN_LENGTH=12
PASSWORD_REQUIRE_UPPERCASE=true
PASSWORD_REQUIRE_LOWERCASE=true
PASSWORD_REQUIRE_NUMBER=true
PASSWORD_REQUIRE_SPECIAL=true
PASSWORD_RATE_LIMIT_MAX=3
Usage Notes
- These rules apply to local accounts only - OIDC users authenticate against their identity provider
- Password changes and new account creation both enforce these rules
PASSWORD_RATE_LIMIT_*prevents brute-force password change attempts
Account Lockout
Protect against brute-force login attacks by temporarily locking accounts after repeated failures.
| Variable | Description | Default | Required | Example |
|---|---|---|---|---|
MAX_LOGIN_ATTEMPTS |
Failed login attempts before account lockout | 5 |
No | 5, 3, 10 |
LOCKOUT_DURATION_MINUTES |
Minutes the account stays locked after exceeding attempts | 15 |
No | 15, 30, 60 |
Usage Notes
- Lockout is per-account, not per-IP
- The failed attempts counter has a 15-minute rolling window - if no further failed attempts occur within that window, the counter resets on its own
- A successful login clears the failed attempts counter (before lockout is triggered)
- Once locked out, the account stays locked for the full
LOCKOUT_DURATION_MINUTES- there is no way to bypass this except waiting - Setting
MAX_LOGIN_ATTEMPTStoo low may lock out legitimate users who mistype passwords
Recommended Settings
Standard:
MAX_LOGIN_ATTEMPTS=5
LOCKOUT_DURATION_MINUTES=15
High Security:
MAX_LOGIN_ATTEMPTS=3
LOCKOUT_DURATION_MINUTES=30
Session Management
Control user session behavior and security.
| Variable | Description | Default | Required | Example |
|---|---|---|---|---|
SESSION_INACTIVITY_TIMEOUT_MINUTES |
Minutes of inactivity before automatic logout | 30 |
No | 30 |
Usage Notes
- Sessions are tracked in the database with activity timestamps
- Each authenticated request updates the session activity
- Expired sessions are automatically invalidated
- Users must log in again after timeout period
- Lower values provide better security but may impact user experience
Recommended Settings
- High Security Environment:
15minutes - Standard Security:
30minutes (default) - User-Friendly:
60minutes
Two-Factor Authentication (TFA)
Settings for two-factor authentication when users have it enabled.
| Variable | Description | Default | Required | Example |
|---|---|---|---|---|
MAX_TFA_ATTEMPTS |
Failed TFA code attempts before lockout | 5 |
No | 5, 3 |
TFA_LOCKOUT_DURATION_MINUTES |
Minutes locked out after exceeding TFA attempts | 30 |
No | 30, 60 |
TFA_REMEMBER_ME_EXPIRES_IN |
"Remember this device" token expiration | 30d |
No | 30d, 7d, 90d |
TFA_MAX_REMEMBER_SESSIONS |
Maximum remembered devices per user | 5 |
No | 5 |
TFA_SUSPICIOUS_ACTIVITY_THRESHOLD |
Failed attempts before flagging suspicious activity | 3 |
No | 3 |
Usage Notes
- These variables only apply when users have TFA enabled on their account
- "Remember this device" allows users to skip TFA on trusted devices
MAX_TFA_ATTEMPTSandTFA_LOCKOUT_DURATION_MINUTESprevent brute-force attacks on TOTP codes- Suspicious activity detection can trigger additional security measures
- Remembered sessions can be revoked by users or admins
Recommended Settings
Standard:
MAX_TFA_ATTEMPTS=5
TFA_LOCKOUT_DURATION_MINUTES=30
TFA_REMEMBER_ME_EXPIRES_IN=30d
TFA_MAX_REMEMBER_SESSIONS=5
TFA_SUSPICIOUS_ACTIVITY_THRESHOLD=3
High Security:
MAX_TFA_ATTEMPTS=3
TFA_LOCKOUT_DURATION_MINUTES=60
TFA_REMEMBER_ME_EXPIRES_IN=7d
TFA_MAX_REMEMBER_SESSIONS=3
TFA_SUSPICIOUS_ACTIVITY_THRESHOLD=2
OIDC / SSO
OpenID Connect configuration for Single Sign-On. Set OIDC_ENABLED=true and fill in your identity provider details to enable SSO.
| Variable | Description | Default | Required | Example |
|---|---|---|---|---|
OIDC_ENABLED |
Enable OIDC authentication | false |
No | true, false |
OIDC_ISSUER_URL |
Identity provider issuer URL | - | If OIDC enabled | https://auth.example.com |
OIDC_CLIENT_ID |
OAuth client ID | - | If OIDC enabled | patchmon |
OIDC_CLIENT_SECRET |
OAuth client secret | - | If OIDC enabled | your-client-secret |
OIDC_REDIRECT_URI |
Callback URL after authentication | - | If OIDC enabled | https://patchmon.example.com/api/v1/auth/oidc/callback |
OIDC_SCOPES |
OAuth scopes to request | openid email profile groups |
No | openid email profile groups |
OIDC_AUTO_CREATE_USERS |
Automatically create PatchMon accounts for new OIDC users | true |
No | true, false |
OIDC_DEFAULT_ROLE |
Default role for auto-created OIDC users | user |
No | user, admin, viewer |
OIDC_DISABLE_LOCAL_AUTH |
Disable local username/password login when OIDC is enabled | false |
No | true, false |
OIDC_BUTTON_TEXT |
Login button text shown on the login page | Login with SSO |
No | Login with SSO, Sign in with Authentik |
Group-to-Role Mapping
Map OIDC groups from your identity provider to PatchMon roles. This keeps role assignments in sync with your IdP.
| Variable | Description | Default | Required | Example |
|---|---|---|---|---|
OIDC_ADMIN_GROUP |
OIDC group name that maps to admin role | - | No | PatchMon Admins |
OIDC_USER_GROUP |
OIDC group name that maps to user role | - | No | PatchMon Users |
OIDC_SYNC_ROLES |
Sync roles from OIDC groups on each login | true |
No | true, false |
Example: Authentik
OIDC_ENABLED=true
OIDC_ISSUER_URL=https://authentik.example.com/application/o/patchmon/
OIDC_CLIENT_ID=patchmon
OIDC_CLIENT_SECRET=your-client-secret-here
OIDC_REDIRECT_URI=https://patchmon.example.com/api/v1/auth/oidc/callback
OIDC_SCOPES=openid email profile groups
OIDC_AUTO_CREATE_USERS=true
OIDC_DEFAULT_ROLE=user
OIDC_BUTTON_TEXT=Login with Authentik
OIDC_ADMIN_GROUP=PatchMon Admins
OIDC_USER_GROUP=PatchMon Users
OIDC_SYNC_ROLES=true
Example: Keycloak
OIDC_ENABLED=true
OIDC_ISSUER_URL=https://keycloak.example.com/realms/your-realm
OIDC_CLIENT_ID=patchmon
OIDC_CLIENT_SECRET=your-client-secret-here
OIDC_REDIRECT_URI=https://patchmon.example.com/api/v1/auth/oidc/callback
OIDC_SCOPES=openid email profile groups
OIDC_AUTO_CREATE_USERS=true
OIDC_DEFAULT_ROLE=user
OIDC_BUTTON_TEXT=Login with Keycloak
Usage Notes
OIDC_REDIRECT_URImust be registered as an allowed redirect URI in your identity provider- When
OIDC_DISABLE_LOCAL_AUTH=true, users can only log in via OIDC - useful for enforcing SSO across the organisation - When
OIDC_SYNC_ROLES=true, the user's role is updated on every login based on their OIDC group membership - If a user is in both
OIDC_ADMIN_GROUPandOIDC_USER_GROUP, the admin role takes precedence - The
groupsscope must be supported by your identity provider and included inOIDC_SCOPESfor group mapping to work
Server & Network Configuration
Server protocol, host, and CORS settings.
| Variable | Description | Default | Required | Example |
|---|---|---|---|---|
PORT |
Backend API server port | 3001 |
No | 3001 |
NODE_ENV |
Node.js environment mode | production |
No | production, development |
SERVER_PROTOCOL |
Server protocol | http |
No | http, https |
SERVER_HOST |
Server hostname/domain | localhost |
No | patchmon.example.com |
SERVER_PORT |
Server port | 3000 |
No | 3000, 443 |
CORS_ORIGIN |
Allowed CORS origin URL | http://localhost:3000 |
No | https://patchmon.example.com |
CORS_ORIGINS |
Multiple allowed CORS origins (comma-separated) | - | No | https://a.example.com,https://b.example.com |
ENABLE_HSTS |
Enable HTTP Strict Transport Security | true |
No | true, false |
TRUST_PROXY |
Trust proxy headers (when behind reverse proxy) | true |
No | true, false |
Usage Notes
SERVER_PROTOCOL,SERVER_HOST, andSERVER_PORTare used to generate agent installation scriptsCORS_ORIGINmust match the URL you use to access PatchMon in your browserCORS_ORIGINS(plural, comma-separated) overridesCORS_ORIGINwhen set - only needed if PatchMon is accessed from multiple domains- Set
TRUST_PROXYtotruewhen behind nginx, Apache, or other reverse proxies ENABLE_HSTSshould betruein production with HTTPS
Example Configurations
Local Development:
SERVER_PROTOCOL=http
SERVER_HOST=localhost
SERVER_PORT=3000
CORS_ORIGIN=http://localhost:3000
ENABLE_HSTS=false
TRUST_PROXY=false
Production with HTTPS:
SERVER_PROTOCOL=https
SERVER_HOST=patchmon.example.com
SERVER_PORT=443
CORS_ORIGIN=https://patchmon.example.com
ENABLE_HSTS=true
TRUST_PROXY=true
Multiple Domains:
SERVER_PROTOCOL=https
SERVER_HOST=patchmon.example.com
SERVER_PORT=443
CORS_ORIGINS=https://patchmon.example.com,https://patchmon-alt.example.com
ENABLE_HSTS=true
TRUST_PROXY=true
Rate Limiting
Protect your API from abuse with configurable rate limits.
| Variable | Description | Default | Required | Example |
|---|---|---|---|---|
RATE_LIMIT_WINDOW_MS |
General rate limit window (milliseconds) | 900000 |
No | 900000 (15 min) |
RATE_LIMIT_MAX |
Maximum requests per window (general) | 5000 |
No | 5000 |
AUTH_RATE_LIMIT_WINDOW_MS |
Authentication endpoints rate limit window (ms) | 600000 |
No | 600000 (10 min) |
AUTH_RATE_LIMIT_MAX |
Maximum auth requests per window | 500 |
No | 500 |
AGENT_RATE_LIMIT_WINDOW_MS |
Agent API rate limit window (ms) | 60000 |
No | 60000 (1 min) |
AGENT_RATE_LIMIT_MAX |
Maximum agent requests per window | 1000 |
No | 1000 |
Understanding Rate Limits
Rate limits are applied per IP address and endpoint category:
- General API: Dashboard, hosts, packages, user management
- Authentication: Login, logout, token refresh
- Agent API: Agent check-ins, updates, package reports
Calculating Windows
The window is a sliding time frame. Examples:
900000ms = 15 minutes600000ms = 10 minutes60000ms = 1 minute
Recommended Settings
Default (Balanced):
RATE_LIMIT_WINDOW_MS=900000      # 15 minutes
RATE_LIMIT_MAX=5000              # ~5.5 requests/second
AUTH_RATE_LIMIT_WINDOW_MS=600000 # 10 minutes
AUTH_RATE_LIMIT_MAX=500          # ~0.8 requests/second
AGENT_RATE_LIMIT_WINDOW_MS=60000 # 1 minute
AGENT_RATE_LIMIT_MAX=1000        # ~16 requests/second
Strict (High Security):
RATE_LIMIT_WINDOW_MS=900000      # 15 minutes
RATE_LIMIT_MAX=2000              # ~2.2 requests/second
AUTH_RATE_LIMIT_WINDOW_MS=600000 # 10 minutes
AUTH_RATE_LIMIT_MAX=100          # ~0.16 requests/second
AGENT_RATE_LIMIT_WINDOW_MS=60000 # 1 minute
AGENT_RATE_LIMIT_MAX=500         # ~8 requests/second
Relaxed (Development/Testing):
RATE_LIMIT_WINDOW_MS=900000      # 15 minutes
RATE_LIMIT_MAX=10000             # ~11 requests/second
AUTH_RATE_LIMIT_WINDOW_MS=600000 # 10 minutes
AUTH_RATE_LIMIT_MAX=1000         # ~1.6 requests/second
AGENT_RATE_LIMIT_WINDOW_MS=60000 # 1 minute
AGENT_RATE_LIMIT_MAX=2000        # ~33 requests/second
Redis Configuration
Redis is used for BullMQ job queues and caching.
| Variable | Description | Default | Required | Example |
|---|---|---|---|---|
REDIS_HOST |
Redis server hostname | localhost |
No | localhost, redis, 10.0.0.5 |
REDIS_PORT |
Redis server port | 6379 |
No | 6379 |
REDIS_USER |
Redis username (Redis 6+) | - | No | default |
REDIS_PASSWORD |
Redis authentication password | - | Recommended | your-redis-password |
REDIS_DB |
Redis database number | 0 |
No | 0, 1, 2 |
Usage Notes
- Redis authentication is highly recommended for security
- Redis 6.0+ supports ACL with usernames; earlier versions use password-only auth
- If no password is set, Redis will be accessible without authentication (not recommended)
- Database number allows multiple applications to use the same Redis instance
Docker Deployment
In Docker, set REDIS_PASSWORD in your .env file. The compose file automatically passes it to both the Redis container (via its startup command) and the backend service (via env_file).
Bare Metal Deployment
The setup script configures Redis ACL with a dedicated user and password per instance. The credentials are written to backend/.env automatically.
Generating Secure Passwords
openssl rand -hex 32
Logging
Control application logging behavior and verbosity.
| Variable | Description | Default | Required | Example |
|---|---|---|---|---|
LOG_LEVEL |
Logging level | info |
No | debug, info, warn, error |
ENABLE_LOGGING |
Enable/disable application logging | true |
No | true, false |
PM_LOG_TO_CONSOLE |
Output logs to the console | false |
No | true, false |
PM_LOG_REQUESTS_IN_DEV |
Log HTTP requests in development mode | false |
No | true, false |
PRISMA_LOG_QUERIES |
Log all Prisma database queries | false |
No | true, false |
Log Levels
Ordered from most to least verbose:
debug: All logs including database queries, internal operationsinfo: General information, startup messages, normal operationswarn: Warning messages, deprecated features, non-critical issueserror: Error messages only, critical issues
Recommended Settings
Development:
LOG_LEVEL=debug
ENABLE_LOGGING=true
PM_LOG_TO_CONSOLE=true
PM_LOG_REQUESTS_IN_DEV=true
PRISMA_LOG_QUERIES=true
Production:
LOG_LEVEL=info
ENABLE_LOGGING=true
PM_LOG_TO_CONSOLE=false
PRISMA_LOG_QUERIES=false
Production (Quiet):
LOG_LEVEL=warn
ENABLE_LOGGING=true
PRISMA_LOG_QUERIES=false
Timezone Configuration
Control timezone handling for timestamps and logs across the application.
| Variable | Description | Default | Required | Example |
|---|---|---|---|---|
TZ |
Timezone for timestamps and logs | UTC |
No | UTC, America/New_York, Europe/London |
Usage Notes
- The
TZenvironment variable controls timezone handling across all components:- Backend (Node.js): Timestamps in API responses, database records, logs
- Agent (Go): Agent logs, integration data timestamps
- If
TZis not set, the application defaults to UTC - Database timestamps are always stored in UTC for consistency
- Display timestamps can be converted to the configured timezone
Common Timezone Values
# UTC (recommended for servers)
TZ=UTC

# UK
TZ=Europe/London

# US
TZ=America/New_York       # Eastern
TZ=America/Chicago         # Central
TZ=America/Los_Angeles    # Pacific

# Europe
TZ=Europe/Paris
TZ=Europe/Berlin

# Asia
TZ=Asia/Tokyo
TZ=Asia/Shanghai
Body Size Limits
Control the maximum size of request bodies accepted by the API.
| Variable | Description | Default | Required | Example |
|---|---|---|---|---|
JSON_BODY_LIMIT |
Maximum JSON request body size | 5mb |
No | 5mb, 10mb, 1mb |
AGENT_UPDATE_BODY_LIMIT |
Maximum body size for agent update payloads | 2mb |
No | 2mb, 5mb |
Usage Notes
JSON_BODY_LIMITapplies to all standard API endpoints (dashboard actions, user management, etc.)AGENT_UPDATE_BODY_LIMITapplies specifically to agent check-in and package report payloads- Increase these if agents are managing a very large number of packages and the payload exceeds the limit
- Keep these as low as practical to limit memory usage and reduce the impact of oversized requests
Encryption
Controls encryption of sensitive data stored in the database (e.g. AI provider API keys, bootstrap tokens).
| Variable | Description | Default | Required | Example |
|---|---|---|---|---|
AI_ENCRYPTION_KEY |
Encryption key for sensitive data at rest (64 hex characters) | - | No | Output of openssl rand -hex 32 |
SESSION_SECRET |
Fallback key used if AI_ENCRYPTION_KEY is not set |
- | No | Output of openssl rand -hex 32 |
How It Works
The backend uses this priority chain to determine the encryption key:
AI_ENCRYPTION_KEY- used directly if set (64 hex chars = 32 bytes, or any string which gets SHA-256 hashed)SESSION_SECRET- ifAI_ENCRYPTION_KEYis not set, SHA-256 hashed to derive the keyDATABASE_URL- if neither above is set, derives a key from the database URL (logs a security warning)- Ephemeral - last resort, generates a random key (data encrypted with this key will be unreadable after a restart)
What Gets Encrypted
- AI API keys - API keys for AI providers (e.g. OpenAI) are AES-256-GCM encrypted before being stored in the database
- Bootstrap tokens - Agent auto-enrollment API keys are encrypted before temporary storage in Redis
Usage Notes
- For most deployments, you do not need to set either variable - the key is derived from
DATABASE_URLwhich is stable - Set
AI_ENCRYPTION_KEYif you need encryption stability across database URL changes or multi-replica deployments - These do not affect user password storage (passwords are bcrypt hashed, not encrypted)
User Management
Default settings for new users.
| Variable | Description | Default | Required | Example |
|---|---|---|---|---|
DEFAULT_USER_ROLE |
Default role assigned to new users | user |
No | user, admin, viewer |
Available Roles
admin: Full system access, can manage users and settingsuser: Standard access, can manage hosts and packagesviewer: Read-only access, cannot make changes
Usage Notes
- Only applies to newly created users
- Existing users are not affected by changes to this variable
- First user created through setup is always an admin
- Can be changed per-user through the user management interface
Frontend Configuration
Frontend-specific environment variables (used during build and runtime).
| Variable | Description | Default | Required | Example |
|---|---|---|---|---|
VITE_API_URL |
Backend API base URL | /api/v1 |
No | http://localhost:3001/api/v1 |
VITE_APP_NAME |
Application name displayed in UI | PatchMon |
No | PatchMon |
VITE_APP_VERSION |
Application version displayed in UI | (from package.json) | No | 1.4.0 |
BACKEND_HOST |
Backend hostname (Docker only) | backend |
No | backend, localhost |
BACKEND_PORT |
Backend port (Docker only) | 3001 |
No | 3001 |
VITE_ENABLE_LOGGING |
Enable frontend debug logging | false |
No | true, false |
Usage Notes
- Frontend variables are prefixed with
VITE_for the Vite build system VITE_*variables are embedded at build time - they cannot be changed at runtimeVITE_API_URLcan be relative (/api/v1) or absoluteBACKEND_HOSTandBACKEND_PORTare used by the Docker frontend container's Nginx proxy config
Complete Example Configuration
Bare Metal (Production)
# Database
DATABASE_URL="postgresql://patchmon_user:secure_db_password@localhost:5432/patchmon_db"
PM_DB_CONN_MAX_ATTEMPTS=30
PM_DB_CONN_WAIT_INTERVAL=2

# Database Connection Pool
DB_CONNECTION_LIMIT=30
DB_POOL_TIMEOUT=20
DB_CONNECT_TIMEOUT=10
DB_IDLE_TIMEOUT=300
DB_MAX_LIFETIME=1800

# JWT
JWT_SECRET="generated-secure-secret-from-openssl"
JWT_EXPIRES_IN=30m
JWT_REFRESH_EXPIRES_IN=3d

# Server
PORT=3001
NODE_ENV=production
SERVER_PROTOCOL=https
SERVER_HOST=patchmon.example.com
SERVER_PORT=443
CORS_ORIGIN=https://patchmon.example.com
ENABLE_HSTS=true
TRUST_PROXY=true

# Session
SESSION_INACTIVITY_TIMEOUT_MINUTES=30

# User
DEFAULT_USER_ROLE=user

# Rate Limiting
RATE_LIMIT_WINDOW_MS=900000
RATE_LIMIT_MAX=5000
AUTH_RATE_LIMIT_WINDOW_MS=600000
AUTH_RATE_LIMIT_MAX=500
AGENT_RATE_LIMIT_WINDOW_MS=60000
AGENT_RATE_LIMIT_MAX=1000

# Redis
REDIS_HOST=localhost
REDIS_PORT=6379
REDIS_PASSWORD=secure_redis_password
REDIS_DB=0

# Logging
LOG_LEVEL=info
ENABLE_LOGGING=true

# Timezone
TZ=UTC

# TFA
TFA_REMEMBER_ME_EXPIRES_IN=30d
TFA_MAX_REMEMBER_SESSIONS=5
TFA_SUSPICIOUS_ACTIVITY_THRESHOLD=3
Docker (Production)
For Docker deployments, see docker/env.example for a complete template. Copy it to .env, fill in the required values, and run docker compose up -d. The compose file reads all variables via env_file: .env.
Troubleshooting
Common Issues
"timeout of 10000ms exceeded" when adding hosts:
- Increase
DB_CONNECTION_LIMIT(try 30 or higher) - Increase
DB_POOL_TIMEOUT(try 20 or 30) - Check backend logs for "DATABASE CONNECTION POOL EXHAUSTED" messages
Database connection failures on startup:
- Increase
PM_DB_CONN_MAX_ATTEMPTS - Increase
PM_DB_CONN_WAIT_INTERVAL - Verify
DATABASE_URLis correct
"Invalid or expired session" errors:
- Check
JWT_SECREThasn't changed between restarts - Verify
SESSION_INACTIVITY_TIMEOUT_MINUTESisn't too low - Ensure
JWT_EXPIRES_INis reasonable
Rate limit errors (429 Too Many Requests):
- Increase
RATE_LIMIT_MAXvalues - Increase window duration (
*_WINDOW_MSvariables)
CORS errors:
- Verify
CORS_ORIGINmatches your frontend URL exactly (protocol + domain + port) - For multiple domains, use
CORS_ORIGINS(plural, comma-separated)
OIDC login fails:
- Verify
OIDC_REDIRECT_URIis registered in your identity provider - Check
OIDC_ISSUER_URLis reachable from the PatchMon server - Ensure
OIDC_CLIENT_SECRETmatches the value in your IdP
Encrypted data unreadable after restart:
- Set
AI_ENCRYPTION_KEYto a stable value so the key persists across restarts - Re-enter AI provider API keys if the encryption key has changed
Security Best Practices
-
Always set strong secrets:
- Use
openssl rand -hex 64forJWT_SECRET - Use
openssl rand -hex 32for database and Redis passwords
- Use
-
Enable HTTPS in production:
- Set
SERVER_PROTOCOL=https - Enable
ENABLE_HSTS=true - Use proper SSL certificates
- Set
-
Configure appropriate rate limits:
- Adjust based on expected traffic
- Lower limits for public-facing deployments
-
Use session timeouts:
- Don't set
SESSION_INACTIVITY_TIMEOUT_MINUTEStoo high - Balance security with user experience
- Don't set
-
Secure Redis:
- Always set
REDIS_PASSWORD - Use Redis ACLs in Redis 6+ for additional security
- Don't expose Redis port publicly
- Always set
-
Enable account lockout:
- Keep
MAX_LOGIN_ATTEMPTSandLOCKOUT_DURATION_MINUTESat defaults or stricter
- Keep
-
Enforce password policy:
- Keep all
PASSWORD_REQUIRE_*options enabled - Consider increasing
PASSWORD_MIN_LENGTHto 12+
- Keep all
Version Information
- Last Updated: February 2026
- Applicable to PatchMon: v1.4.0+
Installation of the PatchMon Agent
Add Host wizard method
Press Add host either from the left hand side menu or on the top right of the page when on the Hosts Page:
You will see a selection box to chose from for Linux, FreeBSD or Windows.
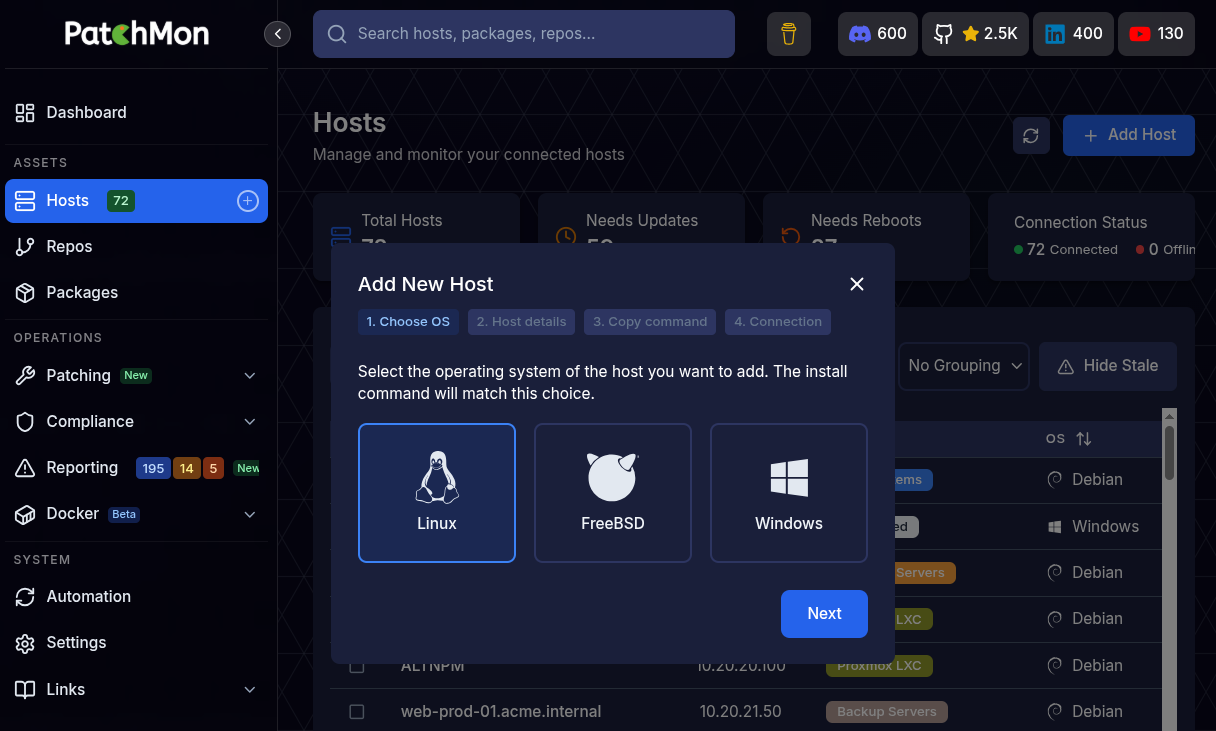
Linux
- Press Next
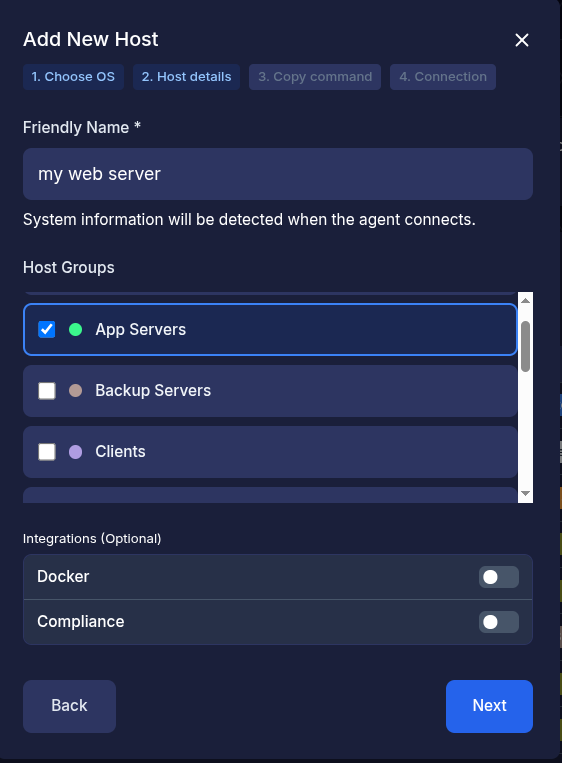
- Enter in the friendly name of the host
- Optionally select the host groups you want to associate this host with. Host groups can be added in Settings -> Host groups
- Optionally toggle integrations such as Docker or Compliance
- Docker integration - Allows docker inventory (stacks, containers, images, networks, volumes etc) to propagate through to PatchMon for visualisation
- Compliance integration - Allows for OpenSCAP and Docker bench scans based agains CIS Benchmarking to take place. Our advice is to leave this disabled until after installation so that you can monitor the status of its installation etc, though once you've done it a few times there is no harm in enabling it later through the hosts individual settings.

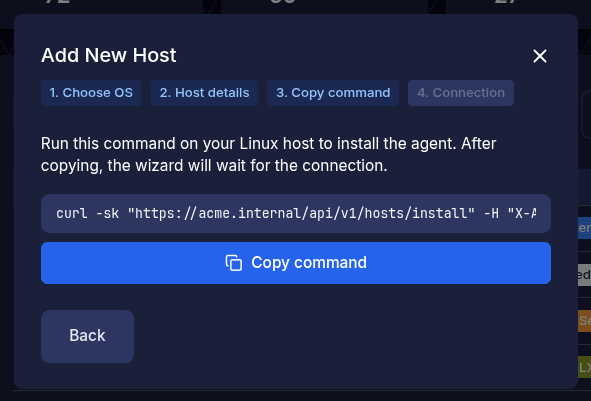
- Press Next and you will be presented with a curl command to run on your server or Linux host to manage.
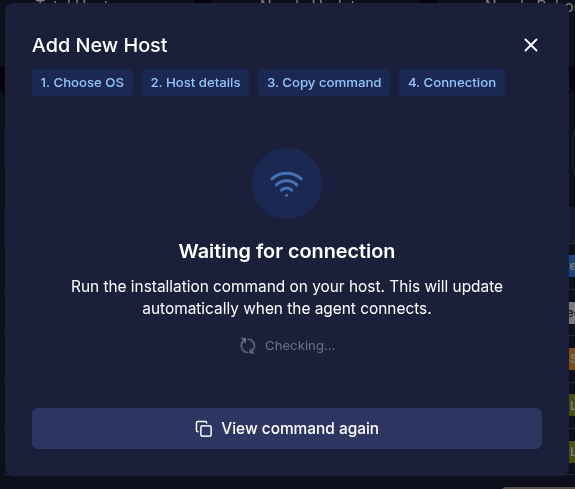
Once the "Copy" button is pressed then PatchMon will expect that you paste this in right away and will present a waiting modal like so :
-

- Now on the host you are to paste this in and you'll see PatchMon installing the agent. Please run this as root
- Once pasted in and the command runs, it will finish with this:
SUCCESS: PatchMon Agent service started successfully
INFO: WebSocket connection established
SUCCESS: PatchMon Agent installation completed successfully!

Installation Summary:
   • Configuration directory: /etc/patchmon
   • Agent binary installed: /usr/local/bin/patchmon-agent
   • Architecture: amd64
   • Dependencies installed: curl
   • Systemd service configured and running
   • API credentials configured and tested
   • WebSocket connection established
   • Logs directory: /etc/patchmon/logs

Management Commands:
   • Test connection: /usr/local/bin/patchmon-agent ping
   • Manual report: /usr/local/bin/patchmon-agent report
   • Check status: /usr/local/bin/patchmon-agent diagnostics
   • Service status: systemctl status patchmon-agent
   • Service logs: journalctl -u patchmon-agent -f
   • Restart service: systemctl restart patchmon-agent

SUCCESS: Your system is now being monitored by PatchMon!
PatchMon will then at this point redirect your page in the browser to the hosts detail view after receiving the initial report.
Note: The first report can sometimes take about 30 seconds, it runs all the package updates from the repositories and collects the data but it shouldn't ever take more than 60 seconds - so do investigate if it does. Another note is that once the agent is installed and the "waiting for report" screen shows, you can come out of that screen and navigate around PatchMon and the report will be fed in its own time.
This is what you should see on the host detail page after the report:
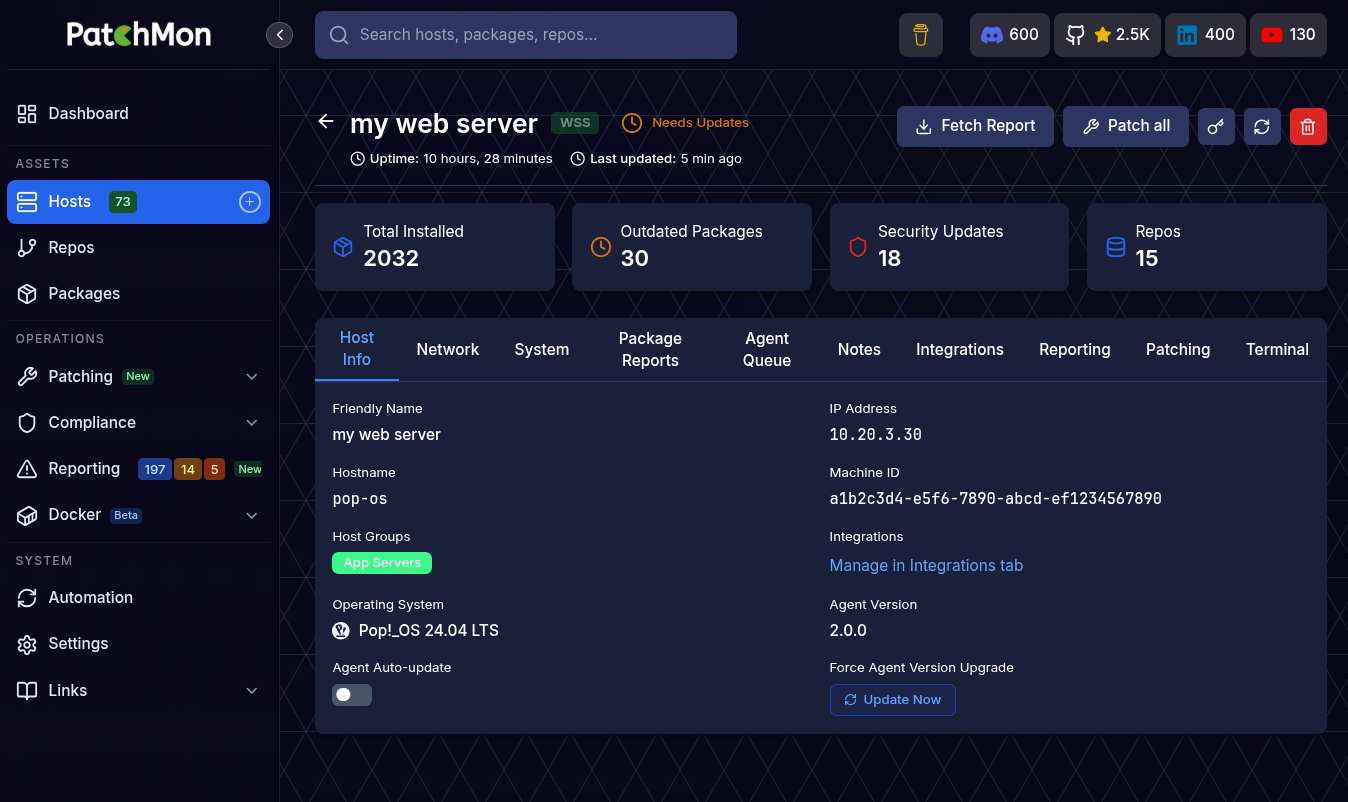
First time setup admin page
First time admin setup
Upon first time setup you will see this page:
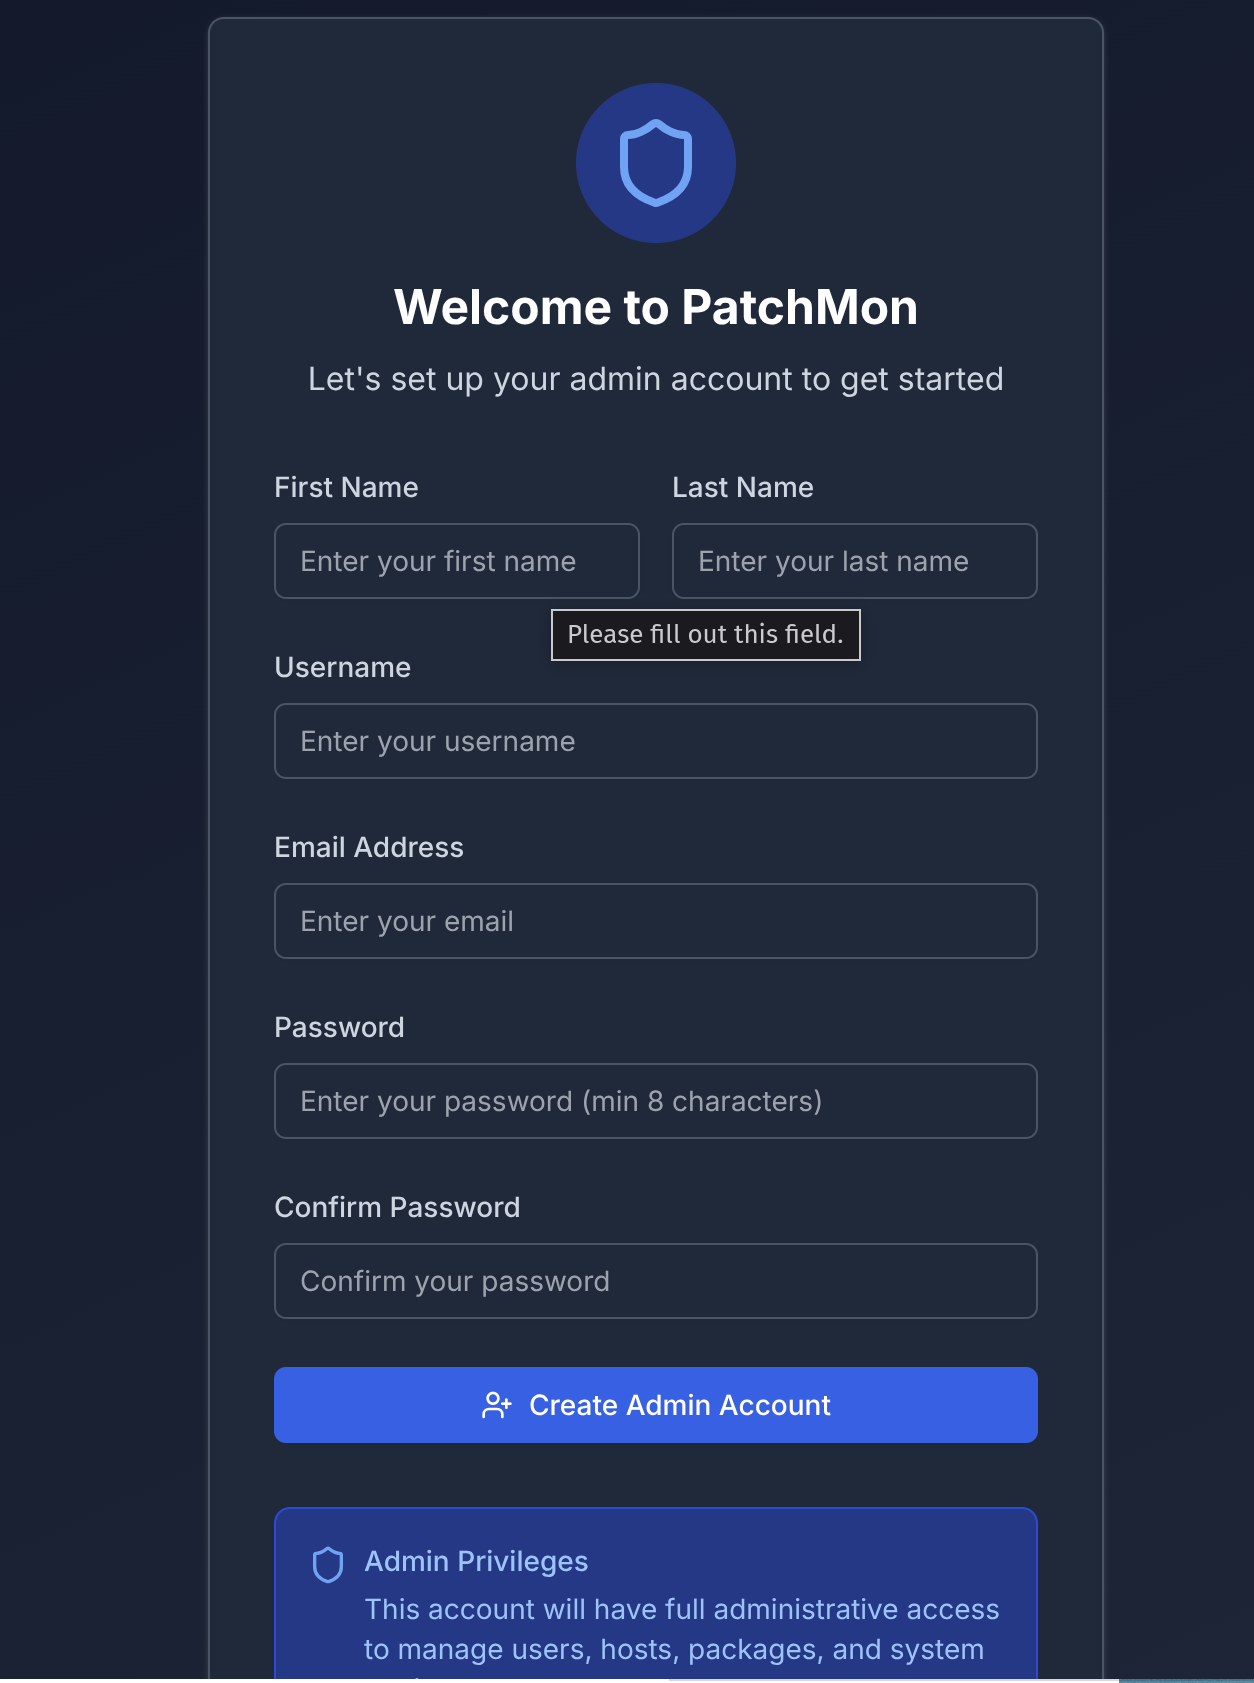
Enter the details and your password (min 8 characters).
Try not using the username "admin" as it's a common one, but something unique to you.
After pressing Create account you will be redirected to the dashboard:
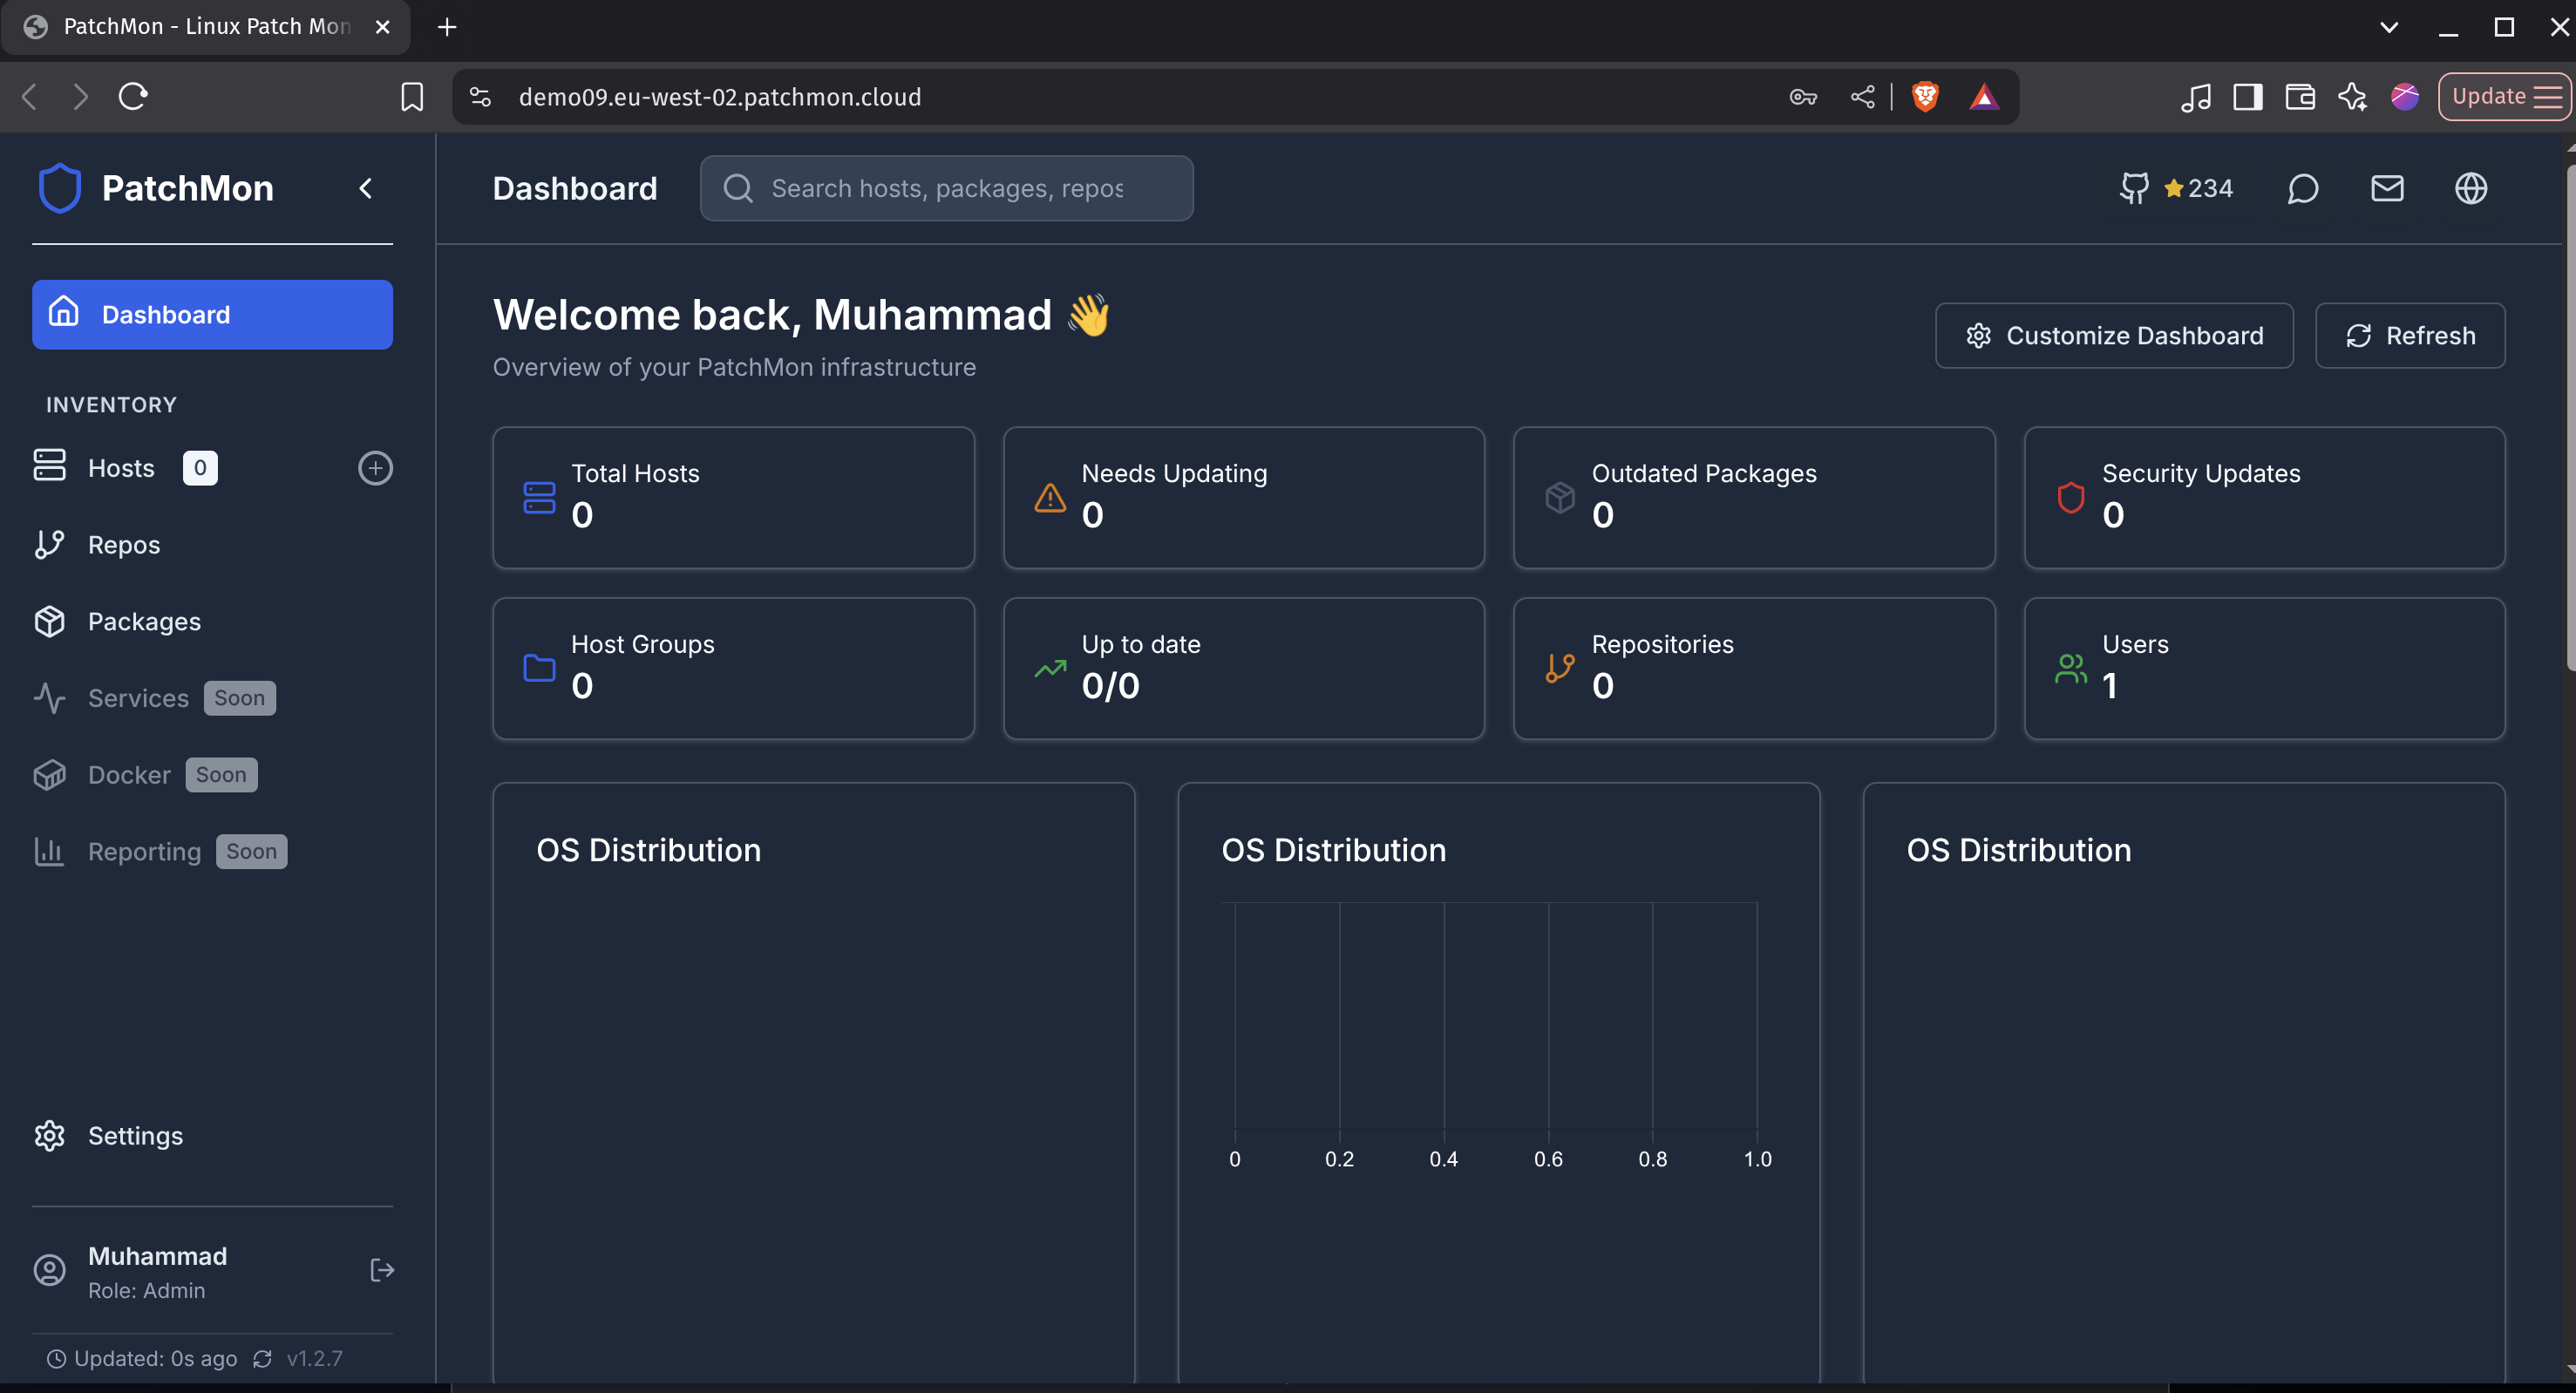
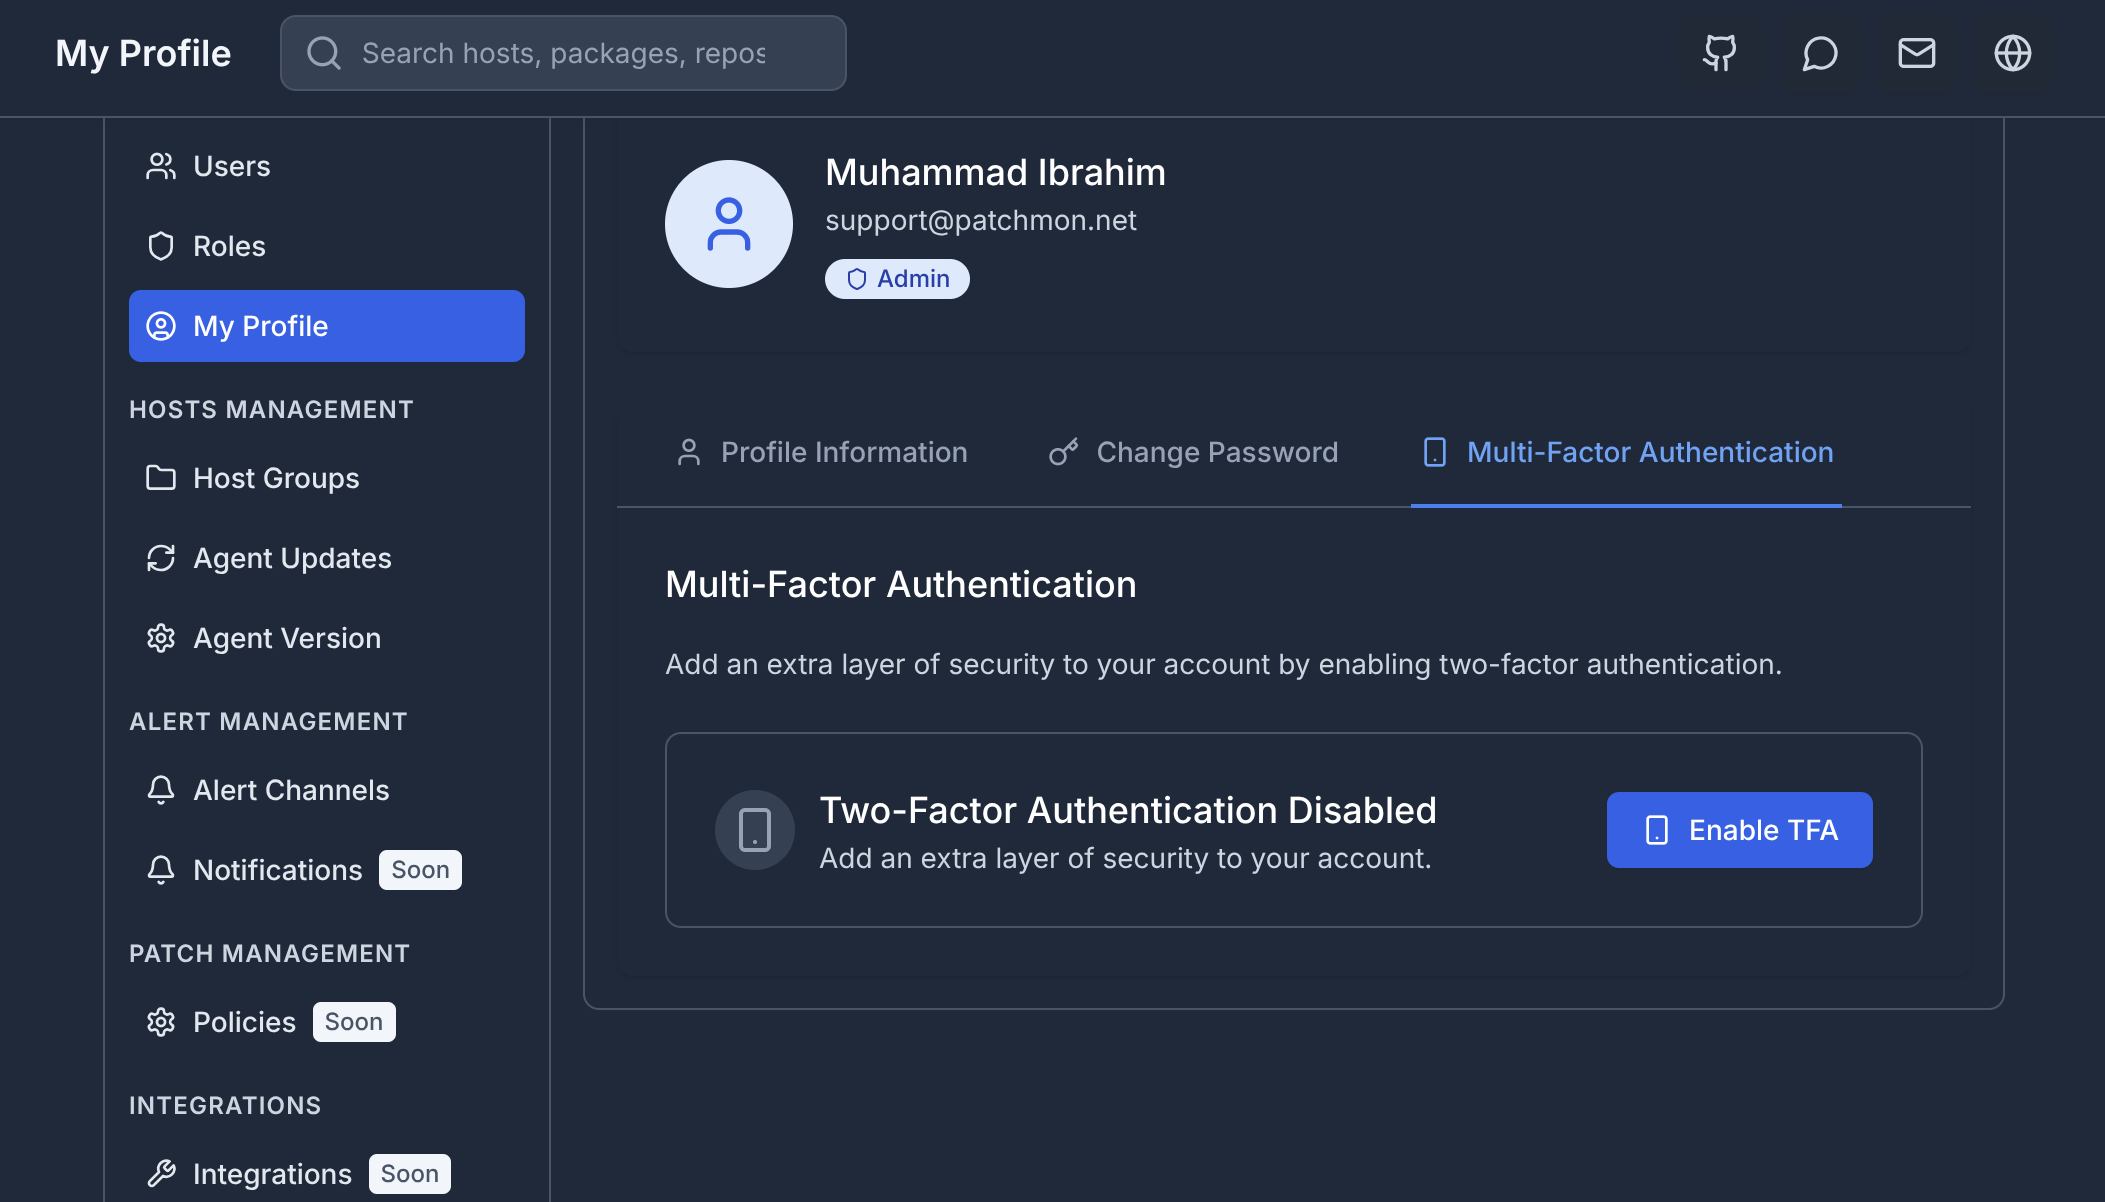
First thing is please setup MFA but going to your profile on the bottom left, you will be greeted with the Profile modification page, please press the Multi-Factor authentication tab and set that up:
If you get errors upon trying to login or create the admin account fort he first time, then ensure you have correctly setup the CORS url setting in your .env file located (/opt/<your instance>/backend/.env) or the docker environment file.
Installing PatchMon Server on K8S with Helm
PatchMon Helm Chart Documentation
Helm chart for deploying PatchMon on Kubernetes.
- Chart repository: github.com/RuTHlessBEat200/PatchMon-helm
- Application repository: github.com/PatchMon/PatchMon
Overview
PatchMon v2.0.0 runs as a containerised application made up of four services:
- Database -- PostgreSQL 18 (StatefulSet with persistent storage)
- Redis -- Redis 8 (used for BullMQ job queues and caching, StatefulSet with persistent storage)
- Server -- Single Go binary serving both the backend API and the React frontend static files (StatefulSet with optional HPA)
- Guacd -- Apache Guacamole proxy daemon for remote desktop / SSH terminal access (Deployment)
Note: In v2.0.0 the separate backend and frontend containers have been merged into a single
serverbinary. If you are upgrading from v1.x, update your values files accordingly —backend.*andfrontend.*keys no longer exist.
The chart deploys all four components into a single namespace and wires them together automatically using init containers, internal ClusterIP services, and a shared ConfigMap.
Container Images
| Component | Image | Default Tag |
|---|---|---|
| Server | ghcr.io/patchmon/patchmon-server | 2.0.0 |
| Database | docker.io/postgres | 18-alpine |
| Redis | docker.io/redis | 8-alpine |
| Guacd | docker.io/guacamole/guacd | latest |
Available Tags (Server)
| Tag | Description |
|---|---|
latest |
Latest stable release |
x.y.z |
Exact version pin (e.g. 2.0.0) |
x.y |
Latest patch in a minor series (e.g. 2.0) |
x |
Latest minor and patch in a major series (e.g. 2) |
edge |
Latest development build from the main branch -- may be unstable, for testing only |
Prerequisites
- Kubernetes 1.19+
- Helm 3.0+
- A PersistentVolume provisioner in the cluster (for database and Redis storage)
- (Optional) An Ingress controller (e.g. NGINX Ingress) for external access
- (Optional) cert-manager for automatic TLS certificate management
- (Optional) Metrics Server for HPA functionality
Quick Start
The quickest way to get PatchMon running is to use the provided
values-quick-start.yaml file.
It contains all required secrets inline and sensible defaults so you can install
with a single command.
Warning:
values-quick-start.yamlships with placeholder secrets and is intended for evaluation and testing only. Never use it in production without replacing all secret values.
1. Install the chart
wget https://github.com/RuTHlessBEat200/PatchMon-helm/blob/main/values-quick-start.yaml
helm install patchmon oci://ghcr.io/ruthlessbeat200/charts/patchmon \
  --namespace patchmon \
  --create-namespace \
  --values values-quick-start.yaml
2. Wait for pods to become ready
kubectl get pods -n patchmon -w
3. Access PatchMon
If ingress is enabled, open the host you configured (e.g. https://patchmon-dev.example.com).
Without ingress, use port-forwarding:
kubectl port-forward -n patchmon svc/patchmon-dev-server 3000:3000
Production Deployment
For production use, refer to the provided
values-prod.yaml file as a starting point.
It demonstrates how to:
- Use an external secret (e.g. managed by KSOPS, Sealed Secrets, or External Secrets Operator) instead of inline passwords
- Configure HTTPS with cert-manager
- Set the correct server protocol, host, and port for agent communication
1. Create your secrets
The chart does not auto-generate secrets. You must supply them yourself.
Required secrets:
| Key | Description |
|---|---|
postgres-password |
PostgreSQL password |
redis-password |
Redis password |
jwt-secret |
JWT signing secret for the server |
ai-encryption-key |
Encryption key for AI provider credentials |
oidc-client-secret |
OIDC client secret (only if OIDC is enabled) |
You can either:
- Set passwords directly in your values file (
database.auth.password,redis.auth.password,server.jwtSecret,server.aiEncryptionKey), or - Create a Kubernetes Secret separately and reference it with
existingSecret/existingSecretPasswordKeyfields.
Example -- creating a secret manually:
kubectl create namespace patchmon

kubectl create secret generic patchmon-secrets \
  --namespace patchmon \
  --from-literal=postgres-password="$(openssl rand -hex 32)" \
  --from-literal=redis-password="$(openssl rand -hex 32)" \
  --from-literal=jwt-secret="$(openssl rand -hex 64)" \
  --from-literal=ai-encryption-key="$(openssl rand -hex 32)"
Secret management tools for production:
- KSOPS -- encrypt secrets in Git using Mozilla SOPS
- Sealed Secrets -- encrypt secrets that only the cluster can decrypt
- External Secrets Operator -- sync secrets from external stores (Vault, AWS Secrets Manager, etc.)
- Vault -- enterprise-grade secret management
2. Create your values file
Start from values-prod.yaml and adjust to your environment:
global:
  storageClass: "your-storage-class"

fullnameOverride: "patchmon-prod"

server:
  env:
    serverProtocol: https
    serverHost: patchmon.example.com
    serverPort: "443"
    corsOrigin: https://patchmon.example.com
  existingSecret: "patchmon-secrets"
  existingSecretJwtKey: "jwt-secret"
  existingSecretAiEncryptionKey: "ai-encryption-key"

database:
  auth:
    existingSecret: patchmon-secrets
    existingSecretPasswordKey: postgres-password

redis:
  auth:
    existingSecret: patchmon-secrets
    existingSecretPasswordKey: redis-password

secret:
  create: false   # Disable chart-managed secret since we use an external one

ingress:
  enabled: true
  className: nginx
  annotations:
    cert-manager.io/cluster-issuer: letsencrypt-prod
    nginx.ingress.kubernetes.io/proxy-body-size: "0"
    nginx.ingress.kubernetes.io/proxy-read-timeout: "3600"
    nginx.ingress.kubernetes.io/proxy-send-timeout: "3600"
    nginx.ingress.kubernetes.io/proxy-connect-timeout: "60"
    nginx.ingress.kubernetes.io/proxy-http-version: "1.1"
    nginx.ingress.kubernetes.io/client-body-buffer-size: "4m"
    nginx.ingress.kubernetes.io/websocket-services: "server"
  hosts:
    - host: patchmon.example.com
      paths:
        - path: /
          pathType: Prefix
          service:
            name: server
            port: 3000
  tls:
    - secretName: patchmon-tls
      hosts:
        - patchmon.example.com
3. Install
helm install patchmon oci://ghcr.io/ruthlessbeat200/charts/patchmon \
  --namespace patchmon \
  --create-namespace \
  --values values-prod.yaml
Configuration Reference
Global Settings
| Parameter | Description | Default |
|---|---|---|
global.imageRegistry |
Override the image registry for all components | "" |
global.imageTag |
Override the image tag for the server (takes priority over server.image.tag if set) |
"" |
global.imagePullSecrets |
Image pull secrets applied to all pods | [] |
global.storageClass |
Default storage class for all PVCs | "" |
nameOverride |
Override the chart name used in resource names | "" |
fullnameOverride |
Override the full resource name prefix | "patchmon-prod" |
commonLabels |
Labels added to all resources | {} |
commonAnnotations |
Annotations added to all resources | {} |
Database (PostgreSQL)
| Parameter | Description | Default |
|---|---|---|
database.enabled |
Deploy the PostgreSQL StatefulSet | true |
database.image.registry |
Image registry | docker.io |
database.image.repository |
Image repository | postgres |
database.image.tag |
Image tag | 18-alpine |
database.image.pullPolicy |
Image pull policy | IfNotPresent |
database.host |
External database host (overrides built-in service discovery when set) | "" |
database.port |
External database port | "" |
database.auth.database |
Database name | patchmon_db |
database.auth.username |
Database user | patchmon_user |
database.auth.password |
Database password (required if existingSecret is not set) |
"" |
database.auth.existingSecret |
Name of an existing secret containing the password | "" |
database.auth.existingSecretPasswordKey |
Key inside the existing secret | postgres-password |
database.replicaCount |
Number of replicas | 1 |
database.updateStrategy.type |
StatefulSet update strategy | RollingUpdate |
database.persistence.enabled |
Enable persistent storage | true |
database.persistence.storageClass |
Storage class (falls back to global.storageClass) |
"" |
database.persistence.accessModes |
PVC access modes | ["ReadWriteOnce"] |
database.persistence.size |
PVC size | 5Gi |
database.resources.requests.cpu |
CPU request | 100m |
database.resources.requests.memory |
Memory request | 128Mi |
database.resources.limits.cpu |
CPU limit | 1000m |
database.resources.limits.memory |
Memory limit | 1Gi |
database.livenessProbe.enabled |
Enable liveness probe | true |
database.readinessProbe.enabled |
Enable readiness probe | true |
database.service.type |
Service type | ClusterIP |
database.service.port |
Service port | 5432 |
database.podAnnotations |
Pod annotations | {} |
database.podSecurityContext |
Pod-level security context | see values.yaml |
database.securityContext |
Container-level security context | see values.yaml |
database.nodeSelector |
Node selector | {} |
database.tolerations |
Tolerations | [] |
database.affinity |
Affinity rules | {} |
Redis
| Parameter | Description | Default |
|---|---|---|
redis.enabled |
Deploy the Redis StatefulSet | true |
redis.image.registry |
Image registry | docker.io |
redis.image.repository |
Image repository | redis |
redis.image.tag |
Image tag | 8-alpine |
redis.image.pullPolicy |
Image pull policy | IfNotPresent |
redis.auth.password |
Redis password (required if existingSecret is not set) |
"" |
redis.auth.existingSecret |
Name of an existing secret containing the password | "" |
redis.auth.existingSecretPasswordKey |
Key inside the existing secret | redis-password |
redis.replicaCount |
Number of replicas | 1 |
redis.updateStrategy.type |
StatefulSet update strategy | RollingUpdate |
redis.persistence.enabled |
Enable persistent storage | true |
redis.persistence.storageClass |
Storage class (falls back to global.storageClass) |
"" |
redis.persistence.accessModes |
PVC access modes | ["ReadWriteOnce"] |
redis.persistence.size |
PVC size | 5Gi |
redis.resources.requests.cpu |
CPU request | 50m |
redis.resources.requests.memory |
Memory request | 10Mi |
redis.resources.limits.cpu |
CPU limit | 500m |
redis.resources.limits.memory |
Memory limit | 512Mi |
redis.livenessProbe.enabled |
Enable liveness probe | true |
redis.readinessProbe.enabled |
Enable readiness probe | true |
redis.service.type |
Service type | ClusterIP |
redis.service.port |
Service port | 6379 |
redis.podAnnotations |
Pod annotations | {} |
redis.podSecurityContext |
Pod-level security context | see values.yaml |
redis.securityContext |
Container-level security context | see values.yaml |
redis.nodeSelector |
Node selector | {} |
redis.tolerations |
Tolerations | [] |
redis.affinity |
Affinity rules | {} |
Server
The server component is a single Go binary that serves both the backend API and the React frontend on port 3000. It is deployed as a StatefulSet.
| Parameter | Description | Default |
|---|---|---|
server.enabled |
Deploy the server | true |
server.image.registry |
Image registry | ghcr.io |
server.image.repository |
Image repository | patchmon/patchmon-server |
server.image.tag |
Image tag (overridden by global.imageTag if set) |
2.0.0 |
server.image.pullPolicy |
Image pull policy | IfNotPresent |
server.replicaCount |
Number of replicas | 1 |
server.updateStrategy.type |
StatefulSet update strategy | RollingUpdate |
server.jwtSecret |
JWT signing secret (required if existingSecret is not set) |
"" |
server.aiEncryptionKey |
AI encryption key (required if existingSecret is not set) |
"" |
server.existingSecret |
Name of an existing secret for JWT and AI encryption key | "" |
server.existingSecretJwtKey |
Key for JWT secret inside the existing secret | jwt-secret |
server.existingSecretAiEncryptionKey |
Key for AI encryption key inside the existing secret | ai-encryption-key |
server.resources.requests.cpu |
CPU request | 10m |
server.resources.requests.memory |
Memory request | 256Mi |
server.resources.limits.cpu |
CPU limit | 2000m |
server.resources.limits.memory |
Memory limit | 2Gi |
server.autoscaling.enabled |
Enable HPA | false |
server.autoscaling.minReplicas |
Minimum replicas | 1 |
server.autoscaling.maxReplicas |
Maximum replicas | 10 |
server.autoscaling.targetCPUUtilizationPercentage |
Target CPU utilisation | 80 |
server.autoscaling.targetMemoryUtilizationPercentage |
Target memory utilisation | 80 |
server.service.type |
Service type | ClusterIP |
server.service.port |
Service port | 3000 |
server.service.annotations |
Service annotations | [] |
server.livenessProbe.enabled |
Enable liveness probe (TCP on port 3000) | true |
server.readinessProbe.enabled |
Enable readiness probe (GET /health on port 3000) |
true |
server.initContainers.waitForDatabase.enabled |
Wait for database before starting | true |
server.initContainers.waitForRedis.enabled |
Wait for Redis before starting | true |
server.initContainers.waitForGuacd.enabled |
Wait for guacd before starting | true |
server.extraEnv |
Extra environment variables to inject into the server container | [] |
server.extraVolumeMounts |
Extra volume mounts for the server container | [] |
server.extraVolumes |
Extra volumes to add to the server pod | [] |
server.podAnnotations |
Pod annotations | {} |
server.podSecurityContext |
Pod-level security context | see values.yaml |
server.securityContext |
Container-level security context | see values.yaml |
server.nodeSelector |
Node selector | {} |
server.tolerations |
Tolerations | [] |
server.affinity |
Affinity rules | {} |
server.topologySpreadConstraints |
Topology spread constraints | [] |
Server Environment Variables
| Parameter | Description | Default |
|---|---|---|
server.env.enableLogging |
Enable application logging | true |
server.env.logLevel |
Log level (trace, debug, info, warn, error) |
info |
server.env.logToConsole |
Log to stdout | true |
server.env.serverProtocol |
Protocol used by agents to reach the server (http or https) |
http |
server.env.serverHost |
Hostname used by agents to reach the server | patchmon.example.com |
server.env.serverPort |
Port used by agents (80 or 443) |
80 |
server.env.corsOrigin |
CORS allowed origin (should match the URL users access in a browser) | http://patchmon.example.com |
server.env.dbConnectionLimit |
Database connection pool limit | 30 |
server.env.dbPoolTimeout |
Pool timeout in seconds | 20 |
server.env.dbConnectTimeout |
Connection timeout in seconds | 10 |
server.env.dbIdleTimeout |
Idle connection timeout in seconds | 300 |
server.env.dbMaxLifetime |
Max connection lifetime in seconds | 1800 |
server.env.rateLimitWindowMs |
General rate limit window (ms) | 900000 |
server.env.rateLimitMax |
General rate limit max requests | 5000 |
server.env.authRateLimitWindowMs |
Auth rate limit window (ms) | 600000 |
server.env.authRateLimitMax |
Auth rate limit max requests | 500 |
server.env.agentRateLimitWindowMs |
Agent rate limit window (ms) | 60000 |
server.env.agentRateLimitMax |
Agent rate limit max requests | 1000 |
server.env.redisDb |
Redis database index | 0 |
server.env.trustProxy |
Trust proxy headers -- set to a CIDR range or true when behind a reverse proxy |
10.0.0.0/8,172.16.0.0/12,192.168.0.0/16 |
server.env.enableHsts |
Enable HSTS header | false |
server.env.defaultUserRole |
Default role for new users | user |
server.env.autoCreateRolePermissions |
Auto-create role permissions | false |
OIDC / SSO Configuration
| Parameter | Description | Default |
|---|---|---|
server.oidc.enabled |
Enable OIDC authentication | false |
server.oidc.issuerUrl |
OIDC issuer URL | "" |
server.oidc.clientId |
OIDC client ID | "" |
server.oidc.clientSecret |
OIDC client secret (required if existingSecret not set) |
"" |
server.oidc.existingSecret |
Existing secret containing the OIDC client secret | "" |
server.oidc.existingSecretClientSecretKey |
Key inside the existing secret | oidc-client-secret |
server.oidc.scopes |
OIDC scopes | openid profile email |
server.oidc.buttonText |
Login button text | Login with SSO |
server.oidc.autoCreateUsers |
Auto-create users on first OIDC login | true |
server.oidc.defaultRole |
Default role for OIDC-created users | user |
server.oidc.syncRoles |
Sync roles from OIDC group claims | true |
server.oidc.disableLocalAuth |
Disable local username/password authentication | false |
server.oidc.sessionTtl |
OIDC session TTL in seconds | 86400 |
server.oidc.groups.superadmin |
OIDC group mapped to the superadmin role | "" |
server.oidc.groups.admin |
OIDC group mapped to the admin role | "" |
server.oidc.groups.hostManager |
OIDC group mapped to the hostManager role | "" |
server.oidc.groups.user |
OIDC group mapped to the user role | "" |
server.oidc.groups.readonly |
OIDC group mapped to the readonly role | "" |
Guacd
Apache Guacamole proxy daemon used for browser-based SSH and remote desktop sessions.
| Parameter | Description | Default |
|---|---|---|
guacd.enabled |
Deploy guacd | true |
guacd.image.registry |
Image registry | docker.io |
guacd.image.repository |
Image repository | guacamole/guacd |
guacd.image.tag |
Image tag | latest |
guacd.image.pullPolicy |
Image pull policy | IfNotPresent |
guacd.replicaCount |
Number of replicas | 1 |
guacd.updateStrategy.type |
Deployment update strategy | RollingUpdate |
guacd.resources.requests.cpu |
CPU request | 10m |
guacd.resources.requests.memory |
Memory request | 32Mi |
guacd.resources.limits.cpu |
CPU limit | 1000m |
guacd.resources.limits.memory |
Memory limit | 512Mi |
guacd.livenessProbe.enabled |
Enable liveness probe (TCP) | true |
guacd.readinessProbe.enabled |
Enable readiness probe (TCP) | true |
guacd.service.type |
Service type | ClusterIP |
guacd.service.port |
Service port | 4822 |
guacd.podAnnotations |
Pod annotations | {} |
guacd.podSecurityContext |
Pod-level security context | see values.yaml |
guacd.securityContext |
Container-level security context | see values.yaml |
guacd.nodeSelector |
Node selector | {} |
guacd.tolerations |
Tolerations | [] |
guacd.affinity |
Affinity rules | {} |
Ingress
| Parameter | Description | Default |
|---|---|---|
ingress.enabled |
Enable ingress resource | true |
ingress.className |
Ingress class name | "" |
ingress.annotations |
Ingress annotations | see values.yaml |
ingress.hosts |
List of ingress host rules | see values.yaml |
ingress.tls |
TLS configuration | [] (disabled) |
The default ingress annotations enable WebSocket support and tune proxy timeouts for agent connections:
ingress:
  annotations:
    nginx.ingress.kubernetes.io/proxy-body-size: "0"
    nginx.ingress.kubernetes.io/proxy-read-timeout: "3600"
    nginx.ingress.kubernetes.io/proxy-send-timeout: "3600"
    nginx.ingress.kubernetes.io/proxy-connect-timeout: "60"
    nginx.ingress.kubernetes.io/proxy-http-version: "1.1"
    nginx.ingress.kubernetes.io/client-body-buffer-size: "4m"
    nginx.ingress.kubernetes.io/websocket-services: "server"
Other
| Parameter | Description | Default |
|---|---|---|
serviceAccount.create |
Create a ServiceAccount | false |
serviceAccount.annotations |
ServiceAccount annotations | {} |
serviceAccount.name |
ServiceAccount name | "" |
configMap.create |
Create the application ConfigMap | true |
configMap.annotations |
ConfigMap annotations | {} |
secret.create |
Create the chart-managed Secret (disable when using an external secret) | true |
secret.annotations |
Secret annotations | {} |
Persistent Volumes
The chart creates the following PersistentVolumeClaims:
| PVC | Component | Purpose | Default Size |
|---|---|---|---|
postgres-data |
Database | PostgreSQL data directory | 5Gi |
redis-data |
Redis | Redis data directory | 5Gi |
All PVCs respect the global.storageClass setting unless overridden at the component level.
Updating PatchMon
Using global.imageTag
The simplest way to update the server image is to set global.imageTag:
helm upgrade patchmon oci://ghcr.io/ruthlessbeat200/charts/patchmon \
  -n patchmon \
  -f values-prod.yaml \
  --set global.imageTag=2.1.0
When global.imageTag is set it overrides server.image.tag.
Pinning the server tag individually
server:
  image:
    tag: "2.0.0"
Upgrading the chart version
# Upgrade with new values
helm upgrade patchmon oci://ghcr.io/ruthlessbeat200/charts/patchmon \
  --namespace patchmon \
  --values values-prod.yaml

# Upgrade and wait for rollout
helm upgrade patchmon oci://ghcr.io/ruthlessbeat200/charts/patchmon \
  --namespace patchmon \
  --values values-prod.yaml \
  --wait --timeout 10m
Check the releases page for version-specific changes and migration notes.
Uninstalling
# Uninstall the release
helm uninstall patchmon -n patchmon

# Clean up PVCs (optional -- this deletes all data)
kubectl delete pvc -n patchmon -l app.kubernetes.io/instance=patchmon
Advanced Configuration
Custom Image Registry
Override the registry for all images (useful for air-gapped environments or private mirrors):
global:
  imageRegistry: "registry.example.com"
This changes every image pull to use the specified registry:
registry.example.com/postgres:18-alpineregistry.example.com/redis:8-alpineregistry.example.com/guacamole/guacd:latestregistry.example.com/patchmon/patchmon-server:2.0.0registry.example.com/busybox:latest(init containers)
Without global.imageRegistry, components use their default registries (docker.io for database/Redis/guacd, ghcr.io for server).
Multi-Tenant Deployment
Deploy multiple isolated instances in separate namespaces using fullnameOverride:
fullnameOverride: "patchmon-tenant-a"

server:
  env:
    serverHost: tenant-a.patchmon.example.com
    corsOrigin: https://tenant-a.patchmon.example.com

ingress:
  hosts:
    - host: tenant-a.patchmon.example.com
      paths:
        - path: /
          pathType: Prefix
          service:
            name: server
            port: 3000
Horizontal Pod Autoscaling
server:
  autoscaling:
    enabled: true
    minReplicas: 2
    maxReplicas: 10
    targetCPUUtilizationPercentage: 70
    targetMemoryUtilizationPercentage: 80
Using an External Database
Disable the built-in database and point the server at an external PostgreSQL instance:
database:
  enabled: false
  host: "my-postgres.example.com"
  port: 5432
  auth:
    database: patchmon_db
    username: patchmon_user
    existingSecret: patchmon-secrets
    existingSecretPasswordKey: postgres-password
Injecting Extra Environment Variables
Use server.extraEnv to pass additional environment variables, for example to trust a custom CA for OIDC:
server:
  extraEnv:
    - name: NODE_EXTRA_CA_CERTS
      value: /etc/ssl/certs/my-ca.crt
  extraVolumeMounts:
    - name: my-ca
      mountPath: /etc/ssl/certs/my-ca.crt
      subPath: ca.crt
      readOnly: true
  extraVolumes:
    - name: my-ca
      configMap:
        name: my-ca-configmap
OIDC / SSO Integration
server:
  oidc:
    enabled: true
    issuerUrl: "https://auth.example.com/realms/master"
    clientId: "patchmon"
    clientSecret: "your-client-secret"
    scopes: "openid profile email groups"
    buttonText: "Login with SSO"
    autoCreateUsers: true
    syncRoles: true
    groups:
      superadmin: "patchmon-admins"
      admin: ""
      hostManager: ""
      user: ""
      readonly: ""
Troubleshooting
Check pod status
kubectl get pods -n patchmon
kubectl describe pod <pod-name> -n patchmon
kubectl logs <pod-name> -n patchmon
Check init container logs
kubectl logs <pod-name> -n patchmon -c wait-for-database
kubectl logs <pod-name> -n patchmon -c wait-for-redis
kubectl logs <pod-name> -n patchmon -c wait-for-guacd
Check service connectivity
# Test database connection
kubectl exec -n patchmon -it statefulset/patchmon-prod-server -- nc -zv patchmon-prod-database 5432

# Test Redis connection
kubectl exec -n patchmon -it statefulset/patchmon-prod-server -- nc -zv patchmon-prod-redis 6379

# Test guacd connection
kubectl exec -n patchmon -it statefulset/patchmon-prod-server -- nc -zv patchmon-prod-guacd 4822

# Check server health
kubectl exec -n patchmon -it statefulset/patchmon-prod-server -- wget -qO- http://localhost:3000/health
Common issues
| Symptom | Likely cause | Fix |
|---|---|---|
Pods stuck in Init state |
Database, Redis, or guacd not yet running | Check StatefulSet/Deployment events: kubectl describe sts -n patchmon |
PVC stuck in Pending |
No matching StorageClass or no available PV | Verify storage class exists: kubectl get sc |
ImagePullBackOff |
Registry credentials missing or incorrect image reference | Check imagePullSecrets and image path |
| Ingress returns 404 / 502 | Ingress controller not installed or misconfigured path rules | Verify controller pods and ingress resource: kubectl describe ingress -n patchmon |
| WebSocket disconnects | Missing WebSocket annotations on ingress | Ensure nginx.ingress.kubernetes.io/websocket-services: "server" and proxy timeout annotations are set |
secret ... not found |
Required secret was not created before install | Create the secret or set secret.create: true with inline passwords |
Development
Lint the chart
helm lint .
Render templates locally
# Render with default values
helm template patchmon . --values values-quick-start.yaml

# Render with production values
helm template patchmon . --values values-prod.yaml

# Debug template rendering
helm template patchmon . --values values-quick-start.yaml --debug
Dry-run installation
helm install patchmon . \
  --namespace patchmon \
  --dry-run --debug \
  --values values-quick-start.yaml
Support
- GitHub Issues: github.com/RuTHlessBEat200/PatchMon-helm/issues
- Application repository: github.com/PatchMon/PatchMon
Nginx example configuration for PatchMon
This nginx configuration is for the type of installation where it's on bare-metal / native installation.
Edits the ports as required
# Example nginx config for PatchMon
# - Frontend served from disk; /bullboard and /api/ proxied to backend
# - HTTP → HTTPS redirect, WebSocket (WSS) support, static asset caching
# Replace: your-domain.com, /opt/your-domain.com/frontend, backend port
# Copy to /etc/nginx/sites-available/ and symlink from sites-enabled, then:
#   sudo nginx -t && sudo systemctl reload nginx

map $http_upgrade $connection_upgrade {
    default upgrade;
    ''      close;
}
upstream patchmon {
    server 127.0.0.1:3001;
}

# Redirect all HTTP to HTTPS (so ws:// is never used; frontend uses wss://)
server {
    listen 80;
    listen [::]:80;
    server_name your-domain.com;

    location /.well-known/acme-challenge/ {
        root /var/www/html;
    }

    location / {
        return 301 https://$host$request_uri;
    }
}

server {
    listen 443 ssl http2;
    listen [::]:443 ssl http2;
    server_name your-domain.com;

    # SSL (Let's Encrypt)
    ssl_certificate /etc/letsencrypt/live/your-domain.com/fullchain.pem;
    ssl_certificate_key /etc/letsencrypt/live/your-domain.com/privkey.pem;
    include /etc/letsencrypt/options-ssl-nginx.conf;
    ssl_dhparam /etc/letsencrypt/ssl-dhparams.pem;

    # Security headers
    add_header Strict-Transport-Security "max-age=31536000; includeSubDomains" always;
    add_header X-Frame-Options DENY always;
    add_header X-Content-Type-Options nosniff always;
    add_header X-XSS-Protection "1; mode=block" always;
    add_header Referrer-Policy "strict-origin-when-cross-origin" always;

    # Gzip
    gzip on;
    gzip_vary on;
    gzip_min_length 1024;
    gzip_proxied any;
    gzip_types text/plain text/css text/xml text/javascript application/javascript application/json application/xml;

    # Bull Board – queue UI and WebSocket (before location /)
    location /bullboard {
        proxy_pass http://localhost:3001;
        proxy_http_version 1.1;
        proxy_set_header Upgrade $http_upgrade;
        proxy_set_header Connection $connection_upgrade;
        proxy_set_header Host $host;
        proxy_set_header X-Real-IP $remote_addr;
        proxy_set_header X-Forwarded-For $proxy_add_x_forwarded_for;
        proxy_set_header X-Forwarded-Proto $scheme;
        proxy_set_header X-Forwarded-Host $host;
        proxy_set_header X-Forwarded-Port 443;
        proxy_set_header Cookie $http_cookie;
        proxy_cache_bypass $http_upgrade;
        proxy_read_timeout 86400s;
        proxy_send_timeout 86400s;
        proxy_connect_timeout 75s;
        proxy_pass_header Set-Cookie;
        proxy_cookie_path / /;
        proxy_set_header X-Original-Forwarded-For $http_x_forwarded_for;
        if ($request_method = 'OPTIONS') {
            return 204;
        }
    }

    # API – REST and WebSockets (SSH terminal, agent WS)
    location /api/ {
        proxy_pass http://localhost:3001;
        proxy_http_version 1.1;
        proxy_set_header Upgrade $http_upgrade;
        proxy_set_header Connection $connection_upgrade;
        proxy_set_header Host $host;
        proxy_set_header X-Real-IP $remote_addr;
        proxy_set_header X-Forwarded-For $proxy_add_x_forwarded_for;
        proxy_set_header X-Forwarded-Proto $scheme;
        proxy_set_header X-Forwarded-Host $host;
        proxy_set_header X-Forwarded-Port 443;
        proxy_cache_bypass $http_upgrade;
        client_max_body_size 10m;
        proxy_read_timeout 86400s;
        proxy_send_timeout 86400s;
        proxy_connect_timeout 75s;
    }

    # Health check
    location /health {
        proxy_pass http://localhost:3001/health;
        proxy_set_header Host $host;
        proxy_set_header X-Real-IP $remote_addr;
        proxy_set_header X-Forwarded-For $proxy_add_x_forwarded_for;
        proxy_set_header X-Forwarded-Proto $scheme;
    }

    # Static assets caching – SPA js/css/images/fonts; exclude Bull Board and API
    location ~* ^/(?!bullboard|api/).*\.(js|css|png|jpg|jpeg|gif|ico|svg|woff|woff2|ttf|eot)$ {
        root /opt/your-domain.com/frontend;
        expires 1y;
        add_header Cache-Control "public, immutable";
    }

    # Custom branding assets (logos, favicons) – from frontend build
    location /assets/ {
        alias /opt/your-domain.com/frontend/assets/;
        expires 1h;
        add_header Cache-Control "public, must-revalidate";
        add_header Access-Control-Allow-Origin *;
    }

    # Frontend SPA
    location / {
        root /opt/your-domain.com/frontend;
        try_files $uri $uri/ /index.html;
        add_header X-Frame-Options DENY always;
        add_header X-Content-Type-Options nosniff always;
        add_header X-XSS-Protection "1; mode=block" always;
    }

    # Optional: security.txt
    # location /security.txt { return 301 https://$host/.well-known/security.txt; }
    # location = /.well-known/security.txt { alias /var/www/html/.well-known/security.txt; }
}
Draft: Uninstallation / removal of the Agent
This is for removing the agent from the client host:
You can get your own uninstallation command by going to :
- Settings
Integrations
Integration API documentation (scoped credentials)
Overview
PatchMon's Integration API provides programmatic access to your PatchMon instance, enabling automation, integration with third-party tools, and custom workflows. API credentials use HTTP Basic Authentication with scoped permissions to control access to specific resources and actions.
Key Features
- Scoped Permissions: Fine-grained control over what each credential can access
- IP Restrictions: Optional IP allowlisting for enhanced security
- Expiration Dates: Set automatic expiration for temporary access
- Basic Authentication: Industry-standard authentication method (RFC 7617)
- Rate Limiting: Built-in protection against abuse
- Audit Trail: Track credential usage with last-used timestamps
Use Cases
- Automation: Integrate PatchMon data into CI/CD pipelines
- Inventory Management: Use with Ansible, Terraform, or other IaC tools
- Monitoring: Feed PatchMon data into monitoring dashboards
- Custom Scripts: Build custom tools that interact with PatchMon
- Third-Party Integrations: Connect PatchMon to other systems
Interactive API Reference (Swagger)
PatchMon includes a built-in interactive API reference powered by Swagger UI. You can explore all available endpoints, view request/response schemas, and test API calls directly from your browser.
To access the Swagger UI:
https://<your-patchmon-url>/api/v1/api-docs
Note: The Swagger UI requires you to be logged in to PatchMon (JWT authentication). Log in to your PatchMon dashboard first, then navigate to the URL above in the same browser session.
The Swagger reference covers all internal and scoped API endpoints. This documentation page focuses specifically on the scoped Integration API that uses Basic Authentication with API credentials.
Creating API Credentials
Step-by-Step Guide
1. Navigate to Settings
- Log in to your PatchMon instance as an administrator
- Go to Settings → Integrations
- You will see the Auto-Enrollment & API tab
2. Click "New Token"
Click the "New Token" button. A modal will appear where you can select the credential type.
3. Select "API" as the Usage Type
In the creation modal, select "API" as the usage type. This configures the credential for programmatic access via Basic Authentication.
4. Configure the Credential
Fill in the following fields:
Required Fields:
| Field | Description | Example |
|---|---|---|
| Token Name | A descriptive name for identification and audit purposes | Ansible Inventory, Monitoring Dashboard |
| Scopes | The permissions this credential should have (at least one required) | host: get |
Optional Fields:
| Field | Description | Example |
|---|---|---|
| Allowed IP Addresses | Comma-separated list of IPs or CIDR ranges that can use this credential. Leave empty for unrestricted access. | 192.168.1.100, 10.0.0.0/24 |
| Expiration Date | Automatic expiration date for the credential. Leave empty for no expiration. | 2026-12-31T23:59:59 |
| Default Host Group | Optionally assign a default host group | Production |
5. Save Your Credentials
⚠️ CRITICAL: Save these credentials immediately — the secret cannot be retrieved later!
After creation, a success modal displays:
- Token Key: The API key (used as the username in Basic Auth), prefixed with
patchmon_ae_ - Token Secret: The API secret (used as the password) — shown only once
- Granted Scopes: The permissions assigned
- Usage Examples: Pre-filled cURL commands ready to copy
Copy both the Token Key and Token Secret and store them securely before closing the modal.
Authentication
Basic Authentication
PatchMon API credentials use HTTP Basic Authentication as defined in RFC 7617.
Format
Authorization: Basic <base64(token_key:token_secret)>
How It Works
- Combine your token key and secret with a colon:
token_key:token_secret - Encode the combined string in Base64
- Prepend
Basicto the encoded string - Send it in the
Authorizationheader
Most HTTP clients handle this automatically — for example, cURL's -u flag or Python's HTTPBasicAuth.
Authentication Flow
┌─────────────┐                                  ┌─────────────┐
│   Client     │                                  │  PatchMon   │
│ Application  │                                  │   Server    │
└──────┬──────┘                                  └──────┬──────┘
       │                                                │
       │  1. Send request with Basic Auth               │
       │  Authorization: Basic <base64>                 │
       │───────────────────────────────────────────────>│
       │                                                │
       │                  2. Validate credentials       │
       │                     a. Decode Base64           │
       │                     b. Find token by key       │
       │                     c. Check is_active         │
       │                     d. Check expiration        │
       │                     e. Verify integration type │
       │                     f. Verify secret (bcrypt)  │
       │                     g. Check IP restrictions   │
       │                                                │
       │                  3. Validate scopes            │
       │                     a. Check resource access   │
       │                     b. Check action permission │
       │                                                │
       │                  4. Return response            │
       │<───────────────────────────────────────────────│
       │  200 OK + Data (if authorised)                 │
       │  401 Unauthorised (if auth fails)              │
       │  403 Forbidden (if scope/IP check fails)       │
       │                                                │
       │                  5. Update last_used_at        │
       │                     timestamp                  │
Validation Steps (In Order)
The server performs these checks sequentially. If any step fails, the request is rejected immediately:
Available Scopes & Permissions
API credentials use a resource–action scope model:
{
  "resource": ["action1", "action2"]
}
Host Resource
Resource name: host
| Action | Description |
|---|---|
get |
Read host data (list hosts, view details, stats, packages, network, system, reports, notes, integrations) |
put |
Replace host data |
patch |
Partially update host data |
update |
General update operations |
delete |
Delete hosts |
Example scope configurations:
// Read-only access
{ "host": ["get"] }

// Read and update
{ "host": ["get", "patch"] }

// Full access
{ "host": ["get", "put", "patch", "update", "delete"] }
Important Notes
- Scopes are explicit — no inheritance or wildcards. Each action must be explicitly granted.
getdoes not automatically includepatchor any other action.- At least one action must be granted for at least one resource. Credentials with no scopes will be rejected during creation.
API Endpoints
All endpoints are prefixed with /api/v1/api and require Basic Authentication with a credential that has the appropriate scope.
Endpoints Summary
| Endpoint | Method | Scope | Description |
|---|---|---|---|
/api/v1/api/hosts |
GET | host:get |
List all hosts with IP, groups, and optional stats |
/api/v1/api/hosts/:id/stats |
GET | host:get |
Get host package/repo statistics |
/api/v1/api/hosts/:id/info |
GET | host:get |
Get detailed host information |
/api/v1/api/hosts/:id/network |
GET | host:get |
Get host network configuration |
/api/v1/api/hosts/:id/system |
GET | host:get |
Get host system details |
/api/v1/api/hosts/:id/packages |
GET | host:get |
Get host packages (with optional update filter) |
/api/v1/api/hosts/:id/package_reports |
GET | host:get |
Get package update history |
/api/v1/api/hosts/:id/agent_queue |
GET | host:get |
Get agent queue status and jobs |
/api/v1/api/hosts/:id/notes |
GET | host:get |
Get host notes |
/api/v1/api/hosts/:id/integrations |
GET | host:get |
Get host integration status |
/api/v1/api/hosts/:id |
DELETE | host:delete |
Delete a host and all related data |
List Hosts
Retrieve a list of all hosts with their IP addresses and host group memberships. Optionally include package update statistics inline with each host.
Endpoint:
GET /api/v1/api/hosts
Required Scope: host:get
Query Parameters:
| Parameter | Type | Required | Description |
|---|---|---|---|
hostgroup |
string | No | Filter by host group name(s) or UUID(s). Comma-separated for multiple groups (OR logic). |
include |
string | No | Comma-separated list of additional data to include. Supported values: stats. |
Filtering by Host Groups:
# Filter by group name
GET /api/v1/api/hosts?hostgroup=Production

# Filter by multiple groups (hosts in ANY of the listed groups)
GET /api/v1/api/hosts?hostgroup=Production,Development

# Filter by group UUID
GET /api/v1/api/hosts?hostgroup=550e8400-e29b-41d4-a716-446655440000

# Mix names and UUIDs
GET /api/v1/api/hosts?hostgroup=Production,550e8400-e29b-41d4-a716-446655440000
Including Stats:
Use ?include=stats to add package update counts and additional host metadata to each host in a single request. This is more efficient than making separate /stats calls for every host.
# List all hosts with stats
GET /api/v1/api/hosts?include=stats

# Combine with host group filter
GET /api/v1/api/hosts?hostgroup=Production&include=stats
Note: If your host group names contain spaces, URL-encode them with
%20(e.g.Web%20Servers). Most HTTP clients handle this automatically.
Response (200 OK) — Without stats:
{
  "hosts": [
    {
      "id": "550e8400-e29b-41d4-a716-446655440000",
      "friendly_name": "web-server-01",
      "hostname": "web01.example.com",
      "ip": "192.168.1.100",
      "host_groups": [
        {
          "id": "660e8400-e29b-41d4-a716-446655440001",
          "name": "Production"
        }
      ]
    }
  ],
  "total": 1,
  "filtered_by_groups": ["Production"]
}
Response (200 OK) — With ?include=stats:
{
  "hosts": [
    {
      "id": "550e8400-e29b-41d4-a716-446655440000",
      "friendly_name": "web-server-01",
      "hostname": "web01.example.com",
      "ip": "192.168.1.100",
      "host_groups": [
        {
          "id": "660e8400-e29b-41d4-a716-446655440001",
          "name": "Production"
        }
      ],
      "os_type": "Ubuntu",
      "os_version": "24.04 LTS",
      "last_update": "2026-02-12T10:30:00.000Z",
      "status": "active",
      "needs_reboot": false,
      "updates_count": 15,
      "security_updates_count": 3,
      "total_packages": 342
    }
  ],
  "total": 1,
  "filtered_by_groups": ["Production"]
}
The
filtered_by_groupsfield is only present when ahostgroupfilter is applied.
Response Fields:
| Field | Type | Description |
|---|---|---|
hosts |
array | Array of host objects |
hosts[].id |
string (UUID) | Unique host identifier |
hosts[].friendly_name |
string | Human-readable host name |
hosts[].hostname |
string | System hostname |
hosts[].ip |
string | Primary IP address |
hosts[].host_groups |
array | Groups this host belongs to |
hosts[].os_type |
string | Operating system type (only with include=stats) |
hosts[].os_version |
string | Operating system version (only with include=stats) |
hosts[].last_update |
string (ISO 8601) | Timestamp of last agent update (only with include=stats) |
hosts[].status |
string | Host status, e.g. active, pending (only with include=stats) |
hosts[].needs_reboot |
boolean | Whether a reboot is pending (only with include=stats) |
hosts[].updates_count |
integer | Number of packages needing updates (only with include=stats) |
hosts[].security_updates_count |
integer | Number of security updates available (only with include=stats) |
hosts[].total_packages |
integer | Total installed packages (only with include=stats) |
total |
integer | Total number of hosts returned |
filtered_by_groups |
array | Groups used for filtering (only present when filtering) |
Get Host Statistics
Retrieve package and repository statistics for a specific host.
Endpoint:
GET /api/v1/api/hosts/:id/stats
Required Scope: host:get
Response (200 OK):
{
  "host_id": "550e8400-e29b-41d4-a716-446655440000",
  "total_installed_packages": 342,
  "outdated_packages": 15,
  "security_updates": 3,
  "total_repos": 8
}
Response Fields:
| Field | Type | Description |
|---|---|---|
host_id |
string (UUID) | The host identifier |
total_installed_packages |
integer | Total packages installed on this host |
outdated_packages |
integer | Packages that need updates |
security_updates |
integer | Packages with security updates available |
total_repos |
integer | Total repositories associated with the host |
Get Host Information
Retrieve detailed information about a specific host including OS details and host groups.
Endpoint:
GET /api/v1/api/hosts/:id/info
Required Scope: host:get
Response (200 OK):
{
  "id": "550e8400-e29b-41d4-a716-446655440000",
  "machine_id": "abc123def456",
  "friendly_name": "web-server-01",
  "hostname": "web01.example.com",
  "ip": "192.168.1.100",
  "os_type": "Ubuntu",
  "os_version": "24.04 LTS",
  "agent_version": "1.4.0",
  "host_groups": [
    {
      "id": "660e8400-e29b-41d4-a716-446655440001",
      "name": "Production"
    }
  ]
}
Get Host Network Information
Retrieve network configuration details for a specific host.
Endpoint:
GET /api/v1/api/hosts/:id/network
Required Scope: host:get
Response (200 OK):
{
  "id": "550e8400-e29b-41d4-a716-446655440000",
  "ip": "192.168.1.100",
  "gateway_ip": "192.168.1.1",
  "dns_servers": ["8.8.8.8", "8.8.4.4"],
  "network_interfaces": [
    {
      "name": "eth0",
      "ip": "192.168.1.100",
      "mac": "00:11:22:33:44:55"
    }
  ]
}
Get Host System Information
Retrieve system-level information for a specific host including hardware, kernel, and reboot status.
Endpoint:
GET /api/v1/api/hosts/:id/system
Required Scope: host:get
Response (200 OK):
{
  "id": "550e8400-e29b-41d4-a716-446655440000",
  "architecture": "x86_64",
  "kernel_version": "6.8.0-45-generic",
  "installed_kernel_version": "6.8.0-50-generic",
  "selinux_status": "disabled",
  "system_uptime": "15 days, 3:22:10",
  "cpu_model": "Intel Xeon E5-2680 v4",
  "cpu_cores": 4,
  "ram_installed": "8192 MB",
  "swap_size": "2048 MB",
  "load_average": {
    "1min": 0.5,
    "5min": 0.3,
    "15min": 0.2
  },
  "disk_details": [
    {
      "filesystem": "/dev/sda1",
      "size": "50G",
      "used": "22G",
      "available": "28G",
      "use_percent": "44%",
      "mounted_on": "/"
    }
  ],
  "needs_reboot": true,
  "reboot_reason": "Kernel update pending"
}
Get Host Packages
Retrieve the list of packages installed on a specific host. Use the optional updates_only parameter to return only packages with available updates.
Endpoint:
GET /api/v1/api/hosts/:id/packages
Required Scope: host:get
Query Parameters:
| Parameter | Type | Required | Default | Description |
|---|---|---|---|---|
updates_only |
string | No | — | Set to true to return only packages that need updates |
Examples:
# Get all packages for a host
curl -u "patchmon_ae_abc123:your_secret_here" \
  https://patchmon.example.com/api/v1/api/hosts/HOST_UUID/packages

# Get only packages with available updates
curl -u "patchmon_ae_abc123:your_secret_here" \
  "https://patchmon.example.com/api/v1/api/hosts/HOST_UUID/packages?updates_only=true"
Response (200 OK):
{
  "host": {
    "id": "550e8400-e29b-41d4-a716-446655440000",
    "hostname": "web01.example.com",
    "friendly_name": "web-server-01"
  },
  "packages": [
    {
      "id": "package-host-uuid",
      "name": "nginx",
      "description": "High performance web server",
      "category": "web",
      "current_version": "1.18.0-0ubuntu1.5",
      "available_version": "1.24.0-2ubuntu1",
      "needs_update": true,
      "is_security_update": false,
      "last_checked": "2026-02-12T10:30:00.000Z"
    },
    {
      "id": "package-host-uuid-2",
      "name": "openssl",
      "description": "Secure Sockets Layer toolkit",
      "category": "security",
      "current_version": "3.0.2-0ubuntu1.14",
      "available_version": "3.0.2-0ubuntu1.18",
      "needs_update": true,
      "is_security_update": true,
      "last_checked": "2026-02-12T10:30:00.000Z"
    }
  ],
  "total": 2
}
Response Fields:
| Field | Type | Description |
|---|---|---|
host |
object | Basic host identification |
host.id |
string (UUID) | Host identifier |
host.hostname |
string | System hostname |
host.friendly_name |
string | Human-readable host name |
packages |
array | Array of package objects |
packages[].id |
string (UUID) | Host-package record identifier |
packages[].name |
string | Package name |
packages[].description |
string | Package description |
packages[].category |
string | Package category |
packages[].current_version |
string | Currently installed version |
packages[].available_version |
string | null | Available update version (null if up to date) |
packages[].needs_update |
boolean | Whether an update is available |
packages[].is_security_update |
boolean | Whether the available update is security-related |
packages[].last_checked |
string (ISO 8601) | When this package was last checked |
total |
integer | Total number of packages returned |
Tip: Packages are returned sorted by security updates first, then by update availability. This puts the most critical packages at the top.
Get Host Package Reports
Retrieve package update history reports for a specific host.
Endpoint:
GET /api/v1/api/hosts/:id/package_reports
Required Scope: host:get
Query Parameters:
| Parameter | Type | Required | Default | Description |
|---|---|---|---|---|
limit |
integer | No | 10 | Maximum number of reports to return |
Response (200 OK):
{
  "host_id": "550e8400-e29b-41d4-a716-446655440000",
  "reports": [
    {
      "id": "report-uuid",
      "status": "success",
      "date": "2026-02-12T10:30:00.000Z",
      "total_packages": 342,
      "outdated_packages": 15,
      "security_updates": 3,
      "payload_kb": 12.5,
      "execution_time_seconds": 4.2,
      "error_message": null
    }
  ],
  "total": 1
}
Get Host Agent Queue
Retrieve agent queue status and job history for a specific host.
Endpoint:
GET /api/v1/api/hosts/:id/agent_queue
Required Scope: host:get
Query Parameters:
| Parameter | Type | Required | Default | Description |
|---|---|---|---|---|
limit |
integer | No | 10 | Maximum number of jobs to return |
Response (200 OK):
{
  "host_id": "550e8400-e29b-41d4-a716-446655440000",
  "queue_status": {
    "waiting": 0,
    "active": 1,
    "delayed": 0,
    "failed": 0
  },
  "job_history": [
    {
      "id": "job-history-uuid",
      "job_id": "bull-job-id",
      "job_name": "package_update",
      "status": "completed",
      "attempt": 1,
      "created_at": "2026-02-12T10:00:00.000Z",
      "completed_at": "2026-02-12T10:05:00.000Z",
      "error_message": null,
      "output": null
    }
  ],
  "total_jobs": 1
}
Get Host Notes
Retrieve notes associated with a specific host.
Endpoint:
GET /api/v1/api/hosts/:id/notes
Required Scope: host:get
Response (200 OK):
{
  "host_id": "550e8400-e29b-41d4-a716-446655440000",
  "notes": "Production web server. Enrolled via Proxmox auto-enrollment on 2026-01-15."
}
Get Host Integrations
Retrieve integration status and details for a specific host (e.g. Docker).
Endpoint:
GET /api/v1/api/hosts/:id/integrations
Required Scope: host:get
Response (200 OK) — Docker enabled:
{
  "host_id": "550e8400-e29b-41d4-a716-446655440000",
  "integrations": {
    "docker": {
      "enabled": true,
      "containers_count": 12,
      "volumes_count": 5,
      "networks_count": 3,
      "description": "Monitor Docker containers, images, volumes, and networks. Collects real-time container status events."
    }
  }
}
Response (200 OK) — Docker not enabled:
{
  "host_id": "550e8400-e29b-41d4-a716-446655440000",
  "integrations": {
    "docker": {
      "enabled": false,
      "description": "Monitor Docker containers, images, volumes, and networks. Collects real-time container status events."
    }
  }
}
Delete Host
Delete a specific host and all related data (cascade). This permanently removes the host and its associated packages, repositories, update history, Docker data, job history, and group memberships.
Endpoint:
DELETE /api/v1/api/hosts/:id
Required Scope: host:delete
Path Parameters:
| Parameter | Type | Required | Description |
|---|---|---|---|
id |
string (UUID) | Yes | The unique identifier of the host to delete |
Response (200 OK):
{
  "message": "Host deleted successfully",
  "deleted": {
    "id": "550e8400-e29b-41d4-a716-446655440000",
    "friendly_name": "web-server-01",
    "hostname": "web01.example.com"
  }
}
Response Fields:
| Field | Type | Description |
|---|---|---|
message |
string | Confirmation message |
deleted.id |
string (UUID) | The ID of the deleted host |
deleted.friendly_name |
string | The friendly name of the deleted host |
deleted.hostname |
string | The hostname of the deleted host |
Error Responses:
| HTTP Code | Error | Description |
|---|---|---|
| 400 | Invalid host ID format |
The provided ID is not a valid UUID |
| 400 | Cannot delete host due to foreign key constraints |
The host has related data that prevents deletion |
| 404 | Host not found |
No host exists with the given ID |
| 403 | Access denied |
Credential does not have host:delete permission |
⚠️ Warning: This action is irreversible. All data associated with the host (packages, repositories, update history, Docker containers, job history, group memberships, etc.) will be permanently deleted.
Common Error Responses (All Endpoints)
404 Not Found — Host does not exist (for single-host endpoints):
{
  "error": "Host not found"
}
500 Internal Server Error — Unexpected server error:
{
  "error": "Failed to fetch hosts"
}
See the Troubleshooting section for authentication and permission errors.
Usage Examples
cURL Examples
List All Hosts
curl -u "patchmon_ae_abc123:your_secret_here" \
  https://patchmon.example.com/api/v1/api/hosts
List Hosts with Stats
curl -u "patchmon_ae_abc123:your_secret_here" \
  "https://patchmon.example.com/api/v1/api/hosts?include=stats"
Filter by Host Group
curl -u "patchmon_ae_abc123:your_secret_here" \
  "https://patchmon.example.com/api/v1/api/hosts?hostgroup=Production"
Filter by Host Group with Stats
curl -u "patchmon_ae_abc123:your_secret_here" \
  "https://patchmon.example.com/api/v1/api/hosts?hostgroup=Production&include=stats"
Filter by Multiple Groups
curl -u "patchmon_ae_abc123:your_secret_here" \
  "https://patchmon.example.com/api/v1/api/hosts?hostgroup=Production,Development"
Get Host Statistics
curl -u "patchmon_ae_abc123:your_secret_here" \
  https://patchmon.example.com/api/v1/api/hosts/HOST_UUID/stats
Get Host System Information
curl -u "patchmon_ae_abc123:your_secret_here" \
  https://patchmon.example.com/api/v1/api/hosts/HOST_UUID/system
Get All Packages for a Host
curl -u "patchmon_ae_abc123:your_secret_here" \
  https://patchmon.example.com/api/v1/api/hosts/HOST_UUID/packages
Delete a Host
curl -X DELETE -u "patchmon_ae_abc123:your_secret_here" \
  https://patchmon.example.com/api/v1/api/hosts/HOST_UUID
Get Only Packages with Available Updates
curl -u "patchmon_ae_abc123:your_secret_here" \
  "https://patchmon.example.com/api/v1/api/hosts/HOST_UUID/packages?updates_only=true"
Pretty Print JSON Output
curl -u "patchmon_ae_abc123:your_secret_here" \
  https://patchmon.example.com/api/v1/api/hosts | jq .
Python Examples
Using requests Library
import requests
from requests.auth import HTTPBasicAuth

# API credentials
API_KEY = "patchmon_ae_abc123"
API_SECRET = "your_secret_here"
BASE_URL = "https://patchmon.example.com"

# Create session with authentication
session = requests.Session()
session.auth = HTTPBasicAuth(API_KEY, API_SECRET)

# List all hosts
response = session.get(f"{BASE_URL}/api/v1/api/hosts")

if response.status_code == 200:
    data = response.json()
    print(f"Total hosts: {data['total']}")

    for host in data['hosts']:
        groups = ', '.join([g['name'] for g in host['host_groups']])
        print(f"  {host['friendly_name']} ({host['ip']}) — Groups: {groups}")
else:
    print(f"Error: {response.status_code} — {response.json()}")
Filter by Host Group
# Filter by group name (requests handles URL encoding automatically)
response = session.get(
    f"{BASE_URL}/api/v1/api/hosts",
    params={"hostgroup": "Production"}
)
List Hosts with Inline Stats
# Get hosts with stats in a single request (more efficient than per-host /stats calls)
response = session.get(
    f"{BASE_URL}/api/v1/api/hosts",
    params={"include": "stats"}
)

if response.status_code == 200:
    data = response.json()
    for host in data['hosts']:
        print(f"{host['friendly_name']}: {host['updates_count']} updates, "
              f"{host['security_updates_count']} security, "
              f"{host['total_packages']} total packages")
Get Host Packages (Updates Only)
# Get only packages that need updates for a specific host
response = session.get(
    f"{BASE_URL}/api/v1/api/hosts/{host_id}/packages",
    params={"updates_only": "true"}
)

if response.status_code == 200:
    data = response.json()
    print(f"Host: {data['host']['friendly_name']}")
    print(f"Packages needing updates: {data['total']}")
    for pkg in data['packages']:
        security = " [SECURITY]" if pkg['is_security_update'] else ""
        print(f"  {pkg['name']}: {pkg['current_version']} → {pkg['available_version']}{security}")
Get Host Details and Stats
# First, get list of hosts
hosts_response = session.get(f"{BASE_URL}/api/v1/api/hosts")
hosts = hosts_response.json()['hosts']

# Then get stats for the first host
if hosts:
    host_id = hosts[0]['id']

    stats = session.get(f"{BASE_URL}/api/v1/api/hosts/{host_id}/stats").json()
    print(f"Installed: {stats['total_installed_packages']}")
    print(f"Outdated: {stats['outdated_packages']}")
    print(f"Security: {stats['security_updates']}")

    info = session.get(f"{BASE_URL}/api/v1/api/hosts/{host_id}/info").json()
    print(f"OS: {info['os_type']} {info['os_version']}")
    print(f"Agent: {info['agent_version']}")
Delete a Host
# Delete a host by UUID (requires host:delete scope)
host_id = "550e8400-e29b-41d4-a716-446655440000"
response = session.delete(f"{BASE_URL}/api/v1/api/hosts/{host_id}")

if response.status_code == 200:
    data = response.json()
    print(f"Deleted: {data['deleted']['friendly_name']} ({data['deleted']['hostname']})")
else:
    print(f"Error: {response.status_code} — {response.json()}")
Error Handling
def get_hosts(hostgroup=None):
    """Get hosts with error handling."""
    try:
        params = {"hostgroup": hostgroup} if hostgroup else {}
        response = session.get(
            f"{BASE_URL}/api/v1/api/hosts",
            params=params,
            timeout=30
        )
        response.raise_for_status()
        return response.json()

    except requests.exceptions.HTTPError as e:
        if e.response.status_code == 401:
            print("Authentication failed — check credentials")
        elif e.response.status_code == 403:
            print("Access denied — insufficient permissions")
        else:
            print(f"HTTP error: {e}")
        return None

    except requests.exceptions.Timeout:
        print("Request timed out")
        return None

    except requests.exceptions.RequestException as e:
        print(f"Request failed: {e}")
        return None
Generate Ansible Inventory
import json
import requests
from requests.auth import HTTPBasicAuth

API_KEY = "patchmon_ae_abc123"
API_SECRET = "your_secret_here"
BASE_URL = "https://patchmon.example.com"

def generate_ansible_inventory():
    """Generate Ansible inventory from PatchMon hosts."""
    auth = HTTPBasicAuth(API_KEY, API_SECRET)
    response = requests.get(f"{BASE_URL}/api/v1/api/hosts", auth=auth, timeout=30)

    if response.status_code != 200:
        print(f"Error fetching hosts: {response.status_code}")
        return

    data = response.json()

    inventory = {
        "_meta": {"hostvars": {}},
        "all": {"hosts": [], "children": []}
    }

    for host in data['hosts']:
        hostname = host['friendly_name']
        inventory["all"]["hosts"].append(hostname)

        inventory["_meta"]["hostvars"][hostname] = {
            "ansible_host": host['ip'],
            "patchmon_id": host['id'],
            "patchmon_hostname": host['hostname']
        }

        for group in host['host_groups']:
            group_name = group['name'].lower().replace(' ', '_')

            if group_name not in inventory:
                inventory[group_name] = {"hosts": [], "vars": {}}
                inventory["all"]["children"].append(group_name)

            inventory[group_name]["hosts"].append(hostname)

    print(json.dumps(inventory, indent=2))

if __name__ == "__main__":
    generate_ansible_inventory()
JavaScript/Node.js Examples
Using Native fetch (Node.js 18+)
const API_KEY = 'patchmon_ae_abc123';
const API_SECRET = 'your_secret_here';
const BASE_URL = 'https://patchmon.example.com';

const authHeader = 'Basic ' + Buffer.from(`${API_KEY}:${API_SECRET}`).toString('base64');

async function getHosts(hostgroup = null) {
  const url = new URL('/api/v1/api/hosts', BASE_URL);
  if (hostgroup) {
    url.searchParams.append('hostgroup', hostgroup);
  }

  const response = await fetch(url, {
    headers: {
      'Authorization': authHeader,
      'Content-Type': 'application/json'
    }
  });

  if (!response.ok) {
    const error = await response.json();
    throw new Error(`HTTP ${response.status}: ${error.error}`);
  }

  return await response.json();
}

// List all hosts
getHosts()
  .then(data => {
    console.log(`Total: ${data.total}`);
    data.hosts.forEach(host => {
      console.log(`${host.friendly_name}: ${host.ip}`);
    });
  })
  .catch(error => console.error('Error:', error.message));
Ansible Dynamic Inventory
Save this as patchmon_inventory.py and make it executable (chmod +x):
#!/usr/bin/env python3
"""
PatchMon Dynamic Inventory Script for Ansible.
Usage: ansible-playbook -i patchmon_inventory.py playbook.yml
"""

import json
import os
import sys
import requests
from requests.auth import HTTPBasicAuth

API_KEY = os.environ.get('PATCHMON_API_KEY')
API_SECRET = os.environ.get('PATCHMON_API_SECRET')
BASE_URL = os.environ.get('PATCHMON_URL', 'https://patchmon.example.com')

if not API_KEY or not API_SECRET:
    print("Error: PATCHMON_API_KEY and PATCHMON_API_SECRET must be set", file=sys.stderr)
    sys.exit(1)

def get_inventory():
    auth = HTTPBasicAuth(API_KEY, API_SECRET)
    try:
        response = requests.get(f"{BASE_URL}/api/v1/api/hosts", auth=auth, timeout=30)
        response.raise_for_status()
        return response.json()
    except requests.exceptions.RequestException as e:
        print(f"Error fetching inventory: {e}", file=sys.stderr)
        sys.exit(1)

def build_ansible_inventory(patchmon_data):
    inventory = {
        "_meta": {"hostvars": {}},
        "all": {"hosts": []}
    }
    groups = {}

    for host in patchmon_data['hosts']:
        hostname = host['friendly_name']
        inventory["all"]["hosts"].append(hostname)

        inventory["_meta"]["hostvars"][hostname] = {
            "ansible_host": host['ip'],
            "patchmon_id": host['id'],
            "patchmon_hostname": host['hostname']
        }

        for group in host['host_groups']:
            group_name = group['name'].lower().replace(' ', '_').replace('-', '_')
            if group_name not in groups:
                groups[group_name] = {
                    "hosts": [],
                    "vars": {"patchmon_group_id": group['id']}
                }
            groups[group_name]["hosts"].append(hostname)

    inventory.update(groups)
    return inventory

def main():
    if len(sys.argv) == 2 and sys.argv[1] == '--list':
        patchmon_data = get_inventory()
        inventory = build_ansible_inventory(patchmon_data)
        print(json.dumps(inventory, indent=2))
    elif len(sys.argv) == 3 and sys.argv[1] == '--host':
        print(json.dumps({}))
    else:
        print("Usage: patchmon_inventory.py --list", file=sys.stderr)
        sys.exit(1)

if __name__ == '__main__':
    main()
Usage:
export PATCHMON_API_KEY="patchmon_ae_abc123"
export PATCHMON_API_SECRET="your_secret_here"
export PATCHMON_URL="https://patchmon.example.com"

# Test inventory
./patchmon_inventory.py --list

# Use with ansible
ansible-playbook -i patchmon_inventory.py playbook.yml
ansible -i patchmon_inventory.py all -m ping
Security Best Practices
Credential Management
Do:
- Store credentials in a password manager or secrets vault (e.g. HashiCorp Vault, AWS Secrets Manager)
- Use environment variables for automation scripts
- Set expiration dates (recommended: 90 days)
- Grant only the minimum permissions needed (principle of least privilege)
- Rotate credentials regularly and delete old ones after migration
Don't:
- Hard-code credentials in source code
- Commit credentials to version control
- Share credentials via email or chat
- Store credentials in plain-text files
IP Restrictions
Restrict credentials to known IP addresses whenever possible:
Allowed IPs: 192.168.1.100, 10.0.0.0/24
For dynamic IPs, consider using a VPN with a static exit IP, a cloud NAT gateway, or a proxy server.
Network Security
- Always use HTTPS in production environments
- Verify SSL certificates — only disable verification (
-k) for development/testing - Use firewall rules to restrict PatchMon API access at the network level
Monitoring & Auditing
- Check "Last Used" timestamps regularly in the Integrations settings page
- Investigate credentials that have not been used in 30+ days
- Review all active credentials monthly
- Remove credentials for decommissioned systems
If Credentials Are Compromised
- Immediately disable the credential in PatchMon UI (Settings → Integrations → toggle off)
- Review the "Last Used" timestamp to understand the window of exposure
- Check server logs for any unauthorised access
- Create new credentials with a different scope if needed
- Delete the compromised credential after verification
- Notify your security team if sensitive data may have been accessed
Troubleshooting
Error Reference
| Error Message | HTTP Code | Cause | Solution |
|---|---|---|---|
Missing or invalid authorization header |
401 | No Authorization header, or it doesn't start with Basic |
Use -u key:secret with cURL, or set Authorization: Basic <base64> header |
Invalid credentials format |
401 | Base64-decoded value doesn't contain a colon separator | Check format is key:secret — ensure no extra characters |
Invalid API key |
401 | Token key not found in the database | Verify the credential exists in Settings → Integrations |
API key is disabled |
401 | Credential has been manually deactivated | Re-enable in Settings → Integrations, or create a new credential |
API key has expired |
401 | The expiration date has passed | Create a new credential to replace the expired one |
Invalid API key type |
401 | The credential's integration_type is not "api" |
Ensure you created the credential with the "API" usage type |
Invalid API secret |
401 | Secret doesn't match the stored bcrypt hash | Create a new credential (secrets cannot be retrieved) |
IP address not allowed |
403 | Client IP is not in the credential's allowed_ip_ranges |
Add your IP: curl https://ifconfig.me to find it |
Access denied — does not have permission to {action} {resource} |
403 | Credential is missing the required scope | Edit the credential and add the required permission |
Access denied — does not have access to {resource} |
403 | The resource is not included in the credential's scopes at all | Edit the credential's scopes to include the resource |
Host not found |
404 | The host UUID does not exist | Verify the UUID from the list hosts endpoint |
Invalid host ID format |
400 | The host ID is not a valid UUID (DELETE endpoint) | Ensure the ID is a valid UUID format |
Cannot delete host due to foreign key constraints |
400 | Host has related data preventing deletion | Check PatchMon server logs for details |
Failed to delete host |
500 | Unexpected error during host deletion | Check PatchMon server logs for details |
Failed to fetch hosts |
500 | Unexpected server error | Check PatchMon server logs for details |
Authentication failed |
500 | Unexpected error during authentication processing | Check PatchMon server logs; may indicate a database issue |
Debug Tips
cURL verbose mode:
curl -v -u "patchmon_ae_abc123:your_secret_here" \
  https://patchmon.example.com/api/v1/api/hosts
Python debug logging:
import logging
logging.basicConfig(level=logging.DEBUG)
requests_log = logging.getLogger("requests.packages.urllib3")
requests_log.setLevel(logging.DEBUG)
requests_log.propagate = True
Common Issues
Empty hosts array
- Verify hosts exist in PatchMon UI → Hosts page
- Check the
hostgroupfilter spelling matches exactly (case-sensitive) - Try listing all hosts without filters first to confirm API access works
Connection timeouts
# Test basic connectivity
ping patchmon.example.com
curl -I https://patchmon.example.com/health
SSL certificate errors
For development/testing with self-signed certificates:
curl -k -u "patchmon_ae_abc123:your_secret_here" \
  https://patchmon.example.com/api/v1/api/hosts
For production, install a valid SSL certificate (e.g. Let's Encrypt).
Getting Help
If issues persist:
- Check PatchMon server logs for detailed error information
- Use the built-in Swagger UI to test endpoints interactively
- Search or create an issue at github.com/PatchMon/PatchMon
- Join the PatchMon community on Discord
Proxmox LXC Auto-Enrollment Guide
Overview
PatchMon's Proxmox Auto-Enrollment feature enables you to automatically discover and enroll LXC containers from your Proxmox hosts into PatchMon for centralized patch management. This eliminates manual host registration and ensures comprehensive coverage of your Proxmox infrastructure.
What It Does
- Automatically discovers running LXC containers on Proxmox hosts
- Bulk enrolls containers into PatchMon without manual intervention
- Installs agents inside each container automatically
- Assigns to host groups based on token configuration
- Tracks enrollment with full audit logging
Key Benefits
- Zero-Touch Enrollment - Run once, enroll all containers
- Secure by Design - Token-based authentication with hashed secrets
- Rate Limited - Prevents abuse with per-day host limits
- IP Restricted - Optional IP whitelisting for enhanced security
- Fully Auditable - Tracks who enrolled what and when
- Safe to Rerun - Already-enrolled containers are automatically skipped
Table of Contents
- How It Works
- Prerequisites
- Quick Start
- Step-by-Step Setup
- Usage Examples
- Configuration Options
- Security Best Practices
- Troubleshooting
- Advanced Usage
- API Reference
How It Works
Architecture Overview
┌─────────────────────┐
│   PatchMon Admin    │
│                     │
│  1. Creates Token   │
│  2. Gets Key/Secret │
└──────────┬──────────┘
           │
           ├─────────────────────────────────┐
           ▼                                 ▼
┌─────────────────────┐          ┌─────────────────────┐
│  Proxmox Host       │          │   PatchMon Server   │
│                     │          │                     │
│  3. Runs Script ────┼──────────▶  4. Validates Token │
│  4. Discovers LXCs  │          │  5. Creates Hosts   │
│  5. Gets Credentials│◀─────────┤  6. Returns Creds   │
│  6. Installs Agents │          │                     │
└──────────┬──────────┘          └─────────────────────┘
           │
           ▼
┌─────────────────────┐
│   LXC Containers    │
│                     │
│  • curl installed   │
│  • Agent installed  │
│  • Reporting to PM  │
└─────────────────────┘
Enrollment Process (Step by Step)
-
Admin creates auto-enrollment token in PatchMon UI
- Configures rate limits, IP restrictions, host group assignment
- Receives
token_keyandtoken_secret(shown only once!)
-
Admin runs enrollment script on Proxmox host
- Script authenticated with auto-enrollment token
- Discovers all running LXC containers using
pct list
-
For each container, the script:
- Gathers hostname, IP address, OS information, machine ID
- Calls PatchMon API to create host entry
- Receives unique
api_idandapi_keyfor that container - Uses
pct execto enter the container - Installs curl if missing
- Downloads and runs PatchMon agent installer
- Agent authenticates with container-specific credentials
-
Containers appear in PatchMon with full patch tracking enabled
Two-Tier Security Model
1. Auto-Enrollment Token (Script → PatchMon)
- Purpose: Create new host entries
- Scope: Limited to enrollment operations only
- Storage: Secret is hashed in database
- Lifespan: Reusable until revoked/expired
- Security: Rate limits + IP restrictions
2. Host API Credentials (Agent → PatchMon)
- Purpose: Report patches, send data, receive commands
- Scope: Per-host unique credentials
- Storage: API key is hashed (bcrypt) in database
- Lifespan: Permanent for that host
- Security: Host-specific, can be regenerated
Why This Matters:
- Compromised enrollment token ≠ compromised hosts
- Compromised host credential ≠ compromised enrollment
- Revoked enrollment token = no new enrollments (existing hosts unaffected)
- Lost credentials = create new token, don't affect existing infrastructure
Prerequisites
PatchMon Server Requirements
- PatchMon version with auto-enrollment support
- Admin user with "Manage Settings" permission
- Network accessible from Proxmox hosts
Proxmox Host Requirements
- Proxmox VE installed and running
- One or more LXC containers (VMs not supported)
- Root access to Proxmox host
- Network connectivity to PatchMon server
- Required commands:
pct,curl,jq,bash
Container Requirements
- Running state (stopped containers are skipped)
- Debian-based or RPM-based Linux distribution
- Network connectivity to PatchMon server
- Package manager (apt/yum/dnf) functional
Network Requirements
| Source | Destination | Port | Protocol | Purpose |
|---|---|---|---|---|
| Proxmox Host | PatchMon Server | 443 (HTTPS) | TCP | Enrollment API calls |
| LXC Containers | PatchMon Server | 443 (HTTPS) | TCP | Agent installation & reporting |
Firewall Notes:
- Outbound only connections (no inbound ports needed)
- HTTPS recommended (HTTP supported for internal networks)
- Self-signed certificates supported with
-kflag
Quick Start
1. Create Token (In PatchMon UI)
- Go to Settings → Integrations → Auto-Enrollment & API tab
- Click "New Token"
- Configure:
- Name: "Production Proxmox"
- Max Hosts/Day: 100
- Host Group: Select target group
- IP Restriction: Your Proxmox host IP
- Save credentials immediately (shown only once!)
2. One-Line Enrollment (On Proxmox Host)
curl -s "https://patchmon.example.com/api/v1/auto-enrollment/script?type=proxmox-lxc&token_key=YOUR_KEY&token_secret=YOUR_SECRET" | bash
That's it! All running LXC containers will be enrolled and the PatchMon agent installed.
3. Verify in PatchMon
- Go to Hosts page
- See your containers listed with "pending" status
- Agent connects automatically after installation (usually within seconds)
- Status changes to "active" with package data
Step-by-Step Setup
Step 1: Create Auto-Enrollment Token
Via PatchMon Web UI
-
Log in to PatchMon as an administrator
-
Navigate to Settings
Dashboard → Settings → Integrations → Auto-Enrollment & API tab -
Click "New Token" button
-
Fill in token details:
Field Value Required Description Token Name Proxmox ProductionYes Descriptive name for this token Max Hosts Per Day 100Yes Rate limit (1-1000) Default Host Group Proxmox LXCNo Auto-assign enrolled hosts Allowed IP Addresses 192.168.1.10No Comma-separated IPs Expiration Date 2027-01-01No Auto-disable after date -
Click "Create Token"
-
CRITICAL: Save Credentials Now!
You'll see a success modal with:
Token Key:    patchmon_ae_a1b2c3d4e5f6...
Token Secret: 8f7e6d5c4b3a2f1e0d9c8b7a...
Copy both values immediately! They cannot be retrieved later.
Pro Tip: Copy the one-line installation command shown in the modal - it has credentials pre-filled.
Step 2: Prepare Proxmox Host
Install Required Dependencies
# SSH to your Proxmox host
ssh root@proxmox-host

# Install jq (JSON processor)
apt-get update && apt-get install -y jq curl

# Verify installations
which pct jq curl
# Should show paths for all three commands
Download Enrollment Script
Method A: Direct Download from PatchMon (Recommended)
# Download with credentials embedded (copy from PatchMon UI)
curl -s "https://patchmon.example.com/api/v1/auto-enrollment/script?type=proxmox-lxc&token_key=YOUR_KEY&token_secret=YOUR_SECRET" \
    -o /root/proxmox_auto_enroll.sh

chmod +x /root/proxmox_auto_enroll.sh
Method B: Manual Configuration
# Download script template
cd /root
wget https://raw.githubusercontent.com/PatchMon/PatchMon/main/agents/proxmox_auto_enroll.sh
chmod +x proxmox_auto_enroll.sh

# Edit configuration
nano proxmox_auto_enroll.sh

# Update these lines:
PATCHMON_URL="https://patchmon.example.com"
AUTO_ENROLLMENT_KEY="patchmon_ae_your_key_here"
AUTO_ENROLLMENT_SECRET="your_secret_here"
Step 3: Test with Dry Run
Always test first!
# Dry run shows what would happen without making changes
DRY_RUN=true ./proxmox_auto_enroll.sh
Expected output:
[INFO] Found 5 LXC container(s)
[INFO] Processing LXC 100: webserver (status: running)
[INFO]   [DRY RUN] Would enroll: proxmox-webserver
[INFO] Processing LXC 101: database (status: running)
[INFO]   [DRY RUN] Would enroll: proxmox-database
...
[INFO] Successfully Enrolled:  5 (dry run)
Step 4: Run Actual Enrollment
# Enroll all containers
./proxmox_auto_enroll.sh
Monitor the output:
- Green
[SUCCESS]= Container enrolled and agent installed - Yellow
[WARN]= Container skipped (already enrolled or stopped) - Red
[ERROR]= Failure (check troubleshooting section)
Step 5: Verify in PatchMon
- Go to Hosts page in PatchMon UI
- Look for newly enrolled containers (names prefixed with "proxmox-")
- Initial status is "pending" (normal!)
- Agent connects automatically after installation (usually within seconds)
- Status changes to "active" with package data populated
Troubleshooting: If status stays "pending" after a couple of minutes, see Agent Not Reporting section.
Usage Examples
Basic Enrollment
# Enroll all running LXC containers
./proxmox_auto_enroll.sh
Dry Run Mode
# Preview what would be enrolled (no changes made)
DRY_RUN=true ./proxmox_auto_enroll.sh
Debug Mode
# Show detailed logging for troubleshooting
DEBUG=true ./proxmox_auto_enroll.sh
Custom Host Prefix
# Prefix container names (e.g., "prod-webserver" instead of "webserver")
HOST_PREFIX="prod-" ./proxmox_auto_enroll.sh
Include Stopped Containers
# Also process stopped containers (enrollment only, agent install fails)
SKIP_STOPPED=false ./proxmox_auto_enroll.sh
Force Install Mode (Broken Packages)
If containers have broken packages (CloudPanel, WHM, cPanel, etc.) that block apt-get:
# Bypass broken packages during agent installation
FORCE_INSTALL=true ./proxmox_auto_enroll.sh
Or use the force parameter when downloading:
curl -s "https://patchmon.example.com/api/v1/auto-enrollment/script?type=proxmox-lxc&token_key=KEY&token_secret=SECRET&force=true" | bash
What force mode does:
- Skips
apt-get updateif broken packages detected - Only installs missing critical tools (jq, curl, bc)
- Uses
--fix-broken --yesflags safely - Validates installations before proceeding
Scheduled Enrollment (Cron)
Automatically enroll new containers on a schedule. Since cron runs with a minimal environment (limited PATH, no user variables), you need to ensure the crontab has the correct environment set up for the script to find required commands like pct, curl, and jq.
Setting Up the Crontab
Edit the root crontab:
crontab -e
Add the following. The PATH and environment variables at the top are essential - without them the script will fail because cron does not inherit your shell's environment:
# === PatchMon Auto-Enrollment Environment ===
# Cron uses a minimal PATH by default (/usr/bin:/bin). The enrollment script
# requires pct, curl, and jq which may live in /usr/sbin or other paths.
# Set a full PATH so all commands are found.
SHELL=/bin/bash
PATH=/usr/local/sbin:/usr/local/bin:/usr/sbin:/usr/bin:/sbin:/bin

# Enrollment credentials (required by the script)
PATCHMON_URL=https://patchmon.example.com
AUTO_ENROLLMENT_KEY=patchmon_ae_your_key_here
AUTO_ENROLLMENT_SECRET=your_secret_here

# Optional overrides
# HOST_PREFIX=proxmox-
# FORCE_INSTALL=false
# CURL_FLAGS=-sk

# === Schedule ===
# Run daily at 2 AM
0 2 * * * /root/proxmox_auto_enroll.sh >> /var/log/patchmon-enroll.log 2>&1

# Or hourly for dynamic environments where containers are created frequently
# 0 * * * * /root/proxmox_auto_enroll.sh >> /var/log/patchmon-enroll.log 2>&1
Why This Matters
Cron does not load your interactive shell profile (~/.bashrc, ~/.profile, etc.). This means:
| What cron is missing | Impact | Fix |
|---|---|---|
PATH only includes /usr/bin:/bin |
pct not found (lives in /usr/sbin) |
Set PATH at top of crontab |
| No exported variables | PATCHMON_URL, credentials are empty |
Define them in crontab or use a wrapper |
| No TTY | Colour output codes may cause log clutter | Redirect to log file with 2>&1 |
Alternative: Wrapper Script
If you prefer not to put credentials in the crontab, create a wrapper script instead:
cat > /root/patchmon_enroll_cron.sh << 'EOF'
#!/bin/bash
# Wrapper that sets the environment for cron execution

export PATH="/usr/local/sbin:/usr/local/bin:/usr/sbin:/usr/bin:/sbin:/bin"
export PATCHMON_URL="https://patchmon.example.com"
export AUTO_ENROLLMENT_KEY="patchmon_ae_your_key_here"
export AUTO_ENROLLMENT_SECRET="your_secret_here"
# export HOST_PREFIX="proxmox-"
# export CURL_FLAGS="-sk"

/root/proxmox_auto_enroll.sh
EOF

chmod 700 /root/patchmon_enroll_cron.sh
Then reference the wrapper in crontab:
0 2 * * * /root/patchmon_enroll_cron.sh >> /var/log/patchmon-enroll.log 2>&1
Make sure the wrapper script is only readable by root (chmod 700) since it contains secrets.
Log Rotation
For long-running cron schedules, consider adding log rotation to prevent unbounded log growth:
cat > /etc/logrotate.d/patchmon-enroll << 'EOF'
/var/log/patchmon-enroll.log {
    weekly
    rotate 4
    compress
    missingok
    notifempty
}
EOF
Verifying Cron is Working
# Check the cron job is registered
crontab -l | grep patchmon

# Check recent cron execution logs
grep patchmon /var/log/syslog | tail -n 20

# Check enrollment log output
tail -f /var/log/patchmon-enroll.log
Already-enrolled containers are automatically skipped on each run, so there is no risk of duplicates or errors from repeated execution.
Multi-Environment Setup
# Production environment (uses prod token)
export PATCHMON_URL="https://patchmon.example.com"
export AUTO_ENROLLMENT_KEY="patchmon_ae_prod_..."
export AUTO_ENROLLMENT_SECRET="prod_secret..."
export HOST_PREFIX="prod-"
./proxmox_auto_enroll.sh

# Development environment (uses dev token with different host group)
export AUTO_ENROLLMENT_KEY="patchmon_ae_dev_..."
export AUTO_ENROLLMENT_SECRET="dev_secret..."
export HOST_PREFIX="dev-"
./proxmox_auto_enroll.sh
Configuration Options
Environment Variables
All configuration can be set via environment variables:
| Variable | Default | Description | Example |
|---|---|---|---|
PATCHMON_URL |
Required | PatchMon server URL | https://patchmon.example.com |
AUTO_ENROLLMENT_KEY |
Required | Token key from PatchMon | patchmon_ae_abc123... |
AUTO_ENROLLMENT_SECRET |
Required | Token secret from PatchMon | def456ghi789... |
CURL_FLAGS |
-s |
Curl options | -sk (for self-signed SSL) |
DRY_RUN |
false |
Preview mode (no changes) | true/false |
HOST_PREFIX |
"" |
Prefix for host names | proxmox-, prod-, etc. |
SKIP_STOPPED |
true |
Skip stopped containers | true/false |
FORCE_INSTALL |
false |
Bypass broken packages | true/false |
DEBUG |
false |
Enable debug logging | true/false |
Script Configuration Section
Or edit the script directly:
# ===== CONFIGURATION =====
PATCHMON_URL="${PATCHMON_URL:-https://patchmon.example.com}"
AUTO_ENROLLMENT_KEY="${AUTO_ENROLLMENT_KEY:-your_key_here}"
AUTO_ENROLLMENT_SECRET="${AUTO_ENROLLMENT_SECRET:-your_secret_here}"
CURL_FLAGS="${CURL_FLAGS:--s}"
DRY_RUN="${DRY_RUN:-false}"
HOST_PREFIX="${HOST_PREFIX:-}"
SKIP_STOPPED="${SKIP_STOPPED:-true}"
FORCE_INSTALL="${FORCE_INSTALL:-false}"
Token Configuration (PatchMon UI)
Configure tokens in Settings → Integrations → Auto-Enrollment & API:
General Settings:
- Token Name: Descriptive identifier
- Active Status: Enable/disable without deleting
- Expiration Date: Auto-disable after date
Security Settings:
- Max Hosts Per Day: Rate limit (resets daily at midnight)
- Allowed IP Addresses: Comma-separated IP whitelist
- Default Host Group: Auto-assign enrolled hosts
Usage Statistics:
- Hosts Created Today: Current daily count
- Last Used: Timestamp of most recent enrollment
- Created By: Admin user who created token
- Created At: Token creation timestamp
Security Best Practices
Token Management
-
Store Securely
- Save credentials in password manager (1Password, LastPass, etc.)
- Never commit to version control
- Use environment variables or secure config management (Vault)
-
Principle of Least Privilege
- Create separate tokens for prod/dev/staging
- Use different tokens for different Proxmox clusters
- Set appropriate rate limits per environment
-
Regular Rotation
- Rotate tokens every 90 days
- Disable unused tokens immediately
- Monitor token usage for anomalies
-
IP Restrictions
- Always set
allowed_ip_rangesin production - Update if Proxmox host IPs change
- Use VPN/private network IPs when possible
- Always set
-
Expiration Dates
- Set expiration for temporary/testing tokens
- Review and extend before expiration
- Delete expired tokens to reduce attack surface
Network Security
-
Use HTTPS
- Always use encrypted connections in production
- Use valid SSL certificates (avoid
-kflag) - Self-signed OK for internal/testing environments
-
Network Segmentation
- Run enrollment over private network if possible
- Use proper firewall rules
- Restrict PatchMon server access to known IPs
Access Control
-
Admin Permissions
- Only admins with "Manage Settings" can create tokens
- Regular users cannot see token secrets
- Use role-based access control (RBAC)
-
Audit Logging
- Monitor token creation/deletion in PatchMon logs
- Track enrollment activity per token
- Review host notes for enrollment source
-
Container Security
- Ensure containers have minimal privileges
- Don't run enrollment as unprivileged user
- Use unprivileged containers where possible (enrollment still works)
Incident Response
If a token is compromised:
-
Immediately disable the token in PatchMon UI
- Settings → Integrations → Auto-Enrollment & API → Toggle "Disable"
-
Review recently enrolled hosts
- Check host notes for token name and enrollment date
- Verify all recent enrollments are legitimate
- Delete any suspicious hosts
-
Create new token
- Generate new credentials
- Update Proxmox script with new credentials
- Test enrollment with dry run
-
Investigate root cause
- How were credentials exposed?
- Update procedures to prevent recurrence
- Consider additional security measures
-
Delete old token
- After verifying new token works
- Document incident in change log
Troubleshooting
Common Errors and Solutions
Error: "pct command not found"
Symptom:
[ERROR] This script must run on a Proxmox host (pct command not found)
Cause: Script is running on a non-Proxmox machine
Solution:
# SSH to Proxmox host first
ssh root@proxmox-host
cd /root
./proxmox_auto_enroll.sh
Error: "Auto-enrollment credentials required"
Symptom:
[ERROR] Failed to enroll hostname - HTTP 401
Response: {"error":"Auto-enrollment credentials required"}
Cause: The X-Auto-Enrollment-Key and/or X-Auto-Enrollment-Secret headers are missing from the request
Solution:
- Verify the script has
AUTO_ENROLLMENT_KEYandAUTO_ENROLLMENT_SECRETset - Check for extra spaces/newlines in credentials
- Ensure token_key starts with
patchmon_ae_ - Regenerate token if credentials lost
# Test credentials manually
curl -X POST \
  -H "X-Auto-Enrollment-Key: YOUR_KEY" \
  -H "X-Auto-Enrollment-Secret: YOUR_SECRET" \
  -H "Content-Type: application/json" \
  -d '{"friendly_name":"test","machine_id":"test"}' \
  https://patchmon.example.com/api/v1/auto-enrollment/enroll
Error: "Invalid or inactive token" / "Invalid token secret"
Symptom:
[ERROR] Failed to enroll hostname - HTTP 401
Response: {"error":"Invalid or inactive token"}
or
[ERROR] Failed to enroll hostname - HTTP 401
Response: {"error":"Invalid token secret"}
Cause: Token key not found or disabled (Invalid or inactive token), or secret doesn't match (Invalid token secret), or token has expired (Token expired)
Solution:
- Check token status in PatchMon UI (Settings → Integrations)
- Enable if disabled
- Extend expiration if expired
- Verify the secret matches the one shown when the token was created
- Create new token if credentials are lost (secrets cannot be retrieved)
Error: "Rate limit exceeded"
Symptom:
[ERROR] Rate limit exceeded - maximum hosts per day reached
Cause: Token's max_hosts_per_day limit reached
Solution:
# Option 1: Wait until tomorrow (limit resets at midnight)
date
# Check current time, wait until 00:00

# Option 2: Increase limit in PatchMon UI
# Settings → Integrations → Edit Token → Max Hosts Per Day: 200

# Option 3: Create additional token for large enrollments
Error: "IP address not authorized"
Symptom:
[ERROR] Failed to enroll hostname - HTTP 403
Response: {"error":"IP address not authorized for this token"}
Cause: Proxmox host IP not in token's allowed_ip_ranges
Solution:
-
Find your Proxmox host IP:
ip addr show | grep 'inet ' | grep -v 127.0.0.1 -
Update token in PatchMon UI:
- Settings → Integrations → Edit Token
- Allowed IP Addresses: Add your IP
-
Or remove IP restriction entirely (not recommended for production)
Error: "jq: command not found"
Symptom:
[ERROR] Required command 'jq' not found. Please install it first.
Cause: Missing dependency
Solution:
# Debian/Ubuntu
apt-get update && apt-get install -y jq

# CentOS/RHEL
yum install -y jq

# Alpine
apk add --no-cache jq
Error: "Failed to install agent in container"
Symptom:
[WARN] Failed to install agent in container-name (exit: 1)
Install output: E: Unable to locate package curl
Cause: Agent installation failed inside LXC container
Solutions:
A. Network connectivity issue:
# Test from Proxmox host
pct exec 100 -- ping -c 3 patchmon.example.com

# Test from inside container
pct enter 100
curl -I https://patchmon.example.com
exit
B. Package manager issue:
# Enter container
pct enter 100

# Update package lists
apt-get update
# or
yum makecache

# Try manual agent install
curl https://patchmon.example.com/api/v1/hosts/install \
  -H "X-API-ID: patchmon_xxx" \
  -H "X-API-KEY: xxx" | bash
C. Unsupported OS:
- Agent supports: Ubuntu, Debian, CentOS, RHEL, Rocky Linux, AlmaLinux, Alpine
- Check
/etc/os-releasein container - Manually install on other distributions
D. Broken packages (use force mode):
FORCE_INSTALL=true ./proxmox_auto_enroll.sh
Error: SSL Certificate Problems
Symptom:
curl: (60) SSL certificate problem: self signed certificate
Cause: Self-signed certificate on PatchMon server
Solution:
# Use -k flag to skip certificate verification
export CURL_FLAGS="-sk"
./proxmox_auto_enroll.sh
Better solution: Install valid SSL certificate on PatchMon server using Let's Encrypt or corporate CA
Warning: Container Already Enrolled
Symptom:
[INFO] ✓ Host already enrolled and agent ping successful - skipping enrollment
Cause: The script detected an existing agent configuration (/etc/patchmon/config.yml and /etc/patchmon/credentials.yml) inside the container and the agent successfully pinged the PatchMon server.
This is normal! The script safely skips already-enrolled hosts. No action needed.
If you need to re-enroll:
- Delete host from PatchMon UI (Hosts page)
- Remove agent config inside the container:
pct exec <vmid> -- rm -rf /etc/patchmon/ - Rerun enrollment script
Agent Not Reporting
If containers show "pending" status after enrollment:
1. Check agent service is running:
pct enter 100

# For systemd-based containers
systemctl status patchmon-agent.service

# For OpenRC-based containers (Alpine)
rc-service patchmon-agent status

# For containers without init systems (crontab fallback)
ps aux | grep patchmon-agent
2. Check agent files exist:
ls -la /etc/patchmon/
# Should show: config.yml and credentials.yml

ls -la /usr/local/bin/patchmon-agent
# Should show the agent binary
3. Check agent logs:
# Systemd journal logs
journalctl -u patchmon-agent.service --no-pager -n 50

# Or check the agent log file
cat /etc/patchmon/logs/patchmon-agent.log
4. Test agent connectivity:
/usr/local/bin/patchmon-agent ping
# Should show success if credentials and connectivity are valid
5. Verify credentials:
cat /etc/patchmon/credentials.yml
# Should show api_id and api_key

cat /etc/patchmon/config.yml
# Should show patchmon_server URL
6. Restart the agent service:
# Systemd
systemctl restart patchmon-agent.service

# OpenRC
rc-service patchmon-agent restart
Debug Mode
Enable detailed logging:
DEBUG=true ./proxmox_auto_enroll.sh
Debug output includes:
- API request/response bodies
- Container command execution details
- Detailed error messages
- curl verbose output
Getting Help
If issues persist:
-
Check PatchMon server logs:
tail -f /path/to/patchmon/backend/logs/error.log -
Create GitHub issue with:
- PatchMon version
- Proxmox version
- Script output (redact credentials!)
- Debug mode output
- Server logs (if accessible)
-
Join Discord community for real-time support
Advanced Usage
Selective Enrollment
Enroll only specific containers:
# Only enroll containers 100-199
nano proxmox_auto_enroll.sh

# Add after line "while IFS= read -r line; do"
vmid=$(echo "$line" | awk '{print $1}')
if [[ $vmid -lt 100 ]] || [[ $vmid -gt 199 ]]; then
    continue
fi
Or use container name filtering:
# Only enroll containers with "prod" in name
if [[ ! "$name" =~ prod ]]; then
    continue
fi
Custom Host Naming
Advanced naming strategies:
# Include Proxmox node name
HOST_PREFIX="$(hostname)-"
# Result: proxmox01-webserver, proxmox02-database

# Include datacenter/location
HOST_PREFIX="dc1-"
# Result: dc1-webserver, dc1-database

# Include environment and node
HOST_PREFIX="prod-$(hostname | cut -d. -f1)-"
# Result: prod-px01-webserver
Multi-Node Proxmox Cluster
For Proxmox clusters with multiple nodes:
Option 1: Same token, different prefix per node
# On node 1
HOST_PREFIX="node1-" ./proxmox_auto_enroll.sh

# On node 2
HOST_PREFIX="node2-" ./proxmox_auto_enroll.sh
Option 2: Different tokens per node
- Create token for each node with different default host groups
- Node 1 → "Proxmox Node 1" group
- Node 2 → "Proxmox Node 2" group
Option 3: Centralized automation
#!/bin/bash
# central_enroll.sh

NODES=(
  "root@proxmox01.example.com"
  "root@proxmox02.example.com"
  "root@proxmox03.example.com"
)

for node in "${NODES[@]}"; do
  echo "Enrolling containers from $node..."
  ssh "$node" "bash /root/proxmox_auto_enroll.sh"
done
Integration with Infrastructure as Code
Ansible Playbook:
---
- name: Enroll Proxmox LXC containers in PatchMon
  hosts: proxmox_hosts
  become: yes
  tasks:
    - name: Install dependencies
      apt:
        name:
          - curl
          - jq
        state: present

    - name: Download enrollment script
      get_url:
        url: "{{ patchmon_url }}/api/v1/auto-enrollment/script?type=proxmox-lxc&token_key={{ token_key }}&token_secret={{ token_secret }}"
        dest: /root/proxmox_auto_enroll.sh
        mode: '0700'

    - name: Run enrollment
      command: /root/proxmox_auto_enroll.sh
      register: enrollment_output

    - name: Show enrollment results
      debug:
        var: enrollment_output.stdout_lines
Terraform (with null_resource):
resource "null_resource" "patchmon_enrollment" {
  triggers = {
    cluster_instance_ids = join(",", proxmox_lxc.containers.*.vmid)
  }

  provisioner "remote-exec" {
    connection {
      host = var.proxmox_host
      user = "root"
      private_key = file(var.ssh_key_path)
    }

    inline = [
      "apt-get install -y jq",
      "curl -s '${var.patchmon_url}/api/v1/auto-enrollment/script?type=proxmox-lxc&token_key=${var.token_key}&token_secret=${var.token_secret}' | bash"
    ]
  }
}
Bulk API Enrollment
For very large deployments (100+ containers), use the bulk API endpoint directly:
#!/bin/bash
# bulk_enroll.sh

# Gather all container info
containers_json=$(pct list | tail -n +2 | while read -r line; do
  vmid=$(echo "$line" | awk '{print $1}')
  name=$(echo "$line" | awk '{print $3}')

  echo "{\"friendly_name\":\"$name\",\"machine_id\":\"proxmox-lxc-$vmid\"}"
done | jq -s '.')

# Send bulk enrollment request
curl -X POST \
  -H "X-Auto-Enrollment-Key: $AUTO_ENROLLMENT_KEY" \
  -H "X-Auto-Enrollment-Secret: $AUTO_ENROLLMENT_SECRET" \
  -H "Content-Type: application/json" \
  -d "{\"hosts\":$containers_json}" \
  "$PATCHMON_URL/api/v1/auto-enrollment/enroll/bulk"
Benefits:
- Single API call for all containers
- Faster for 50+ containers
- Partial success supported (individual failures don't block others)
Limitations:
- Max 50 hosts per request
- Does not install agents (must be done separately)
- Less detailed error reporting per host
Webhook-Triggered Enrollment
Trigger enrollment from PatchMon webhook (requires custom setup):
#!/bin/bash
# webhook_listener.sh

# Simple webhook listener
while true; do
  # Listen for webhook on port 9000
  nc -l -p 9000 -c 'echo -e "HTTP/1.1 200 OK\n\n"; /root/proxmox_auto_enroll.sh'
done
Then configure PatchMon (or monitoring system) to call webhook when conditions are met.
API Reference
Admin Endpoints (Authentication Required)
All admin endpoints require JWT authentication:
Authorization: Bearer <jwt_token>
Create Token
Endpoint: POST /api/v1/auto-enrollment/tokens
Request:
{
  "token_name": "Proxmox Production",
  "max_hosts_per_day": 100,
  "default_host_group_id": "uuid",
  "allowed_ip_ranges": ["192.168.1.10", "10.0.0.5"],
  "expires_at": "2026-12-31T23:59:59Z",
  "metadata": {
    "integration_type": "proxmox-lxc",
    "environment": "production"
  }
}
Response: 201 Created
{
  "message": "Auto-enrollment token created successfully",
  "token": {
    "id": "uuid",
    "token_name": "Proxmox Production",
    "token_key": "patchmon_ae_abc123...",
    "token_secret": "def456...",  // Only shown here!
    "max_hosts_per_day": 100,
    "default_host_group": {
      "id": "uuid",
      "name": "Proxmox LXC",
      "color": "#3B82F6"
    },
    "created_by": {
      "id": "uuid",
      "username": "admin",
      "first_name": "John",
      "last_name": "Doe"
    },
    "expires_at": "2026-12-31T23:59:59Z"
  },
  "warning": "Save the token_secret now - it cannot be retrieved later!"
}
List Tokens
Endpoint: GET /api/v1/auto-enrollment/tokens
Response: 200 OK
[
  {
    "id": "uuid",
    "token_name": "Proxmox Production",
    "token_key": "patchmon_ae_abc123...",
    "is_active": true,
    "allowed_ip_ranges": ["192.168.1.10"],
    "max_hosts_per_day": 100,
    "hosts_created_today": 15,
    "last_used_at": "2025-10-11T14:30:00Z",
    "expires_at": "2026-12-31T23:59:59Z",
    "created_at": "2025-10-01T10:00:00Z",
    "default_host_group_id": "uuid",
    "metadata": {"integration_type": "proxmox-lxc"},
    "host_groups": {
      "id": "uuid",
      "name": "Proxmox LXC",
      "color": "#3B82F6"
    },
    "users": {
      "id": "uuid",
      "username": "admin",
      "first_name": "John",
      "last_name": "Doe"
    }
  }
]
Get Token Details
Endpoint: GET /api/v1/auto-enrollment/tokens/:tokenId
Response: 200 OK (same structure as single token in list)
Update Token
Endpoint: PATCH /api/v1/auto-enrollment/tokens/:tokenId
Request:
{
  "is_active": false,
  "max_hosts_per_day": 200,
  "allowed_ip_ranges": ["192.168.1.0/24"],
  "expires_at": "2027-01-01T00:00:00Z"
}
Response: 200 OK
{
  "message": "Token updated successfully",
  "token": { /* updated token object */ }
}
Delete Token
Endpoint: DELETE /api/v1/auto-enrollment/tokens/:tokenId
Response: 200 OK
{
  "message": "Auto-enrollment token deleted successfully",
  "deleted_token": {
    "id": "uuid",
    "token_name": "Proxmox Production"
  }
}
Enrollment Endpoints (Token Authentication)
Authentication via headers:
X-Auto-Enrollment-Key: patchmon_ae_abc123...
X-Auto-Enrollment-Secret: def456...
Download Enrollment Script
Endpoint: GET /api/v1/auto-enrollment/script
Query Parameters:
type(required): Script type (proxmox-lxcordirect-host)token_key(required): Auto-enrollment token keytoken_secret(required): Auto-enrollment token secretforce(optional):trueto enable force install mode
Example:
curl "https://patchmon.example.com/api/v1/auto-enrollment/script?type=proxmox-lxc&token_key=KEY&token_secret=SECRET&force=true"
Response: 200 OK (bash script with credentials injected)
Enroll Single Host
Endpoint: POST /api/v1/auto-enrollment/enroll
Request:
{
  "friendly_name": "webserver",
  "machine_id": "proxmox-lxc-100-abc123",
  "metadata": {
    "vmid": "100",
    "proxmox_node": "proxmox01",
    "ip_address": "10.0.0.10",
    "os_info": "Ubuntu 22.04 LTS"
  }
}
Response: 201 Created
{
  "message": "Host enrolled successfully",
  "host": {
    "id": "uuid",
    "friendly_name": "webserver",
    "api_id": "patchmon_abc123",
    "api_key": "def456ghi789",
    "host_group": {
      "id": "uuid",
      "name": "Proxmox LXC",
      "color": "#3B82F6"
    },
    "status": "pending"
  }
}
Error Responses:
Note: The API does not perform duplicate host checks. Duplicate prevention is handled client-side by the enrollment script, which checks for an existing agent configuration inside each container before calling the API.
429 Too Many Requests - Rate limit exceeded:
{
  "error": "Rate limit exceeded",
  "message": "Maximum 100 hosts per day allowed for this token"
}
Bulk Enroll Hosts
Endpoint: POST /api/v1/auto-enrollment/enroll/bulk
Request:
{
  "hosts": [
    {
      "friendly_name": "webserver",
      "machine_id": "proxmox-lxc-100-abc123"
    },
    {
      "friendly_name": "database",
      "machine_id": "proxmox-lxc-101-def456"
    }
  ]
}
Limits:
- Minimum: 1 host
- Maximum: 50 hosts per request
Response: 201 Created
{
  "message": "Bulk enrollment completed: 2 succeeded, 0 failed, 0 skipped",
  "results": {
    "success": [
      {
        "id": "uuid",
        "friendly_name": "webserver",
        "api_id": "patchmon_abc123",
        "api_key": "def456"
      },
      {
        "id": "uuid",
        "friendly_name": "database",
        "api_id": "patchmon_ghi789",
        "api_key": "jkl012"
      }
    ],
    "failed": [],
    "skipped": []
  }
}
FAQ
General Questions
Q: Can I use the same token for multiple Proxmox hosts?
A: Yes, as long as the combined enrollment count stays within max_hosts_per_day limit. Rate limits are per-token, not per-host.
Q: What happens if I run the script multiple times?
A: Already-enrolled containers are automatically skipped. The script checks for existing agent configuration inside each container and skips those where the agent is already installed and responsive. Safe to rerun!
Q: Can I enroll stopped LXC containers?
A: No, containers must be running. The script needs to execute commands inside the container to install the agent. Start containers before enrolling.
Q: Does this work with Proxmox VMs (QEMU)?
A: No, this script is LXC-specific and uses pct exec to enter containers. VMs require manual enrollment or a different automation approach (SSH-based).
Q: How do I unenroll a host?
A: Go to PatchMon UI → Hosts → Select host → Delete. The agent will stop reporting and the host record is removed from the database.
Q: Can I change the host group after enrollment?
A: Yes! In PatchMon UI → Hosts → Select host → Edit → Change host group.
Q: Can I see which hosts were enrolled by which token?
A: Yes, check the host "Notes" field in PatchMon. It includes the token name and enrollment timestamp.
Q: What if my Proxmox host IP address changes?
A: Update the token's allowed_ip_ranges in PatchMon UI (Settings → Integrations → Edit Token).
Q: Can I have multiple tokens with different host groups?
A: Yes! Create separate tokens for prod/dev/staging with different default host groups. Great for environment segregation.
Q: Is there a way to trigger enrollment from PatchMon GUI?
A: Not currently (would require inbound network access). The script must run on the Proxmox host. Future versions may support webhooks or agent-initiated enrollment.
Security Questions
Q: Are token secrets stored securely?
A: Yes, token secrets are hashed using bcrypt before storage. Only the hash is stored in the database, never the plain text.
Q: What happens if someone steals my auto-enrollment token?
A: They can create new hosts up to the rate limit, but cannot control existing hosts or access host data. Immediately disable the token in PatchMon UI if compromised.
Q: Can I audit who created which tokens?
A: Yes, each token stores the created_by_user_id. View in PatchMon UI or query the database.
Q: How does IP whitelisting work?
A: PatchMon checks the client IP from the HTTP request. If allowed_ip_ranges is configured, the IP must match one of the allowed ranges using CIDR notation (e.g., 192.168.1.0/24). Single IP addresses are also supported (e.g., 192.168.1.10).
Q: Can I use the same credentials for enrollment and agent communication?
A: No, they're separate. Auto-enrollment credentials create hosts. Each host gets unique API credentials for agent communication. This separation limits the blast radius of credential compromise.
Technical Questions
Q: Why does the agent require curl inside the container?
A: The agent script uses curl to communicate with PatchMon. The enrollment script automatically installs curl if missing.
Q: What Linux distributions are supported in containers?
A: Ubuntu, Debian, CentOS, RHEL, Rocky Linux, AlmaLinux, Alpine Linux. Any distribution with apt/yum/dnf/apk package managers.
Q: How much bandwidth does enrollment use?
A: Minimal. The script download is ~15KB, agent installation is ~50-100KB per container. Total: ~1-2MB for 10 containers.
Q: Can I run enrollment in parallel for faster processing?
A: Not recommended. The script processes containers sequentially to avoid overwhelming the PatchMon server. For 100+ containers, consider the bulk API endpoint.
Q: Does enrollment restart containers?
A: No, containers remain running. The agent is installed without reboots or service disruptions.
Q: What if the container doesn't have a hostname?
A: The script uses the container name from Proxmox as a fallback.
Q: Can I customize the agent installation?
A: Yes, modify the install_url in the enrollment script or use the PatchMon agent installation API parameters.
Troubleshooting Questions
Q: Why does enrollment fail with "dpkg was interrupted"?
A: Your container has broken packages. Use FORCE_INSTALL=true to bypass, or manually fix dpkg:
pct enter 100
dpkg --configure -a
apt-get install -f
Q: Why does the agent show "pending" status forever?
A: Agent likely can't reach PatchMon server. Check:
- Container network connectivity:
pct exec 100 -- ping patchmon.example.com - Agent service running:
pct exec 100 -- systemctl status patchmon-agent.service - Agent logs:
pct exec 100 -- journalctl -u patchmon-agent.service
Q: Can I test enrollment without actually creating hosts?
A: Yes, use dry run mode: DRY_RUN=true ./proxmox_auto_enroll.sh
Q: How do I get more verbose output?
A: Use debug mode: DEBUG=true ./proxmox_auto_enroll.sh
Support and Resources
Documentation
- PatchMon Documentation: https://docs.patchmon.net
- API Reference: https://docs.patchmon.net/api
- Agent Documentation: https://docs.patchmon.net/agent
Community
- Discord: https://patchmon.net/discord
- GitHub Issues: https://github.com/PatchMon/PatchMon/issues
- GitHub Discussions: https://github.com/PatchMon/PatchMon/discussions
Professional Support
For enterprise support, training, or custom integrations:
- Email: support@patchmon.net
- Website: https://patchmon.net/support
PatchMon Team
Auto-enrolment api documentation
Overview
This document provides comprehensive API documentation for PatchMon's auto-enrollment system, covering token management, host enrollment, and agent installation endpoints. These APIs enable automated device onboarding using tools like Ansible, Terraform, or custom scripts.
Table of Contents
- API Architecture
- Authentication
- Admin Endpoints
- Enrollment Endpoints
- Host Management Endpoints
- Ansible Integration Examples
- Error Handling
- Rate Limiting
- Security Considerations
API Architecture
Base URL Structure
https://your-patchmon-server.com/api/v1/
The API version is configurable via the API_VERSION environment variable (defaults to v1).
Endpoint Categories
| Category | Path Prefix | Authentication | Purpose |
|---|---|---|---|
| Admin | /auto-enrollment/tokens/* |
JWT (Bearer token) | Token management (CRUD) |
| Enrollment | /auto-enrollment/* |
Token key + secret (headers) | Host enrollment & script download |
| Host | /hosts/* |
API ID + key (headers) | Agent installation & data reporting |
Two-Tier Security Model
Tier 1: Auto-Enrollment Token
- Purpose: Create new host entries via enrollment
- Scope: Limited to enrollment operations only
- Authentication:
X-Auto-Enrollment-Key+X-Auto-Enrollment-Secretheaders - Rate Limited: Yes (configurable hosts per day per token)
- Storage: Secret is hashed (bcrypt) in the database
Tier 2: Host API Credentials
- Purpose: Agent communication (data reporting, updates, commands)
- Scope: Per-host unique credentials
- Authentication:
X-API-ID+X-API-KEYheaders - Rate Limited: No (per-host)
- Storage: API key is hashed (bcrypt) in the database
Why two tiers?
- Compromised enrollment token ≠ compromised hosts
- Compromised host credential ≠ compromised enrollment
- Revoking an enrollment token stops new enrollments without affecting existing hosts
Authentication
Admin Endpoints (JWT)
All admin endpoints require a valid JWT Bearer token from an authenticated user with "Manage Settings" permission:
curl -H "Authorization: Bearer <jwt_token>" \
     -H "Content-Type: application/json" \
     https://your-patchmon-server.com/api/v1/auto-enrollment/tokens
Enrollment Endpoints (Token Key + Secret)
Enrollment endpoints authenticate via custom headers:
curl -H "X-Auto-Enrollment-Key: patchmon_ae_abc123..." \
     -H "X-Auto-Enrollment-Secret: def456ghi789..." \
     -H "Content-Type: application/json" \
     https://your-patchmon-server.com/api/v1/auto-enrollment/enroll
Host Endpoints (API ID + Key)
Host endpoints authenticate via API credential headers:
curl -H "X-API-ID: patchmon_abc123" \
     -H "X-API-KEY: def456ghi789" \
     https://your-patchmon-server.com/api/v1/hosts/install
Admin Endpoints
All admin endpoints require JWT authentication and "Manage Settings" permission.
Create Auto-Enrollment Token
Endpoint: POST /api/v1/auto-enrollment/tokens
Request Body:
| Field | Type | Required | Default | Description |
|---|---|---|---|---|
token_name |
string | Yes | — | Descriptive name (max 255 chars) |
max_hosts_per_day |
integer | No | 100 |
Rate limit (1–1000) |
default_host_group_id |
string | No | null |
UUID of host group to auto-assign |
allowed_ip_ranges |
string[] | No | [] |
IP whitelist (exact IPs or CIDR notation) |
expires_at |
string | No | null |
ISO 8601 expiration date |
metadata |
object | No | {} |
Custom metadata (e.g. integration_type, environment) |
scopes |
object | No | null |
Permission scopes (only for API integration type tokens) |
Example Request:
{
  "token_name": "Proxmox Production",
  "max_hosts_per_day": 100,
  "default_host_group_id": "uuid-of-host-group",
  "allowed_ip_ranges": ["192.168.1.10", "10.0.0.0/24"],
  "expires_at": "2026-12-31T23:59:59Z",
  "metadata": {
    "integration_type": "proxmox-lxc",
    "environment": "production"
  }
}
Response: 201 Created
{
  "message": "Auto-enrollment token created successfully",
  "token": {
    "id": "uuid",
    "token_name": "Proxmox Production",
    "token_key": "patchmon_ae_abc123...",
    "token_secret": "def456ghi789...",
    "max_hosts_per_day": 100,
    "default_host_group": {
      "id": "uuid",
      "name": "Proxmox LXC",
      "color": "#3B82F6"
    },
    "created_by": {
      "id": "uuid",
      "username": "admin",
      "first_name": "John",
      "last_name": "Doe"
    },
    "expires_at": "2026-12-31T23:59:59Z",
    "scopes": null
  },
  "warning": "⚠️ Save the token_secret now - it cannot be retrieved later!"
}
Important: The
token_secretis only returned in this response. It is hashed before storage and cannot be retrieved again.
List Auto-Enrollment Tokens
Endpoint: GET /api/v1/auto-enrollment/tokens
Response: 200 OK
[
  {
    "id": "uuid",
    "token_name": "Proxmox Production",
    "token_key": "patchmon_ae_abc123...",
    "is_active": true,
    "allowed_ip_ranges": ["192.168.1.10"],
    "max_hosts_per_day": 100,
    "hosts_created_today": 15,
    "last_used_at": "2025-10-11T14:30:00Z",
    "expires_at": "2026-12-31T23:59:59Z",
    "created_at": "2025-10-01T10:00:00Z",
    "default_host_group_id": "uuid",
    "metadata": { "integration_type": "proxmox-lxc" },
    "scopes": null,
    "host_groups": {
      "id": "uuid",
      "name": "Proxmox LXC",
      "color": "#3B82F6"
    },
    "users": {
      "id": "uuid",
      "username": "admin",
      "first_name": "John",
      "last_name": "Doe"
    }
  }
]
Tokens are returned in descending order by creation date. The token_secret is never included in list responses.
Get Token Details
Endpoint: GET /api/v1/auto-enrollment/tokens/{tokenId}
Response: 200 OK — Same structure as a single token in the list response (without token_secret).
Error: 404 Not Found if tokenId does not exist.
Update Token
Endpoint: PATCH /api/v1/auto-enrollment/tokens/{tokenId}
All fields are optional — only include fields you want to change.
Request Body:
| Field | Type | Description |
|---|---|---|
token_name |
string | Updated name (1–255 chars) |
is_active |
boolean | Enable or disable the token |
max_hosts_per_day |
integer | Updated rate limit (1–1000) |
allowed_ip_ranges |
string[] | Updated IP whitelist |
default_host_group_id |
string | Updated host group (set to empty string to clear) |
expires_at |
string | Updated expiration date (ISO 8601) |
scopes |
object | Updated scopes (API integration type tokens only) |
Example Request:
{
  "is_active": false,
  "max_hosts_per_day": 200,
  "allowed_ip_ranges": ["192.168.1.0/24"]
}
Response: 200 OK
{
  "message": "Token updated successfully",
  "token": {
    "id": "uuid",
    "token_name": "Proxmox Production",
    "token_key": "patchmon_ae_abc123...",
    "is_active": false,
    "max_hosts_per_day": 200,
    "allowed_ip_ranges": ["192.168.1.0/24"],
    "host_groups": { "id": "uuid", "name": "Proxmox LXC", "color": "#3B82F6" },
    "users": { "id": "uuid", "username": "admin", "first_name": "John", "last_name": "Doe" }
  }
}
Errors:
404 Not Found— Token does not exist400 Bad Request— Host group not found, or scopes update attempted on a non-API token
Delete Token
Endpoint: DELETE /api/v1/auto-enrollment/tokens/{tokenId}
Response: 200 OK
{
  "message": "Auto-enrollment token deleted successfully",
  "deleted_token": {
    "id": "uuid",
    "token_name": "Proxmox Production"
  }
}
Error: 404 Not Found if tokenId does not exist.
Enrollment Endpoints
Download Enrollment Script
Endpoint: GET /api/v1/auto-enrollment/script
This endpoint validates the token credentials, then serves a bash script with the PatchMon server URL, token credentials, and configuration injected automatically.
Query Parameters:
| Parameter | Required | Description |
|---|---|---|
type |
Yes | Script type: proxmox-lxc or direct-host |
token_key |
Yes | Auto-enrollment token key |
token_secret |
Yes | Auto-enrollment token secret |
force |
No | Set to true to enable force install mode (for broken packages) |
Example:
curl "https://patchmon.example.com/api/v1/auto-enrollment/script?type=proxmox-lxc&token_key=KEY&token_secret=SECRET"
Response: 200 OK — Plain text bash script with credentials injected.
Errors:
400 Bad Request— Missing or invalidtypeparameter401 Unauthorized— Missing credentials, invalid/inactive token, invalid secret, or expired token404 Not Found— Script file not found on server
Enroll Single Host
Endpoint: POST /api/v1/auto-enrollment/enroll
Headers:
X-Auto-Enrollment-Key: patchmon_ae_abc123...
X-Auto-Enrollment-Secret: def456ghi789...
Content-Type: application/json
Request Body:
| Field | Type | Required | Description |
|---|---|---|---|
friendly_name |
string | Yes | Display name for the host (max 255 chars) |
machine_id |
string | No | Unique machine identifier (max 255 chars) |
metadata |
object | No | Additional metadata (vmid, proxmox_node, ip_address, os_info, etc.) |
Example Request:
{
  "friendly_name": "webserver",
  "machine_id": "proxmox-lxc-100-abc123",
  "metadata": {
    "vmid": "100",
    "proxmox_node": "proxmox01",
    "ip_address": "10.0.0.10",
    "os_info": "Ubuntu 22.04 LTS"
  }
}
Response: 201 Created
{
  "message": "Host enrolled successfully",
  "host": {
    "id": "uuid",
    "friendly_name": "webserver",
    "api_id": "patchmon_abc123def456",
    "api_key": "raw-api-key-value",
    "host_group": {
      "id": "uuid",
      "name": "Proxmox LXC",
      "color": "#3B82F6"
    },
    "status": "pending"
  }
}
Note: The
api_keyis only returned in this response (plain text). It is hashed before storage. Thehost_groupisnullif no default host group is configured on the token.
Error Responses:
| Status | Error | Cause |
|---|---|---|
400 |
Validation errors | Missing or invalid friendly_name |
401 |
Auto-enrollment credentials required |
Missing X-Auto-Enrollment-Key or X-Auto-Enrollment-Secret headers |
401 |
Invalid or inactive token |
Token key not found or token is disabled |
401 |
Invalid token secret |
Secret does not match |
401 |
Token expired |
Token has passed its expiration date |
403 |
IP address not authorized for this token |
Client IP not in allowed_ip_ranges |
429 |
Rate limit exceeded |
Token's max_hosts_per_day limit reached |
Duplicate handling: The API does not perform server-side duplicate host checks. Duplicate prevention is handled client-side by the enrollment script, which checks for an existing agent configuration (
/etc/patchmon/config.yml) inside each container before calling the API.
Bulk Enroll Hosts
Endpoint: POST /api/v1/auto-enrollment/enroll/bulk
Headers:
X-Auto-Enrollment-Key: patchmon_ae_abc123...
X-Auto-Enrollment-Secret: def456ghi789...
Content-Type: application/json
Request Body:
{
  "hosts": [
    {
      "friendly_name": "webserver",
      "machine_id": "proxmox-lxc-100-abc123"
    },
    {
      "friendly_name": "database",
      "machine_id": "proxmox-lxc-101-def456"
    }
  ]
}
Limits:
- Minimum: 1 host per request
- Maximum: 50 hosts per request
- Each host must have a
friendly_name(required);machine_idis optional
Response: 201 Created
{
  "message": "Bulk enrollment completed: 2 succeeded, 0 failed, 0 skipped",
  "results": {
    "success": [
      {
        "id": "uuid",
        "friendly_name": "webserver",
        "api_id": "patchmon_abc123",
        "api_key": "def456"
      },
      {
        "id": "uuid",
        "friendly_name": "database",
        "api_id": "patchmon_ghi789",
        "api_key": "jkl012"
      }
    ],
    "failed": [],
    "skipped": []
  }
}
Rate Limit Error (429):
{
  "error": "Rate limit exceeded",
  "message": "Only 5 hosts remaining in daily quota"
}
The bulk endpoint checks the remaining daily quota before processing. If the number of hosts in the request exceeds the remaining quota, the entire request is rejected.
Host Management Endpoints
These endpoints are used by the PatchMon agent (not the enrollment script). They authenticate using the per-host X-API-ID and X-API-KEY credentials returned during enrollment.
Download Agent Installation Script
Endpoint: GET /api/v1/hosts/install
Serves a shell script that bootstraps the PatchMon agent on a host. The script uses a secure bootstrap token mechanism — actual API credentials are not embedded directly in the script.
Headers:
X-API-ID: patchmon_abc123
X-API-KEY: def456ghi789
Query Parameters:
| Parameter | Required | Description |
|---|---|---|
force |
No | Set to true to enable force install mode |
arch |
No | Architecture override (e.g. amd64, arm64); auto-detected if omitted |
Response: 200 OK — Plain text shell script with bootstrap token injected.
Download Agent Binary/Script
Endpoint: GET /api/v1/hosts/agent/download
Downloads the PatchMon agent binary (Go binary for modern agents) or migration script (for legacy bash agents).
Headers:
X-API-ID: patchmon_abc123
X-API-KEY: def456ghi789
Query Parameters:
| Parameter | Required | Description |
|---|---|---|
arch |
No | Architecture (e.g. amd64, arm64) |
force |
No | Set to binary to force binary download |
Response: 200 OK — Binary file or shell script.
Host Data Update
Endpoint: POST /api/v1/hosts/update
Used by the agent to report package data, system information, and hardware details.
Headers:
X-API-ID: patchmon_abc123
X-API-KEY: def456ghi789
Content-Type: application/json
Request Body Fields:
| Field | Type | Required | Description |
|---|---|---|---|
packages |
array | Yes | Array of package objects (max 10,000) |
packages[].name |
string | Yes | Package name |
packages[].currentVersion |
string | Yes | Currently installed version |
packages[].availableVersion |
string | No | Available update version |
packages[].needsUpdate |
boolean | Yes | Whether an update is available |
packages[].isSecurityUpdate |
boolean | No | Whether the update is security-related |
agentVersion |
string | No | Reporting agent version |
osType |
string | No | Operating system type |
osVersion |
string | No | Operating system version |
hostname |
string | No | System hostname |
ip |
string | No | System IP address |
architecture |
string | No | CPU architecture |
cpuModel |
string | No | CPU model name |
cpuCores |
integer | No | Number of CPU cores |
ramInstalled |
float | No | Installed RAM in GB |
swapSize |
float | No | Swap size in GB |
diskDetails |
array | No | Array of disk objects |
gatewayIp |
string | No | Default gateway IP |
dnsServers |
array | No | Array of DNS server IPs |
networkInterfaces |
array | No | Array of network interface objects |
kernelVersion |
string | No | Running kernel version |
installedKernelVersion |
string | No | Installed (on-disk) kernel version |
selinuxStatus |
string | No | SELinux status (enabled, disabled, or permissive) |
systemUptime |
string | No | System uptime |
loadAverage |
array | No | Load average values |
machineId |
string | No | Machine ID |
needsReboot |
boolean | No | Whether a reboot is required |
rebootReason |
string | No | Reason a reboot is required |
repositories |
array | No | Configured package repositories |
executionTime |
string | No | Time taken to gather data |
Example Request:
{
  "packages": [
    {
      "name": "nginx",
      "currentVersion": "1.18.0",
      "availableVersion": "1.20.0",
      "needsUpdate": true,
      "isSecurityUpdate": false
    }
  ],
  "agentVersion": "1.2.3",
  "cpuModel": "Intel Xeon E5-2680 v4",
  "cpuCores": 8,
  "ramInstalled": 16.0,
  "swapSize": 2.0,
  "diskDetails": [
    {
      "device": "/dev/sda1",
      "mountPoint": "/",
      "size": "50GB",
      "used": "25GB",
      "available": "25GB"
    }
  ],
  "gatewayIp": "192.168.1.1",
  "dnsServers": ["8.8.8.8", "8.8.4.4"],
  "networkInterfaces": [
    {
      "name": "eth0",
      "ip": "192.168.1.10",
      "mac": "00:11:22:33:44:55"
    }
  ],
  "kernelVersion": "5.4.0-74-generic",
  "selinuxStatus": "disabled"
}
Response: 200 OK
{
  "message": "Host updated successfully",
  "packagesProcessed": 1,
  "updatesAvailable": 1,
  "securityUpdates": 0
}
Ansible Integration Examples
Basic Playbook for Proxmox Enrollment
---
- name: Enroll Proxmox LXC containers in PatchMon
  hosts: proxmox_hosts
  become: yes
  vars:
    patchmon_url: "https://patchmon.example.com"
    token_key: "{{ vault_patchmon_token_key }}"
    token_secret: "{{ vault_patchmon_token_secret }}"
    host_prefix: "prod-"

  tasks:
    - name: Install dependencies
      apt:
        name:
          - curl
          - jq
        state: present

    - name: Download enrollment script
      get_url:
        url: "{{ patchmon_url }}/api/v1/auto-enrollment/script?type=proxmox-lxc&token_key={{ token_key }}&token_secret={{ token_secret }}"
        dest: /root/proxmox_auto_enroll.sh
        mode: '0700'

    - name: Run enrollment
      command: /root/proxmox_auto_enroll.sh
      environment:
        HOST_PREFIX: "{{ host_prefix }}"
        DEBUG: "true"
      register: enrollment_output

    - name: Show enrollment results
      debug:
        var: enrollment_output.stdout_lines
Advanced Playbook with Token Management
---
- name: Manage PatchMon Proxmox Integration
  hosts: localhost
  vars:
    patchmon_url: "https://patchmon.example.com"
    admin_token: "{{ vault_patchmon_admin_token }}"

  tasks:
    - name: Create Proxmox enrollment token
      uri:
        url: "{{ patchmon_url }}/api/v1/auto-enrollment/tokens"
        method: POST
        headers:
          Authorization: "Bearer {{ admin_token }}"
          Content-Type: "application/json"
        body_format: json
        body:
          token_name: "{{ inventory_hostname }}-proxmox"
          max_hosts_per_day: 200
          default_host_group_id: "{{ proxmox_host_group_id }}"
          allowed_ip_ranges: ["{{ proxmox_host_ip }}"]
          expires_at: "2026-12-31T23:59:59Z"
          metadata:
            integration_type: "proxmox-lxc"
            environment: "{{ environment }}"
        status_code: 201
      register: token_response

    - name: Store token credentials
      set_fact:
        enrollment_token_key: "{{ token_response.json.token.token_key }}"
        enrollment_token_secret: "{{ token_response.json.token.token_secret }}"

    - name: Deploy enrollment script to Proxmox hosts
      include_tasks: deploy_enrollment.yml
      vars:
        enrollment_token_key: "{{ enrollment_token_key }}"
        enrollment_token_secret: "{{ enrollment_token_secret }}"
Playbook for Bulk Enrollment via API
---
- name: Bulk enroll Proxmox containers
  hosts: proxmox_hosts
  become: yes
  vars:
    patchmon_url: "https://patchmon.example.com"
    token_key: "{{ vault_patchmon_token_key }}"
    token_secret: "{{ vault_patchmon_token_secret }}"

  tasks:
    - name: Get LXC container list
      shell: |
        pct list | tail -n +2 | while read -r line; do
          vmid=$(echo "$line" | awk '{print $1}')
          name=$(echo "$line" | awk '{print $3}')
          status=$(echo "$line" | awk '{print $2}')

          if [ "$status" = "running" ]; then
            machine_id=$(pct exec "$vmid" -- bash -c "cat /etc/machine-id 2>/dev/null || cat /var/lib/dbus/machine-id 2>/dev/null || echo 'proxmox-lxc-$vmid-'$(cat /proc/sys/kernel/random/uuid)" 2>/dev/null || echo "proxmox-lxc-$vmid-unknown")
            echo "{\"friendly_name\":\"$name\",\"machine_id\":\"$machine_id\"}"
          fi
        done | jq -s '.'
      register: containers_json

    - name: Bulk enroll containers
      uri:
        url: "{{ patchmon_url }}/api/v1/auto-enrollment/enroll/bulk"
        method: POST
        headers:
          X-Auto-Enrollment-Key: "{{ token_key }}"
          X-Auto-Enrollment-Secret: "{{ token_secret }}"
          Content-Type: "application/json"
        body_format: json
        body:
          hosts: "{{ containers_json.stdout | from_json }}"
        status_code: 201
      register: enrollment_result

    - name: Display enrollment results
      debug:
        msg: "{{ enrollment_result.json.message }}"
Ansible Role
# roles/patchmon_proxmox/tasks/main.yml
---
- name: Install PatchMon dependencies
  package:
    name:
      - curl
      - jq
    state: present

- name: Create PatchMon directory
  file:
    path: /opt/patchmon
    state: directory
    mode: '0755'

- name: Download enrollment script
  get_url:
    url: "{{ patchmon_url }}/api/v1/auto-enrollment/script?type=proxmox-lxc&token_key={{ token_key }}&token_secret={{ token_secret }}&force={{ force_install | default('false') }}"
    dest: /opt/patchmon/proxmox_auto_enroll.sh
    mode: '0700'

- name: Run enrollment script
  command: /opt/patchmon/proxmox_auto_enroll.sh
  environment:
    PATCHMON_URL: "{{ patchmon_url }}"
    AUTO_ENROLLMENT_KEY: "{{ token_key }}"
    AUTO_ENROLLMENT_SECRET: "{{ token_secret }}"
    HOST_PREFIX: "{{ host_prefix | default('') }}"
    DRY_RUN: "{{ dry_run | default('false') }}"
    DEBUG: "{{ debug | default('false') }}"
    FORCE_INSTALL: "{{ force_install | default('false') }}"
  register: enrollment_output

- name: Display enrollment results
  debug:
    var: enrollment_output.stdout_lines
  when: enrollment_output.stdout_lines is defined

- name: Fail if enrollment had errors
  fail:
    msg: "Enrollment failed with errors"
  when: enrollment_output.rc != 0
Ansible Vault for Credentials
# group_vars/all/vault.yml (encrypted with ansible-vault)
---
vault_patchmon_admin_token: "eyJhbGciOiJIUzI1NiIsInR5cCI6IkpXVCJ9..."
vault_patchmon_token_key: "patchmon_ae_abc123..."
vault_patchmon_token_secret: "def456ghi789..."
Playbook with Error Handling and Retries
---
- name: Robust Proxmox enrollment with error handling
  hosts: proxmox_hosts
  become: yes
  vars:
    patchmon_url: "https://patchmon.example.com"
    token_key: "{{ vault_patchmon_token_key }}"
    token_secret: "{{ vault_patchmon_token_secret }}"
    max_retries: 3
    retry_delay: 30

  tasks:
    - name: Test PatchMon connectivity
      uri:
        url: "{{ patchmon_url }}/api/v1/auto-enrollment/tokens"
        method: GET
        headers:
          Authorization: "Bearer {{ vault_patchmon_admin_token }}"
        status_code: 200
      retries: "{{ max_retries }}"
      delay: "{{ retry_delay }}"

    - name: Download enrollment script
      get_url:
        url: "{{ patchmon_url }}/api/v1/auto-enrollment/script?type=proxmox-lxc&token_key={{ token_key }}&token_secret={{ token_secret }}"
        dest: /root/proxmox_auto_enroll.sh
        mode: '0700'
      retries: "{{ max_retries }}"
      delay: "{{ retry_delay }}"

    - name: Run enrollment with retry logic
      shell: |
        for i in {1..{{ max_retries }}}; do
          echo "Attempt $i of {{ max_retries }}"
          if /root/proxmox_auto_enroll.sh; then
            echo "Enrollment successful"
            exit 0
          else
            echo "Enrollment failed, retrying in {{ retry_delay }} seconds..."
            sleep {{ retry_delay }}
          fi
        done
        echo "All enrollment attempts failed"
        exit 1
      register: enrollment_result

    - name: Handle enrollment failure
      fail:
        msg: "Proxmox enrollment failed after {{ max_retries }} attempts"
      when: enrollment_result.rc != 0

    - name: Parse enrollment results
      set_fact:
        enrolled_count: "{{ enrollment_result.stdout | regex_search('Successfully Enrolled:\\s+(\\d+)', '\\1') | default('0') }}"
        failed_count: "{{ enrollment_result.stdout | regex_search('Failed:\\s+(\\d+)', '\\1') | default('0') }}"

    - name: Report enrollment statistics
      debug:
        msg: |
          Enrollment completed:
          - Successfully enrolled: {{ enrolled_count }} containers
          - Failed: {{ failed_count }} containers
Error Handling
HTTP Status Codes
| Code | Meaning | When It Occurs |
|---|---|---|
200 |
OK | Successful read/update operations |
201 |
Created | Token or host created successfully |
400 |
Bad Request | Validation errors, invalid host group, invalid script type |
401 |
Unauthorized | Missing, invalid, or expired credentials |
403 |
Forbidden | IP address not in token's whitelist |
404 |
Not Found | Token or resource not found |
429 |
Too Many Requests | Token's daily host creation limit exceeded |
500 |
Internal Server Error | Unexpected server error |
Error Response Formats
Simple error:
{
  "error": "Error message describing what went wrong"
}
Error with detail:
{
  "error": "Rate limit exceeded",
  "message": "Maximum 100 hosts per day allowed for this token"
}
Validation errors (400):
{
"errors": [
{
"msg": "Token name is required (max 255 characters)",
"param": "token_name",
"location": "body"
}
]
}
Rate Limiting
Token-Based Rate Limits
Each auto-enrollment token has a configurable max_hosts_per_day limit:
- Default: 100 hosts per day per token
- Range: 1–1000 hosts per day
- Reset: Daily (when the first request of a new day is received)
- Scope: Per-token, not per-IP
When the limit is exceeded, the API returns 429 Too Many Requests:
{
"error": "Rate limit exceeded",
"message": "Maximum 100 hosts per day allowed for this token"
}
For bulk enrollment, the remaining daily quota is checked against the request size. If the request contains more hosts than the remaining quota allows, the entire request is rejected:
{
"error": "Rate limit exceeded",
"message": "Only 5 hosts remaining in daily quota"
}
Global Rate Limiting
The auto-enrollment endpoints are also subject to the server's global authentication rate limiter, which applies to all authentication-related endpoints.
Security Considerations
Token Security
- Secret hashing: Token secrets are hashed with bcrypt (cost factor 10) before storage
- One-time display: Secrets are only returned during token creation
- Rotation: Recommended every 90 days
- Scope limitation: Tokens can only create hosts — they cannot read, modify, or delete existing host data
IP Restrictions
Tokens support IP whitelisting with both exact IPs and CIDR notation:
{
"allowed_ip_ranges": ["192.168.1.10", "10.0.0.0/24"]
}
IPv4-mapped IPv6 addresses (e.g. ::ffff:192.168.1.10) are automatically handled.
Host API Key Security
- Host API keys (
api_key) are hashed with bcrypt before storage - The installation script uses a bootstrap token mechanism — the actual API credentials are not embedded in the script
- Bootstrap tokens are single-use and expire after 5 minutes
Network Security
- Always use HTTPS in production
- The
ignore_ssl_self_signedserver setting automatically configures curl flags in served scripts - Implement firewall rules to restrict PatchMon server access to known IPs
Audit Trail
All enrollment activity is logged:
- Token name included in host notes (e.g. "Auto-enrolled via Production Proxmox on 2025-10-11T14:30:00Z")
- Token creation tracks
created_by_user_id last_used_attimestamp updated on each enrollment
Complete Endpoint Summary
Admin Endpoints (JWT Authentication)
| Method | Path | Description |
|---|---|---|
POST |
/api/v1/auto-enrollment/tokens |
Create token |
GET |
/api/v1/auto-enrollment/tokens |
List all tokens |
GET |
/api/v1/auto-enrollment/tokens/{tokenId} |
Get single token |
PATCH |
/api/v1/auto-enrollment/tokens/{tokenId} |
Update token |
DELETE |
/api/v1/auto-enrollment/tokens/{tokenId} |
Delete token |
Enrollment Endpoints (Token Authentication)
| Method | Path | Description |
|---|---|---|
GET |
/api/v1/auto-enrollment/script?type=... |
Download enrollment script |
POST |
/api/v1/auto-enrollment/enroll |
Enroll single host |
POST |
/api/v1/auto-enrollment/enroll/bulk |
Bulk enroll hosts (max 50) |
Host Endpoints (API Credentials)
| Method | Path | Description |
|---|---|---|
GET |
/api/v1/hosts/install |
Download installation script |
GET |
/api/v1/hosts/agent/download |
Download agent binary/script |
POST |
/api/v1/hosts/update |
Report host data |
Quick Reference: curl Examples
Create a token:
curl -X POST \
-H "Authorization: Bearer <jwt_token>" \
-H "Content-Type: application/json" \
-d '{
"token_name": "Production Proxmox",
"max_hosts_per_day": 100,
"default_host_group_id": "uuid",
"allowed_ip_ranges": ["192.168.1.10"]
}' \
https://patchmon.example.com/api/v1/auto-enrollment/tokens
Download and run enrollment script:
curl -s "https://patchmon.example.com/api/v1/auto-enrollment/script?type=proxmox-lxc&token_key=KEY&token_secret=SECRET" | bash
Enroll a host directly:
curl -X POST \
-H "X-Auto-Enrollment-Key: patchmon_ae_abc123..." \
-H "X-Auto-Enrollment-Secret: def456ghi789..." \
-H "Content-Type: application/json" \
-d '{
"friendly_name": "webserver",
"machine_id": "proxmox-lxc-100-abc123"
}' \
https://patchmon.example.com/api/v1/auto-enrollment/enroll
Download agent installation script:
curl -H "X-API-ID: patchmon_abc123" \
-H "X-API-KEY: def456ghi789" \
https://patchmon.example.com/api/v1/hosts/install | bash
Integration Patterns
Pattern 1: Script-Based (Simplest)
# Download and execute in one command — credentials are injected into the script
curl -s "https://patchmon.example.com/api/v1/auto-enrollment/script?type=proxmox-lxc&token_key=KEY&token_secret=SECRET" | bash
Pattern 2: API-First (Most Control)
# 1. Create token via admin API
# 2. Enroll hosts via enrollment API (single or bulk)
# 3. Download agent scripts using per-host API credentials
# 4. Install agents with host-specific credentials
Pattern 3: Hybrid (Recommended for Automation)
# 1. Create token via admin API (or UI)
# 2. Download enrollment script with token embedded
# 3. Distribute and run script on Proxmox hosts
# 4. Script handles both enrollment and agent installation
Ansible Dynamic Library
Github Repo : https://github.com/PatchMon/PatchMon-ansible/tree/main
A dynamic inventory plugin for Ansible that queries the PatchMon HTTP JSON API and exposes hosts as an Ansible inventory.
Description
The dynamic_inventory plugin allows you to use PatchMon as a dynamic inventory source for Ansible. It queries the PatchMon API to retrieve host information including hostnames, IP addresses, and group assignments, and automatically generates an Ansible inventory.
Requirements
- Ansible: >= 2.19.0
- Python: 3.6+
- Dependencies:
requests >= 2.25.1
Installation
Install from Ansible Galaxy
ansible-galaxy collection install patchmon.dynamic_inventory
Install from Source
-
Clone the repository:
git clone https://github.com/PatchMon/PatchMon-ansible.git cd PatchMon-ansible/patchmon/dynamic_inventory -
Build the collection:
ansible-galaxy collection build -
Install the collection:
ansible-galaxy collection install patchmon-dynamic_inventory-*.tar.gz -
Install dependencies:
pip install -r requirements.txt
Configuration
Create an inventory configuration file (e.g., patchmon_inventory.yml):
---
plugin: patchmon.dynamic_inventory
api_url: http://localhost:3000/api/v1/api/hosts/
api_key: your_api_key
api_secret: your_api_secret
verify_ssl: false
Configuration Options
| Option | Description | Required | Default |
|---|---|---|---|
plugin |
Name of the plugin | ✅ | patchmon.dynamic_inventory |
api_url |
URL of the PatchMon API endpoint that returns JSON host data | ✅ | — |
api_key |
API key for authentication | ✅ | — |
api_secret |
API secret for authentication | ✅ | — |
verify_ssl |
Whether to verify SSL certificates when contacting the API | ❌ | true |
Usage
Basic Usage
Run Ansible commands with the inventory file:
# List all hosts
ansible-inventory -i patchmon_inventory.yml --list
# Ping all hosts
ansible all -i patchmon_inventory.yml -m ping
# Run a playbook
ansible-playbook -i patchmon_inventory.yml playbook.yml
Configure as Default Inventory
Add to your ansible.cfg:
[defaults]
inventory = patchmon_inventory.yml
[inventory]
enable_plugins = patchmon.dynamic_inventory.dynamic_inventory
Using in Playbooks
Create a playbook (e.g., ping.yml):
---
- name: Test connectivity to all hosts
hosts: all
gather_facts: no
tasks:
- name: Ping hosts
ansible.builtin.ping:
Run the playbook:
ansible-playbook ping.yml
API Response Format
The plugin expects the PatchMon API to return JSON in the following format:
{
"hosts": [
{
"hostname": "server1.example.com",
"ip": "192.168.1.10",
"host_groups": [
{
"name": "web_servers"
},
{
"name": "production"
}
]
},
{
"hostname": "server2.example.com",
"ip": "192.168.1.11",
"host_groups": [
{
"name": "db_servers"
},
{
"name": "production"
}
]
}
]
}
Inventory Mapping
- Hostname: The
hostnamefield is used as the Ansible host name - IP Address: The
ipfield is mapped to theansible_hostvariable - Groups: Each entry in
host_groupscreates an Ansible group, and hosts are assigned to these groups
Examples
Example 1: List Inventory
ansible-inventory -i patchmon_inventory.yml --list
Output:
{
"_meta": {
"hostvars": {
"server1.example.com": {
"ansible_host": "192.168.1.10"
},
"server2.example.com": {
"ansible_host": "192.168.1.11"
}
}
},
"all": {
"children": [
"ungrouped",
"web_servers",
"db_servers",
"production"
]
},
"db_servers": {
"hosts": [
"server2.example.com"
]
},
"production": {
"hosts": [
"server1.example.com",
"server2.example.com"
]
},
"web_servers": {
"hosts": [
"server1.example.com"
]
}
}
Example 2: Target Specific Groups
# Run on web servers only
ansible-playbook -i patchmon_inventory.yml playbook.yml --limit web_servers
# Run on production hosts only
ansible-playbook -i patchmon_inventory.yml playbook.yml --limit production
Example 3: Using Environment Variables
For security, you can use Ansible vault or environment variables:
---
plugin: patchmon.dynamic_inventory
api_url: http://localhost:3000/api/v1/api/hosts/
api_key: "{{ lookup('env', 'PATCHMON_API_KEY') }}"
api_secret: "{{ lookup('env', 'PATCHMON_API_SECRET') }}"
verify_ssl: false
Authentication
The plugin uses HTTP Basic Authentication with the provided api_key and api_secret. Make sure these credentials have the necessary permissions to query the PatchMon API.
SSL Verification
By default, SSL certificate verification is enabled (verify_ssl: true). For development or self-signed certificates, you can disable it by setting verify_ssl: false. Note: Disabling SSL verification is not recommended for production environments.
Troubleshooting
Test API Connectivity
# Test the API endpoint directly
curl -u "api_key:api_secret" http://localhost:3000/api/v1/api/hosts/
Debug Inventory
# Show detailed inventory information
ansible-inventory -i patchmon_inventory.yml --list --debug
# Test with verbose output
ansible-inventory -i patchmon_inventory.yml --list -v
Common Issues
- Authentication Errors: Verify that your
api_keyandapi_secretare correct - Connection Errors: Check that the
api_urlis accessible and the API is running - JSON Parsing Errors: Ensure the API returns valid JSON in the expected format
- Missing Hosts: Verify that the API response contains a
hostsarray
Development
Testing
Test the plugin locally:
# Test inventory parsing
ansible-inventory -i patchmon_inventory.yml --list
# Test with a playbook
ansible-playbook -i patchmon_inventory.yml ping.yml
Contributing
Contributions are welcome! Please follow these steps:
- Fork the repository
- Create a feature branch
- Make your changes
- Submit a pull request
License
AGPL-3.0-or-later
See the LICENSE file for details.
Authors
- Steve Libonati stevelibonati@yahoo.com
Links
- Repository: https://github.com/PatchMon/PatchMon-ansible
- Issues: https://github.com/PatchMon/PatchMon-ansible/issues
GetHomepage Integration Guide
Overview
PatchMon provides a seamless integration with GetHomepage (formerly Homepage), allowing you to display real-time PatchMon statistics in your GetHomepage dashboard. This integration uses authenticated API endpoints to securely fetch and display your patch management data.
Features
Default Widget Display
By default, the GetHomepage widget displays:
- Total Hosts - Number of active monitored hosts
- Hosts Needing Updates - Hosts with outdated packages
- Security Updates - Number of security-related updates available
Additional Available Data
The API provides additional metrics that you can display by customizing the widget mappings:
- Up-to-Date Hosts - Hosts with no pending updates
- Total Outdated Packages - Aggregate count of packages needing updates
- Total Repositories - Number of active repositories
- Recent Updates (24h) - Update activity in the last 24 hours
- Hosts with Security Updates - Number of hosts requiring security patches
- OS Distribution - Breakdown of operating systems across hosts (returned in API but requires custom formatting)
Prerequisites
- PatchMon instance running and accessible
- GetHomepage installed and configured
- Network access from GetHomepage to PatchMon
- HTTPS recommended (but HTTP works with fallback clipboard)
Setup Instructions
Step 1: Create an API Key in PatchMon
- Log in to PatchMon as an administrator
- Navigate to Settings → Integrations
- Click on the GetHomepage tab
- Click "New API Key" button
- Fill in the token details:
- Token Name: A descriptive name (e.g., "GetHomepage Widget")
- Allowed IP Addresses (Optional): Restrict access to specific IPs
- Expiration Date (Optional): Set an expiration if needed
- Click "Create Token"
Step 2: Save Your Credentials
After creating the token, you'll see a success modal with:
- Token Key: Your API username
- Token Secret: Your API password (shown only once!)
- Base64 Encoded Credentials: Pre-encoded for convenience
- Complete Widget Configuration: Ready-to-use YAML
⚠️ Important: Save the token secret immediately. You won't be able to view it again!
Step 3: Configure GetHomepage
Method A: Copy Complete Configuration (Recommended)
- In the PatchMon success modal, click "Copy Config" button
- Open your GetHomepage
services.ymlfile - Paste the copied configuration
- Save the file
- Restart GetHomepage
The default configuration displays 3 key metrics:
- PatchMon:
href: http://your-patchmon-url:3000
description: PatchMon Statistics
icon: http://your-patchmon-url:3000/assets/favicon.svg
widget:
type: customapi
url: http://your-patchmon-url:3000/api/v1/gethomepage/stats
headers:
Authorization: Basic <base64_encoded_credentials>
mappings:
- field: total_hosts
label: Total Hosts
- field: hosts_needing_updates
label: Needs Updates
- field: security_updates
label: Security Updates
Note: You can add more fields to the
mappingssection. See Configuration Options below for all available fields.
Method B: Manual Configuration
If you need to manually create the base64 credentials:
-
Encode your credentials:
echo -n "YOUR_API_KEY:YOUR_API_SECRET" | base64 -
Create the widget configuration in
services.yml:- PatchMon: href: http://your-patchmon-url:3000 description: PatchMon Statistics icon: http://your-patchmon-url:3000/assets/favicon.svg widget: type: customapi url: http://your-patchmon-url:3000/api/v1/gethomepage/stats headers: Authorization: Basic <your_base64_credentials> mappings: - field: total_hosts label: Total Hosts - field: hosts_needing_updates label: Needs Updates - field: security_updates label: Security Updates -
Restart GetHomepage:
docker restart gethomepage # or systemctl restart gethomepage
Configuration Options
Widget Mappings
The default widget configuration displays 3 metrics: Total Hosts, Hosts Needing Updates, and Security Updates.
You can customize which statistics to display by adding or removing fields in the mappings section. The API provides 8 numeric metrics you can choose from.
How to Customize Mappings
- Locate the
mappings:section in your GetHomepageservices.yml - Add or remove field entries - each entry has two parts:
field:- The metric name from the API (see table below)label:- How it appears in GetHomepage (customize as you like)
- You can display up to ~6-8 metrics before the widget becomes crowded
- Save and restart GetHomepage to see changes
Available Fields
| Field | Description | Default |
|---|---|---|
total_hosts |
Total number of active hosts | ✅ Yes |
hosts_needing_updates |
Hosts with outdated packages | ✅ Yes |
security_updates |
Number of security updates available | ✅ Yes |
up_to_date_hosts |
Hosts with no pending updates | ❌ No |
total_outdated_packages |
Total outdated packages across all hosts | ❌ No |
hosts_with_security_updates |
Hosts requiring security updates | ❌ No |
total_repos |
Number of active repositories | ❌ No |
recent_updates_24h |
Successful updates in last 24 hours | ❌ No |
top_os_1_count |
Count of most common OS (e.g., "Ubuntu: 20") | ❌ No |
top_os_2_count |
Count of 2nd most common OS | ❌ No |
top_os_3_count |
Count of 3rd most common OS | ❌ No |
Note: Fields marked with ❌ are available but not included in the default configuration. Add them to your
mappingssection to display them.OS Distribution: The API also returns
top_os_1_name,top_os_2_name, andtop_os_3_name(strings like "Ubuntu", "Debian", "Rocky Linux"). However, GetHomepage widgets display these awkwardly. It's better to use just the count fields with custom labels that include the OS name (see examples below).
Quick Start: Adding a Metric
Example: Add "Recent Updates (24h)" to your widget
Before (Default - 3 metrics):
mappings:
- field: total_hosts
label: Total Hosts
- field: hosts_needing_updates
label: Needs Updates
- field: security_updates
label: Security Updates
After (Custom - 4 metrics):
mappings:
- field: total_hosts
label: Total Hosts
- field: hosts_needing_updates
label: Needs Updates
- field: security_updates
label: Security Updates
- field: recent_updates_24h # ← Added this line
label: Updated (24h) # ← And this line
Result: Your widget now shows 4 metrics including recent update activity.
You can add any combination of the 8 available fields. Just ensure the field: name matches exactly as shown in the table above.
Advanced Mapping Examples
Example: Security-Focused Widget
Shows security-critical metrics only:
widget:
type: customapi
url: http://your-patchmon-url:3000/api/v1/gethomepage/stats
headers:
Authorization: Basic <credentials>
mappings:
- field: security_updates
label: Security Patches
- field: hosts_with_security_updates
label: Hosts at Risk
- field: hosts_needing_updates
label: Total Pending
Example: Repository Management Widget
Focus on repository and host counts:
widget:
type: customapi
url: http://your-patchmon-url:3000/api/v1/gethomepage/stats
headers:
Authorization: Basic <credentials>
mappings:
- field: total_repos
label: Repositories
- field: total_hosts
label: Managed Hosts
- field: up_to_date_hosts
label: Up-to-Date
Example: Activity Monitoring Widget
Track recent update activity:
widget:
type: customapi
url: http://your-patchmon-url:3000/api/v1/gethomepage/stats
headers:
Authorization: Basic <credentials>
mappings:
- field: recent_updates_24h
label: Updated (24h)
- field: hosts_needing_updates
label: Pending Updates
- field: up_to_date_hosts
label: Fully Patched
Example: Package-Focused Widget
Monitor outdated packages:
widget:
type: customapi
url: http://your-patchmon-url:3000/api/v1/gethomepage/stats
headers:
Authorization: Basic <credentials>
mappings:
- field: total_outdated_packages
label: Outdated Packages
- field: security_updates
label: Security Updates
- field: hosts_needing_updates
label: Affected Hosts
Example: OS Distribution Widget
Show your infrastructure breakdown by operating system:
widget:
type: customapi
url: http://your-patchmon-url:3000/api/v1/gethomepage/stats
headers:
Authorization: Basic <credentials>
mappings:
- field: total_hosts
label: Total Hosts
- field: top_os_1_count
label: Ubuntu Hosts # Customize these labels based on your actual OS mix
- field: top_os_2_count
label: Debian Hosts
- field: top_os_3_count
label: Rocky Linux Hosts
Pro Tip: First test the endpoint with
curlto see what your actual top 3 operating systems are, then customize the labels accordingly. The API returns the OS names intop_os_1_name,top_os_2_name, andtop_os_3_name.
Custom Icon
By default, the widget uses PatchMon's favicon. You can customize it:
# Use PatchMon's dark logo
icon: http://your-patchmon-url:3000/assets/logo_dark.png
# Use PatchMon's light logo
icon: http://your-patchmon-url:3000/assets/logo_light.png
# Use GetHomepage's built-in icons
icon: server
# Use a local icon in GetHomepage
icon: /icons/patchmon.png
API Endpoint Details
Endpoint
GET /api/v1/gethomepage/stats
Authentication
- Type: HTTP Basic Authentication
- Format:
Authorization: Basic <base64(key:secret)>
Response Format
The endpoint returns JSON with the following structure:
{
"total_hosts": 42,
"total_outdated_packages": 156,
"total_repos": 12,
"hosts_needing_updates": 15,
"up_to_date_hosts": 27,
"security_updates": 23,
"hosts_with_security_updates": 8,
"recent_updates_24h": 34,
"os_distribution": [
{ "name": "Ubuntu", "count": 20 },
{ "name": "Debian", "count": 12 },
{ "name": "Rocky Linux", "count": 10 }
],
"top_os_1_name": "Ubuntu",
"top_os_1_count": 20,
"top_os_2_name": "Debian",
"top_os_2_count": 12,
"top_os_3_name": "Rocky Linux",
"top_os_3_count": 10,
"last_updated": "2025-10-11T12:34:56.789Z"
}
All Available Metrics Explained
All numeric fields can be used in GetHomepage mappings:
| Field | Type | Description | Use Case |
|---|---|---|---|
total_hosts |
Number | Total active hosts in PatchMon | Overall infrastructure size |
hosts_needing_updates |
Number | Hosts with at least one outdated package | Hosts requiring attention |
up_to_date_hosts |
Number | Hosts with zero outdated packages | Compliant/healthy hosts |
security_updates |
Number | Total security updates available across all hosts | Critical patches needed |
hosts_with_security_updates |
Number | Hosts requiring security patches | High-risk hosts |
total_outdated_packages |
Number | Sum of all outdated packages | Total patching workload |
total_repos |
Number | Active repositories being monitored | Repository coverage |
recent_updates_24h |
Number | Successful updates in last 24 hours | Recent patching activity |
top_os_1_name |
String | Name of most common OS | OS breakdown |
top_os_1_count |
Number | Count of most common OS | OS breakdown |
top_os_2_name |
String | Name of 2nd most common OS | OS breakdown |
top_os_2_count |
Number | Count of 2nd most common OS | OS breakdown |
top_os_3_name |
String | Name of 3rd most common OS | OS breakdown |
top_os_3_count |
Number | Count of 3rd most common OS | OS breakdown |
os_distribution |
Array | Full breakdown of OS types (for advanced use) | Infrastructure composition |
last_updated |
String (ISO 8601) | Timestamp of when stats were generated | Data freshness |
Note: The API provides top 3 OS distribution data as flat fields (
top_os_*) that can be easily displayed in GetHomepage widgets. The fullos_distributionarray is also available for custom integrations.
Health Check Endpoint
GET /api/v1/gethomepage/health
Returns basic health status and API key name.
Managing API Keys
View Existing Keys
- Go to Settings → Integrations → GetHomepage
- View all created API keys with:
- Token name
- Creation date
- Last used timestamp
- Active/Inactive status
- Expiration date (if set)
Disable/Enable Keys
Click the "Disable" or "Enable" button on any API key to toggle its status.
Delete Keys
Click the trash icon to permanently delete an API key. This action cannot be undone.
Security Features
- IP Restrictions: Limit API key usage to specific IP addresses
- Expiration Dates: Set automatic expiration for temporary access
- Last Used Tracking: Monitor when keys are being used
- One-Time Secret Display: Token secrets are only shown once at creation
Troubleshooting
Error: "Missing or invalid authorization header"
Cause: GetHomepage isn't sending the Authorization header correctly.
Solution:
- Verify the
headers:section is properly indented inservices.yml - Ensure base64 credentials are correctly encoded
- Check for extra spaces or line breaks in the configuration
- Verify you're using
type: customapi(not another widget type)
Error: "Invalid API key"
Cause: The API key doesn't exist or was deleted.
Solution:
- Verify the API key exists in PatchMon (Settings → Integrations)
- Create a new API key if needed
- Update GetHomepage configuration with new credentials
Error: "API key is disabled"
Cause: The API key has been disabled in PatchMon.
Solution:
- Go to Settings → Integrations → GetHomepage
- Click "Enable" on the API key
Error: "API key has expired"
Cause: The API key has passed its expiration date.
Solution:
- Create a new API key without expiration
- Or create a new key with a future expiration date
- Update GetHomepage configuration
Error: "IP address not allowed"
Cause: GetHomepage's IP address is not in the allowed list.
Solution:
- Check GetHomepage's IP address
- Update the API key's allowed IP ranges in PatchMon
- Or remove IP restrictions if not needed
Widget Not Showing Data
Checklist:
- GetHomepage can reach PatchMon URL (test with
curl) - API key is active and not expired
- Base64 credentials are correct
-
services.ymlsyntax is valid YAML - GetHomepage has been restarted after config changes
- Check GetHomepage logs for error messages
Testing the API Endpoint
Test the endpoint manually to see all available metrics:
# Step 1: Encode your credentials
echo -n "your_key:your_secret" | base64
# Output: eW91cl9rZXk6eW91cl9zZWNyZXQ=
# Step 2: Test the endpoint with your credentials
curl -H "Authorization: Basic YOUR_BASE64_CREDENTIALS" \
http://your-patchmon-url:3000/api/v1/gethomepage/stats
Expected response: JSON with all 8 core metrics plus OS distribution:
{
"total_hosts": 42,
"hosts_needing_updates": 15,
"security_updates": 23,
"up_to_date_hosts": 27,
"total_outdated_packages": 156,
"hosts_with_security_updates": 8,
"total_repos": 12,
"recent_updates_24h": 34,
"top_os_1_name": "Ubuntu",
"top_os_1_count": 20,
"top_os_2_name": "Debian",
"top_os_2_count": 12,
"top_os_3_name": "Rocky Linux",
"top_os_3_count": 10,
"os_distribution": [...],
"last_updated": "2025-10-11T12:34:56.789Z"
}
Any of these numeric fields (including top_os_*_count) can be used in your GetHomepage mappings!
To find out what your top 3 operating systems are, look for the top_os_1_name, top_os_2_name, and top_os_3_name values in the response.
Pretty Print for Easy Reading
Use jq to format the output nicely:
curl -H "Authorization: Basic YOUR_BASE64_CREDENTIALS" \
http://your-patchmon-url:3000/api/v1/gethomepage/stats | jq
This makes it easier to see what metrics your instance provides.
How to Display Your OS Distribution
Step 1: Discover your top operating systems
Run the curl command and look for these fields:
curl -s -H "Authorization: Basic YOUR_BASE64_CREDENTIALS" \
http://your-patchmon-url:3000/api/v1/gethomepage/stats | jq '{top_os_1_name, top_os_1_count, top_os_2_name, top_os_2_count, top_os_3_name, top_os_3_count}'
Example output:
{
"top_os_1_name": "Ubuntu",
"top_os_1_count": 35,
"top_os_2_name": "Debian",
"top_os_2_count": 18,
"top_os_3_name": "Rocky Linux",
"top_os_3_count": 12
}
Step 2: Add to your GetHomepage widget
Use the count fields (top_os_*_count) and label them with your actual OS names:
mappings:
- field: total_hosts
label: Total Hosts
- field: top_os_1_count
label: Ubuntu # Use your actual OS from top_os_1_name
- field: top_os_2_count
label: Debian # Use your actual OS from top_os_2_name
- field: top_os_3_count
label: Rocky Linux # Use your actual OS from top_os_3_name
Step 3: Restart GetHomepage
docker restart gethomepage
# or
systemctl restart gethomepage
Your widget will now show your infrastructure OS breakdown! 🎉
Security Best Practices
- Use HTTPS: Always use HTTPS in production for encrypted communication
- IP Restrictions: Limit API key usage to GetHomepage's IP address
- Set Expiration: Use expiration dates for temporary access
- Regular Rotation: Rotate API keys periodically
- Monitor Usage: Check "Last Used" timestamps for suspicious activity
- Unique Keys: Create separate API keys for different GetHomepage instances
- Secure Storage: Store GetHomepage
services.ymlsecurely with proper permissions
Complete Working Examples
Copy-Paste Ready Configurations
These are complete, working configurations you can copy directly into your services.yml file. Just replace the placeholders with your actual values.
Simple Dashboard Widget (Default)
This is the default configuration generated by PatchMon:
- PatchMon:
href: https://patchmon.example.com
description: Patch Management
icon: https://patchmon.example.com/assets/favicon.svg
widget:
type: customapi
url: https://patchmon.example.com/api/v1/gethomepage/stats
headers:
Authorization: Basic dXNlcjpwYXNzd29yZA==
mappings:
- field: total_hosts
label: Total Hosts
- field: hosts_needing_updates
label: Needs Updates
- field: security_updates
label: Security Updates
Detailed Monitoring Widget (Custom)
This example shows how to display 4 metrics including recent activity:
- PatchMon Production:
href: https://patchmon.example.com
description: Production Environment Patches
icon: https://patchmon.example.com/assets/logo_dark.png
widget:
type: customapi
url: https://patchmon.example.com/api/v1/gethomepage/stats
headers:
Authorization: Basic dXNlcjpwYXNzd29yZA==
mappings:
- field: total_hosts
label: Total Servers
- field: hosts_needing_updates
label: Needs Patching
- field: security_updates
label: Security Patches
- field: recent_updates_24h
label: Patched Today
Multiple Environments (Custom)
This example shows different metrics for different environments:
# Production - Focus on security
- PatchMon Prod:
href: https://patchmon-prod.example.com
description: Production Patches
icon: https://patchmon-prod.example.com/assets/favicon.svg
widget:
type: customapi
url: https://patchmon-prod.example.com/api/v1/gethomepage/stats
headers:
Authorization: Basic <prod_credentials>
mappings:
- field: total_hosts
label: Hosts
- field: security_updates
label: Security
- field: hosts_needing_updates
label: Pending
# Development - Focus on package count
- PatchMon Dev:
href: https://patchmon-dev.example.com
description: Development Patches
icon: https://patchmon-dev.example.com/assets/favicon.svg
widget:
type: customapi
url: https://patchmon-dev.example.com/api/v1/gethomepage/stats
headers:
Authorization: Basic <dev_credentials>
mappings:
- field: total_hosts
label: Hosts
- field: total_outdated_packages
label: Packages
- field: up_to_date_hosts
label: Updated
Maximum Information Widget (All 8 Metrics)
This example shows ALL available metrics (may be crowded):
- PatchMon Complete:
href: https://patchmon.example.com
description: Complete Statistics
icon: https://patchmon.example.com/assets/favicon.svg
widget:
type: customapi
url: https://patchmon.example.com/api/v1/gethomepage/stats
headers:
Authorization: Basic <credentials>
mappings:
- field: total_hosts
label: Total Hosts
- field: hosts_needing_updates
label: Needs Updates
- field: up_to_date_hosts
label: Up-to-Date
- field: security_updates
label: Security Updates
- field: hosts_with_security_updates
label: Security Hosts
- field: total_outdated_packages
label: Outdated Packages
- field: total_repos
label: Repositories
- field: recent_updates_24h
label: Updated (24h)
Note: Displaying all 8 metrics may make the widget tall. Choose 3-5 metrics that are most relevant to your needs.
Integration Architecture
┌─────────────────┐
│ GetHomepage │
│ Dashboard │
└────────┬────────┘
│
│ HTTP(S) Request
│ Authorization: Basic <base64>
│
▼
┌─────────────────┐
│ PatchMon │
│ API Server │
│ │
│ /api/v1/ │
│ gethomepage/ │
│ stats │
└────────┬────────┘
│
│ Query Database
│
▼
┌─────────────────┐
│ PostgreSQL │
│ Database │
│ │
│ - Hosts │
│ - Packages │
│ - Updates │
│ - Repositories │
└─────────────────┘
Rate Limiting
The GetHomepage integration endpoints are subject to PatchMon's general API rate limiting:
- Default: 100 requests per 15 minutes per IP address
- GetHomepage typically polls every 60 seconds
- This allows for normal operation without hitting limits
Support and Resources
- PatchMon Documentation: https://docs.patchmon.net
- GetHomepage Documentation: https://gethomepage.dev
- PatchMon Discord: https://patchmon.net/discord
- GitHub Issues: https://github.com/9technologygroup/patchmon.net/issues
Changelog
Version 1.0.1 (2025-10-11)
- Added OS distribution support
- New fields:
top_os_1_count,top_os_2_count,top_os_3_countfor displaying infrastructure OS breakdown - New fields:
top_os_1_name,top_os_2_name,top_os_3_namefor identifying operating systems - Total of 14 displayable metrics now available
Version 1.0.0 (2025-10-11)
- Initial GetHomepage integration release
- Basic authentication support
- Real-time statistics endpoint
- Customizable widget mappings
- IP restriction support
- API key management UI
- 8 core metrics available
Questions or issues? Join our Discord community or open a GitHub issue!
Setting up OIDC SSO Single Sign-on integration
Overview
PatchMon supports OpenID Connect (OIDC) authentication, allowing users to log in via an external Identity Provider (IdP) instead of, or in addition to, local username/password credentials.
Supported Providers
Any OIDC-compliant provider works, including:
- Authentik
- Keycloak
- Okta
- Azure AD (Entra ID)
- Google Workspace
- And others
What You Get
- SSO login via a configurable button on the login page
- Automatic user provisioning on first login (no need to create accounts manually)
- Group-based role mapping so your IdP controls who is an admin, user, or readonly viewer
- Optional - disable local password login entirely and enforce SSO for all users
Prerequisites
- PatchMon already installed and running
- An OIDC-compatible Identity Provider with an OAuth2/OIDC application configured
- HTTPS in production (OIDC routes enforce HTTPS when
NODE_ENV=production)
Step 1 - Create an OIDC Application in Your IdP
Create a new OAuth2 / OIDC application in your Identity Provider with the following settings:
| Setting | Value |
|---|---|
| Application type | Web application / Confidential client |
| Redirect URI | https://patchmon.example.com/api/v1/auth/oidc/callback |
| Scopes | openid, email, profile, groups |
| Grant type | Authorization Code |
| Token endpoint auth | Client Secret (Basic) |
After creating the application, note the Client ID and Client Secret as you'll need both.
Tip: If you plan to use group-based role mapping, ensure your IdP includes the
groupsclaim in the ID token. In Authentik, this is enabled by default. In Keycloak, you may need to add a "Group Membership" mapper to the client scope.
Provider-Specific Notes
Authentik:
- Create an OAuth2/OIDC Provider, then create an Application linked to it
- Issuer URL format:
https://auth.example.com/application/o/patchmon/ - Groups are included via the
groupsorak_groupsclaim (both are supported)
Keycloak:
- Create a Client with Access Type
confidential - Issuer URL format:
https://keycloak.example.com/realms/your-realm - Add a "Group Membership" protocol mapper to include groups in the token
Okta / Azure AD:
- Create an OIDC Web Application
- Ensure groups are included in the ID token claims
Step 2 - Configure PatchMon
Add the following environment variables to your .env file (for Docker deployments) or your backend environment.
Required Variables
OIDC_ENABLED=true
OIDC_ISSUER_URL=https://auth.example.com/application/o/patchmon/
OIDC_CLIENT_ID=your-client-id
OIDC_CLIENT_SECRET=your-client-secret
OIDC_REDIRECT_URI=https://patchmon.example.com/api/v1/auth/oidc/callback
| Variable | Description |
|---|---|
OIDC_ENABLED |
Set to true to enable OIDC |
OIDC_ISSUER_URL |
Your IdP's issuer / discovery URL |
OIDC_CLIENT_ID |
Client ID from your IdP application |
OIDC_CLIENT_SECRET |
Client secret from your IdP application |
OIDC_REDIRECT_URI |
Must match exactly what you configured in your IdP |
Optional Variables
OIDC_SCOPES=openid email profile groups
OIDC_AUTO_CREATE_USERS=true
OIDC_DEFAULT_ROLE=user
OIDC_DISABLE_LOCAL_AUTH=false
OIDC_BUTTON_TEXT=Login with SSO
| Variable | Default | Description |
|---|---|---|
OIDC_SCOPES |
openid email profile groups |
Space-separated scopes to request. Include groups for role mapping |
OIDC_AUTO_CREATE_USERS |
true |
Automatically create a PatchMon account on first OIDC login |
OIDC_DEFAULT_ROLE |
user |
Role assigned when a user doesn't match any group mapping |
OIDC_DISABLE_LOCAL_AUTH |
false |
When true, hides the username/password fields and only shows the SSO button |
OIDC_BUTTON_TEXT |
Login with SSO |
Label shown on the SSO login button |
Step 3 - Group-Based Role Mapping (Optional)
Map your IdP groups to PatchMon roles so that role assignments stay in sync with your directory. Group matching is case-insensitive.
Role Hierarchy
PatchMon checks group membership in this order (highest priority first):
| PatchMon Role | Required IdP Group(s) | Description |
|---|---|---|
| Super Admin | Member of BOTH OIDC_ADMIN_GROUP AND OIDC_SUPERADMIN_GROUP |
Full access including system settings |
| Admin | Member of OIDC_ADMIN_GROUP |
Full access |
| Host Manager | Member of OIDC_HOST_MANAGER_GROUP |
Manage hosts and groups |
| User | Member of OIDC_USER_GROUP |
Standard access with data export |
| Readonly | Member of OIDC_READONLY_GROUP |
View-only access |
| Default | None of the above | Gets OIDC_DEFAULT_ROLE (defaults to user) |
Environment Variables
OIDC_ADMIN_GROUP=PatchMon Admins
OIDC_USER_GROUP=PatchMon Users
OIDC_SUPERADMIN_GROUP=PatchMon SuperAdmins
OIDC_HOST_MANAGER_GROUP=PatchMon Host Managers
OIDC_READONLY_GROUP=PatchMon Readonly
OIDC_SYNC_ROLES=true
| Variable | Description |
|---|---|
OIDC_ADMIN_GROUP |
IdP group name that maps to Admin role |
OIDC_USER_GROUP |
IdP group name that maps to User role |
OIDC_SUPERADMIN_GROUP |
IdP group name that maps to Super Admin (requires both this and Admin group) |
OIDC_HOST_MANAGER_GROUP |
IdP group name that maps to Host Manager role |
OIDC_READONLY_GROUP |
IdP group name that maps to Readonly role |
OIDC_SYNC_ROLES |
When true (default), the user's role is updated on every login based on current group membership. When false, the role is only set on first login |
You only need to define the groups you intend to use. Any variables left unset are simply ignored.
Step 4 - Restart PatchMon
After updating your .env file, restart the backend so it discovers your OIDC provider on startup:
# Docker
docker compose restart backend
# Or if rebuilding
docker compose up -d --force-recreate backend
Check the backend logs to confirm OIDC initialised:
docker compose logs backend | grep -i oidc
You should see:
Discovering OIDC configuration from: https://auth.example.com/...
OIDC Issuer discovered: https://auth.example.com/...
OIDC client initialized successfully
If you see OIDC is enabled but missing required configuration, double-check your environment variables.
Step 5 - Test the Login
- Open PatchMon in your browser
- You should see a "Login with SSO" button (or your custom
OIDC_BUTTON_TEXT) - Click it and you'll be redirected to your IdP
- Authenticate with your IdP credentials
- You'll be redirected back to PatchMon and logged in
If OIDC_AUTO_CREATE_USERS is true, a PatchMon account is created automatically using your email address. The username is derived from the email prefix (e.g. john.doe@example.com becomes john.doe).
First-Time Setup (No Users Exist Yet)
When PatchMon has no users in the database, it displays a setup wizard. If you're using OIDC-only mode (OIDC_DISABLE_LOCAL_AUTH=true), you have two options:
Option A - Log In via OIDC (Recommended)
- Ensure your IdP user is in the admin group (e.g.
PatchMon Admins) - Set
OIDC_AUTO_CREATE_USERS=true - Click the SSO button and the first user will be created with the role determined by your group mapping
Option B - Disable OIDC for the first Admin
If the setup wizard blocks access then you can create a local Admin on first setup then enable/setup OIDC after that. You can remove the first admin user but you should be Super Admin Role.
What Syncs from Your IdP
On every OIDC login, PatchMon automatically syncs the following from your Identity Provider:
- Role (if
OIDC_SYNC_ROLES=true) - based on group membership - Avatar / profile picture - if the
pictureclaim is present - First name and last name - from
given_nameandfamily_nameclaims - Email - used for matching and account linking
Account Linking
If a local PatchMon user already exists with the same email as the OIDC user, PatchMon will automatically link the accounts, but only if the email is marked as verified by the IdP. This prevents account takeover via unverified emails.
Disabling Local Authentication
To enforce SSO for all users, set:
OIDC_DISABLE_LOCAL_AUTH=true
This hides the username/password fields on the login page and only shows the SSO button. Local authentication is only actually disabled if OIDC is also enabled and successfully initialised. This safety check prevents you from being locked out if OIDC is misconfigured.
Important: Ensure at least one OIDC user has admin access before enabling this, or you may lose the ability to manage PatchMon.
Complete Example Configuration
Authentik
# .env
OIDC_ENABLED=true
OIDC_ISSUER_URL=https://authentik.example.com/application/o/patchmon/
OIDC_CLIENT_ID=patchmon
OIDC_CLIENT_SECRET=your-client-secret-here
OIDC_REDIRECT_URI=https://patchmon.example.com/api/v1/auth/oidc/callback
OIDC_SCOPES=openid email profile groups
OIDC_AUTO_CREATE_USERS=true
OIDC_DEFAULT_ROLE=user
OIDC_BUTTON_TEXT=Login with Authentik
OIDC_ADMIN_GROUP=PatchMon Admins
OIDC_USER_GROUP=PatchMon Users
OIDC_SYNC_ROLES=true
Keycloak
# .env
OIDC_ENABLED=true
OIDC_ISSUER_URL=https://keycloak.example.com/realms/your-realm
OIDC_CLIENT_ID=patchmon
OIDC_CLIENT_SECRET=your-client-secret-here
OIDC_REDIRECT_URI=https://patchmon.example.com/api/v1/auth/oidc/callback
OIDC_SCOPES=openid email profile groups
OIDC_AUTO_CREATE_USERS=true
OIDC_DEFAULT_ROLE=user
OIDC_BUTTON_TEXT=Login with Keycloak
OIDC_ADMIN_GROUP=PatchMon Admins
OIDC_USER_GROUP=PatchMon Users
OIDC_SYNC_ROLES=true
Troubleshooting
OIDC Not Initialising
Logs show: OIDC is enabled but missing required configuration
All four required variables must be set: OIDC_ISSUER_URL, OIDC_CLIENT_ID, OIDC_CLIENT_SECRET, OIDC_REDIRECT_URI. Check for typos or empty values.
SSO Button Not Appearing
- PatchMon cannot reach the IdP (DNS / firewall issue)
- Issuer URL is incorrect
- IdP's
.well-known/openid-configurationendpoint is not accessible
"Authentication Failed" After Redirect
- Verify the Redirect URI in your IdP matches
OIDC_REDIRECT_URIexactly (including trailing slashes) - Ensure cookies are not being blocked (OIDC uses httpOnly cookies for session state)
- Check that your IdP supports PKCE (PatchMon uses S256 code challenge)
"Session Expired" Error
The OIDC session has a 10-minute window between initiating login and completing the callback. If the user takes too long at the IdP, the session expires. Simply try logging in again.
User Gets Wrong Role
- Check that the
groupsscope is included inOIDC_SCOPES - Verify your IdP is including groups in the ID token (not just the access token)
- Check backend logs as they show which groups were received:
OIDC groups found: [...] - If logs show
No groups found in OIDC token, configure your IdP to include the groups claim - Group matching is case-insensitive, so
patchmon adminsmatchesPatchMon Admins
"User Not Found" Error
OIDC_AUTO_CREATE_USERS is set to false and no matching PatchMon account exists. Either enable auto-creation or create the user account manually in PatchMon first (the email must match).
Debug Logging
For detailed OIDC troubleshooting, enable debug logging:
LOG_LEVEL=debug
Then check the backend logs:
docker compose logs -f backend | grep -i oidc
Security Notes
- HTTPS is enforced for OIDC login and callback routes when
NODE_ENV=production - PKCE (S256) is used for all authorization code exchanges
- Tokens are stored in httpOnly cookies, not localStorage, to prevent XSS attacks
- Client secrets should never be committed to version control
- Account linking only occurs when the IdP reports the email as verified
- Role sync can be disabled (
OIDC_SYNC_ROLES=false) if you prefer to manage roles manually in PatchMon after first login
Release Notes Docs
2.0.0 (Major)
Architectural changes
Go
- Backend rewritten from the ground up in Go, replacing Node.js and Next.js. The stack is more scalable, uses less RAM, and is significantly more performant.
- sqlc is used for type-safe SQL against PostgreSQL (compile-time checked queries instead of ad-hoc ORM access patterns).
- golang-migrate is used for database migrations (replacing Prisma ORM).
- Structured logging with the standard library
log/slogfor cleaner, machine-parseable logs in production.
Background jobs and automation
- Background work is handled by asynq on Redis instead of BullMQ. PatchMon no longer ships the embedded Bull Board stack; queue visibility and triggers live in the existing Automation UI, which reduces attack surface, image size, and operational complexity.
Docker
- Docker is the officially supported deployment method going forward; bare-metal installs are discontinued. A migration document describes the upgrade path.
- Hardened base images are used. They ship with near-zero CVEs and a smaller footprint.
- No separate frontend container: static React build artifacts are embedded in the Go binary. The container runs that binary (by default on port 3000) with chi:
/api/*is handled by the server, so nginx inside PatchMon is no longer required. You still use nginx or another reverse proxy in front for TLS termination and public access as usual. - A Guacamole (guacd) sidecar is included for Windows RDP. It is separate for now; RDP/VNC for Windows is an area we intend to improve.
API documentation
- OpenAPI 3 spec is served at
/api/v1/openapi.json, with Swagger UI under/api/v1/api-docs(authenticated) for exploring integration endpoints.
New features
- Linux patching: Deploy updates per host or in bulk, on demand or on a schedule. Policies support host/group assignments and exclusions; runs support approval, stop, retry validation, and live log streaming over WebSocket.
- Microsoft Windows agent (beta) and FreeBSD agent support.
- Windows Updates (beta Windows agent): server APIs for update results, reboot state, superseded cleanup, and approved-guid sync, aligned with the new Windows agent.
- Advanced monitoring & alerting: richer alert lifecycle (including assignment and bulk actions), optional advanced alert configuration for tuning and cleanup where your edition includes it.
- Notifications: first-class destinations (SMTP, webhooks, ntfy), routes, delivery log, and scheduled reports so operational signals leave PatchMon reliably.
- Environment variables in the GUI: many settings that were previously only in process environment can be viewed and edited from the Settings UI (per-key updates, with sensible validation), so you change less by hand in compose or shell env for day-to-day tuning.
- OIDC / SSO: configure OpenID Connect from the same Settings area, including import from environment when you are migrating from a file-based or container env setup.
Other improvements
- Compliance / OpenSCAP: SSG and CIS benchmarking content is bundled in the server binary at build time. Agents no longer pull scanning content from GitHub; everyone shares one versioned source of truth and less outbound traffic from agents.
- SSO: improved sign-in flows and Entra ID integration compared to 1.4.x OIDC edge cases (e.g. redirect loops with auto SSO).
- Dashboard: additional cards and data surfaces; dashboard layout preferences carry forward in the new UI.
- Host integration config: apply pending config from the server so integration changes are applied to agents in a controlled, observable way.
- Settings reliability: server URL and related configuration are reimplemented on the Go stack with database-backed resolution, addressing classes of “settings did not persist” issues from the Node era.
- Reverse proxy awareness: continued correct use of forwarded headers for HTTPS/WSS behind proxies (without the Bull Board-specific HTTP quirks from 1.4.x).
- Optional admin pprof: when enabled, CPU/memory profiling endpoints are available to administrators for performance investigation.
Packaging and editions
- Features are grouped into capability modules (e.g. patching policies, advanced alerts, custom branding, Docker inventory, compliance depth, AI assist, remote access). Core workflows stay simple; larger deployments can enable more surface area where their subscription or license allows. See in-app Context / billing documentation for your tenant.
Known issues
- Remote Desktop (RDP): there is a known bug with the RDP connection flow in this release. A fix is planned for the next release.
Migrations
This covers migration for Docker, Proxmox community scripts, and legacy setup.sh installs:
1.4.1
🎉 PatchMon 1.4.1
A maintenance release with OIDC improvements, FreeBSD agent support, installer fixes, and various bug fixes and improvements.
🔐 OIDC Improvements and Hot Fixes
- OIDC authentication fixes and stability improvements
- Hot fixes for edge cases in SSO flows
🖥️ FreeBSD Agent Support
- Native FreeBSD agent support — run the PatchMon agent on FreeBSD hosts
- Initial FreeBSD support via community contribution
📦 Native Installer Upgrade Fixes
- Fixes for native installer upgrade paths
- Improved reliability when upgrading existing installations
🐛 Host Table Views Not Saving -> Bug Fix
- Fixed an issue where host table view preferences (columns, sort order, filters) were not being saved
- Table view state now persists correctly across sessions
🔧 Agent Memory Leaks and Improvements
- Addressed memory leaks in the agent
- General agent stability and resource usage improvements
🔒 Better API Integration Scoping
- Improved scoping for Integration API credentials and access
- Tighter integration between API keys and their permitted scope
🙏 Acknowledgements
- @RuTHlessBEat200 — for agent and OIDC fixes
- @mminkus — for FreeBSD initial PR
- The rest of the community for their support and help on Discord and GitHub
1.4.0 (Major)
🎉 PatchMon 1.4.0
A major release with security compliance scanning, OIDC SSO, an alerting engine, web SSH terminal, and AI-assisted terminal support.
🛡️ Security Compliance Scanning
- OpenSCAP CIS Benchmark scanning directly from the agent (Level 1 / Level 2)
- Docker Bench for Security when Docker integration is enabled
- Compliance dashboard with fleet-wide scores, pass/fail breakdowns, and scan history
- Optional auto-remediation of failed rules during scans
🔐 OIDC Single Sign-On
- OpenID Connect authentication with Authentik, Keycloak, Okta, or any OIDC provider
- Automatic user provisioning on first OIDC login
- Group-based role mapping from your identity provider to PatchMon roles
- Option to disable local auth and enforce SSO-only login
🔔 Alerting & Reporting
- New Reporting page with filtering by severity, type, status, and assignment
- Host Down alerts real time view of host uptime
- Alert types including server update, agent update, and host down
- Per-alert-type configuration for default severity, auto-assignment, escalation, and retention
💻 Web SSH Terminal
- Browser-based SSH to any host from the PatchMon UI
- Direct and proxy modes (proxy mode routes through the agent, no SSH port exposure needed)
🤖 AI Terminal Assistant
- AI chat panel inside the SSH terminal for command suggestions and troubleshooting
- Multiple providers supported: OpenRouter, Anthropic, OpenAI, Google Gemini
- Context-aware using your recent terminal output
🖥️ UI Improvements
- Toast notifications replacing disruptive
alert()popups - Error boundary with crash recovery and a copyable error report
- "Waiting for Connection" screen with real-time status when onboarding a new host
- Swagger / OpenAPI docs served at
/api-docson the server
🔧 Other
- Superuser management permission (
can_manage_superusers) for finer-grained RBAC - More stats and details on hosts with added flags such as
?include=statsor?updates_only=true
Plus Much Much More
1.3.7
📝 ALERT : Auto-update of Agent issue
Versions <1.3.6 have an issue where the service does not restart after auto-update. OpenRC systems are unaffected and work correctly.
This means you will unfortunately have to use systemctl start patchmon-agent on your systems to load up 1.3.7 agent when it auto-updates shortly.
Very sorry for this, future versions are fixed - I built this release notes notification feature specifically to notify you of this.
🎉 New Features & Improvements :
Mobile UI: Mobile user interface improvements are mostly complete, providing a better experience on mobile devices.
Systemctl Helper Script: In future versions (1.3.7+), a systemctl helper script will be available to assist with auto-update service restarts.
Staggered Agent Intervals: Agents now report at staggered times to prevent overwhelming the PatchMon server. If the agent report interval is set to 60 minutes, different hosts will report at different times. This is in the config.yml as "report_offset: xxxx" in seconds
Reboot Detection Information: Reboot detection information is now stored in the database. When the "Reboot Required" flag is displayed, hovering over it will show the specific reason why a reboot is needed (Reboot feature still needs work and it will be much better in 1.3.8)
JSON Report Output: The patchmon-agent report --json command now outputs the complete report payload to the console in JSON format instead of sending it to the PatchMon server. This is very useful for integrating PatchMon agent data with other tools and for diagnostic purposes.
Persistent Docker Toggle: Docker integration toggle state is now persisted in the database, eliminating in-memory configuration issues. No more losing Docker settings on container restarts (thanks to the community for initiating this feature).
Config.yml Synchronization: The agent now writes and compares the config.yml file with the server configuration upon startup, ensuring better synchronization of settings between the agent and server.
Network Information Page: Enhanced network information page to display IPv6 addresses and support multiple network interfaces, providing more comprehensive network details.
Auto-Update Logic Fix: Fixed an issue where agents would auto-update even when per-host auto-update was disabled. The logic now properly honours both server-wide auto-update settings and per-host auto-update settings.
Prisma Version Fix: Fixed Prisma version issues affecting Kubernetes deployments by statically setting the Prisma version in package.json files.
Hiding Github Version: Added a toggle in Server Version settings to disable showing the github release notes on the login screen
Thank you to all contributors :D
1.3.6
Fixed ProxMox Auto-enrollment script
1.3.5
- Fixed critical Bug relating to auto-update failing and looping in a reboot due to incorrect version checking mechanism.
Especially on x86 or ARM processors, the version checking method was flawed so it kept trying to reinstall the agent.
This release will be further elaborated on but for now marking as latest.
1.3.4
✨Fixes and Enhancements
Alpine Support
Version 1.3.4 brings about better apk support for Alpine OS
Auto-enrollment API
In Integration settings you can now create a single command (like a master command) which does not require that you add the host first. This is useful for embedding inside ansible deployment scripts or other use-cases where you have quite a few hosts to add.
NOTE: Proxmox api endpoint has changed:
It now goes like this:
curl -s "https://patchmon-url/api/v1/auto-enrollment/script?type=proxmox-lxc&token_key=KEY&token_secret=SECRET" | bash
Notice that at the end of the auto-enrollment we have a new endpoint called script , which then specifies the script type such as proxmox-lxc
Uninstallation command updated and script to remove the instance totally (with the ability to optionally remove backups of agents etc)
Reboot Needed flag
The server now gives a tag and notification if a host needs rebooting due to the kernel version mismatching when installed kernel differs from the running kernel. There is also a new dashboard card that shows this qty in the hosts table.
Other improvements
- Now uses POSIX compatible installation scripts
- Does not use /bin/bash , now we use /bin/sh
- Added robots.txt to discourage search engines from discovering a public facing version of PatchMon
Upgrading note / instructions
Some members are reporting a upgrade Loop on their systems, please stop the patchmon-agent and start it again
systemctl stop patchmon-agent && systemctl start patchmon-agent after the upgrade.
The issue is that the built-in restart function after downloading the binary isn't loading the new binary files so it's using what's loading in cache/memory.
In the newer versions we have introduced a helper-script
Upgrading
Docker
Pull the latest image and bring it up, nothing new needs doing to env or container settings.
Bare metal
curl -fsSL -o setup.sh https://raw.githubusercontent.com/PatchMon/PatchMon/refs/heads/main/setup.sh && chmod +x setup.sh && bash setup.sh --update
ProxMox community Script
Go into the LXC and type in update
https://community-scripts.github.io/ProxmoxVE/scripts?id=patchmon
Agents
Agents will auto-upgrade to 1.3.4 if the settings have been selected to allow this. Pinned release for the agent repo : https://github.com/PatchMon/PatchMon-agent/releases/tag/1.3.4
Many thanks to the community for their hard work and support. <3
https://buymeacoffee.com/iby___
1.3.3
✨Fixes and Enhancements
ARM support
Supports the installation of ARM and ARM64 agents. Drop down added when creating the command for the installation of the agent and also modified the logic of version handling when the PatchMon server is hosted on an ARM based server. This is because previously the server was checking the current version of its binary but it was pinned to checking the amd64 version of the binary, now this is dynamic based on the actual architecture of the PatchMon server.
Disabling / Enabling docker integration
In the individual hosts page there is now an integrations tab which allows the user to enable or disable docker integration.
This amends the /etc/patchmon/config.yml with the relevant settings.
Dashboard Chart fix
Previously the data taken for this chart was taken from the hosts details data but this did not honor unique packages so the quantities was inflated. Now we have a separate database table model that collects information every 30 minutes for data metrics. This is much more efficient and the charts are now displaying accurate trends.
RHEL fixes
RHEL derived Operating systems such as AlmaLinux, Oracle Linux etc had a bug in the agent that was using the dnf package manager where the version data was not populated in the json payload causing errors upon sending the report. This has now been fixed and also security package quantities are also showing.
TimeZone support
The server environment file now supports a TIMEZONE= variable to show things in the right timezone on the app.
Backend container crashing
This was due to error handling not in place when there was docker events that were closed unexpectedly. This has been fixed to handle it correctly.
Ui fixes
Left justification on tables in the repos page Sorting by Security in repos page now fixed
Upgrading
Docker
Pull the latest image and bring it up, nothing new needs doing to env or container settings.
Bare metal
curl -fsSL -o setup.sh https://raw.githubusercontent.com/PatchMon/PatchMon/refs/heads/main/setup.sh && chmod +x setup.sh && bash setup.sh --update
ProxMox community Script
Go into the LXC and type in update
https://community-scripts.github.io/ProxmoxVE/scripts?id=patchmon
Agents
Agents will auto-upgrade to 1.3.3 if the settings have been selected to allow this. Pinned release for the agent repo : https://github.com/PatchMon/PatchMon-agent/releases/tag/1.3.3
Many thanks to the community for their hard work and support. <3
https://buymeacoffee.com/iby___
1.3.2
✨ Major Features
Docker Support (still in beta)
Previously the docker collector was a script that was ran (also through cron), now it's baked into the Agent binary file and therefore no need for a separate bash script. It also leverages the same credentials.yml which was introduced in 1.3.0. We have also added more information that is collected such as networks and volumes for a complete picture of your Docker environment.
Forced agent update button
You'll now find a button on the host page to force update the agent if it doesn't wish to update automatically.
UI themes to chose from
A few new branding Ui themes have been added allowing you to chose what theme to apply to PatchMons interface. This is currently app-wide and it requires that dark-mode is enabled for these themes to work.
Performance
Additional environment variables have been added relating to Database connections, these are all documented here : Environment Documentation
Metrics
We have introduced a metrics system, more information is found here about how our metrics collection works, what data is collected and opting in/out etc : https://docs.patchmon.net/books/patchmon-application-documentation/page/metrics-collection-information
TFA / Backup Codes
Fixed TFA remember me not actually remembering Fixed Backup Codes entering, they can now be used in the same text box as the code itself
Fixes
- Fixed Host timeout issue due to SSE connection issues on frontend
- Fixed https go agent communication with server
- Fixed Docker inventory collection
- Fixed TFA and Backup Codes
- Fixed not grouping by groups in the hosts table
- IPv6 listening support added in Nginx config by community member @alan7000
- When Deleting Groups it shows the hosts that are being affected
P.S I skipped 1.3.1 version tag because some members in the community have 1.3.1 when I was building it, if we release it as 1.3.1 then their agents won't really update properly - catering for the few.
Docker upgrade instructions video : https://www.youtube.com/watch?v=bi_r9aW2uQA Written Instructions in docs : https://docs.patchmon.net/books/patchmon-application-documentation/page/upgrading-from-130-to-132
For bare-metal type the curl -fsSL -o setup.sh https://raw.githubusercontent.com/PatchMon/PatchMon/refs/heads/main/setup.sh && chmod +x setup.sh && bash setup.sh --update should update your instance
Many thanks to the community for their hard work and support. <3 iby___
1.3.0 (Major)
🚀 PatchMon version 1.3.0
This major release brings a new and improved architecture on the server and agent.
✨ Major Features
GO based Agent
Agent is now a GO based Agent binary file that runs as a service systemctl status patchmon-agent
The Agent serves a websocket connection to PatchMon server.
Agent has been compiled in amd64, i386, arm and arm64
A new repository has been setup for the agent.
BullMQ + Redis
The PatchMon Server runs a BullMQ service which utilises Redis server for scheduling automated and queued jobs. Jobs include things like "Cleanup orphaned repos" where it will remove repositories that are now not associated with any hosts etc Bullboard has also been added so that we can have a dashboard to monitor the jobs from a server level.
WebSocket
PatchMon Agents now connect via Web Socket Secure (https) or Web Socket (ws) to listen for commands from PatchMon. The Agents themselves control the schedule of reporting information however this persistent and bi-directional connection architecture lays the foundation of PatchMon so that it can control and handle management etc.
Performance
Various performance related improvements have been made with the way that node.js uses prisma for the Postgresql ORM. There was a lot of connection leakage where instead of utilising established connections it would create a new connection to the Database. These were causing at times Database connections to rise above 100! Fixes also improved the way the front-end speaks to the /api/v1 endpoints. These remove and handle the 429 (rate limit errors) and other backend errors.
Security
Various security handling has been improved around cookie handling, cors handling etc so that /bullboard can be authenticated
Agent updates checking
New mechanism for checking for Go based agents. The PatchMon server will query the GitHub repo and allow you to download the agents directly whilst the agents themselves will query PatchMon. I have pinned the agent version with the server version and had the agents query the server for downloading the updates as opposed to downloading them from github. This is because I plan to use PGP for signing agents off in the future and improve security mechanisms for server/agent verification.
Upgrading
Bash scripts from 1.2.8 will use an intermediary script of 1.2.9 which will run the installation of the new agent service. Docker upgrade instructions video : https://www.youtube.com/watch?v=NZE2pi6WxWM Written Instructions in docs : https://docs.patchmon.net/books/patchmon-application-documentation/page/upgrading-from-128-to-130 Coming soon:
For bare-metal type the setup.sh update is being modified soon to handle the installation and setup or Redis 7 DB user and password as well as the nginx configuration amendments to handle upgrade on the websocket and add the /bullboard directive.
Many thanks to the community for their hard work and support. <3 iby___
1.2.8 to 1.3.0 - Upgrade
Upgrading the Server
Introduction
Upgrade Video link : https://www.youtube.com/watch?v=NZE2pi6WxWM
There are 3 main changes between version 1.2.X and 1.3.x:
- Go-based Agent Binary: The introduction of a binary based on Go for the agent, replacing the previous bash scripts. This binary executes much faster and is compatible across different architectures when compiled.
- Redis and BullMQ Integration: The introduction of Redis as a back-end database server and BullMQ as the queue manager for tasks and automation management.
- Nginx Configuration: The addition of an nginx block for the presentation of the /bullboard URL.
Let's go through the two types of upgrades:
Docker Upgrade
This is quite simple as we just need to add the following in the container configuration for Redis:
- Add the Redis service
- Add the Redis configuration in the backend environment
- Add a new redis_data volume
Important: Ensure you change the Redis password and update it in all three areas where "your-redis-password-here" is specified. This password should be secure but some alphanumeric characters can cause issues.
Docker Compose Ammendments
name: patchmon
services:
redis:
image: redis:7-alpine
restart: unless-stopped
command: redis-server --requirepass your-redis-password-here # CHANGE THIS TO YOUR REDIS PASSWORD
volumes:
- redis_data:/data
healthcheck:
test: ["CMD", "redis-cli", "--no-auth-warning", "-a", "your-redis-password-here", "ping"] # CHANGE THIS TO YOUR REDIS PASSWORD
interval: 3s
timeout: 5s
retries: 7
backend:
environment:
# Redis Configuration
REDIS_HOST: redis
REDIS_PORT: 6379
REDIS_PASSWORD: your-redis-password-here # CHANGE THIS TO YOUR REDIS PASSWORD
REDIS_DB: 0
# ... other environment variables
volumes:
redis_data:Migration issues
If you get a migration issue like this:
backend-1 | Error: P3009
backend-1 |
backend-1 | migrate found failed migrations in the target database, new migrations will not be applied. Read more about how to resolve migration issues in a production database: https://pris.ly/d/migrate-resolve
backend-1 | The 20251005000000_add_user_sessions migration started at 2025-10-21 22:50:32.244874 UTC failed
backend-1 |
backend-1 |
dependency failed to start: container patchmon-backend-1 is unhealthyThen you need to apply the following commands from the directory where the docker-compose.yml file is:
Depending on your docker environment and version it may be as docker compose run
docker-compose run --rm backend npx prisma migrate resolve --rolled-back 20251005000000_add_user_sessionsdocker-compose run --rm backend npx prisma migrate resolve --applied 20251005000000_add_user_sessionsBare Metal / VM Upgrade
Instructions for bare metal and VM upgrades will be detailed in the following sections... soon... Still building the script to handle the update ...
Agent Side Management
patchmon-agent Management
Overview
The PatchMon agent is a compiled Go binary (patchmon-agent) that runs as a persistent service on monitored hosts. It maintains a WebSocket connection to the PatchMon server for real-time communication, sends periodic package and system reports, collects integration data (Docker, compliance), and supports remote commands such as SSH proxy sessions.
This guide covers everything you need to manage the agent after installation: CLI commands, service management, log access, troubleshooting, updates, and removal.
Key Facts
| Property | Value |
|---|---|
| Binary location | /usr/local/bin/patchmon-agent |
| Configuration directory | /etc/patchmon/ |
| Config file | /etc/patchmon/config.yml |
| Credentials file | /etc/patchmon/credentials.yml |
| Log file | /etc/patchmon/logs/patchmon-agent.log |
| Service name | patchmon-agent (systemd or OpenRC) |
| Runs as | root |
| Primary mode | patchmon-agent serve (long-lived service) |
Table of Contents
- CLI Command Reference
- Service Management
- Viewing Logs
- Testing and Diagnostics
- Manual Reporting
- Configuration Management
- Agent Updates
- Agent Removal
- Common Troubleshooting
- Architecture and Supported Platforms
CLI Command Reference
All commands must be run as root (or with sudo). The agent will refuse to run if it does not have root privileges.
Quick Reference
patchmon-agent [command] [flags]
| Command | Description | Requires Root |
|---|---|---|
serve |
Run the agent as a long-lived service (primary mode) | Yes |
report |
Collect and send a one-off system/package report | Yes |
report --json |
Output the report payload as JSON to stdout (does not send) | Yes |
ping |
Test connectivity and validate API credentials | Yes |
diagnostics |
Show comprehensive system and agent diagnostics | Yes |
config show |
Display current configuration and credential status | No |
config set-api |
Configure API credentials and server URL | Yes |
check-version |
Check if an agent update is available | Yes |
update-agent |
Download and install the latest agent version | Yes |
version |
Print the agent version | No |
Global Flags
These flags can be used with any command:
| Flag | Default | Description |
|---|---|---|
--config <path> |
/etc/patchmon/config.yml |
Path to the configuration file |
--log-level <level> |
info |
Override log level (debug, info, warn, error) |
--version |
— | Print the agent version and exit |
--help |
— | Show help for any command |
serve — Run as a Service
sudo patchmon-agent serve
This is the primary operating mode. It is what the systemd/OpenRC service unit executes. When started, it:
- Loads configuration and credentials from
/etc/patchmon/ - Sends a startup ping to the PatchMon server
- Establishes a persistent WebSocket connection (real-time commands)
- Sends an initial system report in the background
- Starts periodic reporting on the configured interval (default: 60 minutes)
- Syncs integration status and update interval from the server
- Listens for server-initiated commands (report now, update, compliance scan, etc.)
You should not normally run serve manually — it is managed by the system service. If you need to test it interactively, stop the service first to avoid duplicate instances.
Example — running interactively for debugging:
# Stop the service first
sudo systemctl stop patchmon-agent
# Run with debug logging to see all output
sudo patchmon-agent serve --log-level debug
# When finished, restart the service
sudo systemctl start patchmon-agent
report — Send a One-Off Report
sudo patchmon-agent report
Collects system information, installed packages, repository data, hardware info, network details, and integration data (Docker containers, compliance scans), then sends everything to the PatchMon server.
After sending the report, the agent also:
- Checks for available agent updates and applies them if auto-update is enabled
- Collects and sends integration data (Docker, compliance) separately
Output:
The command logs its progress to the configured log file. To see output directly, run with --log-level debug or check the log file.
report --json — Output Report as JSON
sudo patchmon-agent report --json
Collects the same system and package data but outputs the full JSON payload to stdout instead of sending it to the server. This is extremely useful for:
- Debugging — see exactly what data the agent would send
- Validation — verify package detection is correct
- Integration — pipe JSON to other tools for analysis
Example — inspect the report payload:
sudo patchmon-agent report --json | jq .
Example — check which packages need updates:
sudo patchmon-agent report --json | jq '[.packages[] | select(.needsUpdate == true)] | length'
Example — save a snapshot for later comparison:
sudo patchmon-agent report --json > /tmp/patchmon-report-$(date +%Y%m%d).json
Note: The
--jsonflag does not send data to the server and does not require valid API credentials. It only requires root access to read system package information.
ping — Test Connectivity
sudo patchmon-agent ping
Tests two things:
- Network connectivity — can the agent reach the PatchMon server?
- API credentials — are the
api_idandapi_keyvalid?
Success output:
✅ API credentials are valid
✅ Connectivity test successful
Failure output example:
Error: connectivity test failed: server returned 401
Use this command immediately after installation or whenever you suspect credential or network issues.
diagnostics — Full System Diagnostics
sudo patchmon-agent diagnostics
Displays a comprehensive diagnostic report covering:
| Section | Details |
|---|---|
| System Information | OS type/version, architecture, kernel version, hostname, machine ID |
| Agent Information | Agent version, config file path, credentials file path, log file path, log level |
| Configuration Status | Whether config and credentials files exist (✅/❌) |
| Network Connectivity | Server URL, TCP reachability test, API credential validation |
| Recent Logs | Last 10 log entries from the agent log file |
Example output:
PatchMon Agent Diagnostics v1.4.0
System Information:
OS: ubuntu 22.04
Architecture: amd64
Kernel: 5.15.0-91-generic
Hostname: webserver-01
Machine ID: a1b2c3d4e5f6...
Agent Information:
Version: 1.4.0
Config File: /etc/patchmon/config.yml
Credentials File: /etc/patchmon/credentials.yml
Log File: /etc/patchmon/logs/patchmon-agent.log
Log Level: info
Configuration Status:
✅ Config file exists
✅ Credentials file exists
Network Connectivity & API Credentials:
Server URL: https://patchmon.example.com
✅ Server is reachable
✅ API is reachable and credentials are valid
Last 10 log entries:
2026-02-12T10:30:00 level=info msg="Report sent successfully"
...
This is the best single command for troubleshooting agent issues.
config show — View Current Configuration
sudo patchmon-agent config show
Displays the current configuration values and credential status:
Configuration:
Server: https://patchmon.example.com
Agent Version: 1.4.0
Config File: /etc/patchmon/config.yml
Credentials File: /etc/patchmon/credentials.yml
Log File: /etc/patchmon/logs/patchmon-agent.log
Log Level: info
Credentials:
API ID: patchmon_a1b2c3d4
API Key: Set ✅
Security: The API key is never shown. The output only confirms whether it is set.
config set-api — Configure Credentials
sudo patchmon-agent config set-api <API_ID> <API_KEY> <SERVER_URL>
Sets up the agent's API credentials and server URL. This command:
- Validates the inputs (non-empty, valid URL format)
- Saves the server URL to
/etc/patchmon/config.yml - Saves the credentials to
/etc/patchmon/credentials.yml(with600permissions) - Runs an automatic connectivity test (
ping)
Example:
sudo patchmon-agent config set-api \
patchmon_a1b2c3d4 \
abcdef1234567890abcdef1234567890abcdef1234567890abcdef1234567890 \
https://patchmon.example.com
Note: This command is primarily useful for manual installations or credential rotation. The standard install script sets credentials automatically.
check-version — Check for Updates
sudo patchmon-agent check-version
Queries the PatchMon server to see if a newer agent version is available.
Output when up to date:
Agent is up to date (version 1.4.0)
Output when update is available:
Agent update available!
Current version: 1.3.2
Latest version: 1.4.0
To update, run: patchmon-agent update-agent
Output when auto-update is disabled on the server:
Current version: 1.3.2
Latest version: 1.4.0
Status: Auto-update disabled by server administrator
To update manually, run: patchmon-agent update-agent
update-agent — Update to Latest Version
sudo patchmon-agent update-agent
Downloads the latest agent binary from the PatchMon server and performs an in-place update. The process:
- Checks for recent updates (prevents update loops within 5 minutes)
- Queries the server for the latest version
- Downloads the new binary
- Verifies binary integrity via SHA-256 hash comparison (mandatory)
- Creates a timestamped backup of the current binary (e.g.,
patchmon-agent.backup.20260212_143000) - Writes the new binary to a temporary file and validates it
- Atomically replaces the current binary
- Cleans up old backups (keeps the last 3)
- Restarts the service (systemd or OpenRC) via a helper script
Security features:
- Binary hash verification is mandatory — the agent refuses to update if the server does not provide a hash
- Hash mismatch (possible tampering) blocks the update
skip_ssl_verifyis blocked in production environments for binary downloads- Backup files use
0700permissions (owner-only)
Note: In normal operation, the agent auto-updates when the server signals a new version. You only need to run
update-agentmanually when auto-update is disabled or if you want to force an immediate update.
version — Print Version
patchmon-agent version
# or
patchmon-agent --version
Prints the agent version:
PatchMon Agent v1.4.0
This does not require root access.
Service Management
The PatchMon agent runs as a system service managed by systemd (most Linux distributions) or OpenRC (Alpine Linux). In environments where neither is available, a crontab fallback is used.
Systemd (Ubuntu, Debian, CentOS, RHEL, Rocky, Alma, Fedora, etc.)
Service File Location
/etc/systemd/system/patchmon-agent.service
Service File Contents
The installer creates this unit file automatically:
[Unit]
Description=PatchMon Agent Service
After=network.target
Wants=network.target
[Service]
Type=simple
User=root
ExecStart=/usr/local/bin/patchmon-agent serve
Restart=always
RestartSec=10
WorkingDirectory=/etc/patchmon
# Logging
StandardOutput=journal
StandardError=journal
SyslogIdentifier=patchmon-agent
[Install]
WantedBy=multi-user.target
Key properties:
Restart=always— the service automatically restarts if it crashes or is killedRestartSec=10— waits 10 seconds before restarting (prevents rapid restart loops)After=network.target— ensures the network is up before starting- Logs go to the systemd journal as well as the agent's own log file
Common systemd Commands
# Check if the agent is running
sudo systemctl status patchmon-agent
# Start the agent
sudo systemctl start patchmon-agent
# Stop the agent
sudo systemctl stop patchmon-agent
# Restart the agent (e.g., after config changes)
sudo systemctl restart patchmon-agent
# Enable auto-start on boot
sudo systemctl enable patchmon-agent
# Disable auto-start on boot
sudo systemctl disable patchmon-agent
# Check if enabled
sudo systemctl is-enabled patchmon-agent
# Check if active
sudo systemctl is-active patchmon-agent
# Reload systemd after editing the service file manually
sudo systemctl daemon-reload
Reading systemd Journal Logs
# Follow logs in real-time (like tail -f)
sudo journalctl -u patchmon-agent -f
# Show last 50 log entries
sudo journalctl -u patchmon-agent -n 50
# Show logs since last boot
sudo journalctl -u patchmon-agent -b
# Show logs from the last hour
sudo journalctl -u patchmon-agent --since "1 hour ago"
# Show logs from a specific date
sudo journalctl -u patchmon-agent --since "2026-02-12 10:00:00"
# Show only errors
sudo journalctl -u patchmon-agent -p err
# Show logs without pager (useful for scripts)
sudo journalctl -u patchmon-agent --no-pager -n 100
# Export logs to a file
sudo journalctl -u patchmon-agent --no-pager > /tmp/patchmon-logs.txt
OpenRC (Alpine Linux)
Service File Location
/etc/init.d/patchmon-agent
Service File Contents
#!/sbin/openrc-run
name="patchmon-agent"
description="PatchMon Agent Service"
command="/usr/local/bin/patchmon-agent"
command_args="serve"
command_user="root"
pidfile="/var/run/patchmon-agent.pid"
command_background="yes"
working_dir="/etc/patchmon"
depend() {
need net
after net
}
Common OpenRC Commands
# Check if the agent is running
sudo rc-service patchmon-agent status
# Start the agent
sudo rc-service patchmon-agent start
# Stop the agent
sudo rc-service patchmon-agent stop
# Restart the agent
sudo rc-service patchmon-agent restart
# Add to default runlevel (auto-start on boot)
sudo rc-update add patchmon-agent default
# Remove from default runlevel
sudo rc-update del patchmon-agent default
# List services in default runlevel
sudo rc-update show default
Reading Logs on Alpine/OpenRC
OpenRC does not have a journal. Logs are written only to the agent's log file:
# Follow logs in real-time
sudo tail -f /etc/patchmon/logs/patchmon-agent.log
# Show last 50 lines
sudo tail -n 50 /etc/patchmon/logs/patchmon-agent.log
# Search logs for errors
sudo grep -i "error\|fail" /etc/patchmon/logs/patchmon-agent.log
Crontab Fallback (No Init System)
In minimal containers or environments without systemd or OpenRC, the installer sets up a crontab entry:
@reboot /usr/local/bin/patchmon-agent serve >/dev/null 2>&1
The agent is also started immediately in the background during installation.
Managing the Crontab Fallback
# Check for PatchMon crontab entries
crontab -l | grep patchmon
# Stop the agent manually
sudo pkill -f 'patchmon-agent serve'
# Start the agent manually
sudo /usr/local/bin/patchmon-agent serve &
# Restart the agent
sudo pkill -f 'patchmon-agent serve' && sudo /usr/local/bin/patchmon-agent serve &
Viewing Logs
The agent writes logs to two locations depending on the init system:
| Init System | Journal | Log File |
|---|---|---|
| systemd | ✅ journalctl -u patchmon-agent |
✅ /etc/patchmon/logs/patchmon-agent.log |
| OpenRC | ❌ | ✅ /etc/patchmon/logs/patchmon-agent.log |
| Crontab | ❌ | ✅ /etc/patchmon/logs/patchmon-agent.log |
Log File Details
| Property | Value |
|---|---|
| Location | /etc/patchmon/logs/patchmon-agent.log |
| Max size | 10 MB per file |
| Max backups | 5 rotated files |
| Max age | 14 days |
| Compression | Yes (old logs compressed automatically) |
| Rotation | Automatic (handled by the agent, not logrotate) |
The agent uses the lumberjack library for built-in log rotation. You do not need to configure logrotate separately.
Log Levels
Set the log level in /etc/patchmon/config.yml or via the --log-level flag:
| Level | Description | Use Case |
|---|---|---|
debug |
Verbose — every operation, request/response bodies, package details | Active troubleshooting |
info |
Normal — key events, report summaries, connectivity status | Default / production |
warn |
Warnings — non-critical failures, retries, degraded operation | Noise reduction |
error |
Errors only — critical failures that need attention | Minimal logging |
Change log level temporarily (until service restart):
sudo patchmon-agent report --log-level debug
Change log level permanently:
Edit /etc/patchmon/config.yml:
log_level: "debug"
Then restart the service:
sudo systemctl restart patchmon-agent
# or
sudo rc-service patchmon-agent restart
Log Format
Logs use structured text format with timestamps:
2026-02-12T10:30:00 level=info msg="Detecting operating system..."
2026-02-12T10:30:00 level=info msg="Detected OS" osType=ubuntu osVersion=22.04
2026-02-12T10:30:01 level=info msg="Found packages" count=247
2026-02-12T10:30:02 level=info msg="Sending report to PatchMon server..."
2026-02-12T10:30:03 level=info msg="Report sent successfully"
2026-02-12T10:30:03 level=info msg="Processed packages" count=247
2026-02-12T10:30:08 level=info msg="Agent is up to date" version=1.4.0
Testing and Diagnostics
Quick Health Check
Run these commands in order to verify the agent is working correctly:
# 1. Is the service running?
sudo systemctl status patchmon-agent # systemd
# or
sudo rc-service patchmon-agent status # OpenRC
# 2. Can the agent reach the server?
sudo patchmon-agent ping
# 3. Full diagnostics
sudo patchmon-agent diagnostics
# 4. What data would the agent send?
sudo patchmon-agent report --json | jq '.hostname, .os_type, .os_version, .packages | length'
Debugging a Problem
If the agent is not reporting data or appears offline:
# Step 1: Check service status
sudo systemctl status patchmon-agent
# Step 2: Check recent logs for errors
sudo journalctl -u patchmon-agent -n 30 --no-pager
# or
sudo tail -n 30 /etc/patchmon/logs/patchmon-agent.log
# Step 3: Run diagnostics for full picture
sudo patchmon-agent diagnostics
# Step 4: Test connectivity explicitly
sudo patchmon-agent ping
# Step 5: If needed, restart with debug logging temporarily
sudo systemctl stop patchmon-agent
sudo patchmon-agent serve --log-level debug
# (Ctrl+C to stop, then restart the service normally)
sudo systemctl start patchmon-agent
Manual Reporting
While the agent sends reports automatically on its configured interval, you can trigger a report at any time:
# Send a report immediately
sudo patchmon-agent report
This is useful after:
- Making system changes (installing/removing packages)
- Verifying the agent can communicate after a network change
- Testing after reconfiguring the agent
The report command also triggers integration data collection (Docker, compliance) and checks for agent updates, identical to a scheduled report.
Inspecting Report Data
To see exactly what the agent collects without sending anything:
# Full JSON output
sudo patchmon-agent report --json
# Pretty-print with jq
sudo patchmon-agent report --json | jq .
# Just the package count and update summary
sudo patchmon-agent report --json | jq '{
total_packages: (.packages | length),
needs_update: [.packages[] | select(.needsUpdate)] | length,
security_updates: [.packages[] | select(.isSecurityUpdate)] | length,
hostname: .hostname,
os: "\(.osType) \(.osVersion)"
}'
Configuration Management
For comprehensive documentation on all configuration parameters, see the Agent Configuration Reference (config.yml).
Quick Configuration Tasks
View current config:
sudo patchmon-agent config show
Set or change API credentials:
sudo patchmon-agent config set-api <API_ID> <API_KEY> <SERVER_URL>
Edit config file directly:
sudo nano /etc/patchmon/config.yml
sudo systemctl restart patchmon-agent # restart to apply changes
When do changes require a restart?
| Change | Restart Needed? |
|---|---|
patchmon_server |
Yes |
log_level |
Yes |
skip_ssl_verify |
Yes |
update_interval |
No (synced from server via WebSocket) |
integrations.docker |
No (synced from server) |
integrations.compliance |
No (synced from server) |
integrations.ssh-proxy-enabled |
Yes (manual config only) |
Credentials (api_id / api_key) |
Yes |
Agent Updates
How Auto-Update Works
The agent checks for updates in two ways:
- After each report — the agent queries the server for the latest version and updates automatically if one is available
- Server-initiated — the server can push an
update_notificationorupdate_agentcommand via WebSocket
When an update is detected:
- The new binary is downloaded from the PatchMon server
- SHA-256 hash is verified against the server-provided hash (mandatory)
- The current binary is backed up (last 3 backups are kept)
- The new binary replaces the old one atomically
- The service is restarted via a helper script
Manual Update
# Check what version is available
sudo patchmon-agent check-version
# Apply the update
sudo patchmon-agent update-agent
Update Safety Features
- Hash verification — refuses to install if the binary hash does not match
- Update loop prevention — blocks re-updates within 5 minutes of a previous update
- Automatic backup — creates a timestamped backup before replacing the binary
- Rollback — if the new binary fails validation, the update is aborted
- Version verification — checks that the downloaded binary reports the expected version
Backup Files
Update backups are stored alongside the binary:
/usr/local/bin/patchmon-agent # current binary
/usr/local/bin/patchmon-agent.backup.20260212_143000 # backup from update
/usr/local/bin/patchmon-agent.backup.20260210_090000 # older backup
/usr/local/bin/patchmon-agent.backup.20260201_120000 # oldest backup (3 kept)
The agent automatically removes backups beyond the most recent 3.
Agent Removal
There are two methods to remove the PatchMon agent from a host.
Method 1: Server-Provided Removal Script (Recommended)
curl -s https://patchmon.example.com/api/v1/hosts/remove | sudo sh
This script handles everything:
- Stops the service (systemd, OpenRC, or crontab)
- Removes the service file and reloads the daemon
- Kills any remaining agent processes
- Removes the agent binary and legacy scripts
- Removes configuration files and directories (
/etc/patchmon/) - Removes log files
- Cleans up crontab entries
Options:
| Environment Variable | Default | Description |
|---|---|---|
REMOVE_BACKUPS |
0 |
Set to 1 to also remove backup files |
SILENT |
not set | Set to 1 for silent mode (minimal output) |
Examples:
# Standard removal (preserves backups)
curl -s https://patchmon.example.com/api/v1/hosts/remove | sudo sh
# Remove everything including backups
curl -s https://patchmon.example.com/api/v1/hosts/remove | sudo REMOVE_BACKUPS=1 sh
# Silent removal (for automation)
curl -s https://patchmon.example.com/api/v1/hosts/remove | sudo SILENT=1 sh
# Silent removal with backup cleanup
curl -s https://patchmon.example.com/api/v1/hosts/remove | sudo REMOVE_BACKUPS=1 SILENT=1 sh
Method 2: Manual Removal
If the server is unreachable, you can remove the agent manually:
# 1. Stop and disable the service
sudo systemctl stop patchmon-agent
sudo systemctl disable patchmon-agent
sudo rm -f /etc/systemd/system/patchmon-agent.service
sudo systemctl daemon-reload
# or for OpenRC:
sudo rc-service patchmon-agent stop
sudo rc-update del patchmon-agent default
sudo rm -f /etc/init.d/patchmon-agent
# 2. Kill any remaining processes
sudo pkill -f patchmon-agent
# 3. Remove the binary and backups
sudo rm -f /usr/local/bin/patchmon-agent
sudo rm -f /usr/local/bin/patchmon-agent.backup.*
# 4. Remove configuration and logs
sudo rm -rf /etc/patchmon/
# 5. Remove crontab entries (if any)
crontab -l 2>/dev/null | grep -v "patchmon-agent" | crontab -
# 6. Verify removal
which patchmon-agent # should return nothing
ls /etc/patchmon/ 2>/dev/null # should show "No such file or directory"
systemctl status patchmon-agent 2>&1 | head -1 # should show "not found"
Important: Removing the agent from the host does not remove the host entry from PatchMon. To fully decommission a host, also delete it from the PatchMon web UI (Hosts page).
Common Troubleshooting
Agent Shows "Pending" in PatchMon
The host was created but the agent has not yet sent its first report.
# Check service is running
sudo systemctl status patchmon-agent
# Test connectivity
sudo patchmon-agent ping
# If ping fails, check the server URL
sudo patchmon-agent config show
# Force an immediate report
sudo patchmon-agent report
Agent Shows "Offline" in PatchMon
The agent's WebSocket connection is down.
# Check if the service is running
sudo systemctl is-active patchmon-agent
# If not running, check why it stopped
sudo journalctl -u patchmon-agent -n 50 --no-pager
# Restart the service
sudo systemctl restart patchmon-agent
"Permission Denied" Errors
# All agent commands require root
sudo patchmon-agent <command>
# Verify file permissions
ls -la /etc/patchmon/config.yml # should be -rw------- root
ls -la /etc/patchmon/credentials.yml # should be -rw------- root
ls -la /usr/local/bin/patchmon-agent # should be -rwxr-xr-x root
"Credentials File Not Found"
# Check if credentials exist
ls -la /etc/patchmon/credentials.yml
# If missing, reconfigure
sudo patchmon-agent config set-api <API_ID> <API_KEY> <SERVER_URL>
"Connectivity Test Failed"
# Run full diagnostics
sudo patchmon-agent diagnostics
# Test network connectivity manually
curl -I https://patchmon.example.com
# Check DNS resolution
nslookup patchmon.example.com
# or
dig patchmon.example.com
# Check firewall rules
sudo iptables -L -n | grep -i drop
SSL Certificate Errors
# For self-signed certificates in non-production environments:
# Edit /etc/patchmon/config.yml
skip_ssl_verify: true
# Then restart
sudo systemctl restart patchmon-agent
Warning:
skip_ssl_verifyis blocked when thePATCHMON_ENVenvironment variable is set toproduction. This is a security measure to prevent disabling TLS verification in production.
Service Keeps Restarting
Check for crash loops:
# See restart count and recent failures
sudo systemctl status patchmon-agent
# Check logs around restart times
sudo journalctl -u patchmon-agent --since "30 minutes ago" --no-pager
# Common causes:
# - Invalid config.yml (syntax error)
# - Invalid credentials
# - Server unreachable (agent retries but logs errors)
Agent Not Auto-Updating
# Check current version
patchmon-agent version
# Check if update is available
sudo patchmon-agent check-version
# Check if auto-update was recently performed
ls -la /etc/patchmon/.last_update_timestamp
# Try manual update
sudo patchmon-agent update-agent
# Check for update loop prevention (5-minute cooldown)
# If you see "update was performed X ago", wait 5 minutes
Architecture and Supported Platforms
Supported Architectures
| Architecture | Binary Name | Common Devices |
|---|---|---|
amd64 |
patchmon-agent-linux-amd64 |
Standard servers, VMs, most cloud instances |
arm64 |
patchmon-agent-linux-arm64 |
ARM servers, Raspberry Pi 4+, AWS Graviton |
arm (v6/v7) |
patchmon-agent-linux-arm |
Raspberry Pi 2/3, older ARM boards |
386 |
patchmon-agent-linux-386 |
32-bit x86 systems (legacy) |
Supported Operating Systems
| Distribution | Init System | Package Manager | Notes |
|---|---|---|---|
| Ubuntu | systemd | apt | All LTS versions supported |
| Debian | systemd | apt | 10+ |
| CentOS | systemd | yum/dnf | 7+ |
| RHEL | systemd | yum/dnf | 7+ |
| Rocky Linux | systemd | dnf | All versions |
| AlmaLinux | systemd | dnf | All versions |
| Fedora | systemd | dnf | Recent versions |
| Alpine Linux | OpenRC | apk | 3.x+ |
Resource Usage
The agent is lightweight:
| Resource | Typical Usage |
|---|---|
| Memory | ~15-30 MB RSS |
| CPU | Near zero when idle; brief spikes during report collection |
| Disk | ~15 MB (binary) + logs |
| Network | WebSocket keepalive (~1 KB/min); report payloads vary by package count |
See Also:
- Agent Configuration Reference (config.yml) — detailed documentation on every config parameter
- Proxmox LXC Auto-Enrollment Guide — bulk agent deployment on Proxmox
- Integration API Documentation — API endpoints used by the agent
config.yml Mangement and parameters
Overview
The PatchMon agent is configured through a YAML configuration file located at /etc/patchmon/config.yml. This file controls how the agent communicates with the PatchMon server, where logs are stored, which integrations are active, and other runtime behaviour. A separate credentials file (/etc/patchmon/credentials.yml) stores the host's API authentication details.
Both files are owned by root and set to 600 permissions (read/write by owner only) to protect sensitive information.
File Locations
| File | Default Path | Purpose |
|---|---|---|
| Configuration | /etc/patchmon/config.yml |
Agent settings, server URL, integrations |
| Credentials | /etc/patchmon/credentials.yml |
API ID and API Key for host authentication |
| Log File | /etc/patchmon/logs/patchmon-agent.log |
Agent log output |
| Cron File | /etc/cron.d/patchmon-agent |
Scheduled reporting (fallback for non-systemd systems) |
Full Configuration Reference
Below is a complete config.yml with all available parameters, their defaults, and descriptions:
# PatchMon Agent Configuration
# Location: /etc/patchmon/config.yml
# ─── Server Connection ───────────────────────────────────────────────
# The URL of the PatchMon server this agent reports to.
# Required. Must start with http:// or https://
patchmon_server: "https://patchmon.example.com"
# API version to use when communicating with the server.
# Default: "v1" — do not change unless instructed.
api_version: "v1"
# ─── File Paths ──────────────────────────────────────────────────────
# Path to the credentials file containing api_id and api_key.
# Default: "/etc/patchmon/credentials.yml"
credentials_file: "/etc/patchmon/credentials.yml"
# Path to the agent log file. Logs are rotated automatically
# (max 10 MB per file, 5 backups, 14-day retention, compressed).
# Default: "/etc/patchmon/logs/patchmon-agent.log"
log_file: "/etc/patchmon/logs/patchmon-agent.log"
# ─── Logging ─────────────────────────────────────────────────────────
# Log verbosity level.
# Options: "debug", "info", "warn", "error"
# Default: "info"
log_level: "info"
# ─── SSL / TLS ───────────────────────────────────────────────────────
# Skip SSL certificate verification when connecting to the server.
# Set to true only if using self-signed certificates.
# Default: false
skip_ssl_verify: false
# ─── Reporting Schedule ──────────────────────────────────────────────
# How often (in minutes) the agent sends a full report to the server.
# This value is synced from the server on startup. If the server has
# a different value, the agent updates config.yml automatically.
# Default: 60
update_interval: 60
# Report offset (in seconds). Automatically calculated from the host's
# api_id to stagger reporting across hosts and avoid thundering-herd.
# You should not need to set this manually — the agent calculates and
# persists it automatically.
# Default: 0 (auto-calculated on first run)
report_offset: 0
# ─── Integrations ────────────────────────────────────────────────────
# Integration toggles control optional agent features.
# Most integrations can be toggled from the PatchMon UI and the server
# will push the change to the agent via WebSocket. The agent then
# updates config.yml and restarts the relevant service.
#
# EXCEPTION: ssh-proxy-enabled CANNOT be pushed from the server.
# It must be manually set in this file (see below).
integrations:
# Docker integration — monitors containers, images, volumes, networks.
# Can be toggled from the PatchMon UI (Settings → Integrations).
# Default: false
docker: false
# Compliance integration — OpenSCAP and Docker Bench security scanning.
# Three modes:
# false — Disabled. No scans run.
# "on-demand" — Scans only run when triggered from the PatchMon UI.
# true — Enabled with automatic scheduled scans every report cycle.
# Can be toggled from the PatchMon UI.
# Default: "on-demand"
compliance: "on-demand"
# SSH Proxy — allows browser-based SSH sessions through the agent.
# SECURITY: This setting can ONLY be enabled by manually editing
# this file. It cannot be pushed from the server to the agent.
# This is intentional — enabling remote shell access should require
# deliberate action by someone with root access on the host.
# Default: false
ssh-proxy-enabled: false
Parameters In Detail
patchmon_server
| Type | String (URL) |
| Required | Yes |
| Default | None — must be provided |
| Example | https://patchmon.example.com |
The full URL of the PatchMon server. Must include the protocol (http:// or https://). Do not include a trailing slash or path.
api_version
| Type | String |
| Required | No |
| Default | v1 |
The API version string appended to API calls. Leave as v1 unless directed otherwise by PatchMon documentation or release notes.
credentials_file
| Type | String (file path) |
| Required | No |
| Default | /etc/patchmon/credentials.yml |
Path to the YAML file containing the host's api_id and api_key. The credentials file has this structure:
api_id: "patchmon_abc123def456"
api_key: "your_api_key_here"
log_file
| Type | String (file path) |
| Required | No |
| Default | /etc/patchmon/logs/patchmon-agent.log |
Path to the agent's log file. The directory is created automatically if it does not exist. Logs are rotated using the following policy:
- Max file size: 10 MB
- Max backups: 5 rotated files
- Max age: 14 days
- Compression: Enabled (gzip)
log_level
| Type | String |
| Required | No |
| Default | info |
| Options | debug, info, warn, error |
Controls the verbosity of agent logging. Use debug for troubleshooting — it includes API request/response bodies and detailed execution flow. Can also be overridden at runtime with the --log-level CLI flag.
skip_ssl_verify
| Type | Boolean |
| Required | No |
| Default | false |
When true, the agent skips TLS certificate verification when connecting to the PatchMon server. Use this only for internal/testing environments with self-signed certificates. Not recommended for production.
update_interval
| Type | Integer (minutes) |
| Required | No |
| Default | 60 |
How frequently the agent sends a full system report (installed packages, updates, etc.) to the server. This value is synced from the server — if you change the global or per-host reporting interval in the PatchMon UI, the agent will update this value in config.yml automatically on its next startup or when it receives a settings update via WebSocket.
If the value is 0 or negative, the agent falls back to the default of 60 minutes.
report_offset
| Type | Integer (seconds) |
| Required | No |
| Default | 0 (auto-calculated) |
A stagger offset calculated from the host's api_id and the current update_interval. This ensures that agents across your fleet do not all report at the exact same moment (avoiding a thundering-herd problem on the server).
You should not set this manually. The agent calculates it on first run and saves it. If the update_interval changes, the offset is recalculated automatically.
integrations
A map of integration names to their enabled/disabled state. See the Integrations section below for details on each.
Integrations
Docker (docker)
| Type | Boolean |
| Default | false |
| Server-pushable | ✅ Yes |
When enabled, the agent monitors Docker containers, images, volumes, and networks on the host. It sends real-time container status events and periodic inventory snapshots to the PatchMon server.
Requirements: Docker must be installed and the Docker socket must be accessible.
Toggle from UI: Go to a host's detail page → Integrations tab → Toggle Docker on/off. The server pushes the change to the agent via WebSocket, the agent updates config.yml, and the service restarts automatically.
Compliance (compliance)
| Type | Boolean or String |
| Default | "on-demand" |
| Server-pushable | ✅ Yes |
| Valid values | false, "on-demand", true |
Controls OpenSCAP and Docker Bench security compliance scanning.
| Value | Behaviour |
|---|---|
false |
Compliance scanning is fully disabled. No scans run. |
"on-demand" |
Scans only run when manually triggered from the PatchMon UI. Tools are installed but no automatic scheduled scans occur. |
true |
Fully enabled. Scans run automatically on every report cycle in addition to being available on-demand. |
When first enabled, the agent automatically installs the required compliance tools (OpenSCAP, SSG content packages, Docker Bench image if Docker is also enabled).
SSH Proxy (ssh-proxy-enabled)
| Type | Boolean |
| Default | false |
| Server-pushable | ❌ No — manual edit required |
Enables browser-based SSH terminal sessions that are proxied through the PatchMon agent. When a user opens the SSH terminal in the PatchMon UI, the server sends the SSH connection request to the agent via WebSocket, and the agent establishes a local SSH connection on behalf of the user.
Why SSH Proxy Requires Manual Configuration
This is a deliberate security design decision. Enabling SSH proxy effectively allows remote shell access to the host through the PatchMon agent. Unlike Docker or compliance integrations, this has direct security implications:
- It opens an SSH connection path through the agent
- It could be exploited if a PatchMon server or user account were compromised
- The host administrator should make an informed, deliberate choice to enable it
For these reasons, ssh-proxy-enabled cannot be toggled from the PatchMon UI or pushed from the server. If the server attempts to initiate an SSH proxy session while this is disabled, the agent rejects the request and returns an error message explaining how to enable it.
How to Enable SSH Proxy
- SSH into the host where the PatchMon agent is installed
- Open the config file:
sudo nano /etc/patchmon/config.yml
- Find the
integrationssection and changessh-proxy-enabledtotrue:
integrations:
docker: false
compliance: "on-demand"
ssh-proxy-enabled: true # ← Change from false to true
- Save the file and restart the agent:
# Systemd
sudo systemctl restart patchmon-agent.service
# OpenRC (Alpine)
sudo rc-service patchmon-agent restart
- The SSH terminal feature is now available for this host in the PatchMon UI
How to Disable SSH Proxy
Set ssh-proxy-enabled back to false in config.yml and restart the agent service. Existing SSH sessions will be terminated.
How config.yml Is Generated
Initial Generation (Installation)
The config.yml file is created during agent installation by the patchmon_install.sh script. The installer generates a fresh config with:
patchmon_serverset to the server URL used during installationskip_ssl_verifyset based on whether-kcurl flags were used- All integrations defaulted to
false(Docker, SSH proxy) or"disabled"(compliance) - Standard file paths for credentials and logs
# What the installer generates:
cat > /etc/patchmon/config.yml << EOF
# PatchMon Agent Configuration
# Generated on $(date)
patchmon_server: "https://patchmon.example.com"
api_version: "v1"
credentials_file: "/etc/patchmon/credentials.yml"
log_file: "/etc/patchmon/logs/patchmon-agent.log"
log_level: "info"
skip_ssl_verify: false
integrations:
docker: false
compliance: "disabled"
ssh-proxy-enabled: false
EOF
chmod 600 /etc/patchmon/config.yml
Reinstallation Behaviour
If the agent is reinstalled on a host that already has a working configuration:
- The installer checks if the existing configuration is valid by running
patchmon-agent ping - If the ping succeeds, the installer exits without overwriting — the existing configuration is preserved
- If the ping fails (or the binary is missing), the installer:
- Creates a timestamped backup:
config.yml.backup.YYYYMMDD_HHMMSS - Keeps only the last 3 backups (older ones are deleted)
- Writes a fresh
config.yml
- Creates a timestamped backup:
This means a reinstall on a healthy agent is safe and will not destroy your configuration.
How config.yml Is Regenerated / Updated at Runtime
The agent updates config.yml automatically in several scenarios. These are in-place updates — the agent reads the file, modifies the relevant field, and writes it back. Your other settings (including ssh-proxy-enabled) are preserved.
Server-Driven Updates
| Trigger | What Changes | How |
|---|---|---|
| Agent startup | update_interval, report_offset |
Agent fetches the current interval from the server. If it differs from config, the agent updates config.yml. |
| Agent startup | integrations.docker, integrations.compliance |
Agent fetches integration status from the server. If it differs from config, the agent updates config.yml. |
WebSocket: settings_update |
update_interval, report_offset |
Server pushes a new interval. Agent saves it and recalculates the report offset. |
WebSocket: integration_toggle |
integrations.* (except SSH proxy) |
Server pushes a toggle for Docker or compliance. Agent saves the change and restarts the relevant service. |
Agent-Calculated Updates
| Trigger | What Changes | How |
|---|---|---|
| First run | report_offset |
Calculated from api_id hash and update_interval to stagger reports. |
| Interval change | report_offset |
Recalculated whenever update_interval changes. |
CLI: config set-api |
patchmon_server, credentials |
Running patchmon-agent config set-api overwrites the server URL and saves new credentials. |
What Is Never Changed Automatically
| Parameter | Why |
|---|---|
ssh-proxy-enabled |
Security — requires manual host-level action |
log_level |
Only changed by manual edit or --log-level CLI flag |
log_file |
Only changed by manual edit |
credentials_file |
Only changed by manual edit or config set-api |
skip_ssl_verify |
Only changed by manual edit |
Important: How SaveConfig Works
When the agent calls SaveConfig() internally, it writes all parameters back to the file. This means:
- Your
ssh-proxy-enabled: truesetting is preserved across server-driven updates - New integrations added in agent updates are automatically added to the file with their defaults (you'll see them appear after an agent update)
- The file format may be slightly reorganised by the YAML serialiser (key ordering may change), but all values are preserved
CLI Configuration Commands
The agent provides CLI commands for configuration management:
View Current Configuration
sudo patchmon-agent config show
Output:
Configuration:
Server: https://patchmon.example.com
Agent Version: 1.4.0
Config File: /etc/patchmon/config.yml
Credentials File: /etc/patchmon/credentials.yml
Log File: /etc/patchmon/logs/patchmon-agent.log
Log Level: info
Credentials:
API ID: patchmon_abc123def456
API Key: Set ✅
Set API Credentials
sudo patchmon-agent config set-api <API_ID> <API_KEY> <SERVER_URL>
Example:
sudo patchmon-agent config set-api patchmon_1a2b3c4d abcdef123456 https://patchmon.example.com
This command:
- Validates the server URL format
- Saves the server URL to
config.yml - Saves the credentials to
credentials.yml - Tests connectivity with a ping to the server
- Reports success or failure
Custom Config File Path
All commands support a --config flag to use an alternative config file:
sudo patchmon-agent --config /path/to/custom/config.yml serve
Credentials File (credentials.yml)
The credentials file is separate from the config file for security isolation. It contains:
api_id: "patchmon_abc123def456"
api_key: "your_api_key_here"
- Permissions:
600(root read/write only) - Written using atomic rename: The agent writes to a temp file first, then atomically renames it. This prevents partial writes or race conditions.
- Never contains the hashed key: The plain-text API key is stored here; the server stores only the bcrypt hash.
Troubleshooting
Config File Missing
If /etc/patchmon/config.yml does not exist, the agent uses built-in defaults. This means it will not know which server to connect to. Reinstall the agent or create the file manually.
Config File Permissions
# Check permissions (should be 600, owned by root)
ls -la /etc/patchmon/config.yml
# Fix if needed
sudo chmod 600 /etc/patchmon/config.yml
sudo chown root:root /etc/patchmon/config.yml
SSH Proxy Not Working
If the SSH terminal in the PatchMon UI shows an error like:
SSH proxy is not enabled. To enable SSH proxy, edit the file /etc/patchmon/config.yml...
This means ssh-proxy-enabled is set to false (the default). Follow the How to Enable SSH Proxy instructions above.
Config Gets Overwritten
If you notice settings being changed unexpectedly, check:
- Server sync: The
update_intervaland integration toggles (Docker, compliance) are synced from the server on startup and via WebSocket. Changes made in the PatchMon UI will override local values for these fields. - Agent updates: After an agent update, new integration keys may appear in the file with default values.
- Reinstallation: A reinstall only overwrites config if the existing ping test fails.
Your ssh-proxy-enabled, log_level, skip_ssl_verify, and file path settings are never overwritten by server sync.
Viewing Debug Logs
# Temporarily enable debug logging
sudo patchmon-agent --log-level debug serve
# Or set permanently in config.yml
sudo nano /etc/patchmon/config.yml
# Change: log_level: "debug"
# Then restart the service
sudo systemctl restart patchmon-agent.service
Example Configurations
Minimal Configuration
patchmon_server: "https://patchmon.example.com"
All other values use defaults. The agent will function with just the server URL (and valid credentials in credentials.yml).
Full Configuration with SSH Proxy Enabled
patchmon_server: "https://patchmon.internal.company.com"
api_version: "v1"
credentials_file: "/etc/patchmon/credentials.yml"
log_file: "/etc/patchmon/logs/patchmon-agent.log"
log_level: "info"
skip_ssl_verify: false
update_interval: 30
report_offset: 847
integrations:
docker: true
compliance: "on-demand"
ssh-proxy-enabled: true
Self-Signed SSL with Debug Logging
patchmon_server: "https://patchmon.lab.local"
api_version: "v1"
credentials_file: "/etc/patchmon/credentials.yml"
log_file: "/etc/patchmon/logs/patchmon-agent.log"
log_level: "debug"
skip_ssl_verify: true
update_interval: 60
integrations:
docker: false
compliance: false
ssh-proxy-enabled: false
Known issues & troubleshooting
Errors on dashboard after updating using Proxmox-community scripts
NOTE : This is for Version <1.4.2 and not applicable to V2
There seems to be an issue where some people are facing a problem where when they upgrade then it's giving them errors on the dashboard such as "network error" or others, that relates to the fact that the frontend built files is unable to communicate with the PatchMon server.
This seems to be due to the frontend environment file containing a variable VITE_API_URL
Once you remove or comment this out and go back to the PatchMon installation directory where you're able to see both frontend & backend directory then run npm run build
After this it should start working again.
As a rule of thumb if the VITE_API_URL is to be set then set it the same as your CORS_ORIGIN.
Ideally keep this unset and build the files.
Software Architecture
This chapter has documentation on the software architecture
WebSockets Information and Design
PatchMon WebSockets
This document describes how WebSockets are used in PatchMon: endpoints, authentication, WS vs WSS behaviour, and security.
Overview
PatchMon uses a single HTTP server with noServer: true WebSocket handling. All WebSocket upgrades are handled in one place (server.on("upgrade")) and routed by path:
| Path pattern | Purpose | Clients |
|---|---|---|
/api/{v}/agents/ws |
Agent ↔ server persistent connection | PatchMon agent (Go) |
/api/{v}/ssh-terminal/:hostId |
Browser SSH terminal to a host | Frontend (browser) |
/bullboard* |
Bull Board queue UI real-time updates | Bull Board (browser) |
Implementation lives in:
- Backend:
backend/src/services/agentWs.js(agent + Bull Board),backend/src/services/sshTerminalWs.js(SSH terminal).
WebSocket Endpoints
Agent WebSocket
- Path:
/api/{version}/agents/ws(e.g./api/v1/agents/ws) - Auth: HTTP headers on the upgrade request:
X-API-ID,X-API-KEY(validated againsthostsand API key utils). - Purpose: Persistent connection from each agent to the server for:
- Heartbeat / presence
- Commands from server (e.g. trigger update, compliance scan)
- Events from agent (e.g. Docker status)
SSH Terminal WebSocket
- Path:
/api/{version}/ssh-terminal/:hostId(e.g./api/v1/ssh-terminal/abc-123) - Auth: One-time ticket (query
ticket=...) or legacy JWT (token=...orAuthorization: Bearer ...). User must havecan_manage_hosts(or admin). - Purpose: Browser opens a WebSocket to the backend; backend either connects directly to the host via SSH or proxies through the agent WebSocket to the host.
Bull Board WebSocket
- Path:
/bullboard(prefix match) - Auth: Session cookie
bull-board-sessionorAuthorizationheader. - Purpose: Real-time updates for the Bull Board queue UI (echo-style).
WS vs WSS (Secure vs Insecure)
How each part of the system decides between ws (insecure) and wss (secure):
Server (backend)
The server does not choose the protocol; it detects whether the incoming connection is secure and records it for logging and metadata:
socket.encrypted—truewhen the TCP socket is TLS (direct wss to Node).request.headers["x-forwarded-proto"] === "https"—truewhen TLS is terminated at a reverse proxy (e.g. Nginx) that sends the original protocol.
So: if the client connects over TLS, or the proxy sets X-Forwarded-Proto: https, the server treats the connection as secure (wss). Otherwise it is treated as ws.
Code: backend/src/services/agentWs.js (e.g. isSecure, connectionMetadata, log line with protocol=wss|ws).
Agent (Go)
The agent converts the configured server URL to a WebSocket URL and uses that to connect:
| Configured URL | WebSocket URL |
|---|---|
https://... |
wss://... |
http://... |
ws://... |
Already wss:// or ws:// |
Used as-is |
| No protocol | Assumed HTTPS → wss://... |
The path is then appended: .../api/{version}/agents/ws.
Code: agent-source-code/cmd/patchmon-agent/commands/serve.go (connectOnce, URL conversion and wsURL).
Frontend (browser)
The frontend (e.g. SSH terminal) builds the WebSocket URL so it matches the page:
- Page loaded over HTTPS →
wss: - Page loaded over HTTP →
ws:
So the same app works on http and https without extra configuration.
Code: frontend/src/components/SshTerminal.jsx (e.g. protocol = window.location.protocol === "https:" ? "wss:" : "ws:").
Authentication
- Agent WS: Credentials only on the upgrade request via
X-API-IDandX-API-KEY. No auth in query or body. Keys are validated (including bcrypt/legacy) before the WebSocket is accepted. - SSH terminal: Prefer one-time ticket in query (
ticket=...); ticket is consumed once. Legacy:token=...orAuthorization: Bearer .... User must be authorized for the host (e.g.can_manage_hosts). - Bull Board: Session cookie or
Authorizationheader; required before accepting the upgrade.
All three paths reject the upgrade (e.g. 401) if auth fails; the WebSocket is never established.
Message Types and Flows
- Agent → Backend: e.g.
docker_status, pings. JSON over the agent WebSocket. - Backend → Agent: e.g.
update_agent,compliance_scan, SSH proxy payloads. Sent over the same WebSocket by api_id. - SSH terminal: Browser sends
connectwith SSH options; backend (or agent) establishes SSH and forwards terminal I/O over the WebSocket. Resize and other control messages are defined insshTerminalWs.jsand the frontend.
Security Notes
- TLS in production: Use HTTPS and WSS. The agent assumes WSS when the server URL is
https://or has no scheme. - Proxy: When behind Nginx (or similar), ensure
X-Forwarded-Proto: httpsis set for HTTPS so the backend correctly detects secure connections. - Agent TLS verification:
skip_ssl_verifyis blocked whenPATCHMON_ENV=production; avoid disabling TLS verification in production. - SSH terminal: Prefer one-time tickets; avoid putting long-lived tokens in URLs (logs, history). Permissions are enforced per user/role (
can_manage_hosts). - Brute force / abuse: Upgrade is rejected with 401/404 before the WebSocket is created; no WebSocket resource is exposed without valid auth.
General Information
Metrics collection information
We decided it would be useful for us and the community to understand and know three key pieces of information about PatchMon instances out in the field.
- Qty of installations / live setups
- Qty of hosts being monitored
- Version number of your instance
This is so we can produce a metric on the website to show this live statistic.
I consulted with the community on Discord explaining how it's done (the chat can be seen in the Security channel)
Essentially this is the flow:

The main reason is, as a founder it would be amazing to track progression of the app globally to understand how many instances are out there. However something to also note, if there is a security concern with a previous version then we need to know how many instances of that version is out in the field.
Questions:
Do you collect IPs?
Nope - IP addresses are not outputted into any file or seen in a console log when your instance reaches out to us.
How do I opt-in or out ?
Go into settings, metrics and press the toggle button to stop the schedule
How do I delete the information about my qty of hosts and version number you have ?
Please send us an email to support@patchmon.net with your uuid and we will remove it from the database. Note that if you do this then this will be the only time we will be able to associate you with your instance id
What happens if I regenerate my instance id?
In our reports we get a new instance ID and it's duplicated, we have no way of knowing which instance it has replaced however our metrics will look at last 7 days active instances and we will use this metric on the website, so after 7 days the number will drop again
Can I see the code for this?
Absolutely, this project and its code for the app is viewable on github, you'll be able to see how the metrics collector works.
Migration docs
Migrating from 1.4.2 to 2.0.0
This is a migration document for those on 1.4.2 to 2.0.0
I've only tested this from 1.4.2 to 2.0.0 . If you're on a lower version like 1.3.x then i'm not sure this will entirely work but there is a chance it will as the main aspect is the database migration.
Please backup your container or host in a way where you can easily restore if needed to rollback.
Usually there are three types of deployments:
- via docker-compose.yml
- via our native setup.sh script
- via proxmox community scripts
docker-compose.yml is the preferred and supported way.
We had setup.sh originally when we first started the project, at that time we didn't have docker images and we have carried on supporting it until now.
The issue with installing PatchMon natively on an OS is that there are evolving changes as we have progressed and keeping on top of them (also via edge cases) becomes a very heavy task.
Shipping containers is much easier and also more secure as now we are using hardened images from docker to really reduce the CVEs that images are shipped with.
Technically there is a way still to not use docker and that is by serving the Go based binary directly.
I will talk about it but I can't support it officially. I can only point to the right direction.
The proxmox-community scripts team are a great bunch and we speak to them regularly about these major changes and work with them so that upgrade / installation is done seamlessly. They pin the scripts to a specific version so when we release a new version then it takes a few days until the team test the script against the new version.
For now I will document the process for
- Upgrading via docker
- Conversion of native setup.sh type to docker
The main thing when it comes to migrations is carrying over the database and ensuring that the new .env has the necessary entries.
The new V2 brings new features like Patching but more importantly has been completely re-written in GO LANG . Both agent and server are now in GO.
We have seen memory footprint of PatchMon server go from 500MB to 50MB and execution times become much faster.
Docker migration from V1.4.2 to V2
Key changes made in new version :
- Single container for "patchmon-server" as opposed to "backend" and "frontend" . The frontend built static files are now embedded in the backend go binary file served via the container
- Agents volume is now not needed - binaries are now embedded in the container image as opposed to a writable volume.
- Branding assets volume also now not needed - images are now stored in the database as opposed to a writable assets volume
- Fully utilised the .env file for all variables and is shared between the various containers - this keeps the docker-compose.yml clean and we only need to work on looking at the single .env file for any variables.
- Utilising docker hardened images upon build for additional security.
Easy script migration for new docker-compose.yml and .env
- Change your directory to where you have the docker-compose.yml and .env file
- Run the following :
curl -fsSL https://raw.githubusercontent.com/PatchMon/PatchMon/refs/heads/main/tools/migrate1-4-2_to_2-0-0.sh| bash
This will download the new docker-compose.yml and .env whilst migrating your variables to it. Please review your new .env before performing docker compose up because if you had a non standard port mapped to the container then this will also need to be double-checked.
Setup.sh bare-metal to Docker
I'm currently working on writing this up - if you have less than 10 hosts or so consider starting from fresh - it will be easier :)
Proxmox Community Scripts
The community-scripts team will be working on a migration and installation path for the scripts and will work with your "update" as soon as it's available to.
_Archive
Depreciated - Installing PatchMon Server on Ubuntu 24
This is legacy and not applicable for PatchMon V2
Overview
The PatchMon setup script automates the full installation on Ubuntu/Debian servers. It installs all dependencies, configures services, generates credentials, and starts PatchMon - ready to use in minutes.
It supports both fresh installations and updating existing instances.
Requirements
| Requirement | Minimum |
|---|---|
| OS | Ubuntu 20.04+ / Debian 11+ |
| CPU | 2 vCPU |
| RAM | 2 GB |
| Disk | 15 GB |
| Access | Root (sudo) |
| Network | Internet access (to pull packages and clone the repo) |
Fresh Installation
1. Prepare the server
apt-get update -y && apt-get upgrade -y
apt install curl jq bc -y
2. Run the setup script
curl -fsSL -o setup.sh https://raw.githubusercontent.com/PatchMon/PatchMon/refs/heads/main/setup.sh \
&& chmod +x setup.sh \
&& sudo bash setup.sh
3. Follow the interactive prompts
The script will ask you four things:
| Prompt | Description | Default |
|---|---|---|
| Domain/IP | The public DNS or local IP users will access PatchMon from | patchmon.internal |
| SSL/HTTPS | Enable Let's Encrypt SSL. Use y for public servers, n for internal networks |
n |
| Only asked if SSL is enabled - used for Let's Encrypt certificate notifications | - | |
| Release / Branch | Lists the latest 3 release tags plus main. Pick the latest release unless you need a specific version |
Latest tag |
After confirming your choices, the script runs fully unattended.
What the Script Does
The script performs these steps automatically:
- Checks timezone - confirms (or lets you change) the server timezone
- Installs prerequisites -
curl,jq,git,wget,netcat-openbsd,sudo - Installs Node.js 20.x - via NodeSource
- Installs PostgreSQL - creates an isolated database and user for this instance
- Installs Redis - configures ACL-based authentication with a dedicated Redis user and database
- Installs Nginx - sets up a reverse proxy with security headers
- Installs Certbot (if SSL enabled) - obtains and configures a Let's Encrypt certificate
- Creates a dedicated system user - PatchMon runs as a non-login, locked-down user
- Clones the repository to
/opt/<your-domain>/ - Installs npm dependencies in an isolated environment
- Creates
.envfiles - generates secrets and writesbackend/.envandfrontend/.env - Runs database migrations - with self-healing for failed migrations
- Creates a systemd service - with
NoNewPrivileges,PrivateTmp, andProtectSystem=strict - Configures Nginx - reverse proxy with HTTP/2, WebSocket support, and security headers
- Populates server settings in the database (server URL, protocol, port)
- Writes
deployment-info.txt- all credentials and commands in one file
After Installation
- Visit
http(s)://<your-domain>in your browser - Complete the first-time admin setup (create your admin account)
- All credentials and useful commands are saved to:
/opt/<your-domain>/deployment-info.txt
Directory Structure
After installation, PatchMon lives at /opt/<your-domain>/:
/opt/<your-domain>/
backend/
.env # Backend environment variables
src/
prisma/
frontend/
.env # Frontend environment variables (baked at build)
dist/ # Built frontend (served by Nginx)
deployment-info.txt # Credentials, ports, and diagnostic commands
patchmon-install.log
Environment Variables
The setup script generates a backend/.env with sensible defaults. You can customise it after installation.
File location: /opt/<your-domain>/backend/.env
Variables set by the script
| Variable | What the script sets |
|---|---|
DATABASE_URL |
Full connection string with generated password |
JWT_SECRET |
Auto-generated 50-character secret |
CORS_ORIGIN |
<protocol>://<your-domain> |
PORT |
Random port between 3001-3999 |
REDIS_HOST |
localhost |
REDIS_PORT |
6379 |
REDIS_USER |
Instance-specific Redis ACL user |
REDIS_PASSWORD |
Auto-generated password |
REDIS_DB |
Auto-detected available Redis database |
Adding optional variables
To enable OIDC, adjust rate limits, configure TFA, or change other settings, add the relevant variables to backend/.env and restart the service.
For example, to enable OIDC SSO:
# Edit the .env file
sudo nano /opt/<your-domain>/backend/.env
Add at the bottom:
# OIDC / SSO
OIDC_ENABLED=true
OIDC_ISSUER_URL=https://auth.example.com
OIDC_CLIENT_ID=patchmon
OIDC_CLIENT_SECRET=your-client-secret
OIDC_REDIRECT_URI=https://patchmon.example.com/api/v1/auth/oidc/callback
OIDC_SCOPES=openid email profile groups
OIDC_AUTO_CREATE_USERS=true
Then restart:
sudo systemctl restart <your-domain>
Full list of optional variables
All optional environment variables are documented in the Docker env.example file and on the Environment Variables page. The same variables work for both Docker and native installations. Key categories include:
- Authentication -
JWT_EXPIRES_IN,JWT_REFRESH_EXPIRES_IN,SESSION_INACTIVITY_TIMEOUT_MINUTES - Password policy -
PASSWORD_MIN_LENGTH,PASSWORD_REQUIRE_UPPERCASE, etc. - Account lockout -
MAX_LOGIN_ATTEMPTS,LOCKOUT_DURATION_MINUTES - Two-factor authentication -
MAX_TFA_ATTEMPTS,TFA_REMEMBER_ME_EXPIRES_IN, etc. - OIDC / SSO -
OIDC_ENABLED,OIDC_ISSUER_URL,OIDC_CLIENT_ID, etc. - Rate limiting -
RATE_LIMIT_WINDOW_MS,RATE_LIMIT_MAX,AUTH_RATE_LIMIT_*,AGENT_RATE_LIMIT_* - Database pool -
DB_CONNECTION_LIMIT,DB_POOL_TIMEOUT,DB_IDLE_TIMEOUT, etc. - Logging -
LOG_LEVEL,ENABLE_LOGGING - Network -
ENABLE_HSTS,TRUST_PROXY,CORS_ORIGINS - Encryption -
AI_ENCRYPTION_KEY,SESSION_SECRET - Timezone -
TZ - Body limits -
JSON_BODY_LIMIT,AGENT_UPDATE_BODY_LIMIT
After any
.envchange, restart the service:sudo systemctl restart <your-domain>
Updating an Existing Installation
To update PatchMon to the latest version, re-run the setup script with --update:
sudo bash setup.sh --update
The update process:
- Detects all existing PatchMon installations under
/opt/ - Lets you select which instance to update
- Backs up the current code and database before making changes
- Pulls the latest code from the selected branch/tag
- Installs updated dependencies and rebuilds the frontend
- Runs any new database migrations (with self-healing)
- Adds any missing environment variables to
backend/.env(preserves your existing values) - Updates the Nginx configuration with latest security improvements
- Restarts the service
If the update fails, the script prints rollback instructions with the exact commands to restore from the backup.
Managing the Service
Replace <your-domain> with the domain/IP you used during installation (e.g. patchmon.internal).
Service commands
# Check status
systemctl status <your-domain>
# Restart
sudo systemctl restart <your-domain>
# Stop
sudo systemctl stop <your-domain>
# View logs (live)
journalctl -u <your-domain> -f
# View recent logs
journalctl -u <your-domain> --since "1 hour ago"
Other useful commands
# Test Nginx config
nginx -t && sudo systemctl reload nginx
# Check database connection
sudo -u <db-user> psql -d <db-name> -c "SELECT 1;"
# Check which port PatchMon is listening on
netstat -tlnp | grep <backend-port>
# View deployment info (credentials, ports, etc.)
cat /opt/<your-domain>/deployment-info.txt
Troubleshooting
| Issue | Solution |
|---|---|
| Script fails with permission error | Run with sudo bash setup.sh |
| Service won't start | Check logs: journalctl -u <your-domain> -n 50 |
| Redis authentication error | Verify REDIS_USER and REDIS_PASSWORD in backend/.env match Redis ACL. Run redis-cli ACL LIST to check |
| Database connection refused | Check PostgreSQL is running: systemctl status postgresql |
| SSL certificate issues | Run certbot certificates to check status. Renew with certbot renew |
| Nginx 502 Bad Gateway | Backend may not be running. Check systemctl status <your-domain> and the backend port |
| Migration failures | Check status: cd /opt/<your-domain>/backend && npx prisma migrate status |
| Port already in use | The script picks a random port (3001-3999). Edit PORT in backend/.env and update the Nginx config |
For more help, see the Troubleshooting page or check the installation log:
cat /opt/<your-domain>/patchmon-install.log
Please note: This script was built to automate the deployment of PatchMon however our preferred method of installation is via Docker. This method is hard to support due to various parameters and changes within the OS such as versions of Nginx causing issues on the installer.
Anyway, do enjoy and I understand if you're like me ... want to see the files in plain sight that is being served as the app ;)
Web Application User Guide
Users, Roles & SSO
Setting Up Microsoft Azure Entra ID (SSO)
This is a step-by-step guide for configuring Microsoft Azure Entra ID (formerly Azure Active Directory) as the Single Sign-On provider for PatchMon using the Settings UI. No .env editing is required.
What You'll End Up With
- Users sign in to PatchMon with their Microsoft work account.
- PatchMon accounts are created automatically on first login.
- PatchMon roles (Super Admin / Admin / Host Manager / User / Readonly) are driven by Entra ID security groups.
- Optionally, local username/password login is disabled, so SSO is the only way in.
Everything is configured through Settings → OIDC / SSO in the PatchMon web interface.
Before You Begin
You'll need:
| Item | Notes |
|---|---|
| A running PatchMon instance | Reachable at a fixed URL, e.g. https://patchmon.example.com |
| HTTPS on your PatchMon URL | Entra ID will not accept plain http:// redirect URIs (except http://localhost) |
| An existing admin account in PatchMon | So you can sign in and open Settings. If you don't have one, complete the normal setup wizard first |
| Access to the Microsoft Entra admin center | https://entra.microsoft.com. You need Application Administrator or Global Administrator role on the tenant |
Open two browser tabs side-by-side:
- Tab 1: PatchMon → sign in as admin → Settings → OIDC / SSO
- Tab 2: https://entra.microsoft.com
You will collect six values in Tab 2 and paste them into Tab 1:
- Tenant ID
- Application (client) ID
- Client secret (the Value, not the Secret ID)
- Admin group Object ID
- User group Object ID
- (Optional) any additional role group Object IDs
Part A: Configure Entra ID (Tab 2)
Step 1: Get the Callback URL from PatchMon First
Before you start in Entra, grab the callback URL PatchMon will use. You'll paste it into Entra.
- In Tab 1, go to Settings → OIDC / SSO.
- Scroll down to the OAuth2 Configuration section.
- Look at the Callback URL field. It will say something like:
https://patchmon.example.com/api/v1/auth/oidc/callback - Copy it. You'll need this in the next step.
Note: This field is read-only and is derived from the PatchMon server URL setting. If it looks wrong (e.g.
http://localhost:3000when you're running in production), fix your Server URL in Settings → General first.
Step 2: Register an Application in Entra ID
- In Tab 2, open Identity → Applications → App registrations.
- Click + New registration.
- Fill in the form:
- Name:
PatchMon(purely cosmetic, shown on the consent screen) - Supported account types: choose Accounts in this organizational directory only (Single tenant) for most deployments. Only pick multi-tenant if you explicitly want users from other Entra tenants to sign in.
- Redirect URI:
- Platform: Web
- URL: paste the callback URL you copied in Step 1
- Name:
- Click Register.
You'll land on the app's Overview page. Copy these two values into a scratch note:
- Application (client) ID
- Directory (tenant) ID
Step 3: Create a Client Secret
Do not copy the
Secret ID. That is a metadata GUID, not the secret. You want theValuecolumn.
Save this value in your scratch note as Client Secret.
Step 4: Configure Token Claims (Add Groups)
PatchMon maps Entra ID groups to PatchMon roles, so Entra must include group information in the ID token.
What PatchMon receives: With this configuration, Entra ID sends groups as an array of GUIDs (the group Object IDs) in the
groupsclaim of the ID token. You will paste those GUIDs (not group names) into PatchMon's Role Mapping table.
Optional but recommended: add standard user claims
Entra doesn't always include every OIDC-standard claim by default.
- Still on Token configuration, click + Add optional claim.
- Token type: ID.
- Tick
email,family_name,given_name,preferred_username. - Click Add. If prompted to enable the Microsoft Graph
emailpermission, accept.
Step 5: API Permissions
- Open API permissions in the left menu.
- You should already see
User.Readlisted under Microsoft Graph. That's enough. If it's missing, click + Add a permission → Microsoft Graph → Delegated permissions and addUser.Read,openid,profile,email. - Click Grant admin consent for
at the top and confirm. Without admin consent, users will be prompted to consent individually on first login.
Step 6: Create Security Groups for Role Mapping
Decide which PatchMon roles you'll use. At minimum you probably want Admin and User. You can add more later.
For each role:
- In Entra, go to Identity → Groups → All groups.
- Click + New group.
- Fill in:
- Group type:
Security - Group name: e.g.
PatchMon Admins(the name is for humans; PatchMon matches on Object ID) - Membership type:
Assigned(simplest)
- Group type:
- Add the users who should hold that role as Members.
- Click Create.
- After creation, open the group and copy its Object ID (a GUID like
11111111-2222-3333-4444-555555555555) into your scratch note.
Repeat for each role you want to use.
Mapping table
| PatchMon role | Entra group (example) | Where you'll paste the Object ID |
|---|---|---|
| Super Admin | PatchMon SuperAdmins |
Role Mapping table → superadmin row |
| Admin | PatchMon Admins |
Role Mapping table → admin row |
| Host Manager | PatchMon Host Managers |
Role Mapping table → host_manager row |
| User | PatchMon Users |
Role Mapping table → user row |
| Readonly | PatchMon Readonly |
Role Mapping table → readonly row |
You only need to fill in the rows you use. Empty rows are ignored. Users who match none of the groups get the Default (fallback) role.
Part B: Configure PatchMon (Tab 1)
Go back to Tab 1: Settings → OIDC / SSO.
Step 7: Fill in the OAuth2 Configuration Section
Scroll to the OAuth2 Configuration panel and fill in the fields using the values from your scratch note:
| Field in PatchMon | What to put in it |
|---|---|
| Issuer URL | https://login.microsoftonline.com/<TENANT_ID>/v2.0. Replace <TENANT_ID> with the Directory (tenant) ID from Step 2. The /v2.0 suffix is required. |
| Client ID | The Application (client) ID from Step 2 |
| Client Secret | Paste the client secret Value from Step 3, then click the Save button next to the field. The badge will change from "Not set" to "Set" |
| Callback URL | Read-only, already populated. This is the URL you registered in Entra in Step 2 |
| Redirect URI (optional override) | Leave empty. Only use this if your PatchMon is behind a reverse proxy that presents a different public URL |
| Scopes | Change the default openid email profile groups to openid email profile User.Read: remove the trailing groups and add User.Read. Entra rejects groups as an unknown scope. User.Read is required if you want PatchMon to fetch the user's Entra profile photo |
| Button Text | Sign in with Microsoft (or anything you like) |
Click Apply at the bottom of the panel. You should see a toast saying "OIDC settings saved".
Why no
groupsscope for Entra? Other IdPs (Authentik, Keycloak) use agroupsscope to request group claims. Entra does not. It uses the app's Token configuration instead (which you configured in Step 4). Includinggroupsin the Scopes field will cause Entra to reject the authorisation request with an "invalid scope" error.Why add
User.Read? PatchMon usesUser.Readto call Microsoft Graph and fetch the signed-in user's profile photo. Without it, SSO still works, but Entra profile pictures cannot be imported.
Step 8: Configure the Toggles
At the top of the OIDC / SSO page there's a Configuration panel with five toggles. Recommended settings for Entra ID:
| Toggle | Recommended | Why |
|---|---|---|
| Enable OIDC / SSO | Leave OFF for now. You'll turn it on in Step 10 after everything else is set | Flipping it on too early will expose a broken SSO button on the login page |
| Enforce HTTPS | ON | Entra will not work over plain HTTP anyway |
| Sync roles from IdP | ON | Required if you want Entra security groups to drive PatchMon roles |
| Disable local auth | OFF (for now) | Leave this off until you've confirmed SSO works. You can enable it later |
| Auto-create users | ON | Creates PatchMon accounts automatically on first login so you don't have to pre-provision users |
Step 9: Fill in the Role Mapping Table
- Scroll to Role Mapping and click the header to expand it.
- You'll see a table with a Default (fallback) row and one row per PatchMon role.
- For each role you created an Entra group for, paste the group's Object ID (from Step 6) into the OIDC Mapped Role (IdP Group Name) column.
| PatchMon Role | Paste here |
|---|---|
| Default (fallback) | Leave as user, or change to readonly if you want unmatched users to have no write access |
| superadmin | Entra Object ID of PatchMon SuperAdmins (or leave blank if you don't want anyone promoted to superadmin via SSO) |
| admin | Entra Object ID of PatchMon Admins |
| host manager | Entra Object ID of PatchMon Host Managers |
| user | Entra Object ID of PatchMon Users |
| readonly | Entra Object ID of PatchMon Readonly |
- Scroll back up to the OAuth2 Configuration panel and click Apply to save the role mapping. (The role mapping fields are saved together with the OAuth2 fields by the Apply button.)
Important: The label reads "IdP Group Name" but for Entra ID you must paste the group's Object ID (GUID), not the display name. Entra sends GUIDs in the token, not names.
Amber warning: If Sync Roles is on but the Superadmin row is empty, you'll see an amber warning. That is expected: it means no one will be promoted to superadmin via SSO. Existing local superadmins will keep their role. If that's what you want, ignore the warning.
Step 10: Turn On OIDC and Test
- At the top of the page, flip Enable OIDC / SSO to ON. It saves immediately.
- Open PatchMon in a private/incognito browser window (so you're not using your existing session).
- You should see a Sign in with Microsoft button on the login page (or whatever text you set).
- Click it. You'll be redirected to
login.microsoftonline.com. - Sign in with an Entra account that's a member of one of your PatchMon groups.
- You'll be redirected back and logged in.
First-login behaviour:
- A PatchMon account is created automatically. The username is derived from the email prefix (e.g.
alice@contoso.com→alice). - The role is determined by group membership; if no group matches, the Default (fallback) role is used.
- If no admin exists yet in PatchMon, the very first OIDC user is automatically promoted to Super Admin regardless of groups, so you cannot lock yourself out.
Optional: Enforce SSO Only (Disable Password Login)
Once you've confirmed at least one OIDC user has Admin or Super Admin:
- Go back to Settings → OIDC / SSO.
- Turn Disable local auth to ON.
- Click Apply at the bottom of the OAuth2 Configuration panel.
The login page will now only show the Sign in with Microsoft button. Local username/password fields are hidden.
Safety: PatchMon only enforces this flag if OIDC is also enabled and successfully initialised. If OIDC breaks for any reason, local login is automatically re-enabled so you're not locked out.
Troubleshooting
"OIDC is configured via .env" amber banner at the top
You'll see this if OIDC environment variables were set in .env before the UI was used. Click Load from .env to import those values into the database, then remove the OIDC_* lines from .env and restart the server. From then on, everything is managed from the UI.
The "Sign in with Microsoft" button doesn't appear on the login page
- Issuer URL is wrong: it must end in
/v2.0. Double-check for typos in the tenant GUID. - Client Secret is empty or wrong: the label will say "Not set". Re-enter it and click Save next to the secret field.
- PatchMon cannot reach
login.microsoftonline.com: an egress firewall or proxy is blocking it.
Check the server logs; search for oidc:
# Docker
docker compose logs patchmon-server | grep -i oidc
# Native systemd
journalctl -u <your-service-name> | grep -i oidc
AADSTS50011: Reply URL does not match
The redirect URI in Entra does not match the callback URL PatchMon is sending. Go to the Entra app's Authentication page and verify:
- Protocol is
https:// - Host and port exactly match PatchMon's public URL
- Path is
/api/v1/auth/oidc/callbackwith no trailing slash - There are no hidden whitespace characters (paste into a plain editor to check)
If you're behind a reverse proxy and PatchMon is generating the wrong callback URL, fix the Server URL in Settings → General first. Do not use the "Redirect URI (optional override)" field unless you really know the proxy is presenting a different public URL.
AADSTS70011: The provided value for scope ... is not valid
Your Scopes field includes groups. Entra rejects unknown scopes. Change the Scopes field to:
openid email profile User.Read
Click Apply.
AADSTS700016: Application with identifier ... was not found
The Client ID field doesn't match the Application (client) ID in Entra. Copy it again from the app's Overview page and click Apply.
AADSTS7000215: Invalid client secret provided
The secret is wrong, was rotated, or has expired. Create a new one in Entra (Certificates & secrets), paste the new Value into the Client Secret field, and click Save next to the field.
Logged in but got the wrong role (or default role)
-
Make sure Sync roles from IdP toggle is ON.
-
Confirm you pasted the Entra group Object ID (GUID), not the display name, into the Role Mapping table.
-
Check the server logs. PatchMon logs which groups it received:
docker compose logs patchmon-server | grep -i "oidc groups" -
If logs show
oidc no groups in token, revisit Step 4 and make sure the groups claim was added under Token configuration with Security groups → Group ID.
Logged in but no profile photo appears
- Make sure the Scopes field includes
User.Read. - Confirm the Entra app has Microsoft Graph → Delegated permission → User.Read and that admin consent was granted.
- Check whether the user actually has a profile photo set in Microsoft 365 / Entra.
- Sign out and sign back in after changing scopes or permissions so PatchMon gets a fresh access token.
"Too many groups": user belongs to more than 200 groups
If a user is a member of 200+ groups in Entra, the token switches to a _claim_names overage indicator and omits the groups array. PatchMon does not currently follow the overage pointer.
Workaround: In Entra's Token configuration → Edit groups claim, select Groups assigned to the application. This limits the claim to groups explicitly assigned to the PatchMon app, which almost always keeps the total well under 200.
"Session Expired" after clicking the SSO button
Quick Reference: Where Each Value Comes From
| PatchMon UI field | Where to find it in Entra |
|---|---|
| Issuer URL | https://login.microsoftonline.com/<Directory (tenant) ID>/v2.0. Tenant ID is on the Entra app's Overview page |
| Client ID | Entra app Overview → Application (client) ID |
| Client Secret | Entra app → Certificates & secrets → client secret Value (shown once, at creation time) |
| Callback URL | Already filled in by PatchMon. Copy it to Entra, not from it |
| Scopes | openid email profile User.Read (no groups) |
| Role Mapping → each row | Entra → Groups → All groups → |
Two Factor Authentication
PatchMon supports time-based one-time password (TOTP) two-factor authentication (2FA, sometimes called MFA) on top of the normal username / password login. Once enabled on a user's account, every sign-in asks for a 6-digit code from an authenticator app, or a one-time backup code.
This page covers enabling 2FA per user, using backup codes, the "Remember Me" trusted-device feature, and how admins recover an account if the user loses their authenticator.
Related pages:
- Users, Roles and RBAC: manage user accounts
- Setting Up OIDC / Single Sign-On: delegate authentication to an external IdP
- PatchMon Environment Variables Reference: the full env-var list
Scope and limitations
- 2FA is opt-in per user. Each user decides whether to turn it on from their own profile.
- 2FA is not available for OIDC accounts. If a user signs in via OIDC / SSO, their IdP is responsible for MFA. The PatchMon TFA tab is hidden on the profile page for OIDC-only accounts, and the setup endpoint refuses with "MFA is managed by your OIDC provider".
- There is no global "require 2FA for all users" flag in the current release. Administrators cannot enforce 2FA for every account from the UI or an environment variable. If you need enforced 2FA, drive authentication through an OIDC provider that enforces MFA (e.g. Authentik, Entra ID) and set
OIDC_DISABLE_LOCAL_AUTH=true. - The first-time setup wizard offers new admins the option to set up 2FA during initial account creation (Step 2 of the wizard). This is voluntary and can be skipped.
Enabling 2FA on Your Account
Each user enables 2FA themselves from their profile. Admins cannot enable it on behalf of another user.
- Sign in to PatchMon with your username and password.
- Click your avatar (top-right) → Profile.
- Open the Multi-Factor Authentication tab.
- Click Enable TFA.
- A QR code appears. Scan it with your authenticator app of choice. Known-good options:
- Authy
- Google Authenticator
- 1Password
- Bitwarden
- Microsoft Authenticator
- Duo Mobile
- If you can't scan the QR code (shared device, desktop-only app), copy the Manual Entry Key instead and paste it into your authenticator.
- Click Continue to Verification.
- Enter the current 6-digit code from your authenticator app.
- Click Verify & Enable.
You are now shown a one-time list of backup codes (see next section). Save them before clicking Done.
From now on, every password-based login will prompt for a 6-digit verification code after the password step.
Backup codes: save these
After enabling 2FA, PatchMon generates a batch of single-use backup codes. These let you sign in if you lose access to your authenticator app (lost phone, wiped device, etc.).
- Each code can be used exactly once. Once used, it is consumed and cannot be reused.
- They are shown only once, in plaintext, immediately after setup or regeneration. PatchMon stores them as bcrypt hashes in the database; neither you nor an admin can recover the plaintext later.
- Treat them like a second password. Store them in a password manager, or print them and lock them away.
- Click Download Codes to save a plain-text file for offline storage.
Regenerating backup codes
If you think your backup codes have leaked, or you've used most of them:
- Go to Profile → Multi-Factor Authentication.
- Scroll to the Backup Codes panel.
- Click Regenerate Codes.
- A new set of codes is generated and shown. The old set is immediately invalidated.
Using a backup code
On the 2FA prompt at login, you enter backup codes in the same field as TOTP codes. There is no separate "use a backup code" button. PatchMon tries the code as a TOTP first; if that fails, it checks whether it matches one of the stored backup-code hashes. If it matches, that backup code is consumed (removed from the stored list) and you are logged in.
Typical workflow if you've lost your phone:
- At the login page, enter your username and password as usual.
- On the "Two-Factor Authentication" screen, type one of your backup codes in the Verification Code field.
- Click Verify.
The code is spent. Your next login cannot use the same backup code again.
"Remember Me": Trusted Devices
When you enter your 2FA code, there's a Remember me on this computer (skip TFA for 30 days) checkbox. If ticked, PatchMon plants a long-lived, HttpOnly patchmon_device_trust cookie on that browser and records a hashed trust token in the database.
On subsequent logins from the same browser:
- You still enter your password.
- PatchMon sees the trust cookie, matches it to the database record, confirms the record belongs to you and hasn't expired, and skips the 2FA prompt.
- A
last_used_attimestamp on the trust record is bumped each time it's used, so you can see when each remembered device last signed in.
How the trust is keyed
- Roaming between Wi-Fi, mobile hotspot, and office network does not invalidate the trust.
- Updating your browser does not invalidate the trust.
- Copying the cookie to a different browser on a different machine would bypass 2FA for that user (standard web cookie security model). Protect your browser profile accordingly.
Trust lifetime
The default lifetime is 30 days, configurable server-wide via the TFA_REMEMBER_ME_EXPIRES_IN environment variable. Accepts duration strings such as 7d, 30d, 90d. See PatchMon Environment Variables Reference for the full list.
There is a hard cap on how many trusted devices a single user can accumulate, controlled by TFA_MAX_REMEMBER_SESSIONS (default 5). When a sixth device is trusted, the oldest existing trust is removed automatically.
Reviewing your trusted devices
- Go to Profile → Trusted Devices.
- You'll see a list with, for each device:
- Label (best-effort device name derived from the user agent)
- User agent
- IP address at the time it was last used
- Created / Last used / Expires timestamps
- A This device badge next to the one you're currently logged in from
Revoking a trusted device
To stop a specific device skipping 2FA (for example, an old laptop you're decommissioning):
- Profile → Trusted Devices.
- Find the device in the list and click Revoke.
- Confirm.
If the device you're revoking is the current browser, its trust cookie is also cleared, so your next login from this browser will require 2FA again.
Revoking every trusted device
Click Forget all trusted devices at the top of the panel. This:
- Removes every trust record for your account.
- Clears the trust cookie on the current browser.
- Forces a full 2FA prompt on every device next time you sign in.
Use this after a suspected account compromise or after losing a device.
Disabling 2FA
To turn 2FA back off on your own account:
- Profile → Multi-Factor Authentication.
- Click Disable TFA.
- Enter your password to confirm.
- Click Disable TFA.
Side effects:
- The TOTP secret is wiped from the database.
- All existing backup codes are invalidated.
- All of your trusted devices are revoked. This is intentional. The only purpose of a trust record is to skip 2FA, so with 2FA off they serve no purpose. If you later re-enable 2FA, old trust cookies will not be resurrected and every device must confirm 2FA again.
You cannot disable 2FA on an OIDC-only account. The API rejects the request with "Cannot disable TFA for accounts without a password". This is because disabling 2FA requires password confirmation, and OIDC-only accounts have no password set.
Failed Attempts and Lockout
To prevent brute-forcing the 6-digit code space, the verify-2FA endpoint is rate-limited per user.
| Env var | Default | What it does |
|---|---|---|
MAX_TFA_ATTEMPTS |
5 |
Consecutive wrong codes allowed before a lockout |
TFA_LOCKOUT_DURATION_MINUTES |
30 |
How long the lockout lasts |
After the cap is hit, the endpoint returns HTTP 429 Too Many Requests with the message "Too many failed TFA attempts. Please try again later." Wait out the lockout, or ask an admin (see below).
Each failure also returns a remainingAttempts counter in the response, so the login UI can tell the user how many tries are left.
First-Time Wizard: Optional 2FA Setup
When you bring up a brand-new PatchMon instance and complete the setup wizard, Step 2 (Multi-Factor Authentication) offers two choices:
- Setup MFA now: scan a QR code and register an authenticator for the brand-new admin account before finishing the wizard. You'll also capture your backup codes.
- Skip for now: the admin account is created without 2FA. You can turn it on later from Profile → Multi-Factor Authentication.
There is no "enforce for everyone" option in the wizard. This decision is always per-user.
Admin Recovery: User Has Lost Their Authenticator
PatchMon does not have a dedicated "admin reset MFA" button. Recovery is handled through the standard account-recovery flow, which implicitly disables 2FA in a safe way:
Option A: User has a backup code
Ask them to sign in with a backup code (see Using a backup code). Once they're in, they can:
- Profile → Multi-Factor Authentication → Disable TFA to remove the old authenticator secret entirely, and then re-enable with the new phone.
- Or Regenerate Codes to get a fresh set of backup codes without touching the authenticator.
Option B: User has no backup codes and no authenticator
An administrator must reset the account:
- Sign in as a user with
can_manage_users(admin, superadmin, or any custom role with that permission). - Go to Settings → Users.
- Find the affected user and click Reset Password.
- Set a new password and communicate it over an out-of-band secure channel.
Password reset alone does not disable 2FA. The user will still be prompted for a TOTP or backup code after their first login with the new password.
If the user still cannot produce a code, you have two further options:
- Deactivate, then reactivate the account. Edit the user, untick Active, save (this also wipes their trusted devices), then tick Active again. 2FA is still enabled on the account, so this alone does not solve the missing-authenticator problem.
- Delete and re-create the user as a last resort. You lose the user's ID, notification preferences, and any artefacts keyed to their account, so prefer the backup-code route wherever possible.
Feature gap: A "wipe 2FA on another user" admin action is on the roadmap. If you hit this frequently, consider moving your deployment to OIDC / SSO so that MFA is managed by the IdP (see Setting Up OIDC / Single Sign-On).
Direct database workaround (self-hosted only)
If you are self-hosting and absolutely need to clear 2FA on a user without backup codes, a DBA can clear the user's tfa_enabled, tfa_secret and tfa_backup_codes columns directly in the users table, then force a password reset from the UI. This is a last resort. Make a backup first, and never do this on PatchMon Cloud (where direct database access is not available).
-- Replace 'alice' with the affected username. Make a backup first.
UPDATE users
SET tfa_enabled = false,
tfa_secret = NULL,
tfa_backup_codes = NULL
WHERE username = 'alice';
After running this the user can sign in with just a password; they should immediately re-enrol in 2FA from their profile.
Environment Variables Reference
All of these are read once at server start. Changes require a restart to take effect. The full table lives in PatchMon Environment Variables Reference; reproduced here for convenience:
| Variable | Default | Description |
|---|---|---|
MAX_TFA_ATTEMPTS |
5 |
Consecutive wrong 2FA codes before the account is temporarily locked |
TFA_LOCKOUT_DURATION_MINUTES |
30 |
How long a 2FA lockout lasts |
TFA_REMEMBER_ME_EXPIRES_IN |
30d |
How long a "Remember me" trusted-device record is valid. Accepts 7d, 30d, 90d, etc. |
TFA_MAX_REMEMBER_SESSIONS |
5 |
Maximum number of trusted devices per user; the oldest is evicted when the limit is reached |
Troubleshooting
"Invalid verification code" when I know the code is correct
- Clock skew. TOTP codes are time-based. If your phone's clock is more than ~30 seconds out of sync with the server, codes will be rejected. Enable automatic date/time on your phone. PatchMon already tolerates a small drift window server-side, but not more than that.
- Using a used code. TOTP codes roll every 30 seconds. If you paste a stale code from 60+ seconds ago it will fail. Wait for a fresh code.
- Used backup code. Backup codes are single-use. If you've already used one, try a different one.
"Too many failed TFA attempts"
You've hit MAX_TFA_ATTEMPTS. Wait TFA_LOCKOUT_DURATION_MINUTES (default 30) and try again. There is no admin "unlock" button; the lockout key in Redis expires automatically. Self-hosters can flush the key by restarting Redis.
I ticked "Remember me" but I'm still being asked for 2FA
Three likely causes:
- The trust record has expired. The default lifetime is 30 days; check
TFA_REMEMBER_ME_EXPIRES_INon your server. - You're signing in on a different browser, or in a private / incognito window, which doesn't have the cookie.
- A password reset was performed on your account. Password resets (whether self-service or admin-initiated) revoke every trusted device as part of the security response. You'll need to tick Remember me again on the next 2FA prompt.
My MFA tab is missing on the profile page
You signed in via OIDC. PatchMon defers MFA to your IdP in that case. Enable MFA in your IdP (Entra ID, Authentik, Keycloak, etc.) if you want it.
I regenerated backup codes but the old ones still work
The old codes are invalidated at the same moment the new batch is displayed. If a stale code still seems to work, make sure you're looking at the right account. Backup codes are not user-transferable.
Users, Roles and RBAC
Users, Roles and RBAC
PatchMon uses role-based access control (RBAC) to decide who can see and do what inside the application. Every user has exactly one role, and every role is a collection of permissions. This page covers the built-in roles, the full permission list, and how to manage users and roles from the Settings UI.
Related pages:
- Setting Up OIDC / Single Sign-On: authenticate users against an external IdP
- Setting Up Microsoft Azure Entra ID (SSO) with PatchMon: Entra-specific walkthrough
- Two-Factor Authentication: per-user TOTP and trusted devices
The Built-In Roles
PatchMon ships with five roles. You see these in Settings → Users (in the Role dropdown) and in Settings → Roles (as the matrix columns).
| Role | Default Permissions | Typical Use |
|---|---|---|
Super Admin (superadmin) |
Everything, including managing other superadmins | The very first user, or dedicated platform owners |
Admin (admin) |
Everything except managing other superadmins | Day-to-day platform administrators |
Host Manager (host_manager) |
Monitoring + host/infrastructure management + operations (patching, compliance, alerts, automation, remote access) | NOC / Ops engineers |
User (user) |
Monitoring + data export | Engineers who need to look but not break |
Readonly (readonly) |
Monitoring only | Auditors, read-only dashboards, management |
Two important rules about built-ins:
- Cannot be deleted.
superadmin,admin,host_manager,userandreadonlyare always present. The Delete button does not appear for them. - The core three cannot have their permissions edited.
superadmin,adminanduserare locked: their permission matrix is hardcoded and the Edit button is disabled.host_managerandreadonlycan still be edited if you want to tune them.
First user is always Super Admin. When PatchMon is first installed and has no users, the setup wizard creates the initial account as
superadmin, regardless of what role you type. If OIDC is configured for auto-create before first boot, the very first OIDC login is also promoted tosuperadminautomatically so you cannot lock yourself out.
The Full Permission List
Permissions are grouped into four risk tiers. The colour you see in the Roles matrix corresponds to this risk level.
Monitoring & Visibility (Low risk)
Read-only access to dashboards, hosts, packages, reports, and logs.
| Permission key | Label | What it lets the user do |
|---|---|---|
can_view_dashboard |
View Dashboard | View the main dashboard and its stat panels |
can_view_hosts |
View Hosts | See the host list, host detail pages, and connection status |
can_view_packages |
View Packages | See the package inventory across all hosts |
can_view_reports |
View Reports | See compliance scan results and alert reports |
can_view_notification_logs |
View Notification Logs | See notification delivery history and status |
Host & Infrastructure (Medium risk)
Create, modify and delete hosts, packages, and containers.
| Permission key | Label | What it lets the user do |
|---|---|---|
can_manage_hosts |
Manage Hosts | Create / edit / delete hosts, host groups, repositories and integrations |
can_manage_packages |
Manage Packages | Edit package inventory and metadata |
can_manage_docker |
Manage Docker | Delete Docker containers, images, volumes and networks |
Operations (Medium-High risk)
Day-to-day NOC tasks.
| Permission key | Label | What it lets the user do |
|---|---|---|
can_manage_patching |
Manage Patching | Trigger patches, approve patch runs, manage policies |
can_manage_compliance |
Manage Compliance | Trigger compliance scans, remediate findings, install scanners |
can_manage_alerts |
Manage Alerts | Assign, delete and bulk-action alerts |
can_manage_automation |
Manage Automation | Trigger and manage automation jobs |
can_use_remote_access |
Remote Access | Open SSH and RDP terminals against managed hosts |
Administration (High risk)
Organisation-wide control.
| Permission key | Label | What it lets the user do |
|---|---|---|
can_view_users |
View Users | See the user list and account details |
can_manage_users |
Manage Users | Create, edit and delete user accounts |
can_manage_superusers |
Manage Superusers | Manage superadmin accounts and elevated privileges |
can_manage_settings |
Manage Settings | System configuration, OIDC / SSO, AI, alert config, enrollment tokens |
can_manage_notifications |
Manage Notifications | Configure notification destinations and routing rules |
can_export_data |
Export Data | Download and export data and reports |
Billing: On PatchMon Cloud there is also a
can_manage_billingpermission that governs access to the Billing page. On self-hosted instances this permission exists in the schema but the Billing page is not enabled by default.
Viewing the Role Matrix
- Sign in as a user with
can_manage_settings. - Go to Settings → Roles.
- You'll see a matrix: rows are permissions (grouped by tier), columns are roles. A green tick means the role has that permission.
Each column header also shows an n/N counter showing the number of permissions that role currently holds out of the total 20.
Creating a Custom Role
Custom roles let you tailor the permission set beyond the built-in five.
Availability: The Add Role button is only shown when the
rbac_custommodule is enabled on your PatchMon deployment. On self-hosted installs this module is typically enabled by default; on PatchMon Cloud it depends on your plan. If you don't see Add Role and the URLhttps://patchmon.example.com/settings/rolesshows a "Not Available" screen, the module isn't enabled on your plan.
To create one:
- Go to Settings → Roles.
- Click Add Role in the top-right.
- Fill in the modal:
- Role Name: lowercase, underscores instead of spaces. Examples:
host_manager,compliance_auditor,noc_operator. This is the internal key; it cannot be renamed later. - Preset (optional): four quick-start presets are available:
- Read Only: just the Monitoring & Visibility group
- Operator: everything except the Administration group
- Admin: every permission
- Clear All: start from zero
- Permissions: tick / untick individual permissions, or use the Select all / Deselect all shortcut on each group header.
- Role Name: lowercase, underscores instead of spaces. Examples:
- Watch the counter at the bottom (
n/20 permissions selected) as a sanity check. - Click Create Role.
The new role appears as a new column in the matrix and is selectable when creating or editing users.
Editing a Custom Role
- In the matrix, click the pencil icon in the column header of the role you want to edit.
- An editor panel opens below the matrix with all permissions listed.
- Tick / untick as needed, then click Save.
Changes take effect immediately. Any session held by a user with that role has its in-memory permissions refreshed on their next request.
Deleting a Custom Role
You can only delete a role that is not assigned to any user. If any user holds that role, the delete endpoint rejects the request with "Cannot delete role: users are assigned to it". Reassign those users to a different role first (see Editing a Role for an Existing User).
To delete:
- Click the pencil in the role's column header to open the editor panel.
- Click Delete (appears only for non-built-in roles).
- Confirm.
Creating Users
Go to Settings → Users and click Add User in the top-right.
| Field | Notes |
|---|---|
| Username | Minimum 3 characters. Lowercase recommended |
| Must be a valid email. Used for OIDC account linking and email alerts | |
| First Name / Last Name | Optional |
| Password | Must satisfy the active password policy (configured under Settings → Server Config → Security) |
| Role | Choose from built-in or custom roles |
Click Add User. The account is created immediately and can sign in straight away.
Role escalation protection: You cannot create a user with a role that's more privileged than your own. Only
superadminusers can create newadminorsuperadminaccounts. Non-superadmin accounts that hold thecan_manage_superuserspermission can also create and managesuperadminaccounts.
Self-Service Sign-Up
PatchMon can also let users register themselves rather than having an admin invite them.
- Go to Settings → Users.
- Scroll to User Registration Settings.
- Tick Enable User Self-Registration.
- Pick a Default Role for New Users: the role that self-registered accounts are assigned.
- Click Save Settings.
A sign-up link now appears on the login page. Anyone who can reach the login page can create an account.
Security warning: Only enable self-registration on internal or private-network deployments. If your PatchMon is internet-facing, leave it off and invite users manually, or front it with OIDC SSO (which lets your IdP decide who can log in).
Editing a Role for an Existing User
- Go to Settings → Users.
- Find the user in the table and click the Edit (pencil) icon.
- Change Role in the dropdown and click Save.
Important side effects:
- Sessions are revoked. When a user's role changes, all of their existing JWT sessions are invalidated on the server. They must sign in again. This ensures the old role's privileges cannot be replayed from an existing browser tab.
- You cannot change your own role. The API rejects a self-role change with "Cannot change your own role". This is a deliberate safety net: two admins must cooperate to demote each other.
- You cannot promote a user above yourself. An
admincannot promote a user tosuperadmin. Only asuperadmincan create or promote tosuperadmin, and likewise onlysuperadmincan assign theadminrole.
Resetting a User's Password
- In the users table, click the Reset (key) icon on that user's row.
- Enter a new password.
- Click Reset Password.
After a reset, all of that user's sessions and trusted-device records are revoked. This is the standard post-compromise response. The user must sign in with the new password on every device.
You cannot reset the password of an inactive user. Reactivate them first.
Disabling (Deactivating) a User
Disabling is the safer alternative to deletion. The user record, their history, and their audit trail are preserved, but they cannot log in.
- Go to Settings → Users.
- Click the Edit icon on the user you want to disable.
- Untick the Active checkbox.
- Click Save.
Effects:
- All their sessions are revoked immediately.
- All their trusted devices are revoked (so re-activating them later cannot reuse a "remember this device" cookie that predates the deactivation window).
- The user's row is shown with a red Inactive badge in the users table.
To re-enable: edit and tick Active again.
Deleting a User
Deletion is permanent and removes the user record and their associated dashboard preferences, sessions, trusted devices and notification preferences.
- Click the Delete (trash) icon on the user's row.
- Confirm.
Restrictions:
- You cannot delete your own account.
- You cannot delete the last
superadmin(the API refuses). - You cannot delete the last
adminif there are nosuperadminusers (ensures at least one admin always exists). - You cannot delete a user who holds a role that's more privileged than yours.
How Permissions Are Evaluated
- Admin and Super Admin always have every permission, even if the
role_permissionstable says otherwise. The middleware short-circuits their permission checks. This is a safety net: if someone mis-edits theadminrow (which shouldn't be possible via the UI, but could happen via direct database access), admins don't get locked out. - Every other role (built-in or custom) has its permissions read from the database at each request. Changes made in Settings → Roles take effect on the user's next API call; no restart required.
- Role hierarchy for user management is enforced separately from the permissions above:
superadmin→ rank 100admin→ rank 90host_manager→ rank 50- custom roles → rank 30 (mid-tier)
user→ rank 20readonly→ rank 10
You can only modify, delete, or reset the password of users whose role rank is less than or equal to your own. This is distinct from the permission checks. Even if a custom role were granted can_manage_users, its holder still could not touch admin or superadmin accounts unless they additionally had can_manage_superusers.
When OIDC Role Sync Is Enabled
If Settings → OIDC / SSO → Sync roles from IdP is on, PatchMon stops letting admins manage users and roles from the UI. Instead:
- The Add User and Add Role buttons disappear.
- The Users tab shows a read-only list.
- The Roles tab shows a banner reminding you that group membership in your IdP drives role assignment via environment variables:
OIDC_SUPERADMIN_GROUP,OIDC_ADMIN_GROUP,OIDC_HOST_MANAGER_GROUP,OIDC_USER_GROUP,OIDC_READONLY_GROUP. - Users' roles are re-evaluated on every login based on their current IdP group membership.
If you want to use OIDC for authentication but still manage roles locally in PatchMon, leave Sync roles from IdP off. See Setting Up OIDC / Single Sign-On for the full toggle reference.
Troubleshooting
"You do not have permission to assign the role: admin"
Only a superadmin can create or promote users to admin or superadmin. If you're an admin and try to promote someone to admin, the API refuses. Ask a superadmin to do it.
"Cannot modify built-in role permissions"
The superadmin, admin and user rows are locked against permission edits. If you need a role with tweaked permissions, create a custom role based on a preset and assign users to that instead.
"Cannot delete role: users are assigned to it"
Before a role can be deleted, reassign every user who holds it. Use Settings → Users → Edit to change each user's role, then try the delete again.
"Cannot delete the last superadmin user" / "Cannot delete the last admin user"
At least one superadmin must always exist. If there are no superadmins at all, at least one admin must exist. Create a replacement first (and sign in as them to confirm the login works) before deleting the final one.
User's old role is still in effect after I changed it
Changing a role revokes all existing sessions, but the user's browser may still hold an old JWT cookie that hasn't been rejected yet. Ask them to refresh the page or sign out and back in; the server will reject the stale token and redirect them to login.
"Add User" / "Add Role" button is missing
Three possible causes:
- Your role doesn't have
can_manage_settingsorcan_view_users. Check/settings/users: if the page is empty or you get a Forbidden, your role lacks the view permission. - OIDC role sync is on. See When OIDC Role Sync Is Enabled.
- The
rbac_custommodule is not enabled. This only affects the Add Role button on the Roles tab. Custom role creation is a gated feature. The Add User button on the Users tab is always available when the other two conditions are met.
Alerts & Notifications
Compliance
Remote Access
PatchMon Admin Guide
PatchMon Admin Guide
This document is the day-to-day usage guide for PatchMon administrators and operators working in the web UI. For installing or running the PatchMon server itself, see the PatchMon Operator Guide. For developer internals, see the PatchMon Internal Guide.
Table of Contents
- Chapter 1: Welcome to PatchMon
- Chapter 2: Settings in the Web UI
- Chapter 3: Adding a Host
- Chapter 4: Host Detail Page
- Chapter 5: Managing Host Groups
- Chapter 6: Package Inventory
- Chapter 7: Repository Tracking
- Chapter 8: Patching Overview
- Chapter 9: Running a Patch
- Chapter 10: Patch Policies and Scheduling
- Chapter 11: Patch History and Live Logs
- Chapter 12: Enabling Docker Integration
- Chapter 13: Docker Inventory Tour
- Chapter 14: Compliance Overview
- Chapter 15: Running Compliance Scans
- Chapter 16: Compliance Results and Remediation
- Chapter 17: Alerts Overview
- Chapter 18: Notification Destinations
- Chapter 19: Notification Routes and Delivery Log
- Chapter 20: Scheduled Reports
- Chapter 21: Web SSH Terminal
- Chapter 22: RDP via Guacamole
- Chapter 23: AI Terminal Assistant
- Chapter 24: Users, Roles, and RBAC
- Chapter 25: Two-Factor Authentication
- Chapter 26: Discord Notifications
- Chapter 27: gethomepage Dashboard Card
- Chapter 28: Ansible Dynamic Inventory
- Chapter 29: Proxmox LXC Auto-Enrollment Guide
- Chapter 30: Auto-Enrollment API Documentation
- Chapter 31: Integration API Documentation
- Chapter 32: Metrics and Telemetry
Chapter 1: Welcome to PatchMon
PatchMon is an open-source patch management and infrastructure monitoring platform that gives sysadmins and IT teams centralised visibility over patches, packages, compliance, and remote access across their entire server fleet.
It works with standard Linux package managers (apt, yum, and dnf) and requires no inbound ports on your monitored hosts.
How It Works
PatchMon uses a lightweight agent model:
- Deploy the Server. Self-host PatchMon using Docker or the native installer, or use the managed PatchMon Cloud.
- Install the Agent. Add a host in the dashboard and run the one-liner install command on your Linux server.
- Monitor. The agent sends system and package data outbound to PatchMon on a schedule. No inbound ports need to be opened on your servers.
Network requirements: Agents only need outbound access on port 443 (HTTPS). If your systems are behind firewalls that inspect SSL/DNS traffic or are air-gapped, adjust your rules accordingly.
Key Features
| Area | Details |
|---|---|
| Dashboard | Customisable per-user card layout with fleet-wide overview |
| Host Management | Host inventory, grouping, and OS detail tracking |
| Package Tracking | Package inventory, outdated package counts, and repository tracking per host |
| Compliance Scanning | OpenSCAP CIS Benchmark scans and Docker Bench for Security (scheduled or on-demand) |
| Docker Monitoring | Container discovery and status tracking across your hosts |
| Agent System | Lightweight agents with outbound-only communication. No attack surface on your servers. |
| Remote Access | In-browser RDP via Guacamole and SSH terminal with AI-assisted analysis |
| AI Analysis | AI-powered assistance inside the SSH terminal |
| Users & Auth | Multi-user accounts with roles, permissions, and RBAC |
| OIDC SSO | Single Sign-On via external identity providers (e.g. Authentik, Keycloak, Entra ID) |
| TOTP 2FA | Time-based one-time password two-factor authentication |
| Auto-Enrollment | Automatic agent enrollment for Proxmox LXC containers |
| API | REST API with JWT authentication under /api/v1 |
| Rate Limiting | Configurable rate limits for general, auth, and agent endpoints |
Quick Links
- Installing PatchMon Server on Docker
- Installing the PatchMon Agent
- Proxmox LXC Auto-Enrollment Guide
- PatchMon Environment Variables Reference
- Metrics and Telemetry
- Roadmap & Issues
- YouTube
- Discord Community
- GitHub Repository
Architecture
PatchMon is a single Go binary that serves both the API and the embedded React frontend. There is no separate frontend container or web server. The binary also runs database migrations automatically on startup.
End Users (Browser) ──HTTPS──▶ Reverse Proxy (optional)
│
▼
patchmon-server (Go binary)
- REST API (/api/v1)
- Embedded React frontend
- Background job worker (asynq)
- Database migrations
│
┌────────┴────────┐
▼ ▼
PostgreSQL 17 Redis 7
(job queues)
▲
Agents on your servers ──HTTPS──▶ patchmon-server
(outbound only)
In-browser RDP ──────────────────▶ guacd (Guacamole daemon)
| Component | Technology |
|---|---|
| Server | Go single binary (API + embedded frontend + migrations) |
| Frontend | React + Vite (embedded in the server binary) |
| Database | PostgreSQL 17 |
| Job Queue | Redis 7 (via asynq) |
| RDP Gateway | guacd (Apache Guacamole daemon), optional (required for RDP) |
Support
- Discord: patchmon.net/discord
- Email: support@patchmon.net
- GitHub Issues: Report a bug
License
PatchMon is licensed under AGPLv3.
Chapter 2: Settings in the Web UI
Overview
PatchMon 2.0 moves most day-to-day tuning out of the container's .env and into the Settings area of the web UI. From here you manage users and roles, host groups, agent update cadence, server-level toggles, branding, integrations, and authentication providers. Settings are stored in the database and the server re-reads them on every request (with a brief in-memory cache for hot paths), so most changes take effect without restarting the container.
Env vars beat DB values. When the same setting is present both as an environment variable and as a Settings UI value, the environment variable wins. The UI shows a small yellow "env" badge on values that are being overridden by
.env, so you can tell at a glance why your change "didn't save". See PatchMon Environment Variables Reference for the full priority model.
This page is the map of the Settings area: what each page does, which permission unlocks it, and which deeper chapter to read if you need more detail.
How to reach Settings
Click the cog icon in the top navigation bar, or go directly to /settings. You land on whatever your highest-priority settings page is (users, for people with can_view_users; branding, for everyone else with settings permissions).
- User Management: users, roles, your own profile, and social/SSO authentication
- Hosts Management: host groups and agent update behaviour
- Integrations: API integrations (auto-enrolment tokens) and AI Terminal
- Server: server URL, environment variables, branding, server version, and metrics
Some items are hidden depending on your deployment or your edition. For example, Server URL and Metrics are hidden on PatchMon Cloud, and features like Roles (custom RBAC), Branding, and AI Terminal are gated by the corresponding capability modules on paid tiers.
Settings Pages: Quick Reference
| Page | Path | Purpose | Required permission |
|---|---|---|---|
| Users | /settings/users |
Create, edit, and disable accounts | can_view_users / can_manage_users |
| Roles | /settings/roles |
Create and edit custom RBAC roles (Plus tier) | can_manage_settings + rbac_custom module |
| My Profile | /settings/profile |
Your own name, email, password, MFA, trusted devices | Any authenticated user |
| Discord Auth | /settings/discord-auth |
Configure Discord OAuth sign-in | can_manage_settings |
| OIDC / SSO | /settings/oidc-auth |
Configure OpenID Connect single sign-on | can_manage_settings |
| Host Groups | /settings/host-groups |
Organise hosts into groups for policy and visibility | can_manage_settings |
| Agent Updates | /settings/agent-config |
Global auto-update behaviour, update interval | can_manage_settings |
| Agent Version | /settings/agent-version |
Check and manage bundled agent binary versions | can_manage_settings |
| API integrations | /settings/integrations |
Auto-enrolment tokens, Proxmox LXC, getHomepage, etc. | can_manage_settings |
| AI Terminal | /settings/ai-terminal |
Configure AI provider for SSH terminal assist (Max tier) | can_manage_settings + ai module |
| Server URL | /settings/server-url |
Protocol, host, and port agents use to connect back | can_manage_settings |
| Environment | /settings/environment |
Read and edit server environment variables from the UI | can_manage_settings |
| Branding | /settings/branding |
Upload custom logo and favicon (Plus tier) | can_manage_settings + custom_branding module |
| Server Version | /settings/server-version |
Show the running version; check for updates | can_manage_settings |
| Metrics | /settings/metrics |
Control the optional telemetry opt-in | can_manage_settings |
Notifications, alert channels, alert settings, and patch management policies live outside the Settings area in 2.0, see Where alerts and patch policies live below.
User Management
Users
Path: /settings/users
Central directory of all PatchMon accounts. From here you can:
- Create new users (local username/password or OIDC-matched)
- Assign a role (
superadmin,admin,host_manager,user,readonly, or any custom role you've created) - Reset a user's password (admin-initiated reset, not self-serve)
- Enable, disable, or delete an account
- See when each user last logged in
Users also get a one-click button to create an auto-enrolment-style API token scoped to themselves, useful for integrations that need to act on behalf of a specific human operator.
Roles
Path: /settings/roles
Requires: rbac_custom module (Plus tier)
The Roles editor is where custom roles are authored. A role is a named bundle of permission flags:
can_view_dashboard,can_view_hosts,can_view_users,can_view_packages,can_view_reports,can_view_notification_logscan_manage_hosts,can_manage_users,can_manage_settings,can_manage_alerts,can_manage_notifications,can_manage_compliance,can_manage_patching,can_manage_automation,can_manage_dockercan_use_remote_access(SSH terminal and RDP)
The built-in roles (superadmin, admin, user, readonly) are immutable; the editor lets you create and edit additional roles alongside them and assign any user to any custom role.
My Profile
Path: /settings/profile
Your own account settings. Every authenticated user has access. Covers:
- First name, last name, email
- Password change (rate-limited; by default 5 attempts per 15-minute window)
- Two-Factor Authentication: enable or disable TOTP, regenerate backup codes
- Trusted Devices: list and revoke "remember this device" exemptions from MFA challenges
- Dashboard preferences: light/dark mode, card layout, default landing tab
Password policy rules are live: you cannot save a password that fails the server's policy. See PatchMon Environment Variables Reference: Password Policy.
Discord Auth
Path: /settings/discord-auth
Configure a Discord application as a sign-in provider. Each user can link their Discord identity from their profile page; once linked, they can sign in via the Discord button on the login page instead of typing a password.
Discord Auth is intentionally less feature-rich than OIDC SSO. There is no group-to-role mapping, no enforced-SSO mode, and no user auto-provisioning. Use it for communities and small teams; use OIDC SSO for everything else.
OIDC / SSO
Path: /settings/oidc-auth
Full OpenID Connect configuration: issuer URL, client ID and secret, redirect URI, scopes, button text, auto-provisioning, group-to-role mapping, and enforced-SSO toggle. A dedicated Import from environment button pulls existing OIDC_* values from .env into the database so you can migrate from file-based config without retyping anything.
For a step-by-step walk-through (Authentik, Keycloak, Entra ID, Okta), see Setting up OIDC SSO.
Hosts Management
Host Groups
Path: /settings/host-groups
Groups are the primary way to organise hosts for patching policies, alert routing, and dashboard filtering. Each host can belong to many groups; groups are purely organisational (no hierarchy, no nesting) and are referenced by name from policies, scheduled reports, and notification routes.
Agent Updates
Path: /settings/agent-config
Controls how and when PatchMon agents talk to the server and update themselves:
- Update interval: how often agents send a full report (default: 60 minutes); hosts with the WebSocket channel open pick up interval changes live.
- Auto-update behaviour: global on/off for automatic agent binary updates. Per-host overrides live on the host detail page.
- Signup enabled: whether the first-time setup wizard still serves the initial-admin endpoint.
Agent Version
Path: /settings/agent-version
Inspect the bundled agent binary versions (one per OS/architecture), check for newer releases upstream, and force a fresh download of the bundled binaries. Useful after you upgrade the server. Agents pick up the new binaries via the auto-update flow. No manual distribution required.
See Managing the PatchMon Agent for how agents consume this information.
Integrations
API integrations
Path: /settings/integrations
Auto-enrolment tokens and per-integration API credentials:
- Auto-enrolment tokens: one-shot or long-lived tokens that let enrolment scripts register new hosts without a human in the loop. Each token can be scoped to specific host groups and flagged for integrations like Proxmox LXC or getHomepage.
- Integration-type tokens: the scoped token model used by the integration
/api/*routes, includinggethomepagefor the dashboard widget.
AI Terminal
Path: /settings/ai-terminal
Requires: ai module (Max tier)
Configure the AI provider used by the in-browser SSH terminal's assist feature. Supported providers: OpenAI, Anthropic, Google Gemini, OpenRouter. Credentials are encrypted at rest using AI_ENCRYPTION_KEY (see Environment Variables Reference). The page includes a "Test connection" button so you can confirm the key works before saving.
Server
Server URL
Path: /settings/server-url
Hidden on: PatchMon Cloud
Three fields (protocol, host, port) that together define the base URL agents use to reach the server. This is the same URL the first-time setup wizard asked you to confirm, persisted in the database so the UI can generate correct install commands for every new host you add.
If you change the URL later, existing agents keep using whatever URL they were installed with; only new agents pick up the change. Rerun the install command on any host you want to retarget.
Environment
Path: /settings/environment
Requires: can_manage_settings
New in 2.0: every tunable environment variable that can be safely changed at runtime is listed here with its effective value, source (env / database / default), default, and a one-line description. Editable variables have an edit button; sensitive or bootstrap-only variables (like DATABASE_URL, JWT_SECRET, REDIS_PASSWORD, AI_ENCRYPTION_KEY, SESSION_SECRET) show as read-only and must still be changed in .env.
Variables are grouped by category: Database, Server, Logging, Authentication, Password policy, Server performance, Rate limits, Redis, Encryption, Deployment.
When you edit a value, the UI writes it to the database and immediately flashes a "Restart the application for changes to take effect" toast. Some settings take effect on the next request (CORS origin, log level, rate limits); others need a restart. The UI doesn't always know which is which, so the safe rule is: change, then docker compose restart server.
Tip: If you've been managing PatchMon from
.envfiles for a long time and want to move configuration into the database, clear a variable from.envfirst, then change it here. Otherwise the env value keeps winning.
Full reference: PatchMon Environment Variables Reference.
Branding
Path: /settings/branding
Requires: custom_branding module (Plus tier)
Upload a custom logo and favicon. The assets are stored in the database and served via GET /api/v1/settings/logos/{type}, so they live through container restarts without a persistent volume. Both dark-mode and light-mode variants can be uploaded separately. The read path is public (so the login page can show your branding before the user authenticates) but upload/reset are gated behind the custom_branding module.
Server Version
Path: /settings/server-version
Hidden on: PatchMon Cloud
Shows the running PatchMon server version, the latest upstream version (checked daily by the version-update-check automation job, see Background jobs and automation), and a manual "Check for updates" button. It does not perform the upgrade. To upgrade, PatchMon is a container-image swap (see Installing PatchMon Server on Docker).
Metrics
Path: /settings/metrics
Hidden on: PatchMon Cloud
Opt-in anonymous telemetry. PatchMon sends a small heartbeat (server version, number of hosts, rough OS distribution) to the upstream metrics endpoint once a day. You can turn this off, regenerate your anonymous instance ID, or send a one-off payload immediately. See Metrics and telemetry for exactly what is sent.
Where Alerts and Patch Policies Live
In 1.4.x these lived inside Settings. In 2.0 they've moved to more natural homes:
- Alerts (Open alerts, History):
/reporting→ Alerts tab - Alert Lifecycle
/reporting→ Alert Lifecycle tab (retention, auto-resolve, cleanup jobs) → Alert Lifecycle tab (requiresalerts_advancedmodule, Plus tier) - Destinations (SMTP, webhook, ntfy):
/reporting→ Destinations tab - Event Rules (routing alerts to destinations):
/reporting→ Event Rules tab - Delivery Log:
/reporting→ Delivery Log tab - Scheduled Reports:
/reporting→ Scheduled Reports tab - Patch Policies (scheduling, approval rules, exclusions):
/patching?tab=policies
Deep Dives
Some configuration areas have enough surface area to deserve their own page:
- Setting up OIDC SSO: Authentik, Keycloak, Entra ID, group-to-role mapping
- PatchMon Environment Variables Reference: every variable the server reads, with defaults and validation rules
- Managing the PatchMon Agent: agent CLI, update behaviour, troubleshooting
- Background jobs and automation: what the scheduled jobs on the Automation page actually do
- WebSockets architecture: how the server talks to agents and browsers in real time
Troubleshooting
"I changed a setting but nothing happened"
Check the Environment page for the variable you changed. If the "Source" column says env, your change to the database value is being overridden by an environment variable set in .env or the container spec. Clear the env value and the DB value will take over.
"I saved a setting and the UI says 'Restart to take effect'"
Some settings (startup-only values like PORT, DATABASE_URL, pool sizes) are read once at boot and cached for the life of the process. Restart the server container:
docker compose restart server
A small number of settings (CORS origin, log level, rate-limit windows) are re-resolved on every request and don't require a restart. The UI doesn't always distinguish between them; when in doubt, restart.
"Branding / AI Terminal / Roles is greyed out"
These are paid-tier features. Self-hosted users on the free tier see them in the sidebar but can't click through; clicking redirects to an upgrade page. If you're on a paid tier and still see them as locked, click Settings → My Profile → Subscription to confirm the module is listed under your enabled modules.
See Also
- First-time admin setup
- PatchMon Environment Variables Reference
- Managing the PatchMon Agent
- Setting up OIDC SSO
- Background jobs and automation
Chapter 3: Adding a Host
Overview
"Adding a host" is a two-sided operation. On the server side, you pre-register the host in the web UI: give it a friendly name, pick its operating system family, optionally place it in host groups, and receive a unique API ID and API key. On the host side, run the one-line install command that downloads and configures the agent using those credentials.
This page walks through the Add Host wizard, the install command, the Waiting for Connection screen, and what to do if the agent never shows up.
The server side is UI-only. You do not need shell access to the PatchMon server. Installing the agent on the target host is a separate job; see Installing the PatchMon Agent for distribution-specific prerequisites.
Permission required: can_manage_hosts. Users with only can_view_hosts see the Hosts list but not the Add Host button.
Before You Start
You will need:
- A PatchMon user account with
can_manage_hosts(typically Admin or a custom role). - Console or SSH access to the host you are adding, with root /
sudo(Linux/FreeBSD) or Administrator (Windows). - Outbound HTTPS from the host to the PatchMon server on port 443. No inbound ports are opened on the host.
- If your PatchMon server uses a self-signed certificate, decide up front whether to install the CA into the host's trust store or to bypass TLS verification in the install command.
Opening the Add Host Wizard
The wizard has four steps:
| Step | What happens |
|---|---|
| 1. Choose OS | Pick Linux, FreeBSD, or Windows |
| 2. Host details | Name the host, pick groups, toggle integrations |
| 3. Copy command | Copy the install one-liner, run it on the host |
| 4. Connection | The wizard waits for the agent to connect and report |
Step indicators at the top highlight where you are. You can go Back at any point before Step 3 is submitted.
Step 1: Choose OS
You pick one of three tiles:
- Linux: Ubuntu, Debian, CentOS, RHEL, Rocky, Alma, Fedora, Alpine, etc.
- FreeBSD: FreeBSD 13 / 14, including pfSense.
- Windows: Windows 10/11 (amd64 or ARM64) and Windows Server 2019 / 2022 / 2025.
The choice controls which install command the wizard generates and which download URL the server uses. You do not pick an architecture (amd64 / arm64 / arm / 386) here. The install script detects it automatically on the target host and downloads the matching binary.
Click Next to continue.
Step 2: Host Details
This form creates the host record on the server. Three groups of fields:
Friendly Name (required)
A human-readable label such as web-01.prod or billing-db. It appears in the Hosts list, dashboards, alerts, and the URL bar (/hosts/<id>). It is editable later from the Host Detail page, so don't worry about getting it perfect.
The placeholder server.example.com is not used as the system hostname. The real hostname is detected when the agent first reports.
Host Groups (optional)
A checkbox list of existing groups with coloured dots next to each name. Tick any group you want the host to belong to; a host can belong to multiple groups. You can change membership later from the Hosts table or the Host Detail page.
If you have no groups yet, this section is empty. Create groups first from Settings → Host Groups, see Managing Host Groups.
Integrations (optional)
Two toggles:
- Docker: enables container, image, volume, and network discovery via the Docker socket. Requires the
dockermodule on your plan. - Compliance: enables OpenSCAP CIS benchmark scanning. Requires the
compliancemodule on your plan.
These toggles write the initial docker_enabled / compliance_enabled state on the host record. The agent picks them up on its first connection and updates config.yml accordingly. If you're not sure, leave them off; you can switch them on later from the Host Detail → Integrations tab. See Enabling Docker Integration.
Click Next. PatchMon creates the host in Pending state and generates a unique API ID and API key. The key is displayed only once (in the command on the next step). If you close the wizard without copying it, you will need to regenerate credentials from the Host Detail page.
Step 3: Copy the Install Command
The wizard now shows a read-only command tailored to:
- The chosen OS (Linux / FreeBSD / Windows).
- Your server's configured URL.
- The new host's API ID and API key.
- Your global TLS setting (
ignore_ssl_self_signed): if it is on, the Linux command usescurl -skand Windows toggles default to SSL bypass.
Linux / FreeBSD
curl -s "https://patchmon.example.com/api/v1/hosts/install" \
-H "X-API-ID: patchmon_xxxxxxxx" \
-H "X-API-KEY: xxxxxxxxxxxxxxxxxxxxxxxxxxxxxxxxxxxxxxxxxxxxxxxxxxxxxxxxxxxxxxxx" | sudo sh
On FreeBSD the script drops sudo, because root usually runs the command directly.
Windows
On Windows the command is a PowerShell snippet that downloads the installer via Invoke-WebRequest and executes it. Two checkboxes adjust it:
- Self-signed certificate (SSL bypass): prepends code that forces TLS 1.2 and disables certificate validation for the download. Use only on lab or internal-CA environments.
- Use curl instead of Invoke-WebRequest (if download fails): switches to
curl.exefor the download, useful when corporate endpoint-protection tooling breaksInvoke-WebRequest.
The Windows command must be run in an elevated PowerShell (Run as Administrator).
Copy
Click the Copy command button (or the Copy icon). The command is placed in your clipboard and the wizard advances to Step 4. If your browser blocks clipboard access, the wizard falls back to a prompt() dialog with the command pre-selected; copy from there.
Tip: Store the command somewhere safe only if you need it for later re-use. The API key is not shown again from this screen. If you lose it, regenerate credentials from Host Detail → Deploy Agent → API Credentials → Regenerate.
Step 4: Waiting for Connection
After you copy the command, the wizard flips to a progress screen. It polls the server every 2 seconds and walks through four stages:
| Stage | Icon | What it means |
|---|---|---|
| Waiting for connection | Pulsing Wi-Fi | Host record exists; no agent has connected yet. Run the command now. |
| Connected | Green tick | The agent has opened a WebSocket to the server. The initial report is still in flight. |
| Receiving initial report | Animated download | The agent is sending its first system / package inventory. |
| Done | Green tick | Initial report received. The wizard redirects you to the new Host Detail page. |
Run the copied command on the target host. Within a few seconds the status flips to Connected, and shortly after to Done. At Done, the modal closes and the URL changes to /hosts/<hostId>.
If you need to see the command again (for example because you pasted it into the wrong terminal), click View command again to jump back to Step 3. The command and credentials are preserved.
Note: Closing the wizard before the agent connects does not cancel the host. The host remains in Pending state and you can finish enrolment later from the Host Detail page. However, the plaintext API key is cleared from memory once the modal closes. If enrolment is not complete, open the host, click Deploy Agent, and regenerate credentials to get a fresh command.
After Enrolment
Once the agent connects and sends its first report:
- The host moves from Pending to Active.
- The OS type, OS version, architecture, hostname, IP, kernel, and package list populate automatically.
- The Connection column on the Hosts page shows a green WSS badge (or WS if you are running without TLS).
- Packages, repositories, and any enabled integrations (Docker, compliance) start reporting on the configured interval.
Troubleshooting: The Host Doesn't Check In
If the wizard sits on Waiting for connection for more than a minute or two, run through the checks below on the target host.
Check the install command actually ran
On Linux / FreeBSD the install script is verbose. Look for:
Downloading patchmon-agent-<os>-<arch>...Installing to /usr/local/bin/patchmon-agentWriting /etc/patchmon/config.ymlWriting /etc/patchmon/credentials.ymlStarting patchmon-agent service
If the script aborted early, re-run it. If apt-get fails because of broken packages, open the host again from the Hosts page, click Deploy Agent, tick Force install (bypass broken packages) on the Quick Install tab, and use the regenerated command.
Confirm the service is running
Linux (systemd):
sudo systemctl status patchmon-agent
Alpine (OpenRC):
sudo rc-service patchmon-agent status
Windows:
Get-Service -Name PatchMonAgent
For detailed service management, see Managing the PatchMon Agent.
Test the connection manually
On the host, run the agent's built-in connectivity and credential test:
sudo patchmon-agent ping
A successful response looks like:
API credentials are valid
Connectivity test successful
If this fails, the agent log is the next stop:
sudo tail -n 50 /etc/patchmon/logs/patchmon-agent.log
Common causes:
- HTTP 401: the API key on the host does not match the one stored on the server. Usually this means the wizard was closed and the host was re-created, or credentials were rotated. Regenerate credentials from Host Detail → Deploy Agent.
- TLS / certificate error: the host does not trust the server's TLS certificate. Either install the CA into the host trust store, or set
skip_ssl_verify: truein/etc/patchmon/config.yml(lab only). - Connection refused / timeout: firewall, DNS, or reverse-proxy issue. From the host,
curl -I https://patchmon.example.comshould return an HTTP response.
See Managing the PatchMon Agent for a full diagnostic walkthrough and the patchmon-agent diagnostics command.
Nothing wrong on the host: still "Waiting"?
Open the host record regardless: from the Hosts page, click the host's friendly name (even while it's in Pending). The page shows a Deploy Agent button near the top right. Click it to reopen the install command and the waiting screen, and try again.
If the host has been Pending for a long time and you want to start over, delete the host from the Hosts page (trash icon or bulk-select → Delete), then add it again from scratch.
Bulk / Automated Enrolment
The Add Host wizard is designed for one host at a time. For automated enrolment:
- Proxmox LXC: PatchMon can auto-enrol all containers on a Proxmox host. See Proxmox LXC Auto-Enrollment Guide.
- Scripted deployments: Use the Integration API to create hosts, then deploy the install command via configuration management (Ansible, Salt, Chef, cloud-init). See Integration API Documentation.
Related Pages
- Managing Host Groups: create groups before (or after) adding hosts.
- Host Detail Page: guided tour of the page you land on after enrolment.
- Installing the PatchMon Agent: full agent-installer documentation.
- Managing the PatchMon Agent: post-install CLI, logs, diagnostics.
- Agent Configuration Reference: every
config.ymlfield explained.
Chapter 4: Host Detail Page
Overview
The Host Detail page is the single-host workbench in PatchMon. Reach it by clicking any host's friendly name from the Hosts page, or navigate directly to /hosts/<hostId>. Every action, statistic, and tab for a specific host lives here: connection status, package counts, repositories, integrations, patch runs, agent queue, credentials, and (when the relevant modules are enabled) Docker inventory and compliance results.
This page is a guided tour of the layout: what to click and what each tab is for.
Permission required: can_view_hosts to open the page. Mutating actions (trigger report, change groups, toggle integrations, delete host, run patches) need can_manage_hosts.
Page Header
The top of the page has four main areas:
Identity strip
- Friendly name (large heading), editable inline.
- Hostname and IP underneath, both editable inline (clicking shows a text field; Enter to save, Esc to cancel).
- Status chips: Active / Pending / Inactive / Error, and a coloured WebSocket badge (WSS green for secure, WS amber for plaintext, Offline red).
- Reboot required chip when the agent has detected pending-reboot flags (e.g.
/var/run/reboot-required, kernel updates). - Uptime and Last updated relative timestamps.
If there's a pending patch run awaiting a fresh post-patch report, you'll see an Awaiting inventory report chip that links to the run.
Action buttons (top right)
| Button | What it does | Requires agent online? |
|---|---|---|
| Apply | Appears only when pending config changes (e.g. integration toggles) need to be pushed to the agent. | Yes |
| Fetch Report | Sends a WebSocket command asking the agent to collect and submit a fresh report now. | Yes |
| Patch all | Opens the Patching wizard pre-scoped to this host. Hidden on Windows hosts. | Yes |
| Deploy Agent (key icon) | Opens the Credentials modal with the install command and API credentials. | No |
| Refresh (circular arrow) | Re-fetches host data from the PatchMon server (UI only). | No |
| Delete host (trash icon) | Opens a confirmation dialog and then removes the host record. | No |
Package statistics cards
Four clickable cards:
- Total Installed → opens Packages filtered by this host.
- Outdated Packages → Packages filtered to this host with only those needing updates.
- Security Updates → Packages filtered to this host with only security updates.
- Repos → opens Repositories filtered to this host.
Use these as quick jump-offs to the fleet-wide pages with the host pre-selected.
The Tab Strip
Below the cards is a horizontal tab bar. On desktop, all content is inside tabs; on mobile, sections are stacked as cards and tabs are replaced by quick-jump links.
The tab strip is context-aware. Some tabs only appear under certain conditions:
| Tab | Always visible? | Notes |
|---|---|---|
| Host Info | Yes | Default landing tab. |
| Network | Yes | |
| System | Yes | |
| Package Reports | Yes | Historical inventory snapshots. |
| Agent Queue | Yes | Background jobs for this host. |
| Notes | Yes | Free-text notes. |
| Integrations | Yes | Per-host Docker / Compliance toggles. |
| Reporting | Conditional | Hidden when global alerts are off. |
| Docker | Conditional | Only when the host has reported a working Docker integration. Gated by the docker module; shows a PLUS badge if your plan doesn't have it. |
| Patching | Yes | Gated by the patching module; shows a tier badge if your plan doesn't have it. |
| Compliance | Conditional | Only when the host has reported the compliance integration. Gated by the compliance module. |
| Terminal | Yes on Linux/FreeBSD | Browser-based SSH. Gated by the ssh_terminal module. |
| RDP | Windows hosts only | Browser-based RDP via Guacamole. Gated by the rdp module. |
Each tab below is described as what you see and what you can do.
Host Info
Quick reference panel for the host's identity and agent settings. Fields include:
- Friendly Name: inline-editable.
- IP Address: inline-editable; if the agent has picked a primary interface, this field is read-only and tagged from eth0 (or whatever the interface is).
- Hostname: inline-editable.
- Machine ID: read-only unique hardware identifier.
- Host Groups: coloured multi-select chips. Add or remove groups; changes save on blur.
- Operating System: icon plus OS type and version (detected by the agent).
- Agent Version: version of
patchmon-agentcurrently reporting. - Agent Auto-update: per-host toggle. If global auto-update is disabled, a yellow warning badge is shown with a tooltip pointing to Settings → Agent Updates.
- Force Agent Version Upgrade: the Update Now button sends an immediate upgrade command via WebSocket. Disabled when the agent is offline.
See Managing the PatchMon Agent for what the agent does when it receives an upgrade command.
Network
Visible when the agent has reported network data. Two sections:
- DNS Servers: grid of resolvers the host uses.
- Network Interfaces: one card per NIC with:
- Name, type, and UP/DOWN status.
- MAC address, MTU, and link speed / duplex.
- All
inetandinet6addresses with netmask and gateway. - A star icon to mark one interface as the primary. PatchMon will use that interface's primary address as the host's IP everywhere in the UI, overriding auto-detection.
Clearing the primary flag re-enables auto-detection.
System
Hardware and OS specifics collected on each report:
- Kernel version, SELinux status, architecture, package manager.
- CPU model, socket/core counts, frequency.
- Memory: total, used, free, swap (formatted in GiB).
- Storage / disk layout.
- Hardware vendor, product, serial number (where the agent can read it).
- SSG (OpenSCAP) version when the compliance integration is enabled.
This tab is read-only. All values come from the agent report.
Package Reports
Paginated history of package inventory snapshots the agent has sent. Useful for:
- Auditing when a package was installed, removed, or upgraded.
- Comparing two reports to understand what a patch run changed.
- Proving a package state at a given date to an auditor.
Each row shows the report timestamp, total packages, outdated count, security count, and a link to expand the full per-package diff.
Agent Queue
Live view of the background jobs queued for this host (fetch report, patch commands, compliance scans, integration config syncs, agent updates, etc.). The tab auto-refreshes every 30 seconds. You see:
- Waiting: queued but not yet picked up.
- Active: currently running.
- Delayed: scheduled for later.
- Failed: error state with the last error message.
- Job History: recently completed jobs with timestamps and outcome.
Use this tab to trace a "my Fetch Report click didn't do anything" complaint.
Notes
A free-text area for operator notes: change windows, ownership, special configuration, support contacts. Click into the text area to edit, then Save.
Notes are visible to any user with can_view_hosts on this PatchMon deployment.
Integrations
Per-host toggles and setup status for optional agent integrations. Two primary panels:
Docker
- Toggle: enables Docker discovery for this host. When off, no containers / images / volumes / networks are collected.
- The change is staged as a pending configuration; a yellow banner appears at the top of the tab until the change is applied.
- Click Apply in the page header to push the change to the agent via WebSocket. The agent updates its
config.ymland reports back.
See Enabling Docker Integration for prerequisites and troubleshooting.
Compliance Scanning
- A three-state selector: Disabled, On-Demand, Enabled.
- Disabled: no scans.
- On-Demand: only run when triggered from the UI; not included in scheduled reports.
- Enabled: scans run on the agent's normal reporting interval.
- Setup status indicator showing Installing / Ready / Partial / Error, with per-component status (OpenSCAP, Docker Bench).
- Scanner Types section: individual toggles for OpenSCAP (CIS Benchmarks) and Docker Bench (the Docker Bench toggle is disabled if the Docker integration is off on this host).
Changes require the agent to be connected via WebSocket.
Refresh Status
The Refresh Status button at the top right of the tab asks the agent to report its current integration readiness immediately. Useful after installing OpenSCAP manually on the host.
Reporting
Host-scoped overrides for alerting. The tab is hidden when global alerts are disabled in Settings.
Primary feature: Host Down Alerts with three states:
- Inherit from global settings (default).
- Enabled: always create alerts when this host goes offline, regardless of global defaults.
- Disabled: never create alerts for this host even if the global setting is on.
Use the Disabled override for hosts that are expected to be intermittent (dev laptops, ephemeral CI runners) so they don't spam your alert channels.
Docker (conditional)
Appears only when the host has actually reported a working Docker integration on at least one report. The tab is a compact per-host version of the fleet-wide Docker Inventory Tour.
Sub-tabs: Stacks, Containers, Images, Volumes, Networks. Each sub-tab shows counts in a badge next to its name.
Requires the docker module to be enabled on your plan. Plans without the module show a tier badge on the tab and an upgrade prompt inside.
Patching
Per-host patch run history and trigger point. Shows:
- A filterable, sortable, paginated list of runs for this host.
- Status chips (queued, running, completed, failed, approval pending).
- Inline output for completed runs.
- The Patch all button at the top of the Host Detail page is the quick way to start a new run scoped to this host.
Requires the patching module. The tab displays a tier badge when unavailable.
Compliance (conditional)
Appears when the compliance integration has been set up and at least one scan has run. Shows the latest benchmark results, failed rules with remediation guidance, and history. The agent installs OpenSCAP automatically when the integration is enabled; this tab surfaces that install's progress plus scan output.
Requires the compliance module.
Terminal
Browser-based SSH session to the host, proxied through the agent. No inbound port is needed on the host; the connection is routed over the existing agent WebSocket. Typical workflow:
- Open the Terminal tab.
- PatchMon fetches a short-lived SSH ticket and opens a WebSocket to the agent.
- The agent connects to localhost SSH (or the configured target) and relays the session.
- AI-assisted analysis is available within the terminal UI.
Gated by the ssh_terminal module. The agent-side ssh-proxy-enabled switch in config.yml must also be on. This is not a UI toggle, due to its security implications. See the SSH section of Agent Configuration Reference.
RDP (Windows only)
Browser-based RDP session using a Guacamole (guacd) gateway on the PatchMon server. Like the Terminal tab, it uses the agent to reach the host without requiring inbound firewall rules.
Visible only on Windows hosts, gated by the rdp module, and requires the agent-side rdp-proxy-enabled switch to be on in config.yml.
Credentials Modal (Deploy Agent)
Click Deploy Agent (key icon) in the page header to open the modal. Two tabs:
Quick Install
A copy-ready install command for this host, pre-populated with its API ID and API key. Options:
- Force install (bypass broken packages): Linux / FreeBSD only.
- Self-signed certificate (SSL bypass): Windows only.
- Use curl instead of Invoke-WebRequest: Windows only, workaround for hosts where PowerShell's downloader is blocked.
Click Copy. You're automatically moved to the Waiting for Connection screen, which polls until the agent connects and sends its first report. This is identical to step 4 of the Add Host wizard.
API Credentials
- API ID: copyable.
- API Key: obscured by default. The plaintext key is only available if it was just created or regenerated; otherwise the field shows hashed – not usable.
- Regenerate: creates a new API ID and key and invalidates the old ones. Use this if credentials have been lost or compromised. The agent on the host will need to be reconfigured or the install command re-run.
Common Actions: Where to Click
Quick reference for the most-asked "how do I…" questions:
| Goal | Where |
|---|---|
| Trigger an immediate report | Page header → Fetch Report |
| Force the agent to self-update | Host Info tab → Update Now |
| Open a shell in the browser | Terminal tab |
| See what the agent is doing right now | Agent Queue tab |
| Change which host groups the host is in | Host Info tab → Host Groups field (or the Hosts table inline edit) |
| Turn Docker monitoring on / off | Integrations tab → Docker toggle, then Apply in header |
| Run CIS scans | Integrations tab → Compliance selector → Enabled or On-Demand |
| Re-copy the install command | Deploy Agent (key icon) → Quick Install |
| Rotate the API key | Deploy Agent → API Credentials → Regenerate |
| Patch this single host | Page header → Patch all (opens wizard scoped to host) |
| Permanently remove the host | Page header → trash icon |
Mobile Layout
On smaller screens, the tab strip is replaced with stacked cards (Host Information, Network, System, Package Reports, and so on). The action buttons collapse into an icon row. Some dense sections (for example the Integrations mode selector) show a Manage in Integrations tab shortcut.
All data shown on mobile is the same as on desktop; only the layout changes.
Related Pages
- Adding a Host: how a host gets here in the first place.
- Managing Host Groups: editing group membership.
- Managing the PatchMon Agent: CLI equivalents of the actions on this page.
- Enabling Docker Integration: what turning on the Docker toggle actually does.
- Docker Inventory Tour: the fleet-wide view of the data surfaced on the Docker tab.
Chapter 5: Managing Host Groups
Overview
Host groups are the primary way to organise your fleet in PatchMon. A group is a named bucket with a colour and an optional description. Each host can belong to any number of groups. Groups appear as a column and filter on the Hosts page, as a selector on the Patching page, as a scope for patch policies, and as a filter in the Integration API.
This page covers creating, editing, and deleting groups, assigning hosts to them, and how groups feed into other parts of PatchMon.
Permission required: can_manage_settings to create / edit / delete groups (the page sits under Settings); can_manage_hosts to change which groups a host belongs to.
Where to Find Host Groups
There are two places to manage groups in the UI, and both edit the same data:
- Settings → Host Groups: full management page with a table view, create / edit / delete actions, and host counts.
- Options page (
/options): the same host-groups component, rendered inline for operators who havecan_manage_hostsbut notcan_manage_settings.
You can get to host counts and host assignments from either place, but the Settings → Host Groups route is the canonical one and is the one this page describes.
Creating a Group
The form has three fields:
| Field | Required? | Notes |
|---|---|---|
| Name | Yes | Short identifier such as Production, Web servers, DB tier. Shown in the UI and in API output. |
| Description | No | Free-text note shown in tooltips and on the group card. Use it for scope or ownership information. |
| Color | Yes | A hex value used for the coloured dot next to the group name. Picker + text input; defaults to #3B82F6 (blue). |
Click Create Group to save. The new group appears immediately in the table with a 0 hosts count.
Assigning Hosts to a Group
Groups are assigned on the host, not on the group. You have three paths:
During enrolment
On step 2 of the Add Host wizard (Host details) tick each group the host should belong to. See Adding a Host.
Inline from the Hosts page
- Open Hosts from the left navigation.
- Find the row for the host you want to change.
- Click the value in the Group column. It becomes an editable multi-select with coloured group chips.
- Tick / untick groups, then click away (or press Enter) to save.
Bulk assign
- Open Hosts.
- Select multiple rows using the checkboxes in the Select column.
- A toolbar appears above the table with Fetch Reports, Assign to Group, and Delete.
- Click Assign to Group. A modal lists every group with a checkbox.
- Tick one or more groups and click Assign to Groups. All selected hosts are updated in a single call.
Note on bulk behaviour: the bulk assign modal sets the selected groups on each host. It does not add to existing memberships. If you want to add a group without removing others, use the inline edit on the Hosts table or the Host Groups selector on the Host Detail page.
From the Host Detail page
Open any host (Hosts → click friendly name). On the Host Info tab, the Host Groups field is a multi-select identical to the one on the Hosts list. Tick / untick and click away to save.
Editing a Group
From Settings → Host Groups:
- Click the pencil icon in the Actions column of the group you want to change.
- A modal titled Edit Host Group opens with the current Name, Description, and Color pre-filled.
- Change whatever you need and click Update Group.
Editing a group's name or colour updates it everywhere: the Hosts table, the host's detail page, the Patching targets, and the API all pick up the new value immediately.
Deleting a Group
Deletion is restricted to prevent you from orphaning hosts by accident.
- From Settings → Host Groups, click the trash icon next to a group.
- The Delete Host Group modal opens.
- If the group has no hosts, the Delete Group button is enabled. Confirm to delete.
- If the group has one or more hosts, the modal shows a yellow warning with the list of hosts in the group, and the Delete Group button stays disabled.
What happens to hosts when the group is deleted?
You cannot delete a group that still contains hosts. The UI prevents it and the server returns an error. To delete a populated group, first move or remove the hosts:
- Move each host out of the group: open the host, untick the group in the Host Groups field, and save. The host stays in PatchMon and keeps any other group memberships.
- Or use bulk-assign from the Hosts page to reassign many hosts at once.
Once the group is empty, return to Settings → Host Groups and delete it.
Note: Deleting a group does not delete hosts. Hosts that were only in that group become ungrouped and still appear in the Hosts list. They can be reassigned to another group later.
Filtering by Group
On the Hosts page
- Click Filters in the Hosts toolbar to reveal the filter panel.
- Open the Host Group dropdown. It lists every group plus an Ungrouped option.
- Pick a group. The table reloads showing only hosts in that group.
- Use Clear Filters to reset.
You can also deep-link by visiting /hosts?group=<groupId>; group-clicks from other parts of the UI (for example the Host Groups page's host count badge) do exactly this.
Grouping the table
Above the filter panel, the No Grouping dropdown lets you group rows by Group, Status, or OS. Picking By Group splits the Hosts table into sections, one per group, each with a count header. Hosts in multiple groups appear under each of their groups. This is a visual grouping, not a filter.
Hiding stale hosts
The Hide Stale toggle on the Hosts toolbar can be combined with a group filter to narrow a view down to "active hosts in the production group", for example.
How Groups Feed Other Features
Groups are a selector across the product. Wherever a workflow asks "which hosts?" you can usually answer "this group".
Patching
- When you build a patch run, the target picker offers Host or Host group as the target type.
- Choosing a host group expands the target to every current member at the time the run is queued.
- Patch policies (recurring runs) can use a host group as the primary selector, so adding a new host to the group automatically includes it in the next scheduled run.
For the full patching flow, see the Patching chapter.
Integration API
The Integration API exposes host-group membership as a filter on host-related endpoints. Common patterns:
- Listing hosts in a specific group.
- Fetching package status rolled up by group for an external dashboard.
- Triggering bulk reports only for hosts in
Production.
See Integration API Documentation for the exact endpoints and parameters.
Alerts and Reporting
Some alert channels and scheduled reports support scoping by host group so that, for example, the platform team only receives notifications for Production hosts while the dev team owns Staging. See the Alerts & Notifications chapter for specifics.
Dashboards
Dashboard cards and the Hosts summary counts are fleet-wide by default. Individual host-centric views (Host Detail) show the groups a host belongs to as coloured chips, and clicking a chip deep-links back to a group-filtered Hosts list.
Good Practice
A few patterns worth knowing:
- Keep group names short. They show up in chips, tables, and filter dropdowns with limited width.
- One group per purpose. Environment (
Production,Staging), role (Web,DB,Cache), location (EU-West,US-East), or owner (Platform,Billing) are all reasonable axes. Combine them by giving a host multiple memberships instead of creating compound groups likeProd-Web-EU. - Use colour consistently. For example: red for production, yellow for staging, green for development. Consistent colours make the chips in the Hosts table and on dashboards readable at a glance.
- Empty is fine. Groups with zero hosts are valid; they are often created ahead of time for patch-policy planning. The UI just won't let you delete a group that still has hosts.
Related Pages
- Adding a Host: assign groups during enrolment.
- Host Detail Page: edit a single host's group memberships.
- Integration API Documentation: query hosts by group programmatically.
Chapter 6: Package Inventory
Overview
The Packages page is PatchMon's fleet-wide package inventory. It aggregates every package reported by every agent across your fleet into a single searchable list, with one row per unique package name, showing how many hosts have it installed, how many need updates, whether any of those updates are security-flagged, and which repositories supply the latest version.
This page walks through the Packages list, the filters, the per-package detail page, and how the inventory ties into the Outdated Packages card on the Dashboard.
Permission required: can_view_packages to view packages. can_manage_hosts to trigger patch runs from this page.
Getting There
Click Packages in the left navigation. The page shows a summary row, a filter toolbar, and a paginated table.
You can also deep-link:
/packages?host=<hostId>: pre-filter to a specific host./packages?filter=outdated: only packages with at least one pending update./packages?filter=securityor/packages?filter=security-updates: only packages with security updates available./packages?filter=regular: only packages with non-security updates.
The Dashboard's Outdated Packages card and the Host Detail cards use these query-string shortcuts.
Summary Cards
Five cards at the top of the page summarise what you're looking at:
| Card | Meaning | Click behaviour |
|---|---|---|
| Packages | Unique package names currently in the list | – |
| Installations | Sum of per-host installs across all listed packages | – |
| Outdated Packages | Packages with at least one host needing an update | Filters to Packages Needing Updates |
| Security Packages | Packages with at least one host needing a security update | Filters to Security Updates Only |
| Outdated Hosts | Distinct hosts that appear in the "needs update" side of those packages | Jumps to Hosts filtered to hosts needing updates |
The Packages and Installations figures reflect the current filter set; the Outdated Hosts card jumps you out to the Hosts page rather than filtering in-place.
The Filter Toolbar
Above the table:
- Search: free-text search across package names (debounced, matched server-side).
- Category: package category as reported by the underlying package manager (only populated for managers that expose categories, primarily apt/dpkg).
- Update Status: the main filter. Four options:
- All Packages
- Packages Needing Updates
- Security Updates Only
- Regular Updates Only
- Host: limits the list to packages present on a single host. When set, the page shows only that host's packages and unlocks the Patch all button to run a patch on just that host.
- Columns: customise which columns are visible and in which order.
Note: The toolbar filters by a single host, not by host group. To review packages across a group, open the Hosts page, filter by group, bulk-select the hosts, and review their packages via the individual host links or patch wizards. Group-wide patching is driven from the Patching page, not from here.
Reading the Table
Default columns:
| Column | Content |
|---|---|
| (select) | Checkbox. Tick to include the package in a multi-host patch run. |
| Package | Package name with a Package icon. Click the name to open the Package Detail page. An Info bubble appears when the package has a description; click it to see the description in a modal. |
| Installed On | Number of hosts with the package. When some (but not all) of those hosts need an update, the column shows N/M hosts (for example 3/12 hosts means 3 of 12 are outdated). Clicking the cell opens the relevant set of hosts on the Hosts page. |
| Status | One of three badges: Up to Date (green), Update Available (amber), Security Update Available (red, with a shield icon). |
| Latest Version | The newest version PatchMon has seen reported across all hosts for this package. |
| Source Repos | Repo chips. Each chip links to that repository. If more than three sources are reported, the overflow is shown as +N. |
How "Installed On" is calculated
The count includes every host PatchMon has seen reporting the package, regardless of version. The "needs updates" part of N/M hosts is hosts whose currently installed version is older than the latest version available from their configured repositories.
Security vs Regular updates
A package is "security" when at least one host sees a security-flagged update for it (typically because the update is pulled from a distribution's security channel such as *-security on Debian/Ubuntu or a vendor advisory on RHEL). Regular updates are non-security package upgrades. The Status column surfaces whichever priority is higher.
Sorting and Pagination
- Click any sortable column header to toggle sort direction.
- The status sort uses a priority: Security Update Available first, then Update Available, then Up to Date, so ascending order puts the highest-risk packages at the top.
- The page size selector (bottom of the table) supports 25, 50, 100, or 200 rows. Your choice is remembered per browser.
Clicking into a Package
Clicking a package name (or using the filter chip from a host's detail page) opens /packages/<id>, the Package Detail page. Two tabs:
Hosts tab (default)
Lists every host where the package is installed. Key elements:
- Top summary cards: Updates Needed, Latest Version, Updated (when PatchMon last saw a report for the package), Hosts with Package, Up to Date.
- A Source Repositories strip showing every repo across the fleet that supplies this package (click through to a repo detail).
- Description panel: the package description as reported by the host's package manager.
- Only pending filter: ticked by default; untick to see every host, including ones already up to date.
- Search: filters the host list.
- Per-row actions: for Linux/FreeBSD hosts, you can trigger a targeted patch of this one package. Windows hosts are marked as managed via Windows Update / WinGet.
- Select multiple rows and use Patch selected to run the same upgrade across many hosts in one patch run.
Activity tab
Recent patch runs in which this specific package was upgraded, with timestamps, target hosts, and outcomes. Useful for "when was this CVE closed across the fleet?" audits.
Bulk Patch from the Packages Page
Two flows produce a patch run from the Packages page:
Patch selected packages across chosen hosts
- Tick the checkbox on each package to include. The header shows
N selected. - Click Patch selected (N) (top right).
- The Patch wizard opens in multi-host mode, discovers which hosts have the selected packages installed and need updates, and lets you pick which to include.
- If the Host filter is already set to a single host, the wizard locks to that host to avoid offering unrelated hosts.
Patch all on a single host
- Set the Host filter to one host.
- Click Patch all (top right, only appears when a single non-Windows host is filtered).
- Confirm in the wizard to upgrade every outdated package on that host.
Both flows route you into the Patching chapter. See the patch-run pages there for what happens next.
The Outdated Packages Dashboard Card
The Dashboard shows a Outdated Packages card near the top of the Cards layout (the actual position depends on your personal dashboard customisation). The number shown is the fleet-wide count of packages with at least one host needing an update, which is the same figure as the Outdated Packages card on the Packages page.
Clicking the Dashboard card navigates to /packages?filter=outdated, which:
- Sets the Update Status filter to Packages Needing Updates.
- Clears the Category filter.
- Leaves other filters at their defaults.
From there, you can drill into individual packages, set up a patch run, or narrow to a specific host.
Tips
- Live list, periodic backing data. Rows are fetched from the PatchMon server and reflect the most recent reports submitted by each host. To refresh a host's data immediately, open the host's detail page and click Fetch Report. The Packages list picks up the new state on its next refetch (or click Refresh on the Packages page).
- Drilling down into patch state. The Hosts page is the better starting point when you care about which hosts are behind on updates. Use the Packages page when you care about which packages expose the fleet.
- Windows hosts. Package reporting works for Windows (via
winget,chocolatey, and MSI inventory), but the Patch all / Patch selected actions do not target Windows. Patching on Windows is managed via Windows Update or WinGet directly on the host.
Related Pages
- Host Detail Page: per-host package summary and fetch-report actions.
- Repository Tracking: see which repositories each package comes from.
- Managing the PatchMon Agent: how the agent collects package data.
- Integration API Documentation: fetch the same inventory programmatically.
Chapter 7: Repository Tracking
Overview
Every Linux host configures one or more package repositories: sources.list entries on Debian/Ubuntu, .repo files under /etc/yum.repos.d/ on RHEL-family, repositories on Alpine, pacman.conf entries on Arch, and pkg sources on FreeBSD. PatchMon's agent inventories those repositories on every report and sends them up alongside the package list. The server aggregates the results into a single fleet-wide view on the Repositories page.
This page walks through the Repositories list and detail view, the filters, how security is determined, and how repository data is kept current.
Permission required: can_view_hosts to read repositories; can_manage_hosts to edit or delete repository records.
What a Repository Entry Represents
A repository record in PatchMon corresponds to a package source as reported by a host's package manager:
| Package manager | Repository source |
|---|---|
| apt (Debian, Ubuntu) | Each entry in /etc/apt/sources.list and /etc/apt/sources.list.d/*.list or *.sources |
| yum / dnf (CentOS, RHEL, Rocky, Alma, Fedora) | Each enabled entry in /etc/yum.repos.d/*.repo |
| apk (Alpine) | Each line in /etc/apk/repositories |
| pacman (Arch) | Each [repo] section in /etc/pacman.conf |
| pkg (FreeBSD) | Each configured pkg repository |
Multiple hosts configured with the same URL are collapsed into a single repository record in the fleet view, so you can see at a glance which hosts pull from a given source. The per-host relationship is tracked separately so you can drill in and see exactly where a repo is in use.
Key fields on a repository entry:
- Name: a human-friendly identifier (often the repo's
Labelorid). - URL: the base URL the package manager fetches from.
- Distribution / release codename: e.g.
jammy,el9,3.19. - Is Secure:
truewhen the URL starts withhttps://,falsefor plaintexthttp://. - Is Active: whether the repo is currently enabled on at least one host.
- Host count: number of hosts currently configured with this repo.
Getting to the Repositories Page
Click Repositories in the left navigation. You can also deep-link:
/repositories?host=<hostId>: pre-filter to a single host's repositories.- The Repos card on the Host Detail page and the source-repo chips on the Packages page both use these query-string shortcuts.
Summary Cards
Four cards at the top:
| Card | Meaning |
|---|---|
| Total Repositories | Unique repositories across the fleet |
| Active Repositories | Repositories currently enabled on at least one host |
| Secure (HTTPS) | Count of repositories whose URL uses HTTPS |
| Security Score | secure ÷ total as a percentage |
A low Security Score is a quick signal that you still have HTTP-only repositories in the fleet, which is a good target for remediation.
Filter Toolbar
- Search: free-text search across the repository name and URL (debounced, matched server-side).
- Host filter indicator: when
?host=<id>is set, a pill shows Filtered by:with an Xto clear. - Security: All Security Types / HTTPS Only / HTTP Only.
- Status: All Statuses / Active Only / Inactive Only.
- Columns: customise visible columns and their order.
Reading the Table
Default columns:
| Column | Content |
|---|---|
| Repository | Name, with a Database icon. Click to open the detail page. |
| URL | Full URL. For Debian-family repos, the deb- / deb-src- prefix is stripped from display names for readability. |
| Distribution | Distribution / codename / release. |
| Security | Secure (HTTPS) with a lock icon, or Insecure (HTTP) with an open-lock icon. |
| Status | Active or Inactive. |
| Hosts | Count of hosts currently configured with this repo. Click to filter the Hosts page by hosts using this repo. |
| Actions | Delete icon (requires can_manage_hosts). |
Column visibility and order are persisted per browser.
Clicking into a Repository
Clicking a repository opens /repositories/<id>, the Repository Detail page. It has three main sections stacked vertically:
Repository Details
- Name, Description, URL, Distribution, Is Active, Priority.
- Inline edit toggle (pencil icon, requires
can_manage_hosts) lets you change the friendly name, description, active flag, and priority. - Delete repository button opens a confirmation dialog.
- Top-right summary chips: secure / insecure, active / inactive, last updated.
Editing or deleting a repository from this screen affects the PatchMon record, not the underlying host configuration. The next time an agent reports, PatchMon will reconcile with what's actually on the host. If the repo is still configured on any host, it will reappear. Delete is most useful for stale records where no host actively uses the repo.
Hosts Using This Repository
A searchable, paginated list of every host that has this repository configured. Each row shows:
- Friendly name (link to the Host Detail page).
- Hostname and IP.
- OS and version icon.
- When the host last reported the repository.
- Any host-specific settings (priority override, enabled flag).
Use this view to answer "who's still pulling from this old mirror?" questions.
Packages from this Repository
A searchable, paginated list of every package PatchMon has seen delivered through this repository. Each row shows:
- Package name (link to the Package Detail page).
- Latest version.
- Status badge: Up to Date, Update Available, or Security Update.
- Source repo chip.
This is the easy way to audit "which packages on my fleet come from this third-party repository?"
How Repositories Are Kept Up-to-Date
Agents collect their repository configuration on every report cycle:
- The agent runs package-manager introspection (
apt-cache policy,dnf repolist, etc.). - The result is serialised and sent alongside the package inventory and system info.
- The PatchMon server upserts repository records and updates the per-host link table:
- New repositories appear.
- Removed repositories are marked inactive (and retained as records, so historical package activity can still reference them).
- URL or distribution changes are reconciled. If you change a URL in
/etc/apt/sources.list, the next report updates it.
Because updates are report-driven, the Repositories page reflects the last known state. To force an immediate refresh for one host, open the host and click Fetch Report.
Security Filter in Practice
The HTTPS Only / HTTP Only filter is the quickest audit tool for enforcing secure package sources:
- Set Security to HTTP Only.
- The list now shows every plaintext repository in the fleet.
- For each, click into the repo and use the Hosts Using This Repository list to see who needs reconfiguring.
- Fix on the host (swap URL to HTTPS in the relevant
.list/.repo/apk repositoriesfile, update the distribution's certificate stores if needed), then run Fetch Report on the host. - The next report will move the host off the insecure record and onto the HTTPS one.
Some legitimate setups (for example, local intranet mirrors, or signed-but-insecure-transport repos such as classic Debian archives protected purely by GPG) are unavoidably HTTP. Use repository descriptions (via the edit dialog) to flag "approved HTTP" entries so future reviewers know they were considered.
Deleting a Repository Record
From the Repositories table or detail page, operators with can_manage_hosts can delete a record. The confirmation dialog lists the impact:
- The repository record is removed from PatchMon.
- Per-host links to that record are removed.
- The underlying host configuration is not changed; no file on the host is modified.
Because the agent re-reports every cycle, a delete is only permanent if no host actually has the repo configured any more. This is why the Inactive Only status filter is helpful: records with zero hosts are safe to tidy up, while records still tied to hosts will reappear after the next report.
Related Pages
- Package Inventory: browse packages, and use the repository chips there to jump to the repo detail.
- Host Detail Page: per-host repositories surface through the Repos summary card.
- Managing the PatchMon Agent: how the agent collects repository data on each report.
- Integration API Documentation: repositories are exposed as API objects for external tooling and compliance reporting.
Chapter 8: Patching Overview
What Patching Is
Patching is the PatchMon feature that lets you deploy package and security updates to your Linux and FreeBSD hosts on demand or on a schedule, with validation, approval, stop, retry, and live log streaming over WebSocket. You drive it from the Patching page in the web UI, or from the Patching tab on any Host Detail page.
Patching in 2.0 is a first-class module rather than a side-feature. Runs are persisted, queued through Redis/asynq, executed by the agent on the host, and streamed back to the browser live.
Module Gate
Both halves of the feature are gated by a capability module. If the module is not enabled on your plan, the relevant UI appears locked with an "Upgrade required" placeholder and the corresponding API routes reject the request.
| UI area | Required module |
|---|---|
| Patching dashboard, Runs & History, trigger a patch run, approve, stop, retry | patching |
| Policies tab, policy assignments, exclusions, scheduled runs | patching_policies |
Fleet-wide the Patching page is hidden from the sidebar when patching is not enabled. The Policies tab inside the page is shown with a tier badge when patching is enabled but patching_policies is not.
Who Can Use It
Patching uses two RBAC permissions on top of the module gate:
| Action | Permission | Route pattern |
|---|---|---|
| View dashboard, list runs, open a run, watch the live stream | can_view_hosts |
GET /patching/* |
| Trigger a run, approve, retry validation, stop, delete a run | can_manage_patching |
POST /patching/trigger, POST /patching/runs/{id}/approve, etc. |
| View policies | can_view_hosts |
GET /patching/policies |
| Create, edit, delete policies and policy assignments / exclusions | can_manage_patching |
POST/PUT/DELETE /patching/policies/* |
If your role has can_view_hosts but not can_manage_patching, you will see the Patching page read-only. The action buttons (Patch all, Approve, Stop, Delete) either do not appear or return a 403.
The Three Core Concepts
Everything in the Patching module revolves around three concepts:
1. Patch Run
A patch run is one unit of patching work against a single host. Every time you click "Patch all" on a host, approve a submission, or retry a validation, a run row is created in the database.
Each run has:
- A type:
patch_all(install all available package updates) orpatch_package(install a specific package or set of packages). - A dry-run flag: if
dry_run=true, the agent reports what would change without actually installing anything. This only applies topatch_package;patch_allcannot be dry-run because the agent's bulk upgrade path does not support--dry-runfaithfully. - A status that moves through the run lifecycle (see below).
- A persisted shell output that captures every line of stdout/stderr produced by the package manager. Live subscribers get it streamed over WebSocket; everyone else gets the full blob on completion.
- Optional policy metadata: the effective patch policy is snapshotted onto the run at trigger time, so you can see in run detail "which policy was in effect when this was queued".
Run statuses
The server moves a run through these statuses, visible as badges in the Runs & History table and in the run detail header:
| Status | Meaning |
|---|---|
queued |
The execution task has been enqueued on the asynq queue, waiting for the worker to pick it up. |
pending_validation |
A dry-run was queued for validation but has not completed yet (the host may be offline). |
validated |
The dry-run finished successfully; the run is waiting for an operator to approve it. |
pending_approval |
A patch run was submitted for approval without a dry-run (e.g. a patch_all that cannot be dry-run). An approver needs to sign off before the run is queued. |
approved |
The original validation run after someone approved it. A new execution run (linked by validation_run_id) is created alongside this row and queued. |
scheduled |
The run has been accepted but is waiting for its run_at timestamp (delayed or fixed-time policy). |
running |
The agent is currently executing the package manager command on the host. This is the status that opens the live WebSocket stream. |
completed |
The run finished successfully. The persisted shell_output is now authoritative. |
dry_run_completed |
A dry-run finished successfully (terminal state for dry-runs that aren't turned into a real run). |
failed |
The run finished with a non-zero exit status or the host reported an error. |
cancelled |
The run was stopped by an operator (via Stop Run) or deleted before execution. |
2. Patch Policy
A patch policy controls when an approved patch run actually fires. Policies are optional; a host with no policy attached gets the implicit "Default" policy, which runs patches immediately on trigger.
Each policy has a delay type:
- Immediate: run as soon as the task is dequeued.
- Delayed: wait N minutes after the trigger before running (useful for "give me 30 minutes to change my mind").
- Fixed time: run at a specific wall-clock time (
HH:MMin a named timezone, e.g.03:00inEurope/London). Used for maintenance windows.
Policies are assigned to hosts or host groups. You can also add per-host exclusions to carve specific hosts out of a group-assigned policy. See Patch Policies and Scheduling for full details.
3. Dry-Run / Validation
A dry-run (also called a validation run) asks the agent to simulate the package installation without applying it. It exists to catch problems before you touch the host:
- For
apt-get, the agent runsapt-get -s install <packages>and parses the simulation output. - For
dnf/yum, the agent runs the planning step that reports "what would be installed" without committing. - For
pkgon FreeBSD, the agent runspkg upgrade -nor the equivalent install-no-run. - For
pacman, the agent usespacman -S -p/pacman -Syu -p(print-only) as the validation step.
When the dry-run completes the run transitions to validated and shows you the list of packages that would be installed, including dependencies that were pulled in. If more packages would be installed than you originally asked for, the UI badges the run with Extra deps and surfaces the full list in the run detail "Packages affected" panel so you can review before approving.
Approval is the step that turns a validated dry-run into a real patching run. On approval:
- The validation run is marked
approved(terminal) and preserved with its output for audit. - A new patch run is created with
dry_run=false, linked to the validation viavalidation_run_id. - The new run is enqueued against the effective policy (so "Approve & Patch" at 14:00 on a host with a
03:00fixed-time policy produces ascheduledrun, not an immediate one). - You can override the policy at approval time by picking Immediate in the approve wizard, which bypasses the delay.
Multi-OS Coverage
The agent chooses the patching back-end by detecting the host's package manager. Linux and FreeBSD patching are fully supported; Windows patching has its own path.
| Package manager | OSes | Supported for patching |
|---|---|---|
apt-get |
Debian, Ubuntu, Raspbian | Yes |
dnf |
RHEL 8+, Rocky, AlmaLinux, Fedora | Yes |
yum |
RHEL 7, CentOS 7 | Yes |
pacman |
Arch Linux, Manjaro | Yes |
pkg |
FreeBSD 13+ (plus freebsd-update for the base system on patch_all) |
Yes |
apk |
Alpine Linux | No. The agent reports apk inventory but rejects patch runs with package manager "apk" not supported for patching (apt, dnf, yum, pkg, pacman required). Alpine hosts are visible in PatchMon and get compliance scans, but patch runs on them fail on the agent side. |
| Windows Update Agent (WUA) + WinGet | Windows 10/11, Server 2019/2022/2025 | Yes (separate path) |
Note: The 2.0 release notes describe Linux patching generally. If you need to patch Alpine hosts, track the package manager roadmap or use your existing Alpine tooling until
apksupport lands.
Windows patching
When the agent detects it is running on Windows, patch runs are handled by the WUA + WinGet path rather than the Linux package-manager path:
- Patch all installs every Windows Update currently marked
approvedfor that host by the server, plus runswinget upgrade --allfor WinGet-managed applications. - Patch package routes by name: strings that look like a
KB.../ GUID update are sent via WUA, anything else is treated as a WinGet package ID. - Reboot state, superseded-update cleanup, and approved-GUID sync all go through dedicated
/patching/windows-updates/*endpoints used by the beta Windows agent.
Windows patching is flagged beta in 2.0 and the Run Detail page renders the same way regardless of OS. The terminal pane simply shows PowerShell / winget output instead of apt-get output.
Where Patching Lives in the UI
There are two ways into patching from the left-hand navigation:
- Patching (top-level sidebar item): the fleet-wide view. This is the page described in Running a Patch, Patch Policies and Scheduling, and Patch History and Live Logs.
- Hosts → select a host → Patching tab: the per-host view. Start a Patch all run for that host, watch its packages list, open any previous patch run for this host. The tab is hidden when the
patchingmodule is disabled.
You can also enter the Patching UI from:
- A package link in the Packages page. "Patch this package" starts a
patch_packagewizard pre-loaded with the selected package and the hosts it is installed on. - The Dashboard patching cards (queued/running counts), which deep-link into the Runs & History tab with the appropriate status filter applied.
What Happens When You Click "Patch All"
The end-to-end flow for a single patch_all run is:
- You click Patch all on a Host Detail page. The Patch Wizard opens, pre-loaded with the host.
- You optionally override the policy (e.g. "Run immediately" on a host that has a delayed policy) and click the fire button.
- The browser calls
POST /patching/triggerwithpatch_type=patch_all. Becausepatch_allcannot be dry-run, the run starts inpending_approvalif you ticked "Submit for approval", or goes straight toqueuedotherwise. - The server inserts a
patch_runsrow, snapshots the effective policy onto it, and enqueues arun_patchtask on thepatchingasynq queue. If the policy introduces a delay, asynq schedules the task for the future and the run status showsscheduled. - When the task dequeues, the server sends a
run_patchWebSocket message to the agent connected for that host. - The agent flips the run to
running, callsapt-get upgrade -y(or the equivalent for the OS), and streams stdout/stderr back overPOST /patching/runs/{id}/outputin short chunks. - The server fans each chunk out to any browsers subscribed to
GET /patching/runs/{id}/stream, and persists the combined output to the database. - On success the agent sends a final
completedstage with the authoritative shell output. The server marks the runcompleted, emits apatch_run_completednotification, and flags the host as "awaiting post-patch report" so the next inventory sync can update the package status. - The Run Detail page swaps the green Live pill for a subtle Awaiting inventory report pill, then for New report received once the agent sends its next scheduled inventory report and the system knows the on-host packages reflect reality.
See Running a Patch for the step-by-step operator walkthrough, and Patch History and Live Logs for everything to do with the terminal pane and log stream.
Related Documentation
- Running a Patch: step-by-step, from trigger through live log to "patched".
- Patch Policies and Scheduling: configure when patches actually run.
- Patch History and Live Logs: work with the Runs & History table and live terminal output.
- Release Notes: 2.0.0: the release that introduced the patching module.
Chapter 9: Running a Patch
This page walks you through starting a patch run from the PatchMon web UI, from the initial click through dry-run validation, approval and live log streaming, to the final "patched" state. Everything here happens in the browser against a logged-in session.
Assumes you have the patching module enabled and the can_manage_patching permission. If the action buttons are missing, see Patching Overview for the permission matrix.
Starting Points
There are three entry points into a patch run:
| Entry point | What gets pre-filled | Typical use |
|---|---|---|
| Host Detail → Patching tab → Patch all | Target host is locked; patch type is patch_all |
"Update everything on this host, now." |
| Host Detail → Patching tab → Patch selected packages | Target host is locked; patch type is patch_package with the packages you ticked |
"Patch just these two CVEs on this host." |
| Packages → select a package → Patch this package | Package name is locked; host list is discovered from fleet inventory (only hosts that actually need the update) | "Roll out this specific package across the fleet." |
All three funnel into the same Patch Wizard, a single modal used everywhere patching is initiated, so the mental model is identical regardless of where you started from.
The Patch Wizard
The wizard has a fixed six-step sequence, but it auto-skips steps that have no decision to make for your starting point. Unused steps are shown muted in the step indicator so you always see the full mental model.
| # | Step | Shown when |
|---|---|---|
| 1 | Hosts | You entered from Packages (fleet rollout) and need to pick which hosts to patch. Hidden when the host is pre-locked. |
| 2 | Packages | You entered with a multi-package list and want to trim it. Hidden for patch_all or single-package runs. |
| 3 | Validate | patch_package only. Hidden for patch_all (cannot dry-run) and for Approve flows (validation already exists). |
| 4 | Timing | Always shown. Review effective policy and optionally override to "run immediately". |
| 5 | Approval | patch_package only. Choose "Approve & Patch now" or "Submit for approval". Hidden in Approve mode. |
| 6 | Submit | Always shown. Final per-host summary and the fire button. |
Flow A: Patch All on a Single Host
This is the simplest case: update every out-of-date package on one host.
- Open Hosts → select your host → Patching tab.
- Click Patch all. The wizard opens at the Timing step (Hosts, Packages, Validate and Approval are all skipped for
patch_all). - Review the effective patch policy shown on the Timing step. If the host has a delayed or fixed-time policy attached, the wizard tells you when the run will actually start (for example "Runs at 03:00 Europe/London").
- If you need to bypass the delay, tick Run immediately. This sets
schedule_override=immediateon the trigger call and fires the run as soon as the worker dequeues it. - Click Next to advance to Submit.
- On Submit, read the per-host summary (host name, patch type, effective run time) and click Queue & patch.
What happens next on the server:
- A
patch_runsrow is inserted withpatch_type=patch_all,dry_run=false, and the policy snapshot. - A
run_patchtask is enqueued on thepatchingasynq queue. - If the policy introduces a delay, the task is scheduled for the future and the run is shown as
scheduledin Runs & History. Otherwise it goes straight toqueued. - The browser deep-links into the Run Detail page so you can watch the live terminal.
Note:
patch_allcannot be dry-run. The agent's bulk-upgrade path (apt-get upgrade,dnf upgrade,pkg upgrade,pacman -Syu) does not support a reliable simulation mode. If you want a dry-run, patch specific packages instead.
Flow B: Patch a Specific Package with Dry-Run
This is the richer flow and the one to use for anything security-sensitive. The dry-run runs first, you review the transaction, then you approve.
- Open Patching → click into the package from a host, or start from Packages → package name → Patch this package.
- The wizard opens at the Validate step (Hosts and Packages steps may be visible for fleet rollouts).
- Click Run dry-run. The browser calls
POST /patching/triggerwithdry_run=true. For each target host, the server:- Creates a
patch_runsrow inpending_validationstatus. - Sends the
run_patchcommand to the agent withDryRun=true. - The agent runs the package-manager simulation step (for example
apt-get -s install <packages>).
- Creates a
- The wizard polls each run until it terminates. While you wait you see:
- The per-host status badge (pending validation → running → validated).
- A live terminal excerpt for the currently running host.
- When the dry-run completes, the run transitions to
validatedand the wizard shows:- The final Packages affected list (what would be installed, always a superset of the original request because of dependency resolution).
- An Extra deps badge if dependency resolution pulled in packages you didn't originally ask for.
- The captured stdout/stderr for the simulation.
- Review the output. If the transaction looks correct, click Next to the Timing step, choose Run immediately or leave the policy delay, and then Approve & Patch on the Submit step.
- The browser calls
POST /patching/runs/{validationId}/approve. The server:- Marks the validation run
approved(terminal state; the row and output are preserved for audit). - Creates a new
patch_runsrow withdry_run=false, linked to the validation viavalidation_run_id. - Enqueues the real
run_patchtask with the effective policy delay. - Returns the new run ID; the UI deep-links you into its Run Detail page if it's going to start immediately.
- Marks the validation run
Retrying a stuck validation
If the agent was offline when you triggered the dry-run, the run will sit in pending_validation until it comes back. You have two options:
- Retry Validation: re-queues the same dry-run task. Call this once the agent is back online. Works via
POST /patching/runs/{id}/retry-validationand is only available forpatch_packageruns. - Skip & Patch: bypasses the dry-run entirely and queues the real patch run directly. Use this when you're confident about the change and the host won't come back soon. The UI labels the button amber to make it clear you're skipping a safety step.
Both options are available from the Runs & History table, from the Run Detail page, and inline on a per-row basis.
Submitting a patch_all run for approval
patch_all can't be dry-run, but you can still route it through an approval gate. In the wizard's Approval step tick Submit for approval. The run is created in pending_approval status with no execution task enqueued. A second reviewer with can_manage_patching can then open Runs & History, click Approve on that row, and the server builds the real execution run the same way as a validated approval. Until that happens the run sits in the DB and can also be deleted.
Flow C: Patch a Package Across the Fleet
Same as Flow B, but starting from the Packages page. The wizard discovers which hosts have the package out of date (only those show up in the Hosts step) and validates each in parallel.
Watching a Run: The Run Detail Page
Once a run is fired and not delayed, the UI redirects you into /patching/runs/{id}. The page has:
- A header with the host name, status badge, Awaiting inventory report pill (post-patch), and the primary action buttons for the current state (Approve & Patch, Retry Validation, Skip & Patch, Stop Run).
- A left-side Run summary card: host, type, initiated by, approved by, started / completed timestamps, link to the validation run if any, patch policy in effect, and packages affected.
- A right-side Shell output terminal for the live log stream.
Live log streaming
While the run is running, the Run Detail page opens a WebSocket connection to /api/v1/patching/runs/{id}/stream. The server's in-process patchstream hub fans out agent-published events to every connected browser:
- snapshot: sent once when you connect. Contains the current stage and whatever
shell_outputis already persisted, so the terminal pane is primed even if you arrived mid-run. - chunk: a short piece of stdout/stderr from the agent, appended to the terminal as it arrives.
- done: a terminal stage (
completed,failed,cancelled,validated, ordry_run_completed). The socket closes and the UI refetches run metadata to show the final state.
The header shows a pulsing green Live pill while the WebSocket is open. If you scroll up in the terminal to read earlier output, the UI stops auto-scrolling; scroll back to the bottom and it resumes.
If you arrive on a run that's already in a terminal state, the server sends a single snapshot message containing the persisted shell_output plus a synthetic done message, then closes the connection. The database is the source of truth, so you see exactly the same terminal contents as everyone else.
Copying output
When the run is not queued or running, a Copy output button appears above the terminal. It copies the full shell output to your clipboard. Use this for incident reports or to paste into a ticket.
The terminal normalises carriage returns. apt-get and dpkg use \r to overwrite progress bars on a single line, which would be invisible in a scrollback view. The UI converts \r to \n so every progress update becomes its own readable line.
Stopping a Running Patch
You can stop a run while it is in the running state. This is a hard stop with no graceful "let it finish the current package" behaviour.
- On the Run Detail page, click Stop Run in the header.
- Confirm in the dialog. The warning "Partially-installed packages may leave the host in an intermediate state" is there for a reason. Interrupting
aptordnfmid-transaction can leave dpkg or rpmdb needing manual repair. - The browser calls
POST /patching/runs/{id}/stop. The server looks up the agent in theagentregistry, sends apatch_run_stopWebSocket message, and returns202 Accepted. - The agent cancels the subprocess via
SIGINT, collects whatever output it has, and reports a terminalcancelledstage back to the server. - The live stream closes and the run's final status is
cancelled.
When Stop Run is not available
- The run is not in the
runningstate (no subprocess to interrupt). Forqueued,scheduled,pending_validation,pending_approval, orvalidated, use Delete in Runs & History instead. That also removes any scheduled task from the asynq queue. - The agent is not currently connected. The UI returns a 409 with "Agent is not currently connected". Wait for the agent to reconnect, or stop the agent's systemd service if you need the patch process killed at the OS level.
Post-Patch: The Awaiting Inventory Report Pill
When a patch_all or non-dry-run patch_package completes, the server sets awaiting_post_patch_report_run_id on the host. The Run Detail page shows an Awaiting inventory report pill next to the status badge, and the polling interval keeps ticking every 3 seconds.
The agent's next scheduled inventory report (usually within 60 minutes, sooner if triggered manually) updates the host's package list. The server clears the awaiting flag, and:
- If the host's
last_updatetimestamp is newer than the run'scompleted_at, the pill changes to New report received. - Otherwise the pill disappears. Absence is the soft success signal.
This is how you know the packages the patch run installed are now reflected in the Package Inventory view, not just that the apt command returned exit 0.
Troubleshooting Common Cases
The run sits in queued forever
The asynq worker picked up the task but cannot reach the agent, or the agent never received the WebSocket command.
- Check the agent's connection status on the Host Detail page (green Connected pill).
- Check the server logs for
patching:entries around the task ID (patch-run-<run-id>). - If the agent has been offline and just reconnected, wait up to 30 seconds for the WebSocket re-handshake.
"package manager ... not supported for patching"
The agent rejected the run because the host's detected package manager is not in the supported list (apt, dnf, yum, pkg, pacman). This is the error you see on Alpine (apk) hosts today. The run immediately transitions to failed with the message in error_message.
The run completes but the package inventory hasn't updated
The agent hasn't sent its post-patch inventory report yet. The Awaiting inventory report pill will flip automatically once it arrives. If it doesn't arrive within an hour, force a report from the agent CLI:
sudo patchmon-agent report
Approve returns 400 "Only validated... runs can be approved"
Another operator already approved or deleted the run while you were looking at it. Reload Runs & History; the row will now be in approved or gone.
Related Documentation
- Patching Overview: the three core concepts, module gates, and supported OS coverage.
- Patch Policies and Scheduling: control when approved runs actually fire.
- Patch History and Live Logs: the Runs & History table, filtering, and deeper dive into the live log stream.
- Managing the PatchMon Agent: agent CLI, service management, and troubleshooting connection issues.
Chapter 10: Patch Policies and Scheduling
A patch policy controls when an approved patch run actually fires on a host. Policies let you carve out maintenance windows, build in a delay for "I might change my mind" runs, or force an immediate execution on anything that matters. Assignments and exclusions let you apply a policy broadly (to a host group) while still carving specific hosts out of it.
This page walks through the policy model, how effective policies are resolved, the Settings UI, and how policies interact with run triggers.
Module Gate and Permissions
Patch policies are gated by the patching_policies capability module, which is separate from the base patching module. A deployment with patching enabled but not patching_policies can still trigger patch runs; they just run immediately and cannot be scheduled through a policy.
| Action | Required module | Required permission |
|---|---|---|
| View policies and their assignments | patching_policies |
can_view_hosts |
| Create, edit, delete policies | patching_policies |
can_manage_patching |
| Add or remove policy assignments (host / host group) | patching_policies |
can_manage_patching |
| Add or remove host exclusions | patching_policies |
can_manage_patching |
If patching_policies is not enabled, the Policies tab on the Patching page is shown with an "Upgrade required" placeholder and a tier badge.
Where Policies Live in the UI
There are two equivalent entry points, both showing the same policy list with the same editor:
- Patching page → Policies tab: the main view. Lists every policy, shows schedule type and assignment count, and lets you expand a policy to manage its assignments and exclusions inline.
- Settings → Patch Management: the admin-centric view, identical in function, kept so patch policies are discoverable alongside other operational settings.
Both pages are backed by the same /api/v1/patching/policies endpoints, so any change you make in one is visible immediately in the other.
The Policy Model
Each policy has the following fields:
| Field | Type | Description |
|---|---|---|
name |
string, required | Display name of the policy. |
description |
string, optional | Free-text description. |
patch_delay_type |
enum, required | immediate, delayed, or fixed_time. |
delay_minutes |
integer, required when delayed |
Minutes to wait after the trigger before running. |
fixed_time_utc |
string, required when fixed_time |
Time of day in HH:MM format. See the timezone note below. |
timezone |
string, optional | IANA timezone name (e.g. Europe/London, America/New_York). Used in the UI label only. |
The three delay types
Immediate. The run fires as soon as the asynq worker dequeues the task. This is the default policy behaviour when no policy is attached to a host. Use for development hosts or anything where you actively approve each run.
Delayed. The run is scheduled for now + delay_minutes at the moment it is triggered. Typical values are 30-60 minutes, enough time for an operator to cancel if the trigger was a mistake, but short enough that the patch still lands in the current shift. The delay is counted from the trigger time (or approval time, for patch_package), not from policy creation.
Fixed time. The run is scheduled for the next occurrence of HH:MM. If HH:MM has already passed today, the run is scheduled for HH:MM tomorrow. Use for maintenance windows (03:00 daily reboots, for example). Delays can be long: a run triggered at 14:00 for a 03:00 fixed-time policy will sit in scheduled status for 13 hours.
Timezone handling (important)
The fixed_time_utc column is literally interpreted as UTC by the server when computing the next run time. The timezone field on the policy is stored and shown in the UI label (Fixed time at 03:00 Europe/London), but the scheduler does not apply it. 03:00 always means 03:00 UTC.
This is a known wrinkle:
- The database column is named
fixed_time_utc, which is the source of truth. - The UI builds the "at 03:00 Europe/London" display string from
fixed_time_utc + timezonepurely for labelling. ComputeRunAtparsesfixed_time_utcinto a UTC wall-clock time and ignores the storedtimezone.
Practical advice: enter the fixed time as the UTC equivalent of your intended local time and use the timezone field purely as a reminder to yourself. A 03:00 Europe/London maintenance window in winter (GMT) should be stored as fixed_time_utc=03:00; in summer (BST) you would want 02:00. If you need true local-time scheduling that follows DST, plan patch runs with a delayed policy triggered by an external scheduler instead.
Note: This may change in a future release. Verify the current behaviour in your deployment by triggering a test run and checking the
scheduled_attimestamp on the run before relying on timezone-aware semantics.
Creating a Policy
- Open Patching → Policies (or Settings → Patch Management).
- Click Create policy. A modal opens with the policy form.
- Fill in:
- Name: required. Pick something that describes the window, not the host set (e.g. "Nightly 03:00 UTC", not "Production web tier"). Host assignment is done separately.
- Description: optional but helpful.
- Patch delay:
Immediate,Delayed (run after N minutes), orFixed time (e.g. 3:00 AM).
- If you picked Delayed, enter the number of minutes (minimum 1).
- If you picked Fixed time:
- Enter the time in
HH:MMformat. Remember this is interpreted as UTC. - Pick a timezone from the dropdown. This only changes the label; see the timezone note above.
- Enter the time in
- Click Create. The policy appears in the list with
0 assignment(s).
Policies are empty until you assign them. A newly-created policy is inert and does not automatically apply to any host.
Assigning Policies
A policy can be assigned to a host (direct) or a host group (indirect). Direct assignments take precedence over group assignments; see Effective Policy Resolution below.
To assign a policy:
- In the Policies list, click the N assignment(s) link on the policy row. The row expands to show the Applied to panel.
- Choose Host or Host group from the dropdown.
- Pick the target host or group from the second dropdown.
- Click Add.
The assignment takes effect immediately for any future patch runs on that target. Runs already queued against the old effective policy are not recomputed; they keep the policy snapshot from the moment they were triggered (visible in the Run Detail sidebar).
To remove an assignment, click the × next to its chip in the Applied to list.
Exclusions
Exclusions let you carve a specific host out of a policy that it would otherwise inherit through a host group. Direct host assignments cannot be excluded because the precedence rules make the direct assignment always win.
Typical use:
- You have a host group
production-webwith 50 hosts. - You assign a
Nightly 03:00 UTCpolicy to that group. - One particular host in the group (
prod-web-api-01) serves a customer in Singapore who cannot tolerate a 03:00 UTC outage (that's mid-day for them). - You add
prod-web-api-01as an Exclusion on the policy. That host is then treated as having no policy (falls back to Default / immediate) even though it is still in theproduction-webgroup. - Optionally, assign
prod-web-api-01directly to a different policy with a 19:00 UTC fixed time.
To add an exclusion, expand the policy and use the Exclusions row: pick a host from the dropdown, click Exclude host. The host is shown as an amber chip in the exclusions list.
Exclusions apply only to that specific policy. If the host is a member of another group assigned to a different policy, that other policy can still apply.
Effective Policy Resolution
When a patch run is triggered, the server resolves the effective policy for the target host using this precedence:
- Direct host assignment: if the host has any policy directly assigned, that policy wins. Exclusions do not apply here (you can't direct-assign and then exclude).
- Group assignment: if the host is a member of one or more host groups, the server walks the groups' policy assignments and picks the first policy (by assignment
created_atascending) where the host is not excluded. - Default: if none of the above applies, the effective policy is the implicit "Default" policy, which is equivalent to
patch_delay_type=immediate. The Run Detail sidebar shows this as "Default policy. Runs immediately on trigger."
If a host is in multiple groups with conflicting policies, the oldest policy assignment wins. Order matters. If you need deterministic behaviour in a complex fleet, prefer direct host assignments over layered group policies, or design your groups so that each host is only in one "scheduling" group.
Checking the effective policy
Before triggering a run, the Patch Wizard's Timing step calls GET /patching/preview-run?host_id=<id> for each selected host. The response contains the run_at_iso time (what ComputeRunAt returns right now) and the resolved policy's name, ID, and delay type. That's how the wizard tells you "Runs at 03:00 UTC via Nightly-Window" before you click fire.
The policy snapshot
When a run is created, the server also takes a snapshot of the effective policy onto the run row (policy_snapshot JSON). The snapshot is what the Run Detail page displays, and it is immutable; changing or deleting the policy later does not rewrite the snapshot. This is important for audit: "which policy was in effect when this run fired on 12 March?" always has an answer, even if the policy has since been deleted.
Scheduling Semantics
Once the effective policy is resolved, the server converts it into an asynq job delay:
| Policy type | delayMs computation |
Visible run status |
|---|---|---|
immediate |
0 |
queued immediately |
delayed |
delay_minutes × 60 × 1000 |
scheduled for run_at = now + delay_minutes |
fixed_time |
ms until next HH:MM UTC |
scheduled for run_at = next HH:MM UTC |
The patch_runs row stores both created_at (when the run was inserted) and scheduled_at (when asynq should release it to the worker). The Runs & History table shows scheduled_at as "Started" time if the run has not yet started.
Schedule overrides at trigger / approve time
Both POST /patching/trigger and POST /patching/runs/{id}/approve accept a schedule_override field. The only currently-supported value is "immediate", which forces delayMs=0 regardless of the effective policy. This is what the Run immediately checkbox in the Patch Wizard Timing step sets.
The snapshot on the run is still taken from the effective policy. The override only changes the actual firing time, not the policy metadata. Run Detail will show the real policy (e.g. "Nightly 03:00 UTC") but the run's scheduled_at will be absent and its status will jump straight to queued.
Deleting a scheduled run
A scheduled run can be deleted from Runs & History. When you click Delete on a scheduled row:
- The server removes the run's row from the
patch_runstable. - It also calls
inspector.DeleteTask("patching", "patch-run-<id>")to remove the queued asynq task, so the run doesn't fire after being deleted.
Deletion is only allowed for runs in queued, pending_validation, pending_approval, validated, approved, or scheduled status. Anything running or terminal is not deletable (use Stop Run for a running run; terminal runs are historical records and cannot be removed from the UI).
Editing and Deleting Policies
Editing a policy in place (change name, description, delay type, or delay value) is supported from the Policies list. Click the pencil icon on a policy row to open the edit modal, then Update.
Existing runs are not re-scheduled when you edit a policy; their snapshot was taken at trigger time. Only future runs will use the new values.
Deleting a policy removes it immediately. All assignments and exclusions attached to it are removed with it (cascade delete). Any run in scheduled status that was created from this policy keeps its scheduled_at and still fires when the time comes. The policy ID on the run becomes a dangling reference, but the policy name is preserved in the policy_snapshot column for the UI.
If you're replacing a policy with a new one, prefer reassigning hosts and groups to the new policy before deleting the old one.
Common Patterns
Single maintenance window across the fleet
Create one policy (Nightly 03:00 UTC) with fixed_time at 03:00. Assign it to a top-level host group that contains everything, or to each host directly. Use exclusions for the handful of hosts that need a different window.
Canary-then-production
Create two policies:
Canary 01:00 UTCwithfixed_timeat01:00, assigned to yourcanaryhost group.Production 04:00 UTCwithfixed_timeat04:00, assigned to yourproduction-allhost group.
Trigger the same patch_package run on both groups at the same time. The canary hosts patch first; production follows three hours later. If canary reports failures, delete the still-scheduled production runs before they fire.
Slow-rollout "hold for 30 minutes"
Create a Delayed 30min policy with patch_delay_type=delayed, delay_minutes=30. Assign it to everything. Every approved run goes into scheduled status for 30 minutes before firing. If you realise you approved the wrong thing, delete the scheduled run; otherwise it fires automatically.
Mixed: immediate by default, fixed-window for production
- Leave most hosts with no assignment. They fall through to the Default (immediate) policy.
- Create a
Prod 03:00 UTCpolicy and assign it directly to theproductiongroup. - A patch triggered from the Packages page across the fleet then runs immediately on dev/staging and waits for the next 03:00 UTC on production.
Related Documentation
- Patching Overview: the three core concepts and how patching fits together.
- Running a Patch: the Patch Wizard flow, including the Timing step that reads the effective policy.
- Patch History and Live Logs: reading run history, including the policy snapshot shown on each run.
- Hosts and Groups: managing host groups, which are the usual unit of policy assignment.
Chapter 11: Patch History and Live Logs
The Runs & History tab on the Patching page is where every past and pending patch run lives. This page covers how to read the history table, filter and search it, select runs for bulk actions, and work with the live log stream on the Run Detail page.
Getting to Runs & History
From the left sidebar, click Patching and switch to the Runs & History tab. The URL becomes /patching?tab=runs and is shareable.
Deep-link filters are also supported via URL parameters:
/patching?tab=runs&status=active: queued + running/patching?tab=runs&status=failed: only failed runs/patching?tab=runs&status=completed: only completed runs/patching?tab=runs&status=pending_approval&type=patch_all: combined filter
These are the same URLs the Patching dashboard cards link to when you click the Total runs / Queued / Completed / Failed tiles at the top of the page.
The Runs & History Table
The table has eight columns on desktop:
| Column | What it shows |
|---|---|
| Delete checkbox | Selects the row for bulk delete. Only shown for deletable statuses (queued, pending_validation, pending_approval, validated, approved, scheduled). |
| Approve checkbox | Selects the row for bulk approval. Only shown for approvable statuses (validated, pending_validation, pending_approval). |
| Host | Friendly name if set, otherwise hostname, otherwise host UUID. Clickable from the Run Detail page sidebar. |
| Type | Summary of the run type: "Patch all", or a compact list of package names for patch_package (e.g. curl, openssl). Dry-runs render the same way but the status badge tells you it was a validation. |
| Status | The run status badge plus an Extra deps pill when a validated run would install more packages than you requested. |
| Initiated by | The username of the operator who triggered the run. Empty for runs triggered by automation. |
| Started | created_at timestamp for not-yet-started runs, started_at for running / completed runs. |
| Completed | completed_at timestamp if the run has finished, otherwise blank. |
| Actions | Inline action buttons: Retry, Skip & Patch, Approve, View. See Inline row actions below. |
On mobile (<768px) the table collapses into per-run cards with the same information stacked vertically. Actions sit at the bottom of each card as full-width buttons.
Pagination and page size
The table is paginated server-side via GET /patching/runs?limit=<N>&offset=<M>. The default is 25 rows per page. You can change the page size to 50, 100, or 200 from the dropdown at the bottom; your choice is remembered in localStorage under patching-runs-limit.
The runs list is sorted by created_at descending by default, with newest runs at the top. The server also accepts sort_by (created_at, started_at, completed_at, status) and sort_dir (asc, desc) but the UI does not expose sort controls today; filter and paginate to narrow the window instead.
Filtering
Two filters are available above the table:
- Status:
All,Active (queued + running),Queued,Pending validation,Pending approval,Validated (awaiting approval),Approved,Scheduled,Running,Completed,Failed,Cancelled. - Type:
All,Patch all,Patch package.
Filters reset the pagination to page 1. Click Clear filters to remove both. The selected filters are also encoded in the URL, so you can bookmark or share a filtered view.
Empty states
- If the filters match nothing, the table shows "No runs match your filters" with a prompt to adjust the filter.
- If there are no runs at all (fresh install), the table shows "No patch runs yet. Patch runs triggered from the Overview tab or from host detail pages will appear here."
Inline Row Actions
The rightmost Actions column shows action buttons specific to the row's current status:
| Status | Buttons shown |
|---|---|
pending_validation |
Retry (re-queue the dry-run), Skip & Patch (bypass validation and go straight to executing), View |
pending_approval |
Approve, View |
validated |
Approve, View |
| All others | View only |
View always opens the Run Detail page at /patching/runs/{id}.
Approve and Skip & Patch both route through the Patch Wizard in approve mode, even for a single row. This is a deliberate consistency choice: every path that turns a validation into a real run uses the same UI, so you get the per-host policy override UI for free (e.g. you can pick "Run immediately" at approval time even if the host normally has a delayed policy).
Retry re-queues the dry-run task without opening the wizard. Use this after bringing an offline host back online. Only available for patch_package runs; patch_all cannot be re-validated because it cannot be dry-run.
Bulk selection and bulk actions
At the top of each row are two optional checkboxes, one for delete and one for approve. Clicking them adds the row to a selection set; the header checkbox selects every eligible row on the current page.
Once at least one row is selected, a bulk action bar appears above the table:
- Delete N selected: deletes every selected run. This also removes any scheduled asynq task for each run.
- Approve N selected: opens the Patch Wizard pre-loaded with every selected validation. You get one Timing / Submit sequence for the batch, with per-host policy overrides.
After a bulk approval, the UI shows a summary banner (e.g. "Approved 5, 1 failed"). Failures for individual hosts are surfaced without blocking the other approvals.
You cannot mix a delete selection and an approve selection for the same row. The two checkboxes toggle independently and both sets are tracked. You can clear either selection at any time with the Clear delete or Clear approve buttons.
The Run Detail Page
Click View on any row, or navigate directly to /patching/runs/{id}, to open the Run Detail page. The layout is:
- Header: back arrow, host name as H1, subtitle with run type / status badge / post-patch pill, and primary action buttons (Approve & Patch, Retry Validation, Skip & Patch, Stop Run) right-aligned.
- Run summary sidebar (left, on desktop): host, type, initiated by, approved by, started / completed / scheduled-for, link to the linked validation run (when applicable), patch policy in effect, and the full list of packages affected.
- Primary content (right): state banners for non-terminal statuses (
pending_validation,pending_approval,validated), an error panel whenerror_messageis set, and the Shell output terminal.
State banners
The Run Detail page shows a context-specific banner for every non-terminal state so you immediately know what the run is waiting for:
- Pending validation: "Validation pending. Host may be offline." Explains that you can retry when the host is back, or skip validation.
- Pending approval: "Awaiting approval." Explains that the run was submitted for approval and needs a second reviewer.
- Validated: "Validation complete. Approval required." If the run would install more packages than you asked for, the banner includes the dependency count so you know to review the Packages affected panel.
Polling cadence
While the page is open, the Run Detail query refetches on a status-dependent interval:
queued,pending_validation: every 3 seconds.running: every 5 seconds if the live WebSocket is open, every 3 seconds otherwise (the faster poll is a safety net if the WebSocket drops).completedand the host is still flagged as "awaiting post-patch inventory report": every 3 seconds so the Awaiting inventory report pill flips to New report received as soon as the agent's next report arrives.- Everything else: no automatic refetch.
Live Log Streaming
When a run is running, the Run Detail page opens a WebSocket to /api/v1/patching/runs/{id}/stream. Authentication is the same JWT cookie you use for the rest of the UI; the outer Auth middleware handles the upgrade.
Message types
The stream speaks JSON. Three message types arrive from the server:
// Sent exactly once when the browser connects
{ "type": "snapshot",
"patch_run_id": "...",
"stage": "running",
"shell_output": "Reading package lists...\n...",
"error_message": "" }
// Sent for each line-buffered stdout/stderr chunk the agent pushes
{ "type": "chunk",
"patch_run_id": "...",
"stage": "progress",
"chunk": "Setting up libssl3 (3.0.2-0ubuntu1.15)...\n" }
// Sent once when the run reaches a terminal stage on the agent
{ "type": "done",
"patch_run_id": "...",
"stage": "completed", // or failed / cancelled / validated / dry_run_completed
"error_message": "" }
The browser appends every chunk.chunk to its local terminal buffer. When done arrives, the browser closes the socket and invalidates the run query so the page refetches the final persisted state.
Keepalive
The server sends a WebSocket ping frame every 30 seconds to keep the connection alive through proxies and load balancers. Write operations use a 10-second deadline; a stuck client is dropped rather than pinning a goroutine. There is no agent or server-side retry logic for the browser socket. If the page reconnects (for example, after a brief network blip), the snapshot replays the full buffered output, and any missed chunks that were persisted to the database are included in it.
Why you may see "(No output yet)"
There's a small window after clicking Queue & patch where the run is still queued:
- The asynq worker has not yet dequeued the task.
- The agent has not yet received the
run_patchcommand. - No output has been published.
The terminal shows "(No output yet)" during this window. The status badge tells you Queued; once the agent flips to running, the first chunk arrives within a second or two.
Terminal rendering
The Run Detail page renders output in a GitHub-dark-styled <pre> at ~420px tall (55vh max). It is scrollable and word-wrapping is preserved. Progress-bar \r characters from apt-get and dpkg are converted to \n so each progress update becomes its own line in the scrollback. You lose the animated overwrite but gain readability.
If you scroll up manually (more than ~32px from the bottom) the UI stops auto-scrolling so it doesn't fight you. Scroll back to within 32px of the bottom and auto-scroll resumes.
Copying output
When the run is in any non-running, non-queued state, a Copy output button appears above the terminal. It copies the full shell_output to your clipboard via navigator.clipboard.writeText. Use this to paste into a ticket, email, or post-incident report.
No Built-in Export or Download
There is no server-side export endpoint for runs. You cannot download a run's log as a file, and there is no CSV/JSON export of the Runs & History table. Options if you need one:
- For a single run: use Copy output on the Run Detail page and paste into a file yourself.
- For bulk analysis: hit the API directly (
GET /api/v1/patching/runs?limit=200&offset=0) and write the JSON to disk. The API is paginated to 200 rows max per request, and authenticates with the same JWT bearer token as the web UI.
Note: The listed
GET /patching/runsresponse includes the run metadata (status, timestamps, host info, package list) but not the full shell output. To get shell output in bulk, iterate over run IDs and fetch each withGET /patching/runs/{id}.
Notifications for Runs
Run lifecycle events emit notifications via the normal notifications pipeline. Destinations like SMTP, webhooks, or ntfy configured in Settings → Notifications see them. The events are:
| Event type | Emitted when | Default severity |
|---|---|---|
patch_run_started |
Agent reports running stage |
informational |
patch_run_approved |
An operator approves a validation | informational |
patch_run_completed |
Agent reports completed stage (non-dry-run) |
informational |
patch_run_failed |
Agent reports failed stage |
error |
patch_run_cancelled |
An operator deletes a not-yet-running run | informational |
The notification message includes the host name, patch type, package list (truncated to 5 with "... and N more"), effective policy name, and (for failures) the captured error message truncated to 300 characters. Severity is resolved via the per-event alert settings, so you can raise or lower the default by event type in the alerts configuration.
Deleting Runs
Runs in queued, pending_validation, pending_approval, validated, approved, or scheduled state can be deleted. Deletion:
- Removes the row from
patch_runs. - Removes the asynq task (
patch-run-<id>andpatch-run-<id>-retryif it exists) from the queue. - Emits a
patch_run_cancellednotification event.
Terminal runs (completed, failed, cancelled, dry_run_completed) cannot be deleted from the UI; they are historical audit records. If you need to purge old runs for storage reasons, contact support or write a direct database query targeting patch_runs.created_at.
Running runs cannot be deleted. Use Stop Run (see Running a Patch) instead; that issues a graceful cancel through the agent.
Related Documentation
- Patching Overview: the three core concepts: run, policy, dry-run.
- Running a Patch: detailed walkthrough of triggering, approving, and stopping a run.
- Patch Policies and Scheduling: policy model, assignments, and how the schedule is computed.
- Alerts and Notifications: configure where patch run events get delivered.
Chapter 12: Enabling Docker Integration
Overview
The PatchMon agent includes an optional Docker integration that discovers containers, images, volumes, and networks on the host and reports them to the PatchMon server. When enabled, the agent also subscribes to the Docker event stream and relays container lifecycle events (start, stop, die, pause, unpause, kill, destroy) as status updates, keeping the fleet-wide Docker inventory broadly in sync with what is running.
This page covers what the integration does, how to enable it per host from the PatchMon UI, what the agent needs on the host, how config.yml reflects the toggle, and what to check when the integration doesn't report.
Module gate: The Docker views (/docker/* routes, Docker tabs on Host Detail) require the docker module to be enabled on your plan. Plans without the module show a tier badge on the Docker tab and an upgrade prompt when you navigate to /docker.
Permission required: can_manage_hosts to toggle the integration; can_view_hosts to see the resulting inventory.
What the Integration Does
When enabled on a host, the agent:
- Discovers inventory on each report: lists all containers (running and stopped), images (including intermediate layers PatchMon elects to ignore), volumes (local / NFS / custom driver), and networks (bridge / host / overlay / macvlan / user-defined).
- Streams container events in real time: subscribes to the Docker daemon's event bus. Each relevant event (start, stop, die, pause, unpause, kill, destroy) is translated into a
container_start/container_stop/container_die/container_pause/container_unpause/container_kill/container_destroystatus event and pushed to the server over the agent's WebSocket. - Resolves image provenance: for each image, PatchMon attempts to attribute it to a registry (Docker Hub, GHCR, GitLab, Quay, ECR, ACR, GCR, local, private) and makes the registry entry clickable when possible.
- Tracks available updates: compares the running image tag against available tags in the registry (where the registry allows it) and flags images with newer versions.
- Feeds the Compliance module: if compliance scanning is also enabled for the host, Docker Bench for Security can run as an additional scanner (see the Compliance chapter).
The resulting data powers two places in the UI:
- The Docker Inventory page at
/docker: fleet-wide view across all hosts. See Docker Inventory Tour. - The Docker tab on the Host Detail page: the same data filtered to one host.
Agent Prerequisites on the Host
The Docker integration talks directly to the Docker daemon through the Unix socket. What the agent needs on the host:
| Requirement | Detail |
|---|---|
| Docker Engine installed | Any reasonably recent version; the agent uses the Go Docker client SDK. |
| Docker socket present | The agent looks for /var/run/docker.sock. If the socket is missing (Docker not installed, or not yet started), the integration reports as unavailable. |
| Agent has read access to the socket | The agent runs as root, which has access on standard installs. On hosts where docker.sock is mode 0660 and owned by root:docker, root access is fine. Custom Docker configurations that tighten socket permissions further may need adjustment. |
| Docker daemon responsive | The agent pings the daemon when it first checks availability; a responsive ping confirms Docker is up. If Docker is installed but the service isn't running, the agent waits for it and retries rather than crashing. |
The Docker binary (docker) is not required on the PATH. The agent uses the Docker Engine API directly via the socket, so the CLI is optional. You can verify the socket path and daemon version from the host with a quick command:
ls -l /var/run/docker.sock
docker version # if the CLI is installed
Windows hosts: The agent's Docker integration is Linux / FreeBSD only. Windows hosts do not surface the Docker tab regardless of whether Docker Desktop is installed.
Enabling the Integration from the UI
There are two places to switch it on:
On a new host during enrolment
On step 2 of the Add Host wizard (Host details), the Integrations section has a Docker toggle. Tick it before clicking Next. When the agent first connects, it will already have docker: true in its config.yml and start collecting data on the first report.
See Adding a Host.
On an existing host
- Open Hosts → click the host's friendly name to open its Host Detail page.
- Click the Integrations tab.
- Find the Docker panel.
- Click the toggle at the right of the panel to set it to Enabled.
- A yellow banner appears at the top of the tab and the page header: Pending configuration changes.
- Click Apply in the page header to push the change to the agent over the WebSocket.
The agent then:
- Updates
config.ymlto setintegrations.docker: true. - Re-initialises its integration manager.
- Starts collecting Docker inventory on the next reporting cycle (typically within one report interval; the default is 60 minutes, but the initial report after enabling is sent immediately).
- Begins streaming container events.
What "Pending configuration changes" means
The toggle on the UI writes the desired state to the PatchMon server. The change is only actually sent to the agent when you click Apply, which broadcasts the new config over the WebSocket. If the agent is offline, Apply is disabled and the banner tells you so. The change waits in pending state until the agent reconnects.
You'll see integrations.docker change in the agent's config.yml shortly after Apply is clicked, without needing to restart the service (the update interval and integration toggles are synced at runtime).
Disabling the Integration
From the same Integrations tab on the host:
- Click the Docker toggle to Disabled.
- Click Apply in the page header.
After the change is applied:
- The agent stops discovering Docker inventory.
- Existing inventory records remain in PatchMon (so historical queries and event history are preserved), but the agent will no longer refresh them.
- Container event streaming is stopped.
Disabling does not remove Docker from the host or stop containers; it only instructs the agent to stop monitoring.
How It Looks in config.yml
The agent config file is located at:
- Linux / FreeBSD:
/etc/patchmon/config.yml - Windows:
C:\ProgramData\PatchMon\config.yml
The integrations block contains the Docker toggle:
integrations:
docker: true # Enabled by the UI toggle
compliance:
enabled: false
on_demand_only: true
openscap_enabled: true
docker_bench_enabled: false
See Agent Config YML Reference for the full schema and how each field behaves.
You can enable Docker integration by editing the config file directly, but using the UI toggle is strongly preferred: it keeps the server's view of the host in sync with the config and prevents a subsequent Apply from silently overwriting your edit.
When Docker Integration Doesn't Report
Symptoms you might see:
- The Docker tab never appears on the Host Detail page, even after enabling the integration and clicking Apply.
- The host enabled Docker, but no containers or images appear at
/docker. - Real-time status (container start / stop) doesn't update.
Work through the checks below in order.
1. Confirm the server saw the toggle
On the Host Detail page, open the Integrations tab. The Docker panel should show Enabled with a green badge. If it shows Disabled: the change was not saved. Toggle again and click Apply.
2. Confirm the agent received the config
On the host:
sudo grep -A 4 '^integrations:' /etc/patchmon/config.yml
Expect:
integrations:
docker: true
...
If the file still shows docker: false, the Apply button wasn't clicked or the agent's WebSocket wasn't connected at the time. Back in the UI, look at the page header. If the Apply button is still visible, click it again (the agent must be connected).
3. Confirm the Docker socket is accessible
ls -l /var/run/docker.sock
sudo docker ps # agent runs as root, so sudo mimics its view
If the socket is missing, Docker isn't installed or isn't running. Install / start Docker and watch the next report.
4. Look at the agent's log for Docker errors
sudo tail -n 50 /etc/patchmon/logs/patchmon-agent.log | grep -i docker
Typical messages:
Docker socket not found: Docker isn't installed, or the socket has a non-standard path.Failed to create Docker client: the socket exists but the agent can't open a client; check permissions.Docker container event: confirms the event stream is active and receiving events.Docker daemon ping failed, retrying: Docker is installed but unresponsive. The agent will keep retrying.
For the full logging reference, see Managing the PatchMon Agent.
5. Force a report and recheck
Back in the UI, on the Host Detail page, click Fetch Report. The agent collects a fresh inventory (including Docker) and reports immediately. Watch the Docker tab count badges update.
6. Refresh integration status
On the Integrations tab, the Refresh Status button asks the agent to report its current integration readiness state. Useful after installing Docker, fixing socket permissions, or starting the Docker service.
7. Module gate
If the Docker tab shows a tier badge instead of content, the docker module is not enabled on your plan. Contact your PatchMon administrator to enable it on the subscription plan.
Related Pages
- Docker Inventory Tour: what the inventory looks like once the integration is working.
- Host Detail Page: where the Integrations tab lives and how Apply works.
- Adding a Host: enable Docker at enrolment time.
- Agent Config YML Reference: every field in
config.yml, including the integrations block. - Managing the PatchMon Agent: agent logs, diagnostics, and service management.
Chapter 13: Docker Inventory Tour
Overview
Once the Docker integration is enabled on one or more hosts, PatchMon aggregates the discovered containers, images, volumes, and networks into a fleet-wide Docker Inventory. The inventory answers "what's running where" questions: which hosts have Docker, which containers are running, which images are out of date, and which volumes and networks exist across the estate.
This page is a guided tour of /docker (the fleet view), /docker/hosts/:id (per-host view), and the detail pages for containers, images, volumes, and networks.
Module required: docker. Plans without the module show a tier-badge prompt on the Docker tab and the /docker routes. Contact your PatchMon administrator to enable it.
Permission required: can_view_hosts to view the inventory; can_manage_hosts to delete Docker resources from the UI.
Getting to the Docker Page
Click Docker in the left navigation. You land on /docker with Stacks selected by default. The URL accepts a ?tab= parameter (stacks, containers, images, volumes, networks, hosts) so you can deep-link to a specific tab.
If no hosts have the Docker integration enabled, the list sections are empty. See Enabling Docker Integration to turn it on for a host.
Top-of-Page Statistics
Four summary cards sit above the tabs:
| Card | Meaning | Click behaviour |
|---|---|---|
| Hosts with Docker | Hosts actively reporting Docker inventory | – |
| Running Containers | running / total counts across the fleet |
– |
| Total Images | Distinct images reported across all hosts | – |
| Updates Available | Images PatchMon knows have newer tags in their registry | Opens the Images tab filtered to Updates available |
These figures come from the /docker/dashboard endpoint and are refreshed every 30 seconds automatically while the page is open.
Tab Strip
Six tabs. Each has a counter badge to show at a glance how big the fleet is across that dimension:
- Stacks: containers grouped by their Compose project / stack label.
- Containers: every container on every host.
- Images: every image on every host.
- Volumes: every volume on every host.
- Networks: every network on every host.
- Hosts: a directory of hosts with Docker enabled.
Clicking a tab resets the page's search field and sets a sensible default sort for that view (status on containers, repository on images, name elsewhere).
Stacks tab
Groups running containers by their Compose project / stack label. Each group card shows:
- Stack name.
- Number of containers in the stack, broken down by status.
- Host the stack runs on (stacks are scoped per host; a stack of the same name on two hosts appears twice).
- Links to the individual containers and their images.
Use this tab when you think in terms of "my wordpress stack" rather than "individual containers".
Containers tab
One row per container. Columns include:
- Name: click to open the container detail page (
/docker/containers/:id). - Image: the image tag, with registry-aware linking (click a Docker Hub image to jump to Docker Hub, GHCR to GitHub, etc.).
- Status: colour-coded badge: running (green), exited (red), paused (yellow), restarting (blue), or plain for other states.
- Host: friendly name of the host the container lives on. Click to jump to the per-host Docker view.
- Optional columns: created timestamp, ports, state transitions.
Filters:
- Search across name, image, and host.
- Status filter: All, Running, Exited, Paused, Restarting.
- Sort by name, image, status (with secondary sort by name within status), or host.
Actions:
- Delete (trash icon): deletes the container via the agent. Requires
can_manage_hosts. Errors are surfaced in an alert.
Images tab
One row per image. Rows show:
- Repository + tag (and registry link when recognised).
- Size.
- Source (Docker Hub, GHCR, GitLab, Quay, ECR, ACR, GCR, local, private, unknown) as a coloured badge.
- Container count: how many containers on which hosts reference this image.
- Update indicator: a chip when a newer tag is available in the registry.
Filters include source type and an Updates available filter (the same filter the top Updates Available card opens).
Clicking an image opens /docker/images/:id: the image detail page with a list of the hosts that have the image and the containers using it.
Volumes tab
One row per volume with:
- Name, driver (
local,nfs, custom). - Mountpoint on the host.
- Host the volume lives on.
- Container count: how many containers mount it.
Filter by Driver and search. Click a volume name to open /docker/volumes/:id, which shows which containers currently mount it, along with the host.
Networks tab
One row per network with:
- Name, driver (
bridge,host,overlay,macvlan,none, custom), scope. - IPAM subnet / gateway.
- Host the network exists on.
- Container count.
Filter by Driver and search. Click a network name to open /docker/networks/:id with container membership.
Hosts tab
A compact directory of hosts that have the Docker integration enabled, sorted alphabetically by friendly name. Each row summarises container / image counts for that host and links to the per-host Docker view at /docker/hosts/:id.
Use this tab as the starting point when you want to focus on a single host rather than pivot by resource type.
Per-Host Docker View
The URL /docker/hosts/:id (and the row link on the Hosts tab) opens a view scoped to one host. It shows:
- The host's friendly name, hostname, and a link back to the main Host Detail page.
- Container and image counts, running / exited / paused breakdowns.
- The host's container list, grouped by stack where available.
- The host's image list.
This view is equivalent to the Docker tab on the host's main Host Detail page (see Host Detail Page). Either works. Pick whichever route you land on.
Resource Detail Pages
Each Docker resource has its own detail page. They follow the same pattern: top section with identifying metadata, cards with stats, related resources, and any actions.
Container detail: /docker/containers/:id
Shows the container's name, image, status, ports, host, created and started timestamps, restart policy, command and entrypoint, labels, mounts, and networks.
A Similar containers strip at the bottom lists other containers using the same image across the fleet, useful for "is this redis:7 running anywhere else?" questions.
Image detail: /docker/images/:id
Shows repository, tag, digest, size, architecture, OS, labels, history (layers), and the registry link.
Below, two lists:
- Hosts with this image: every host pulling it, with the tag they currently have.
- Containers using this image: every container across the fleet referencing this image.
An Updates panel appears when a newer tag is available in the source registry.
Volume detail: /docker/volumes/:id
Shows driver, mountpoint, size (when Docker reports it), labels, and options. The Containers using this volume list shows where it is mounted.
Network detail: /docker/networks/:id
Shows driver, scope, IPAM configuration, and options. The Containers attached list shows what's connected to the network.
How the Data Stays Current
Docker data flows into PatchMon on two channels:
Periodic inventory reports
Every time the agent runs its regular report cycle (default: 60 minutes, configurable server-side), it enumerates containers, images, volumes, and networks and sends the snapshot to the server. The full inventory in /docker reflects the last snapshot from each host.
To force an immediate refresh for a single host, open its Host Detail page and click Fetch Report.
Real-time container events
When the Docker integration is enabled, the agent also subscribes to the Docker event stream and pushes container lifecycle events over its existing WebSocket connection. The relevant event types are:
container_start(maps torunning)container_stop/container_die/container_kill(all map toexited)container_pause(paused)container_unpause(running)container_destroy(removed)
The server records these events against the container record so that, for example, a container crash is visible in the UI within seconds rather than waiting for the next full report.
UI refresh cadence
On top of those agent-driven pushes, the /docker page itself refreshes the dashboard summary every 30 seconds via polling, and per-tab queries refetch when you switch tabs. The manual Refresh button (top right, circular arrow) forces an immediate refetch of whichever tab is active.
Tip: If you change something on a host (start / stop a container, pull an image) and want to see it in the UI, the event should appear within a few seconds via the WebSocket push. A full refresh of image / volume / network inventory waits for the next report. Use Fetch Report on the Host Detail page if you can't wait.
Deleting Docker Resources
Containers, images, volumes, and networks can be deleted from their table rows (trash icon) or from their detail pages. Deletion:
- Requires
can_manage_hosts. - Opens a confirmation modal listing the resource and its host.
- Sends a delete command to the agent over the WebSocket.
- The agent executes the equivalent
docker rm/docker rmi/docker volume rm/docker network rmand reports the outcome back.
If Docker refuses (for example because a container is still running, or an image is still referenced by a container), the UI surfaces the error inline.
Search and Sort Persistence
Search and filter state are per-tab and reset when you switch tabs (so switching from Containers to Images doesn't carry a container-specific filter into the Images view). Sort field and direction reset to the tab's default when you switch, too.
The main Refresh button also clears any per-tab "updates available" filter that was set via the dashboard card click.
Related Pages
- Enabling Docker Integration: how to switch the integration on for a host.
- Host Detail Page: the per-host Docker tab, equivalent to
/docker/hosts/:id. - Managing the PatchMon Agent: the agent that collects the Docker data.
- Agent Config YML Reference: the
integrations.dockersetting inconfig.yml.
Chapter 14: Compliance Overview
What Compliance Scanning Is
Compliance scanning evaluates your hosts against published security benchmarks: CIS Benchmarks for the operating system and Docker Bench for Security for container hosts. Results are reported per rule (pass, fail, warning) back to the web UI, giving you a fleet-wide compliance score, per-host rule detail, and optional auto-remediation for failed rules.
Scanning is performed by the PatchMon agent on each host, not by the server. The agent runs the scanner locally, parses the output, and submits structured results back to the server via POST /api/v1/compliance/scans. The server aggregates the data into dashboards and rule views.
This page covers the overall model: what the scanners are, how SSG content is delivered in 2.0, the module gate, and the permission matrix. For walkthroughs of actually running scans and reading results, see Running Compliance Scans and Results and Remediation.
Module Gate
All compliance UI and API routes are gated by the compliance capability module. Some plans (smaller tiers) do not include compliance at all; on those plans the Security Compliance sidebar item is hidden and the corresponding API endpoints return 403.
| UI area | Required module |
|---|---|
| Security Compliance page (all tabs) | compliance |
| Host Detail → Compliance tab | compliance |
| Compliance-related per-host settings (mode, scanner toggles, default profile) | compliance |
If the module is disabled, the Host Detail page shows an "Upgrade required" placeholder in the Compliance tab and the dashboard hides compliance cards.
Permission Matrix
Compliance uses three RBAC permissions on top of the module gate. Each API route applies a specific combination:
| Action | Required permission | Example route |
|---|---|---|
| View the dashboard, scan history, host compliance detail, rule detail, trends, and active scan list | can_view_reports |
GET /compliance/dashboard, GET /compliance/scans/{hostId} |
| Trigger scans (single or bulk), cancel a running scan, install the scanner, upgrade SSG content, trigger per-rule remediation | can_manage_compliance |
POST /compliance/trigger/{hostId}, POST /compliance/cancel/{hostId}, POST /compliance/remediate/{hostId} |
| Change per-host compliance mode, per-host scanner toggles (OpenSCAP / Docker Bench), default profile for a host | can_manage_hosts |
POST /hosts/{hostId}/integrations/compliance/mode, POST /hosts/{hostId}/integrations/compliance/scanners |
In practice a "compliance operator" role typically has can_view_reports + can_manage_compliance; a "host owner" role typically has can_manage_hosts so they can enable or disable compliance on their own hosts. A pure auditor role with can_view_reports alone can see everything but cannot change anything.
Note: The release-notes shorthand of "can_view_reports and can_manage_hosts" doesn't quite line up with the handler: triggering a scan requires
can_manage_compliance, notcan_manage_hosts. Use the table above as the source of truth.
The Two Scanners
The compliance integration on the agent (patchmon-agent/internal/integrations/compliance/compliance.go) runs two independent scanners. A "scan" as submitted to the server is actually an array of sub-scans, one per scanner that ran successfully.
1. OpenSCAP: CIS Benchmarks
What it is. OpenSCAP is the OS-level security compliance scanner. On supported Linux distributions it evaluates the host against the CIS Benchmark datastreams published by SCAP Security Guide (SSG). The agent picks the relevant ssg-*-ds.xml datastream for the host's OS and runs oscap xccdf eval against it.
Profile levels. Each datastream ships with two CIS-derived profiles:
- CIS Level 1 Server (
level1_server): the baseline profile, intended for general-purpose systems with minimal operational impact. This is the default profile used for ad-hoc scans. - CIS Level 2 Server (
level2_server): the extended profile, for environments that require defence-in-depth (classified/regulated workloads). Some L2 rules impose real operational restrictions (e.g. disablingwirelesswhere it's present).
The per-host default profile setting (Host Detail → Integrations → Compliance) controls which profile is used for scheduled scans. A manual scan can override the default by passing profile_id in the trigger request; the Host Detail Compliance tab exposes this as "Pick a profile".
Supported operating systems (as surfaced by the Compliance Settings panel):
| OS | Profiles shipped in SSG |
|---|---|
| Ubuntu | CIS Level 1 Server, CIS Level 2 Server |
| Debian | CIS Level 1 Server, CIS Level 2 Server |
| RHEL | CIS Level 1 Server, CIS Level 2 Server |
| CentOS | CIS Level 1 Server, CIS Level 2 Server |
| Rocky Linux | CIS Level 1 Server, CIS Level 2 Server |
| AlmaLinux | CIS Level 1 Server, CIS Level 2 Server |
| Fedora | CIS Level 1 Server, CIS Level 2 Server |
| SLES | CIS Level 1 Server, CIS Level 2 Server |
| OpenSUSE | CIS Level 1 Server, CIS Level 2 Server |
Any host OS not listed has no SSG datastream available and OpenSCAP scans will be skipped on it. The scanner is still "available" in the integrations metadata if oscap is installed; it just has nothing to evaluate.
Default per-host state: OpenSCAP is enabled by default on every host that has compliance turned on. This is controlled by the compliance_openscap_enabled host flag, defaulted to true in 1.4.2 and preserved on upgrade.
2. Docker Bench for Security
What it is. Docker Bench is the container-host security scanner from the Center for Internet Security. It evaluates the Docker daemon, its configuration files, running containers, images, and Swarm configuration against the CIS Docker Benchmark. Rules are categorised into sections:
- Host Configuration
- Docker Daemon Configuration
- Docker Daemon Configuration Files
- Container Images and Build File
- Container Runtime
- Docker Security Operations
- Docker Swarm Configuration
Results use a different status model from OpenSCAP: instead of pass/fail, most Docker Bench rules either pass or emit a warning. There are very few hard fails. The Compliance dashboard surfaces Docker Bench statistics separately in the "Docker Bench Analysis" section, with "Warnings by Section" charts instead of the severity-based ones used for OpenSCAP.
When it runs. Docker Bench runs only when both of the following are true:
- The Docker integration is enabled on the host (the scanner reads the same Docker socket).
- Docker Bench is enabled on the per-host scanner toggle.
If either is off, Docker Bench is skipped even if the binary is installed.
Default per-host state: Docker Bench is disabled by default on every host (per 1.4.2). You must explicitly toggle it on per host (Host Detail → Integrations → Compliance → Docker Bench). Most hosts do not run Docker, and running Docker Bench on a host without Docker produces a long list of misleading "Docker daemon not running" failures.
Per-Host Scanner Configuration
Every host that has compliance enabled exposes four compliance-related fields, manageable from the Host Detail → Integrations → Compliance panel or from the Compliance page's Hosts tab:
| Field | Values | Meaning |
|---|---|---|
compliance_mode |
disabled, on-demand, enabled |
Overall compliance switch for this host. disabled means the agent does not run any scanner. on-demand means scans run only when manually triggered. enabled means scans run on the fleet-wide compliance_scan_interval. |
compliance_openscap_enabled |
true / false |
Whether OpenSCAP runs on this host. Default true. |
compliance_docker_bench_enabled |
true / false |
Whether Docker Bench runs on this host. Default false. |
compliance_default_profile_id |
profile ID or null | The OpenSCAP profile used for scheduled / "all profiles" scans on this host. Null means the agent defaults to level1_server. |
Changes to these fields are queued as pending config and pushed to the agent on the next heartbeat via the Apply Pending Config flow (see Managing the PatchMon Agent). They do not take effect until the agent confirms receipt.
Mode: disabled vs on-demand vs enabled
- Disabled: nothing runs on this host. The scanner integration is marked off and the Compliance UI shows "Disabled" in the Mode column.
- On-demand: the scheduled-scan path is disabled but manual Run Scan buttons still work. Use this when you only want to scan on investigation.
- Enabled: the agent runs scheduled scans at the fleet-wide interval set in Security Compliance → Settings → Scan Interval (default 24 hours, configurable from 6 hours to 7 days).
The fleet-wide default compliance mode (Security Compliance → Settings → Default Compliance Mode) applies only to newly registered hosts. Existing hosts keep their current mode across server upgrades.
SSG Content Is Bundled in the Server Binary
This is one of the most important architectural changes in 2.0 for compliance.
In 1.x and earlier, each agent fetched SCAP Security Guide (SSG) content from GitHub at scan time. That required every agent to have outbound access to github.com, created occasional transient failures when GitHub was unavailable, and allowed agents to drift to different SSG versions depending on when they last pulled.
In 2.0, SSG and CIS benchmarking content is bundled with the server binary at build time and served from a single SSG_CONTENT_DIR on the server. Agents now fetch content from the server itself, via two new endpoints:
GET /api/v1/compliance/ssg-version, returns the SSG version string and the list ofssg-*-ds.xmlfiles available.GET /api/v1/compliance/ssg-content/{filename}, streams a specific datastream file to the agent.
Both endpoints accept agent API-key authentication.
What this means operationally
- No external network calls at scan time. Agents in air-gapped environments no longer need GitHub access; they need server access, which they already had for heartbeats.
- One SSG version across the fleet. Every agent gets the same content bundle. The Compliance Settings page shows the active version and the list of content files under OpenSCAP Content.
- Version-pinned scanning. Because the server binary ships with the content, upgrading the server is the way to get new SSG rules. You can also trigger a per-host
UpgradeSSGjob (Host Detail → Integrations → Compliance) to push the current server-bundled version to that host.
Where to see the active version
Security Compliance → Settings → OpenSCAP Content shows:
- The SSG version string (e.g.
0.1.77). - The number of content files bundled.
- A collapsible list of every
ssg-*-ds.xmlfilename. - The table of supported OSes and their profiles.
Where Compliance Lives in the UI
There are three ways in:
- Security Compliance (top-level sidebar): the fleet-wide view. Five tabs: Overview (dashboard), Hosts (per-host table with scan controls), Scan Results (drill into rules), History (chronological scan list), Settings (default mode, interval, SSG content).
- Hosts → select a host → Compliance tab: per-host drill-down with the same scan controls, latest scan summary, rule breakdown by status / severity / section, and a per-rule remediation action.
- Dashboard → Compliance cards: the main PatchMon dashboard includes a compliance summary card that deep-links into the Compliance page with the relevant filter applied. Hidden when the
compliancemodule is disabled.
The top of every compliance view has five status cards: Total hosts, Compliant, Warning, Critical, Never scanned. Clicking "Never scanned" filters the Hosts tab to just the never-scanned subset so you can fix coverage gaps.
What a Scan Looks Like End-to-End
A typical ad-hoc scan flows like this:
- An operator clicks Run Scan on a host (either from the Compliance Hosts tab or from the Host Detail page).
- The browser calls
POST /compliance/trigger/{hostId}. The server clears any stale "cancel" flag for this host in Redis, enqueues arun_scantask on thecomplianceasynq queue, and returns the job ID. - The task dequeues and sends a
run_scanWebSocket command to the agent. The server updates thecompliance_scansrecord torunningstatus as soon as the agent confirms receipt. - The agent runs one or both scanners in sequence. OpenSCAP calls
oscap xccdf evalagainst the SSG datastream; Docker Bench callsdocker-bench-security(bundled with the agent). - Each sub-scan produces structured rule results. The agent batches them into a
CompliancePayloadand submits viaPOST /api/v1/compliance/scans. - The server's
ReceiveScanshandler validates API credentials, applies a 10-requests-per-minute rate limit, and writes the scan + results into the database in a single transaction. It honours the per-hostopenscap_enabledanddocker_bench_enabledflags on the server side too, so accidental submissions from a scanner the host has disabled are rejected. - On success, the server emits a
compliance_scan_completednotification event (with per-profile summaries) and, if any scan errored, a separatecompliance_scan_failedevent. - The UI's active-scan poll sees the row disappear from the
active_scansendpoint, shows a toast "Compliance scan completed", and the dashboard refetches.
Scheduled scans go through the same run_scan → agent → ReceiveScans pipeline; only the initiator differs.
Stuck Scans and Auto-Cleanup
Compliance scans can take a long time: a full OpenSCAP L2 scan on a mid-size host can run 15–45 minutes, so PatchMon has an explicit stall detection threshold rather than a short timeout.
A scan is considered stalled if it has been in running status for more than 3 hours without completing. A recurring asynq job (ComplianceScanCleanup, at POST /api/v1/compliance/scans/cleanup) runs periodically and moves every stalled scan to a terminal state with the error message Scan terminated automatically after running for more than 3 hours. This guarantees the Scans in Progress widget doesn't accumulate ghost scans and frees up the per-host "currently scanning" flag.
The GET /compliance/scans/stalled endpoint lets you see which scans are about to be cleaned up. The Compliance page exposes this via the stalled-scans widget (when any rows exist).
Related Documentation
- Running Compliance Scans: triggering scans, bulk scan modal, cancelling, handling stuck scans.
- Results and Remediation: reading the dashboard, drilling into host detail and rule detail, auto-remediation.
- Docker Monitoring: Docker integration prerequisite for Docker Bench.
- Managing the PatchMon Agent: Apply Pending Config flow used to push compliance toggles to agents.
- Release Notes - 1.4.0: the release that introduced compliance scanning.
- Release Notes - 1.4.2: per-host scanner toggles, scan cancel, 3h auto-cleanup.
- Release Notes - 2.0.0: bundled SSG content and the rewrite.
Chapter 15: Running Compliance Scans
This page covers how to trigger a compliance scan, watch it progress, cancel it if needed, and set up scheduled scans across the fleet. All actions are from the web UI; everything runs against a logged-in session with the compliance module enabled.
You need can_manage_compliance to trigger, cancel, or install scanners; can_view_reports to watch progress without changing anything; and can_manage_hosts to change per-host compliance mode or scanner toggles.
Three Ways to Start a Scan
| Entry point | Best for | Scope |
|---|---|---|
| Host Detail → Run Scan button | Investigating a single host | 1 host, "all profiles" (whatever scanners are enabled for that host) |
| Security Compliance → Hosts tab → green Play button | Re-scanning a specific host from the fleet view | 1 host, "all profiles" |
| Security Compliance → Scheduled, via fleet interval | Ongoing coverage across hosts where compliance mode is enabled |
Every host with mode=enabled, runs periodically |
Bulk ad-hoc scans across a selected host set are also supported. See Bulk Scans below.
Triggering a Scan on One Host
From the Host Detail page
- Open Hosts → select the host → Compliance tab (also reachable via Security Compliance → host row → host name link).
- Look at the top-right of the Compliance tab. You'll see:
- A Connected or Disconnected pill: this is the agent's WebSocket connection status. Scans require a connected agent.
- A Run Scan button (green with a Play icon).
- Click Run Scan. The UI calls
POST /api/v1/compliance/trigger/{hostId}withprofile_type=all(run every scanner enabled for this host). - The button flips to a spinner with "Scanning…" and a toast confirms "Compliance scan triggered". The response includes a
jobIdyou can correlate with server logs if needed.
If the agent is disconnected, the button is disabled and the tooltip reads "Host is disconnected". Re-enable connectivity (see Managing the PatchMon Agent) before retrying.
You can also pick a specific profile instead of running all scanners:
- On the Host Detail Compliance tab, expand the profile selector (if visible for your role) and choose a profile, for example,
level2_serverinstead of the defaultlevel1_server. - Tick Enable Remediation if you want the agent to apply OpenSCAP's remediation scripts for any failed rule during this scan. Remediation in-scan is destructive, only tick this when you've reviewed what the rules would do.
- Click Run Scan. The request body includes
profile_type,profile_id, andenable_remediation.
From the Security Compliance Hosts tab
- Open Security Compliance → Hosts tab. You see a table of every compliance-enabled host.
- Click the green Play button in the Run column for the host you want to scan. This has exactly the same effect as Run Scan on Host Detail, with
profile_type=all. - Watch the row turn blue: the Last activity column shows an animated "OpenSCAP" / "Docker Bench" / "Scanning…" label while the scan is in progress.
Watching Scan Progress
There is no live log stream for compliance scans (unlike patch runs). Instead, the UI relies on active-scan polling.
The active-scans widget
On the Compliance page Overview tab, when any scan is running, a blue Scans in Progress card appears with a spinner. Each running scan is shown as a pill with:
- Host name (link to Compliance Host Detail).
- Profile type badge (OpenSCAP or Docker Bench) and started-at timestamp.
- Connection indicator (green Wi-Fi icon if the agent is connected, red if not).
The list also appears inline above the hosts table and refetches via GET /api/v1/compliance/scans/active every 30 seconds while scans are active, and every 2 minutes when idle. The dashboard uses the same cadence.
The pending-scans window
Between the moment you click Run Scan and the moment the agent updates the DB row to running, there's a few-second gap where the scan exists as an asynq task but not yet as a database row. The UI bridges this with pendingScans state: the just-triggered host shows up in the active-scans widget with a "Triggering…" status immediately, and is replaced by the real DB row once it lands (or removed after 60 seconds if no corresponding scan shows up).
Completion notifications
When an active scan disappears from the /compliance/scans/active response, the UI compares against the previous poll's active-scan set and shows a success toast:
- "Compliance scan completed" for a generic completion.
- "Scan completed for host name" for a tracked pending scan.
The dashboard and the history tab refetch automatically at this point.
Per-rule progress during scanner install
If the host doesn't have OpenSCAP or the CIS benchmark content installed yet, the first action is usually to install the scanner, which has its own progress model. See Installing the Scanner below.
Cancelling a Scan
A scan can be cancelled while it is running. Unlike patch runs, there is no "Stop Run" confirmation modal. Cancel is a one-click action because scanners are read-only and safe to interrupt.
From the Hosts tab
- On the Hosts tab, find the row with the blue "Scanning…" indicator.
- Click the red StopCircle button in the Run column. The UI calls
POST /api/v1/compliance/cancel/{hostId}. - A toast confirms "Cancel request sent for host".
What cancel actually does
The CancelScan handler on the server does three things:
- Removes any queued
run_scantask from asynq, so a scan that hasn't yet reached the agent won't start. - Sets a
compliance_scan_cancelflag in Redis for this host, so if the worker picks up the task between DeleteTask and the agent message, the worker sees the cancel flag and skips execution. - Sends a
compliance_scan_cancelWebSocket message to the agent, so an already-running scan is interrupted at the process level.
If the agent is connected and busy scanning, it receives the cancel, terminates the OpenSCAP / Docker Bench subprocess, and submits whatever partial results it has. The scan record is marked cancelled.
If the agent is offline, only the queue-level cancel applies: the scan won't run when the agent reconnects because the task has already been removed from the queue.
Cancel is idempotent. Calling it on a host with no active scan returns success with "Scan cancel sent".
Scheduled Scans
Scheduled scans are the "set and forget" path. Every host with compliance_mode=enabled gets a scan on the fleet-wide interval, no operator intervention required.
Fleet-wide defaults
Set from Security Compliance → Settings:
- Default Compliance Mode: applied to newly registered hosts only. Existing hosts keep whatever mode they already have.
Disabled, new hosts register with compliance off. You must explicitly enable per host.On-Demand, new hosts register with scanning available but scheduled off. ManualRun Scanworks.Enabled, new hosts register ready for scheduled scanning.
- Scan Interval: how often
enabledhosts scan. Presets: 6h, 12h, 24h (default), 48h, 3d, 7d. Also accepts a raw minutes value between 60 and 10080 (7 days).
Saving Settings pushes the new interval to every connected agent on the next heartbeat. Offline agents pick it up when they reconnect.
Per-host mode overrides
The default is advisory; every host has its own compliance_mode. To change it:
- Open Hosts → host → Integrations tab.
- Scroll to Compliance.
- Pick Disabled, On-Demand, or Enabled.
- The change is queued as pending config and applied via the Apply Pending Config flow on the host's next agent heartbeat.
The Compliance page's Hosts tab shows the current mode in the Mode column (Disabled, On-demand, Scheduled).
Per-host scanner toggles
On the same Integrations → Compliance panel you'll find two checkboxes:
- OpenSCAP: default
on. Tick to have the agent run OpenSCAP CIS scans during each scheduled and on-demand scan. - Docker Bench: default
off. Tick only for hosts that actually run Docker and where the Docker integration is enabled.
These toggles are also reflected in the Hosts-tab Scanners column (OpenSCAP, Docker, OpenSCAP, Docker, or - if nothing is enabled).
Default profile
Set from Host Detail → Integrations → Compliance → Default profile. Pick between the available profiles exposed by the agent (typically level1_server, level2_server, and possibly docker-bench on hosts where Docker is present). This is the profile used for scheduled scans and for ad-hoc scans where no explicit profile is passed (profile_type=all).
Bulk Scans Across the Fleet
For ad-hoc "scan everything right now" operations, use the Bulk Scan modal (opened from the Compliance page; the exact entry point depends on your module / edition, usually a bulk action button on the Hosts tab).
The modal lets you:
- Choose a Profile Type.
All Profiles,OpenSCAP Only, orDocker Bench Only. - Tick Enable Remediation if you want OpenSCAP to apply remediation scripts during the scan.
- Tick the hosts you want to include (or Select All).
- Click Scan N Hosts.
The UI sends one POST /api/v1/compliance/trigger/bulk request with the full host list. The server enqueues one run_scan task per host. Hosts that are offline are still queued. They scan as soon as they reconnect and the worker dequeues their task (or the task is cleaned up if the queue drops it before reconnection).
The modal shows a results banner:
- Green if every trigger succeeded.
- Yellow if some failed, with the list of host names and the specific error per host.
After a successful bulk scan, the modal auto-closes after three seconds and each triggered host appears in the active-scans widget as pending / running.
Installing the Scanner
Compliance scanning on a host needs OpenSCAP (oscap binary) installed and the SSG content available locally. The first time you enable compliance on a host, the scanner usually isn't there yet. PatchMon handles this with an install job.
- Enable compliance mode on the host (set to
On-DemandorEnabled). - On next Apply Pending Config, the agent receives the new integration state and reports that the scanner is not installed.
- From the Host Detail Compliance tab, click Install Scanner. The UI calls
POST /api/v1/compliance/install-scanner/{hostId}. - The server enqueues an install task. The worker sends an install message to the agent.
- The agent installs
openscap-scanner(viaapt/dnf) and downloads SSG content from the server viaGET /api/v1/compliance/ssg-content/{filename}. Progress events are reported back to Redis and surfaced in the UI viaGET /compliance/install-job/{hostId}, which returns the current state (waiting,active,completed) plus a per-step message and progress percent. - When the install completes, the Run Scan button becomes active.
Install can be cancelled mid-flight from the same UI via POST /api/v1/compliance/install-scanner/{hostId}/cancel.
Upgrading SSG content on a host
When the server is upgraded to a newer PatchMon version with newer bundled SSG content, existing hosts may still have older content cached locally. To force an upgrade:
- Host Detail → Integrations → Compliance → Upgrade SSG Content. The UI calls
POST /api/v1/compliance/upgrade-ssg/{hostId}. - The server enqueues an
ssg_upgradetask. The agent downloads the latestssg-*-ds.xmlfiles from the server. - Poll the upgrade job via
GET /api/v1/compliance/ssg-upgrade-job/{hostId}: the UI showswaiting,active, orcompletedwith a message.
The Compliance Settings page always shows the currently-active server-side SSG version under OpenSCAP Content → SSG x.y.z.
Handling Stuck Scans
Any scan that has been in running status for more than 3 hours is considered stalled. A recurring cleanup job (ComplianceScanCleanup, triggered at POST /api/v1/compliance/scans/cleanup) marks every such scan as cancelled with the error message:
Scan terminated automatically after running for more than 3 hours
This prevents orphaned "forever running" scans from clogging the active-scans widget. The cleanup runs on a schedule driven by the recurring automation queue; administrators with can_manage_compliance can also trigger it on demand from the Automation UI.
Seeing stalled scans
The GET /api/v1/compliance/scans/stalled endpoint returns every scan older than 3 hours that is still marked running. If the Compliance page shows a Stalled Scans widget (rendered when any stalled rows exist), clicking a row links into the host's compliance detail so you can inspect it.
Why a scan might legitimately stall
- The agent crashed mid-scan. There was no opportunity to submit a terminal result.
- The agent lost network connectivity mid-scan. Results were generated but not submitted; by the time connectivity returned, the 3-hour window had passed.
- A profile on an unusually large host simply exceeded 3 hours (uncommon for L1, possible for L2 with heavy file-integrity rules on deep filesystems). The cleanup will fire; re-run the scan manually afterwards.
What the operator should do
If a scan was cleaned up automatically and you need results:
- Check agent health (
sudo patchmon-agent diagnosticson the host, or review the host's recent logs from the Host Detail page). - If the agent is healthy, Run Scan again from the Host Detail or Compliance Hosts tab.
- If scans reliably take more than 3 hours on a specific host (typically an extra-large file server), consider switching that host to an on-demand schedule so it only scans when you're actively watching.
Rate Limits
Agent-side submission of scan results is rate-limited to 10 submissions per minute per host at POST /api/v1/compliance/scans. Legitimate use never hits this: a host only submits once per scan. The limit exists to contain a misbehaving agent that tries to re-submit results in a loop.
Server-side scan triggers are not individually rate-limited beyond the general-auth rate limits you configure for the API, but asynq's worker pool naturally paces execution: a fleet-wide "scan everything now" will queue 100+ tasks and work through them at a sensible rate.
Related Documentation
- Compliance Overview: module gate, permissions, scanner architecture, bundled SSG content.
- Results and Remediation: what to do with scan results once they land.
- Docker Monitoring: the Docker integration you need for Docker Bench scans.
- Managing the PatchMon Agent: diagnostics and the Apply Pending Config flow used to push compliance settings.
Chapter 16: Compliance Results and Remediation
Once a compliance scan completes, results appear in three layers of the web UI: the fleet-wide dashboard, the per-host Compliance tab, and the per-rule Rule Detail page. This page walks through each layer in operator terms, then covers the optional auto-remediation paths and the compliance trends view.
You need can_view_reports to see any of this; can_manage_compliance to trigger remediation.
Fleet-Wide Dashboard
The Security Compliance landing page opens on the Overview tab, which is the fleet-wide dashboard. It's designed to answer "how is my overall compliance posture, and where do I look first?" in a single glance.
The five summary cards
Across the top of every Compliance page view sit five identical cards:
| Card | What it counts | Derived from |
|---|---|---|
| Total hosts | total_hosts + unscanned: every host with compliance visibility, scanned or not |
summary.total_hosts + summary.unscanned |
| Compliant | Hosts whose latest scan score is ≥ 80% | summary.hosts_compliant |
| Warning | Hosts whose latest scan score is between 60% and 79% | summary.hosts_warning |
| Critical | Hosts whose latest scan score is < 60% | summary.hosts_critical |
| Never scanned | Hosts that have never successfully submitted a scan | summary.unscanned |
The Never scanned card is clickable, it toggles a filter on the Hosts tab to show only never-scanned hosts, which is the fastest way to find coverage gaps.
Six charts
The Overview tab grid has six charts:
- Failures by Severity: stacked doughnut of critical / high / medium / low failed rules across the fleet. Clicking a slice deep-links into the Scan Results tab filtered to that severity.
- OpenSCAP Distribution: split of pass / fail rules across OpenSCAP scans.
- Compliance Profiles: pie of scans by profile type (OpenSCAP vs Docker Bench). Clicking drills into the matching filter.
- Last Scan Age: distribution of when hosts were last scanned (today / this week / this month / older).
- Compliance Trend: placeholder today; reserved for the trends view.
- Host Compliance Status: bar chart of hosts by Compliant / Warning / Critical / Never Scanned.
All charts refetch every 2 minutes (or every 30 seconds when there's at least one active scan) so the dashboard stays useful for an operator who leaves the page open during a rollout.
Profile-type filter
Above the charts is a profile type filter with three values: All Scans (default), OpenSCAP, Docker Bench. Switching to OpenSCAP or Docker Bench reveals additional profile-specific panels:
- OpenSCAP Analysis: Rule Results doughnut, Failures by Severity bar, Score Distribution, Scan Freshness.
- Docker Bench Analysis: Rule Results doughnut (pass vs warning), Warnings by Section bar (broken down into the CIS Docker Benchmark sections), Score Distribution, Scan Freshness.
The Docker Bench view intentionally uses "Warnings" instead of "Failures" because Docker Bench's status model is pass-or-warning for most checks, not pass-or-fail.
Hosts Tab: Per-Host Fleet View
The Hosts tab shows a row per compliance-enabled host. This is your work list, sort and scan from here.
| Column | What it shows |
|---|---|
| Run | Green Play button (trigger scan) or red Stop button (cancel scan). |
| Host name | Friendly name (clickable, opens Compliance Host Detail). |
| Status | Shield icon colour-coded: green ≥80%, yellow 60-79%, red <60%, grey never-scanned. |
| Last activity | Friendly date of last scan and activity label ("Scan", or "Scanning…" while active). |
| Passed / Failed / Skipped | Click the count to deep-link into the Scan Results tab, filtered by this host and that status. |
| Scanner status | Scanned, Enabled, or -; whether the agent has actually produced a scan, has the scanner enabled without results, or has no scanner integration active. |
| Mode | Scheduled, On-demand, or Disabled: this host's compliance_mode. |
| Scanners | Which scanners are enabled per host: OpenSCAP, Docker, OpenSCAP, Docker, or -. |
Clicking any Passed / Failed / Skipped number pivots you straight into the Scan Results tab with the host and status filters applied, so "click the 12 Failed for hostA" gets you a filtered rule list for that host's latest scan.
The page also respects the tableFilter override driven by the Never scanned summary card, click that card and the table filters to hosts with no scan records.
Scan Results Tab: Rule Drill-Down
The Scan Results tab (also reachable via the per-host clicks described above) is where you investigate specific rules across the fleet. It shows every rule that has been evaluated by any scanned host, with:
- Rule title, rule reference (e.g.
xccdf_org.ssgproject.content_rule_...), section (CIS section number for OpenSCAP, bench section for Docker Bench). - Severity badge (critical / high / medium / low / unknown).
- Profile type badge (OpenSCAP / Docker Bench).
- Hosts passed / failed / warned / total across the fleet.
Filters above the table: status (pass / fail / warn / error / skipped), severity, profile type, specific host, and full-text search. These all push down to GET /api/v1/compliance/rules so the filtering is server-side and consistent with the dashboard drill-down links.
Click any rule to open Rule Detail.
Rule Detail: Single Rule Across the Fleet
The Rule Detail page (/compliance/rules/{ruleId}) is what you open when you want to understand "what is this rule, why is it failing, how do I fix it, and which hosts does it affect?".
It has four sections:
1. Summary cards
Four cards at the top: Affected Hosts, Passing, Failing, Warnings, counts across the fleet for the rule's latest scan per host.
2. Description
The human-readable explanation from the benchmark, expanded in full. For OpenSCAP rules this is the SCAP <Description> element; for Docker Bench it's the rule prose from the benchmark.
3. Why this failed (Rationale)
The benchmark's rationale for why this rule exists, why it matters, what risk it mitigates. Shown as plain text.
4. What the fix does + Remediation
The right column contains two panels that help operators act on a failure:
- What the fix does: a short plain-English explanation of the remediation, derived heuristically from the remediation text (for example, "This fix will update file permissions or ownership…" when the script uses
chmod/chown; "This fix will update SSH daemon configuration…" when the script touches/etc/ssh). This is UI scaffolding, not audit-grade. Always read the actual remediation script below. - Remediation: the exact script the scanner would run. For OpenSCAP rules this is the shell fix pulled from SSG. For Docker Bench it's the benchmark-prescribed command. A Copy button copies the script to your clipboard so you can paste into a change ticket or runbook.
If the benchmark doesn't ship a remediation script (common for high-level "document this" rules), the panel reads "No remediation steps available."
5. Affected Hosts table
Every host that has evaluated this rule shows up here with:
- Host name (click to open Compliance Host Detail).
- Status for this rule on this host (Pass / Fail / Warning / N/A / Skipped / Error).
- Why (this host): either the scanner's
findingtext, or aCurrent: X → Required: Ystring built fromactual+expected. This is the concrete reason why this host failed, which is usually enough to diagnose without opening a shell.
Use this view to scope impact: "this rule fails on 14 hosts; is it the same root cause on all of them?" Sort by the status column, look for clusters of identical finding text, and fix them as a batch.
Compliance Host Detail
The per-host compliance view (/compliance/hosts/{hostId}) is reached by clicking any host name across Compliance. Its layout:
- Header: back link, Shield icon, host name as H1, Run Scan button with connection-status pill, link to Full Host Details.
- Five summary cards: Passed, Failed, Warning, N/A, and Score (or recent scan metadata).
- Scan Results table: paginated at 25 rows per page, drilled into the most recent scan for this host by default, filterable by status and severity.
- Inline rule actions: each failed rule row has an expand button that shows the Why / Rationale / Remediation inline, plus a "Remediate this rule" button (see below).
Filters on the five summary cards: click the Passed rules card to filter results to pass-only, click Failed for fail-only, etc. The card selected gets a coloured ring so you know the active filter.
The scan shown is the latest per-profile. A profile-type filter above the table lets you flip between the latest OpenSCAP scan and the latest Docker Bench scan for the host. If the latest scan is older than a week, a soft warning reminds you that the results may be stale.
Auto-Remediation
There are two remediation paths, each driven from a different part of the UI.
1. Per-rule on-demand remediation
Fix a single failed rule without running a full scan.
- Open Compliance Host Detail for the host.
- In the Scan Results table, expand a failed rule.
- Click Remediate this rule.
- The UI calls
POST /api/v1/compliance/remediate/{hostId}with{ "rule_id": "<rule-ref>" }. The server validates that the agent is connected and sends aremediate_ruleWebSocket message to the agent. - The agent runs
oscap xccdf eval --remediate --rule <rule>against the SSG datastream, that runs OpenSCAP's targeted remediation script for just that one rule. - The UI shows a toast "Remediation triggered". The next scan (manual or scheduled) should show that rule flipping from Fail to Pass if the fix was successful.
Per-rule remediation is limited to OpenSCAP rules today. Docker Bench does not ship executable remediation scripts in the benchmark. The UI greys out the Remediate button on Docker Bench rules for this reason.
2. In-scan remediation
Apply remediation scripts for every failing rule as part of a scan.
- From the Run Scan dialog on Host Detail, tick Enable Remediation before starting the scan.
- From the Bulk Compliance Scan modal (Compliance page), tick Enable Remediation before triggering the batch.
When enable_remediation=true is set on the trigger, the agent runs OpenSCAP in --remediate mode, which attempts the remediation fix for every rule that fails. The scan results submitted back to the server include a remediation_applied / remediation_count summary so you can tell the difference between a regular scan and a remediating scan.
When to use which
- Per-rule: tightly-scoped changes, especially on production where you want to see exactly one thing change at a time. Safer, slower.
- In-scan: bulk cleanup on a newly-built host, or a lab environment you just rebuilt and want to harden in one pass. Faster, but applies every fix, review the affected rule set first.
Warning: Some OpenSCAP remediation scripts are destructive. They can change SSH configuration, disable protocols, modify PAM settings, or set kernel parameters that break unrelated tooling. Always test in-scan remediation on a non-production host before rolling it across the fleet. Per-rule remediation is safer because you've read the script first.
Release-note lineage
Auto-remediation was introduced in 1.4.0 ("Optional auto-remediation of failed rules during scans"). In 2.0 it remains under the Compliance module, it did not move into the Patching module. If you're reading older release notes, per-rule remediation still runs through POST /api/v1/compliance/remediate/{hostId}, not through a patch run.
Trends Over Time
GET /api/v1/compliance/trends/{hostId}?days=30 returns the host's scan history as a time series: completed_at, score, profile_name, profile_type for each scan in the window. The UI uses this to render the Compliance Trend panel on the Overview tab (currently a placeholder waiting for rendering updates) and to show trend lines on Compliance Host Detail.
The API supports days between 1 and 365. Typical use is the default 30 days for day-to-day monitoring, or 365 when writing an annual compliance report.
History Tab: Chronological Scans
The History tab is a flat list of every scan the system has ever recorded, newest first. Paginated at 25 per page, filterable by status, profile type, and host.
Each row shows:
- Host name.
- Profile (e.g.
level1_serverOpenSCAP, orDocker Bench for Security). - Started at and duration.
- Totals: total rules, passed, failed, warnings, skipped, not applicable.
- Score and any error message.
Scans that were auto-cancelled after the 3-hour stall threshold appear here with the error message "Scan terminated automatically after running for more than 3 hours" and a status of cancelled, useful for spotting hosts that consistently time out.
There is no export endpoint for scan history. To archive scans for regulators, call GET /api/v1/compliance/scans/history directly and write the JSON to disk.
Notifications for Scans
Every completed scan emits a compliance_scan_completed notification event. The notification body includes:
- Fleet-friendly title:
Compliance Scan - <hostname>(- N Failed Rulessuffix when failures are present). - Per-profile summary lines: profile name, score as a percentage, passed count, failed count.
- Structured metadata for downstream processing: host ID, host name, failed count, passed count, total rules, profile summaries.
Default severity is informational, escalated to warning when there's at least one failed rule. The per-event alert settings let you override severity or suppress these if you already have a dashboard.
A separate compliance_scan_failed event is emitted for each sub-scan that errored during a multi-scanner run (e.g. OpenSCAP succeeded but Docker Bench failed). Default severity is error. Metadata includes the profile name, profile type, and the captured error.
Practical Workflow
A typical compliance cycle in PatchMon looks like:
- Baseline, turn compliance on across the fleet (
Default Compliance Mode = On-Demand, then enable per host) and bulk-scan everything once to build the baseline. Expect a lot of failures; that's the starting point. - Triage, open the Overview tab. Use Failures by Severity to find critical failures; click through to the Scan Results tab filtered to critical.
- Investigate, on each rule, open Rule Detail. Read the rationale, read the remediation, pick a handful of identical-finding hosts and fix them manually or via per-rule remediation.
- Rescan, on each fixed host, click Run Scan. Confirm the rule flipped to Pass.
- Enable scheduling, once the baseline is clean, switch
compliance_mode=enabledon the hosts that care, set the scan interval to 24h (or whatever suits your SLO), and leave it running. The dashboard becomes your ongoing signal for drift. - Revisit: the Scan Freshness chart on the OpenSCAP / Docker Bench tabs tells you which hosts haven't scanned recently; bring those back into the loop.
Related Documentation
- Compliance Overview: scanner architecture, permissions, module gate.
- Running Compliance Scans: triggering, cancelling, scheduling, stuck-scan handling.
- Docker Monitoring: the Docker integration prerequisite for Docker Bench scans.
- Alerts and Notifications: routing
compliance_scan_completedandcompliance_scan_failedevents to your destinations. - Release Notes - 1.4.0: introduction of auto-remediation.
Chapter 17: Alerts Overview
What alerts are in PatchMon
An alert is a record of a noteworthy condition detected by the server: a host that has stopped reporting, a security-updates threshold being crossed, a new PatchMon server version becoming available, and so on. Alerts appear in Reporting and can be routed to chat, email, or ntfy through the notifications pipeline. The same event that creates an alert can also be sent to external destinations. Alerts are the in-app representation of operational signals.
Alerts are grouped into categories in Settings and the UI: host, patching, compliance, docker, security, remote_access, and system.
The global master switch lives under Reporting → Alert Lifecycle → Alerts system. When this is off, no alerts are created at all, regardless of per-type configuration.
Alert types implemented today
The following alert types fire from the server code in 2.0. Each can be individually enabled, tuned, and routed.
| Type | Category | Fired when |
|---|---|---|
host_down |
host | A host has not reported within 3× its update_interval, or its agent WebSocket disconnects |
host_recovered |
host | A previously-down host starts reporting again or its WebSocket reconnects |
host_enrolled |
host | A new host is successfully enrolled |
host_deleted |
host | A host is removed from the inventory |
host_security_updates_exceeded |
security | A host has more security updates than the configured threshold |
host_pending_updates_exceeded |
security | A host has more pending updates than the configured threshold |
host_security_updates_resolved |
security | Security updates count drops below threshold again |
host_pending_updates_resolved |
security | Pending updates count drops below threshold again |
server_update |
system | A newer PatchMon server version is detected via the DNS version check |
agent_update |
system | A newer agent version is released |
patch_run_started |
patching | A patch run begins |
patch_run_completed |
patching | A patch run finishes |
patch_run_failed |
patching | A patch run exits with errors |
patch_run_approved |
patching | A patch run is approved for execution |
patch_run_cancelled |
patching | A patch run is cancelled by an operator |
patch_reboot_required |
patching | Packages requiring a reboot were installed |
compliance_scan_completed |
compliance | An OpenSCAP compliance scan finishes |
compliance_scan_failed |
compliance | A compliance scan errors out |
container_stopped |
docker | A tracked Docker container stops unexpectedly |
container_started |
docker | A previously-stopped container starts again |
container_image_update_available |
docker | A newer image digest is available for a tracked container |
ssh_session_started |
remote_access | A user opens a web SSH session to a host |
rdp_session_started |
remote_access | A user opens a web RDP session to a host |
user_login |
system | A user signs in |
user_login_failed |
system | A failed sign-in attempt |
account_locked |
system | An account is locked after repeated failures |
user_created |
system | A new user is created |
user_role_changed |
system | A user's role is changed |
user_tfa_disabled |
system | A user's two-factor authentication is removed |
If a type listed in the release notes is not in this table, it is not implemented in the server. Anything absent from the alert_config table is treated as enabled by default for backwards compatibility, but only types with emitters in the server code actually fire.
The Reporting page
Alerts are managed from Reporting in the main navigation. The page has a fixed header with four severity cards (Informational, Warning, Error, Critical) plus a Total Active card, and a tab bar underneath.
Tabs
| Tab | Purpose |
|---|---|
| Overview | Dashboards: alerts by severity, volume trend, alerts by type, recent alerts, responder workload, deliveries by destination |
| Alerts | The filterable table of open and historical alerts |
| Alert Lifecycle | Per-type configuration (gated by the alerts_advanced module) |
| Destinations | Notification destinations (SMTP, webhook, ntfy, internal) |
| Event Rules | Routing rules that fan events out to destinations |
| Scheduled Reports | Cron-scheduled fleet reports delivered to destinations |
| Delivery Log | Every outbound notification attempt, with status and errors |
Clicking any severity card jumps straight to the Alerts tab filtered to that severity and status = open.
Filters
The Alerts tab supports four filters in addition to a free-text search box:
| Filter | Values |
|---|---|
| Severity | All Severities, Informational, Warning, Error, Critical |
| Type | All Types or any alert type present in the current result set |
| Status | All Status, Open, Acknowledged, Investigating, Escalated, Silenced, Done, Resolved |
| Assignment | All Assignments, Assigned to me, Assigned, Unassigned |
Filters persist in the URL (?tab=alerts&severity=critical&status=open), so you can deep-link directly to a filtered view. The severity cards in the header also highlight when a filter is active.
Sorting
Three columns in the alerts table are sortable by clicking the header: Severity, Type, and Created. The arrow icon next to the column header indicates the current sort direction.
Alert lifecycle
PatchMon tracks alerts with two concepts:
is_active: a boolean on the alert row. An alert is active when it is open or still being worked on, and inactive once it has been resolved.- Current state: a label derived from the most recent action recorded against the alert (e.g.
acknowledged,resolved).
Actions
The available actions are driven by a database table rather than being hardcoded, so the list may vary slightly between deployments. Actions split into two groups:
Workflow actions keep the alert active and just record progress. Typical names:
acknowledgedinvestigatingescalatedsilenced
Resolution actions close the alert: they set is_active=false, record resolved_at and resolved_by, and move the alert out of the active stats. Typical names:
resolveddone
Running a resolution action on an already-resolved alert is safe. Running a workflow action on a resolved alert re-activates it (this is how "reopen" works in practice: pick a workflow action like acknowledged).
Workflow actions appear under Workflow and resolution actions under Resolve in both the row menu and the alert details modal.
Assignment
Alerts can be assigned to a user from three places:
- The Assigned To dropdown on the alerts table: changes the assignment inline.
- The Assigned To dropdown in the alert details modal.
- The Auto-assign column in Alert Lifecycle: sets a default assignee for all new alerts of a given type.
Choose Unassigned to clear. Every assignment change is written to the alert history.
History
Every action (created, assigned, unassigned, acknowledged, resolved, and any custom action) is recorded in alert_history. Open the alert details modal and scroll to History to see who did what and when. System-driven actions (e.g. host_recovered auto-resolving a host_down alert) are recorded with user "System".
Bulk actions
Select one or more alerts using the checkboxes in the Alerts tab to reveal a bulk-actions bar above the table. You can:
- Apply any workflow or resolution action to every selected alert in one call.
- Delete the selected alerts permanently.
Bulk updates stream through the same history recording as individual actions. Deleting an alert does not leave a history trail; use a resolution action if you want to keep the audit record.
The number of selected alerts is shown on the left. Use the checkbox in the table header to select or deselect every visible row.
Per-alert-type configuration
Each alert type has its own row in Reporting → Alert Lifecycle. This tab is gated by the alerts_advanced module; plans without it show an upgrade prompt here.
Each row exposes:
| Column | Meaning |
|---|---|
| Active | Master switch for this alert type. When off, no alerts of this type are created and no notifications are emitted. |
| Severity | Default severity applied to new alerts of this type. |
| Alert delay | Seconds to wait before delivering the outbound notification. If a cancelling counterpart event (e.g. host_recovered for host_down) fires within the delay window, the notification is suppressed. Useful for flappy hosts. |
| Frequency | For periodic checks only (host_down, host_security_updates_exceeded, host_pending_updates_exceeded). Minutes between checks. |
| Threshold | For threshold alerts only (host_security_updates_exceeded, host_pending_updates_exceeded). Numeric threshold above which an alert fires. |
| Auto-assign | Toggle plus user picker: any new alert of this type is assigned to the chosen user automatically. |
| Retention | Days to keep alerts of this type before cleanup. Empty = never auto-clean. |
| Auto-resolve | Days after which active alerts auto-resolve if no one touches them. |
Changes are staged locally. Use the Apply button on the top bar to save them, or Discard to revert. The browser warns you if you navigate away with unsaved changes.
Cleanup
Below the table, the Alert cleanup card runs the retention policy:
- Preview cleanup shows the list of alerts that would be deleted under the current retention and auto-resolve rules.
- Delete N alerts commits the preview. The action is irreversible.
Cleanup only deletes alerts that satisfy retention_days. Whether it also deletes unresolved alerts is governed by cleanup_resolved_only per type (default: resolved only).
Permissions
| Permission | What it grants |
|---|---|
can_manage_alerts |
Create/modify alert configurations, run cleanup, act on alerts |
can_manage_notifications |
Create, edit, test, and delete destinations, routes, and scheduled reports |
can_view_notification_logs |
Read the Delivery Log tab |
can_view_hosts |
List host groups and hosts when building routes and reports |
Admins and superadmins bypass these checks. Regular users without can_manage_alerts can still view the Alerts tab but cannot perform actions.
Related pages
- Notification Destinations
- Notification Routes and Delivery Log
- Scheduled Reports
- Host Down and Host Recovered Alerts
Chapter 18: Notification Destinations
What a destination is
A destination is an endpoint that outgoing notifications are sent to: an SMTP mailbox, an HTTP webhook URL, an ntfy topic, or the built-in Internal Alerts destination that records alerts inside PatchMon itself.
Destinations are the "where" half of the notifications pipeline. The "what goes there" half is handled by event rules, covered in Notification Routes and Delivery Log.
Destinations live under Reporting → Destinations in the web UI.
Channel types
PatchMon 2.0 ships four destination channel types. The list is fixed in the server code:
| Channel | Value | What it does |
|---|---|---|
| Webhook | webhook |
HTTP POST of a JSON payload to any URL. Generic by default; Discord and Slack webhook URLs are auto-detected and formatted with the appropriate rich payload. |
email |
SMTP delivery to one or more recipients, with HTML body and an optional attachment for scheduled reports. | |
| ntfy | ntfy |
Push notification via ntfy.sh or a self-hosted ntfy server. |
| Internal Alerts | internal |
Built-in destination that drops events into the Alerts tab. You cannot create or delete this one; it is created automatically and can only be enabled or disabled. |
Discord is a webhook, not a channel type. To post alerts to a Discord channel, create a Webhook destination with the Discord webhook URL. The separate Settings → Discord Authentication area is only for Discord OAuth2 sign-in; it is unrelated to notifications.
Permissions
Creating, editing, testing, and deleting destinations requires the can_manage_notifications permission. Admins and superadmins bypass the check. Users without the permission do not see the Destinations tab at all.
Creating a destination
- Open Reporting → Destinations.
- Click Add destination.
- Pick a channel type (Webhook, Email, or ntfy) and click Next.
- Give the destination a Display name: this is what appears in the event rules picker, the delivery log, and scheduled report selectors.
- Fill in the channel-specific configuration (see below).
- Leave Enabled on (default) or turn it off to save the configuration without sending anything yet.
- Click Create.
A successfully-created destination shows up in the destinations table with its channel icon, display name, and enabled switch.
Webhook
Pick this for generic JSON webhooks, Discord, or Slack. Discord and Slack URLs are auto-detected and sent rich payloads; other URLs receive a generic JSON body.
| Field | Required | Notes |
|---|---|---|
| Webhook URL | Yes | Full HTTPS URL. Discord: https://discord.com/api/webhooks/.... Slack: https://hooks.slack.com/services/.... Generic: any endpoint that accepts POST with Content-Type: application/json. |
| Signing secret | No | Optional HMAC secret. When set, each webhook is signed with SHA-256 over the payload; the signature is sent in a header so the receiver can verify authenticity. |
Email (SMTP)
| Field | Required | Notes |
|---|---|---|
| SMTP host | Yes | e.g. smtp.example.com, smtp.sendgrid.net. |
| SMTP port | No | Defaults to 587. Use 465 for implicit TLS, 25 for unencrypted relay (avoid). |
| Username | No | SMTP auth user. Leave blank if your relay does not require it. |
| Password | No | SMTP auth password. Stored encrypted. |
| From | Yes | Envelope + header From address, e.g. patchmon@example.com. Must be accepted by the relay. |
| To | Yes | Comma-separated list of recipients. |
| Use TLS | No | On by default. STARTTLS on port 587, implicit TLS on 465. Disable only for on-prem relays without TLS. |
ntfy
| Field | Required | Notes |
|---|---|---|
| Server URL | No | Leave empty for https://ntfy.sh. Fill in your own URL for self-hosted ntfy. |
| Topic | Yes | ntfy topic name. Subscribe to the same topic on your phone/desktop to receive push notifications. |
| Access token | No | ntfy bearer token for protected topics. Alternative to basic auth. |
| Username / Password | No | Basic auth. Use instead of access token when your ntfy server is configured for HTTP basic auth. |
Internal Alerts
You cannot create this destination; it is seeded automatically with the ID internal-alerts and appears with the Built-in tag. Its sole job is to write events into the in-app Alerts tab. You can:
- Enable / disable it from the destinations table (disable if you do not want internal alert records at all, for example when you only use external chat or email).
- Reference it from event rules, same as any other destination.
You cannot delete it. Attempting to delete returns 400 Bad Request: The Internal Alerts destination cannot be deleted. You can disable it instead.
Editing a destination
Click Edit in the destinations table. The modal re-loads the current configuration (secrets included, so you do not have to re-type passwords or tokens) and lets you change any field. Click Save to apply.
The enabled switch is inline in the table; click it to toggle without opening the modal.
Secrets are always encrypted at rest using PatchMon's SESSION_SECRET. When you re-enter a secret and save, the value is re-encrypted. The decrypted value is returned only to operators with can_manage_notifications.
Testing a destination
Use Test in the destinations row to verify the configuration without waiting for a real event:
- Click Test next to any enabled non-built-in destination.
- PatchMon enqueues a synthetic event with type
test, severityinformational, and the message "This is a test message from PatchMon notification settings." - A toast confirms the test is enqueued. Actual delivery happens through the notifications worker and takes a second or two.
- The Delivery Log updates automatically after about three seconds; look there for the outcome.
Tests do not bypass global rate-limiting. If your destination is already at its per-minute rate cap (60 messages/minute), the test returns
429 Too many notifications; try again shortly.
Failure cases returned by the test endpoint:
| HTTP | Message | Meaning |
|---|---|---|
400 Bad Request |
Destination is disabled |
Enable it first. |
404 Not Found |
Destination not found |
The destination was likely deleted in a parallel tab. |
429 Too Many Requests |
Too many notifications; try again shortly |
Rate limit hit. |
503 Service Unavailable |
Notifications not configured |
Background worker or Redis is not running. |
Deleting a destination
Click the trash icon in the destinations table. The confirmation dialog warns that the action is permanent. Deleting a destination does not delete the event rules that target it: those routes will be orphaned and should be updated to point at a different destination or removed. Deliveries in the Delivery Log keep their historical destination_id and appear as a raw ID if the name can no longer be resolved.
You cannot delete the internal-alerts destination (see above).
What gets stored
Every destination is a database row with:
- A stable UUID (
id) used by event rules and the delivery log. channel_typefrom the list above.display_name.enabledboolean.config_encrypted: the JSON configuration, encrypted withSESSION_SECRETso a database dump does not expose SMTP passwords, ntfy tokens, or HMAC secrets.created_at/updated_attimestamps.
The list endpoint never returns the raw config, only a has_secret flag. The decrypted config is fetched on demand from a separate endpoint when the edit modal opens.
Discord sign-in vs Discord webhooks
The two "Discord" areas in PatchMon are independent:
| Area | Purpose | Where |
|---|---|---|
| Discord Authentication | OAuth2 sign-in, users log in to PatchMon with their Discord account, optionally requiring membership of a server and role. | Settings → Discord Authentication |
| Discord webhook destination | Post alerts into a Discord channel via a channel webhook URL. | Reporting → Destinations → Add destination → Webhook |
Configure them separately. The OAuth2 settings are not required to send alerts to Discord.
Related pages
Chapter 19: Notification Routes and Delivery Log
Overview
In PatchMon, a route (labelled Event Rule in the UI) connects one or more event types, and optionally a severity floor, a host scope, or a match rule, to a destination. When an event fires, the notifications engine evaluates every enabled route; each matching route produces a delivery to its destination.
Routes handle fan-out: one host_down event can notify your on-call ntfy topic, post to a Discord #alerts channel, and write an internal alert record, all from a single emit.
Both routes and the Delivery Log live under Reporting in the main navigation:
- Reporting → Event Rules: create, edit, and disable routes.
- Reporting → Delivery Log: every outbound delivery attempt, sent or failed.
Permissions
| Action | Permission |
|---|---|
| Create / edit / disable / delete routes | can_manage_notifications |
| Read the delivery log | can_view_notification_logs |
Admins and superadmins bypass these checks.
Creating a route
- Go to Reporting → Event Rules.
- Click Add event rule. (Disabled until at least one destination exists. Create one first under Notification Destinations.)
- Fill in the modal:
| Field | Notes |
|---|---|
| Destination | Required. Pick from the list of configured destinations. You can only route to enabled destinations; disabled destinations are skipped at delivery time. |
| Events | Tick All events to match every event type, or tick individual events. Selecting every individual event collapses back to "All events". |
| Minimum severity | Floor for the route. Events below this severity are ignored. Order is informational < warning < error < critical. |
| Host groups | Optional. If any are selected, only events whose host is a member of at least one of the groups match. Leave empty for "any host". |
| Individual hosts | Optional. If any are selected, only events for those specific hosts match. Leave empty for "any host". |
| Enabled | On by default. Turn off to keep the rule for later without it firing. |
- Click Add.
Event type reference
Pick from the same set documented in Alerts Overview. host_down, host_recovered, patch_run_completed, ssh_session_started, and so on. You can also select high-volume or low-volume events like user_login and account_locked to route sign-in telemetry.
Host group and host filters combined
If both host groups and individual hosts are set, the event must satisfy both filters. In practice you usually pick one or the other, not both.
Events without a host context (e.g. server_update, user_created) are filtered out by any host scope you add. Leave both scope fields empty to match those as well.
Severity, delay, and lifecycle
Per-type Alert delay in Alert Lifecycle applies before the route fan-out: if the event has a configured alert_delay_seconds, PatchMon enqueues the delivery with that delay. If a counterpart event fires within the window (for example, host_recovered while a delayed host_down is queued), the delayed notification is cancelled. Counterpart mapping:
| Delayed event | Cancelled by |
|---|---|
host_down |
host_recovered |
container_stopped |
container_started |
host_security_updates_exceeded |
host_security_updates_resolved |
host_pending_updates_exceeded |
host_pending_updates_resolved |
Editing and deleting routes
Each row in Event Rules has Edit and Delete buttons.
- Edit reopens the modal with the saved values. Save to update; the new criteria take effect for the next matching event.
- Delete removes the rule entirely. Deliveries already enqueued finish, but no new deliveries are produced.
Disabled routes are displayed with a muted Disabled badge and do not receive deliveries. Disable is the safer option if you want to pause a rule temporarily.
How matching works
For each outgoing event, the server:
- Looks up all routes whose
event_typesinclude the event type (or the wildcard*). - Drops routes whose destination is disabled.
- Drops routes whose
min_severityis above the event's severity. - For each remaining route, applies the host-group and host-ID filters.
- Deduplicates: events that repeat within a 2-minute window for the same destination are collapsed into one delivery. The fingerprint key is
event_type + reference_id + destination_id + 2-minute bucket. - Rate-limits: each destination is capped at 60 deliveries per minute. Deliveries over the cap are dropped with a warning in the server log.
- Enqueues an asynq task to the
notificationsqueue withMaxRetry=5.
The queue worker then dispatches the delivery according to the destination's channel type (SMTP send, HTTP POST, ntfy publish, or internal alert write).
The Delivery Log
The Delivery Log tab shows every outbound notification attempt with its result. Use it when a destination is not receiving messages, a webhook recipient reports errors, or you want an audit trail of what went where.
Columns
| Column | Meaning |
|---|---|
| Time | When the delivery was processed, shown as a relative time ("5m ago"). Hover for the exact timestamp. |
| Status | sent for success (green), anything else for failure (red). |
| Event | The event type that produced the delivery (e.g. host_down, patch_run_failed). |
| Destination | The destination display name at the time of delivery. Shows the UUID if the destination has been deleted. |
| Reference | reference_type:reference_id, clickable for host, patch_run, and alert references so you can jump to the source. |
| Error | Error message returned by the delivery attempt. Empty for successful deliveries. |
Pagination
The log is paginated at 50 rows per page. Use the left and right arrows at the bottom to move through history. The most recent deliveries are on page 1.
Use the Refresh log button in the page header to pull the latest entries without navigating away.
Retries
The notifications worker retries failed deliveries up to 5 times with exponential back-off (handled by asynq). Each attempt is recorded on the same delivery log row: the attempt_count field increments, and the row is upserted with the latest status and error_message. The provider message ID (e.g. SMTP queue ID, webhook Message-ID) is captured in provider_message_id when the remote end returns one.
If all five retries fail, the delivery row stays at the last failed state. There is no automatic escalation; diagnose the failure from the Error column.
Common failure reasons
| Error (excerpt) | Likely cause |
|---|---|
connect: connection refused / i/o timeout |
Destination host is unreachable from the PatchMon server. Check firewall / network. |
authentication failed / 535 5.7.8 |
Wrong SMTP credentials or token. Re-edit the destination and re-enter. |
400 Bad Request from Discord/Slack webhook |
Webhook URL is wrong, revoked, or the rich payload is malformed for a customised Slack app. |
403 Forbidden from ntfy |
Topic requires auth you have not provided, or token is expired. |
destination disabled |
Someone disabled the destination between enqueue and delivery. Re-enable and re-trigger. |
If an expected entry is missing, check that the route is enabled, the destination is enabled, the event passed the severity and scope filters, and the alert type itself is enabled in Alert Lifecycle.
Deduplication and rate-limiting in the log
Duplicates suppressed by the 2-minute dedup window do not appear in the delivery log; they are silently skipped before a delivery task is created. Rate-limited deliveries are also skipped silently (a warning goes to the server log, not the delivery log). If a destination suddenly stops receiving events, check:
- The destination is enabled.
- No route has been deleted.
- The per-minute rate cap is not being exceeded upstream. 60 messages/minute is per-destination.
App links in notifications
Every notification includes an app_link in its metadata pointing back to the most relevant page in PatchMon:
| Reference type | Link |
|---|---|
patch_run |
/patching/runs/<id> |
host |
/hosts/<id> |
alert |
/hosts/<host_id> if known, otherwise / |
user |
/settings/users |
test |
/reporting |
Formatters for each channel render this as a clickable button (Discord/Slack rich embeds), an <a> tag (email), or a Click action (ntfy).
Related pages
Chapter 20: Scheduled Reports
Overview
A scheduled report is a periodic fleet summary that PatchMon renders to HTML (with a CSV attachment) and delivers through one or more notification destinations on a cron schedule. Use them to keep leadership and on-call teams informed about compliance posture, patching throughput, pending updates, and open alerts, without anyone needing to log into the UI.
Scheduled reports are managed under Reporting → Scheduled Reports. They share the same destinations as event-driven notifications, so any email, webhook, or ntfy destination you have already set up can receive reports too.
Permissions
Creating, editing, running, and deleting scheduled reports requires can_manage_notifications. Admins and superadmins bypass the check. Users without the permission do not see the tab.
To include host-group scoping, the user must also have can_view_hosts (so the group picker can populate).
Creating a report
- Open Reporting → Scheduled Reports.
- Click New report. (Disabled until at least one destination exists. Create one under Notification Destinations.)
- Fill in the modal:
| Field | Notes |
|---|---|
| Report name | Required. Shown in the table and as the email subject prefix. |
| Schedule | Frequency + time of day. See Schedule options. |
| Sections | Which blocks to include in the rendered report. See Report sections. |
| Deliver to | Tick every destination that should receive this report. You can send the same report to multiple destinations. |
| Scope to host groups | Optional. Limit the report's per-host sections to the selected host groups. Leave empty for fleet-wide. |
| Top rows per section | Numeric cap on per-host lists, defaults to 20. |
| Enabled | On by default. Disable to keep the report saved but paused. |
- Click Create.
After creation, the report appears in the table with its next run time, status badge, and action buttons.
Schedule options
The modal composes a standard five-field cron expression for you, so you rarely see cron syntax directly. Frequencies and the resulting cron:
| Frequency | Cron produced | What it means |
|---|---|---|
| Daily | M H * * * |
Every day at the chosen time. |
| Weekdays (Mon to Fri) | M H * * 1-5 |
Mondays to Fridays at the chosen time. |
| Weekly | M H * * D,D,… |
The chosen days of the week. Pick one or more via the Mon/Tue/… toggle buttons. |
| Monthly | M H D * * |
The chosen day of the month (1st, 15th, Last day, or a custom day 1–31). |
All schedules evaluate in the server timezone configured in PatchMon settings; the modal labels this next to the time picker. Changes to the server timezone after the report is saved do not automatically re-schedule existing reports. Edit the report and save again to re-evaluate.
The schedule is displayed on the table in plain English ("Daily at 08:00", "Weekdays at 09:30", "15th of month at 06:00"), computed from the underlying cron.
Report sections
Each report is a composition of sections, ticked independently:
| Section | Content |
|---|---|
| Executive summary | Total hosts, average compliance score, critical hosts, compliant hosts, plus a patching overview (runs, completed, failed, running). |
| Compliance summary | Passed rules, failed rules, critical hosts, hosts with no recent scan. |
| Recent patch runs | Latest patch runs by status with timestamps and target counts. |
| Hosts / status | Host status rollup: offline, stale, active. |
| Open alerts | Currently active alerts grouped by severity. |
| Hosts by outstanding updates | Top hosts sorted by pending updates (respects the Top rows per section cap). |
| Top outdated security packages | Packages with the most hosts needing a security update. |
New reports default to Executive summary + Compliance summary + Recent patch runs unless you customise the selection.
Delivering a report
Every tick in Deliver to adds a destination to the report's fan-out. At run-time, PatchMon:
- Resolves the destinations (skips disabled ones).
- Renders the HTML body and CSV attachment once.
- Sends the same payload to each destination in parallel.
For each channel type the payload adapts:
| Destination | What the recipient sees |
|---|---|
| HTML email rendered inline; CSV attached. Subject contains the report name and timestamp. | |
| Webhook | JSON POST with report metadata, a summary, and the HTML body in a field. Use this to fan reports into a downstream system (data warehouse, Google Sheets ingester, etc.). |
| ntfy | Short push notification with a link back to the latest report in the UI. The full HTML does not fit ntfy, so it is summarised. |
| Internal Alerts | A system record under the Alerts tab, useful when you want a run history inside PatchMon without email. |
A report's appearance in the Delivery Log uses event_type: scheduled_report. Filter the log by the report's destinations to audit deliveries.
Running a report manually
Click the green Play button in the report's row to run it immediately. The report is queued for instant execution and delivered to the configured destinations.
Manual runs respect the same destination state: disabled destinations are skipped, and rate limits still apply.
Disabled reports show the play button greyed out. Enable the report (or edit and tick Enabled) before running. The button tooltip tells you why it is unavailable.
Editing and deleting
- Edit reopens the same modal pre-filled with the current schedule, sections, and destinations. Saving re-computes the next run time.
- Delete removes the report permanently. Past deliveries in the log remain.
- Enabled switch: edit the report and toggle Enabled in the modal. Disabled reports keep their schedule but do not fire until re-enabled; their next-run time is still displayed.
How scheduling works internally
Scheduled reports are stored in the scheduled_reports table. On create or update, PatchMon computes the next run via the cron expression in the server's timezone and writes it to next_run_at. The scheduler enqueues the report task to asynq at exactly that time, with no background polling loop.
When the task executes, the worker:
- Re-reads the report row.
- Aborts if it has been disabled since enqueue.
- Renders HTML + CSV via the server's report renderer (see
internal/notifications/report_render.go). - Fans out to each destination with the same fingerprint + rate-limit + retry semantics as regular notifications.
- Updates
last_run_atand queues the next occurrence.
Because the schedule is stored as a cron string plus a timezone, daylight-saving transitions are handled by the cron library. Jobs that would fall in a skipped hour are pushed to the next valid slot; jobs repeated in a duplicate hour fire once.
Known limits
- The scheduled-report pipeline does not attempt full re-delivery of a whole report's fan-out on transient failure. A delivery that fails retries per-destination (up to 5 times via asynq), but the render is not re-done. In practice this means a report either reached each destination successfully (with retries covering transient issues) or ended up in the delivery log as
failedfor that destination. - There is no "skip next run" option. To skip a single run, disable the report before its scheduled time, then re-enable it afterwards.
- Report templates are not customisable from the UI in 2.0. The rendered HTML layout is fixed; customise by choosing sections and host-group scope. Custom templates are a candidate for a future release.
Related pages
Chapter 21: Web SSH Terminal
Overview
PatchMon ships an in-browser SSH terminal that lets operators connect to any monitored Linux/FreeBSD host without leaving the web UI. The terminal is a full xterm with line editing, colours, scrollback, resize, and keyboard shortcuts, powered by a WebSocket between the browser and the PatchMon server.
Two connection modes are supported:
- Direct: the PatchMon server dials the host's SSH port (22 by default) and bridges the session. Use this when your server has network reach to the hosts.
- Proxy: the PatchMon server asks the host's own agent to open a local SSH connection (to
localhost:22on the host) and tunnels it back through the agent's existing outbound WebSocket. No inbound SSH port exposure required on the target host.
Authentication to the host uses an SSH password or an SSH private key (with an optional passphrase). Authentication to PatchMon itself is handled by your existing session cookies plus a one-time ticket described below.
Web SSH is shipped in PatchMon from 1.4.0 onwards; in 2.0 it is provided under the remote_access capability module.
Permissions
| Role | Web SSH access |
|---|---|
| admin / superadmin | Always granted. |
| Any other role | Requires can_use_remote_access on the role permissions. |
Users without can_use_remote_access attempting to open the terminal are rejected with HTTP 403 Access denied during the WebSocket handshake.
Opening a terminal
- Go to Hosts and click the host you want to connect to.
- On the Host Detail page, open the Terminal tab (or click the SSH Terminal button in the header).
- Pick the Connection mode (Direct or Proxy).
- Enter the SSH username (defaults to
root; the last-used username per host is cached in your browser's local storage). - Choose an Authentication method:
- Password: type the host password.
- Key: paste the private key (OpenSSH or PEM format) and the passphrase if encrypted.
- Adjust the SSH port if needed (default
22). - If you picked Proxy mode, set the Proxy host (default
localhost) and Proxy port (default22). These are the destination the agent will dial, typicallylocalhost:22when you want the agent to SSH into its own host. - Click Connect.
Once the green "SSH connection established" line appears, the terminal is live and interactive.
Your SSH credentials are never stored by the server or browser. They are sent over the authenticated WebSocket once at connect time and held in browser state only for the life of the session. Disconnecting clears them from memory.
Direct mode
In Direct mode, the PatchMon server dials the host directly:
- Browser →
POST /api/v1/auth/ssh-ticketwith{ "hostId": "<id>" }. Requires your PatchMon session cookie. Returns a 30-second, single-use ticket. - Browser opens
wss://<patchmon-host>/api/v1/ssh-terminal/<hostId>?ticket=<ticket>. - Server consumes the ticket (deleted from Redis on use), validates the user is active and has permission, and upgrades to WebSocket.
- Browser sends the
connectmessage with auth credentials, terminal size, and connection mode. - Server dials
host.ip(falling back tohost.hostname) on the chosen port, authenticates with password or private key, and starts an interactive shell.
Host key verification: the server uses ~/.ssh/known_hosts on the PatchMon container if it exists, and falls back to InsecureIgnoreHostKey otherwise. Direct mode does not prompt the user to accept host keys. Keys are accepted on first use when the fallback is active. Supply a known_hosts file via volume mount for production deployments that require strict verification.
Use Direct mode when:
- The PatchMon server has network reach to the host on the SSH port.
- You accept bridging SSH via the server host rather than via the host's agent.
Proxy mode
Proxy mode routes the SSH session through the host's existing agent WebSocket, avoiding the need to expose an SSH port inbound to PatchMon.
Flow:
- Browser → ticket + WebSocket as in Direct mode.
- Server receives the
connectmessage withconnection_mode: "proxy". - Server generates a 16-byte session ID, stores a proxy session record, and sends
{ "type": "ssh_proxy", "session_id": …, "host": "localhost", "port": 22, "username": … }over the agent's existing WebSocket. - The agent dials
<proxy_host>:<proxy_port>(defaultslocalhost:22) on its own host and pipes the stream back to the server over the WebSocket asssh_proxy_dataframes. - The server forwards those frames to the browser as terminal
dataevents.
Agent config requirement. Proxy mode requires integrations.ssh-proxy-enabled: true in the agent's /etc/patchmon/config.yml. This setting is not pushed from the server. It has to be set manually and the agent service restarted. If the agent rejects the request, the terminal shows "Agent not connected" or an agent-supplied error.
Use Proxy mode when:
- The host has no inbound SSH exposure (behind NAT, in a restricted VPC, behind a corporate firewall).
- You already trust the agent's outbound connection to PatchMon and want to reuse it.
- You want to SSH to
localhostthrough the agent without punching holes through the edge firewall.
One-time tickets for WebSocket auth
WebSocket upgrades cannot include the normal authentication cookies reliably across all browsers, and passing long-lived tokens via query parameters would expose them in server logs and browser history. PatchMon avoids both problems with one-time tickets:
- Tickets are 64 hex characters, generated from
crypto/randon the server. - Tickets live in Redis with a 30-second TTL.
- A ticket carries the user ID and the host ID it was minted for.
- The WebSocket handler consumes the ticket on first use (atomic
DEL). A second attempt to open a WebSocket with the same ticket fails withInvalid or expired ticket. - Ticket validation also verifies the
hostIdin the URL matches the one encoded in the ticket. Stolen tickets cannot be reused against a different host.
You get the ticket implicitly by clicking Connect in the UI; there is no operator-visible ticket string.
Keyboard and terminal interactions
The embedded xterm supports the usual shortcuts:
| Action | Shortcut |
|---|---|
| Copy selection | Browser-standard (Ctrl+Shift+C / Cmd+C) |
| Paste | Ctrl+Shift+V / Cmd+V |
| Send Ctrl+C to the remote | Ctrl+C (when no selection) |
| Scrollback | Mouse wheel or trackpad |
| Clear screen | Remote clear command |
The terminal automatically resizes when the PatchMon browser window resizes, the AI Assistant panel opens/closes, or the sidebar collapses. The server is notified over the WebSocket so the remote TTY keeps cols and rows in sync. Resize events are honoured in Direct mode (when supported by the remote SSH server) and in Proxy mode via ssh_proxy_resize messages to the agent.
Terminal output is also captured in a rolling 5 000-character buffer for the AI Terminal Assistant, if enabled.
Session lifetime and idle timeout
- Ticket TTL: 30 seconds. A session that takes longer than that to start must re-request a ticket.
- Idle disconnect: after 15 minutes with no terminal activity the session is closed automatically. A visible warning appears 1 minute before the disconnect. Any input or output resets the timer.
- Manual disconnect: click Disconnect in the toolbar or close the terminal panel. Credentials are wiped from browser state on disconnect.
What happens when the WebSocket drops
- If the server-side SSH process exits (e.g. you type
exiton the remote shell), the terminal shows "SSH connection closed" and the WebSocket stays open for a potential newconnect. - If the WebSocket itself drops unexpectedly and you were connected, the terminal attempts to reconnect once after 3 seconds, via a brand-new ticket and WebSocket. Authentication re-uses the cached username but you must re-enter password or key, as credentials are not persisted in the browser.
- Close codes that are not retried:
1000(normal close),1006(abnormal close, often auth failure),1008(policy violation). For those, you get "Connection failed: Session may have expired. Please refresh the page or log in again.".
Auditing
Every successful ticket mint (i.e. the user has requested a terminal session) fires an ssh_session_started event:
- Severity:
informational(configurable in Alert Lifecycle). - Metadata:
host_id,host_name,user_id. - Reference: the host record.
Route this event type to a destination (for example, a #security Discord channel) if you want a live audit trail of all web SSH sessions. Configure routing in Notification Routes and Delivery Log.
Server logs also record each upgrade and ticket consumption under ssh-terminal connected and ssh-terminal ticket invalid log lines.
Troubleshooting
| Symptom | Likely cause and fix |
|---|---|
| "Authentication required. Please log in again." when clicking Connect | Your PatchMon session cookie is missing or expired. Refresh the page and sign in. |
| "Invalid or expired ticket" on upgrade | More than 30 seconds elapsed between ticket mint and WebSocket open, or the ticket was already consumed. Retry; PatchMon mints a new ticket on the retry. |
| "Agent not connected." in Proxy mode | Host's agent WebSocket is down. Verify from Host Detail → Status; restart the agent service on the host. |
| Agent rejects with "ssh-proxy-enabled must be true" | Set integrations.ssh-proxy-enabled: true in the agent's config.yml and restart the agent service. |
| "Failed to parse private key" | Key is encrypted: add the passphrase. Or the key format is unsupported; use OpenSSH or PEM PKCS#8. |
| Connection established but first-time host key warning on server log | The PatchMon container has no known_hosts for this host. Add one via a volume mount, or accept that first-use keys are auto-trusted. |
Related pages
- AI Terminal Assistant
- RDP via Guacamole
- Managing the PatchMon Agent
- Agent Configuration Reference
Chapter 22: RDP via Guacamole
Known issue (2.0.0). The RDP connection flow has a known bug in PatchMon 2.0.0. Sessions may fail to establish, disconnect early, or return opaque errors in certain environments. A fix is planned for the next release. See Release Notes 2.0.0 for details. If RDP is mission-critical for your rollout, validate the workflow in a staging instance before relying on it in production.
Overview
PatchMon 2.0 lets you open a full RDP session to a Windows host from your browser, with no RDP client installed locally and no inbound RDP port exposed to the outside world. The session travels:
- From the browser as a Guacamole WebSocket tunnel, into the PatchMon server.
- From the PatchMon server into a
guacdsidecar, which speaks the RDP protocol. - From
guacdthrough a short-lived TCP proxy to the host's own PatchMon agent, which forwards tolocalhost:3389on the Windows host.
This is a one-time ticketed connection with keyboard, mouse, and clipboard support. Screen size is configurable, and NLA/TLS/legacy RDP is auto-negotiated.
RDP is provided under the remote_access capability module.
Known issue: 2.0.0 RDP bug
Before using RDP in production, read this.
Version 2.0.0 has a known bug in the RDP connection flow that can cause:
- Sessions to fail handshake with generic errors.
- Ticket resolution issues that surface as "invalid or expired ticket" on otherwise valid sessions.
- Early disconnects after a successful handshake under some network conditions.
A fix is planned for the next release. In the meantime:
- If RDP is critical, stay on the last 1.4.x release that works for you, or retry the session.
- Always verify the Web SSH Terminal works end-to-end first. It has no such known issue and is a good baseline check for connectivity and agent health.
- When reporting RDP issues, include the server log lines tagged
rdp-ticketandrdp tunnel, and the agent'srdp_proxy_*log lines.Full context: Release Notes 2.0.0, section Known issues.
Architecture
┌──────────┐ Guacamole protocol over WSS ┌──────────────────┐ TCP 4822 ┌───────┐ TCP ┌──────────────────┐ TCP 3389 ┌──────────────┐
│ Browser │ ───────────────────────────→ │ patchmon-server │ ───────────→ │ guacd │ ────→ │ Ephemeral port │ ──────────→ │ Windows │
│ (guac- │ │ (Go binary) │ │ │ │ on the server │ │ Agent relay │
│ common- │ ←─────────────────────────── │ │ ←─────────── │ │ ←──── │ (local listen) │ ←────────── │ → localhost │
│ js) │ │ │ │ │ │ │ │ 3389 │
└──────────┘ └──────────────────┘ └───────┘ └──────────────────┘ └──────────────┘
│ ▲
│ Agent WebSocket (rdp_proxy_*) │
└─────────────────────────────────────────────────┘
Key components:
guacd: Apache Guacamole's daemon, shipped as a sidecar container in PatchMon's Docker Compose (guacamole/guacd:1.5.5). Runs on4822/tcpinside thepatchmon-internalnetwork. No public ports.- PatchMon server: acts as the Guacamole WebSocket tunnel endpoint and owns the RDP ticket store. It asks the host's agent to set up a local TCP proxy, then hands that proxy to
guacd. - Agent proxy: on receiving
rdp_proxyover its WebSocket, the agent opens a local TCP bridge and forwards bytes between PatchMon andlocalhost:3389on the Windows host. Requiresintegrations.rdp-proxy-enabled: truein the agent config. - Windows host: runs the standard Windows RDP service on
127.0.0.1:3389(bound to localhost via the agent; no inbound exposure needed).
See Installing PatchMon Server on Docker for the sidecar configuration as deployed by the standard compose file. If you run PatchMon without the sidecar, install guacd separately (apt install guacd / yum install guacd) and set GUACD_ADDRESS to point at it.
Permissions and module
| Access | Requirement |
|---|---|
| Open an RDP session | admin, superadmin, or can_use_remote_access + can_view_hosts on your role |
| Create RDP ticket for a host | can_manage_hosts (needed to see the control on the host detail page in the first place) |
| Deployment | remote_access capability module enabled |
Users without the required permission are rejected at POST /auth/rdp-ticket with 403 Access denied.
Prerequisites
Before you can open an RDP session to a host, all of these must be true:
- The host is identified as Windows in PatchMon (
os_typeorexpected_platformcontains "windows"). Non-Windows hosts are rejected with400 RDP is only available for Windows hosts. - The host's PatchMon agent is online and connected via its WebSocket.
- The agent's
config.ymlhasintegrations.rdp-proxy-enabled: true. This setting is not pushable from the server. You edit it on the host and restart thePatchMonAgentservice. - RDP is enabled on the Windows host, and the agent's user context can reach
localhost:3389. (The default NLA mode is fine; PatchMon negotiates security automatically.) - The PatchMon server is able to reach
guacdat its configured address (defaults to127.0.0.1:4822orguacd:4822depending on deployment). If not, RDP ticket creation fails early with503 guacd is not reachable on the PatchMon server.
Opening an RDP session
- Go to Hosts and click the Windows host.
- On Host Detail, open the Remote Access area and click Open RDP (or the RDP icon in the toolbar).
- Enter the Windows username and password for the account to sign in as.
- Optionally adjust the Screen size. Defaults to
1024 × 768. Allowed range is320–8192on each axis; values outside this range are clamped. - Click Connect.
The server then:
- Preflights
guacdwith a 2-second TCP dial. - Asks the rdpproxy to allocate an ephemeral listener (one per session), which is the "port" that
guacdwill dial into. - Sends
rdp_proxyto the host's agent, waits up to 12 seconds for the agent to acknowledge withrdp_proxy_connected. - Mints an RDP ticket and returns the WebSocket tunnel URL to the browser.
- The browser opens
wss://<patchmon-host>/api/v1/rdp/websocket-tunnel?ticket=…&width=…&height=…, completes the Guacamole handshake, and starts streaming frames.
Once connected you see the Windows sign-in screen (or desktop, if NLA authenticated) in your browser.
Credentials handling
- Username and password are sent once over HTTPS to
POST /auth/rdp-ticketand stored encrypted in the RDP ticket record alongside the session ID, host ID, and screen dimensions. - The ticket is single-use and expires quickly (tens of seconds). When
guacdconsumes it to set up the tunnel, the stored credentials are forwarded toguacdand then to RDP. PatchMon itself does not keep them after the session starts. - For environments where Windows asks for a certificate, the default guacd config uses
ignore-cert=trueto accept the self-signed certificate Windows generates out of the box, matchingmstsc.exebehaviour. Hardened per-host overrides are a candidate for a future release. - Security mode is negotiated as
any, which lets FreeRDP pick the strongest common mode (NLA → TLS → legacy RDP). Hardcoding NLA would break hosts with Negotiate/TLS-only security layers and refuses blank-credential sessions. - Empty username and password are allowed (some hosts accept blank-credential sessions) but
guacdusually fails handshake in that case; the server logsmissing_username_or_password: trueso you can spot it in the audit trail.
One-time tickets
RDP tickets work like SSH tickets:
- 64-character hex string,
crypto/randentropy. - Stored in Redis with a short TTL.
- Consumed atomically on first use by
doGuacConnect. - Bound to a user ID, a host ID, a proxy session ID, a port, the encrypted credentials, and the requested screen width/height.
- Validated against the user's current active state. A deactivated user cannot re-use a still-live ticket.
You never see or handle the ticket directly; the UI requests it under the hood when you click Connect.
Keyboard layouts and clipboard
- Keyboard: the Guacamole client maps the browser's keydown events to scancodes. For most Latin keyboards (en-GB, en-US) this "just works". For non-Latin layouts, match the Windows layout to the browser's. Guacamole has no per-session keyboard-layout selector in PatchMon 2.0.
- Clipboard: bidirectional text clipboard is supported via Guacamole's native clipboard channel. Copy in Windows, paste in the browser, or vice versa. Rich clipboard (images, file lists) is not supported.
- Mouse: primary, secondary, and wheel. Mouse-wheel-click middle button is supported.
- Full-screen: toggle via your browser's F11/fullscreen mode. Guacamole resizes the RDP session to the browser viewport where the host allows dynamic resolution.
Printer redirection, audio, drive mapping, and USB forwarding are not enabled in 2.0.
Session limits
| Limit | Default | Source |
|---|---|---|
| Concurrent RDP sessions per server | 50 | rdpproxy.DefaultMaxSessions |
| Per-session idle timeout | 30 minutes | rdpproxy.sessionIdleTimeout |
guacd preflight timeout |
2 seconds | guacdPreflightTimeout |
| Agent handshake timeout | 12 seconds | agentHandshakeTimeout |
Exceeding the concurrency cap returns 503 Too many concurrent RDP sessions on this server, please try again later.
Disconnecting
- Manual disconnect: close the browser tab or click the disconnect control in the RDP panel. The server tears the session down, tells the agent to close the TCP bridge, and releases the Redis ticket record.
- Windows sign-out: the RDP session closes normally; the tunnel stays open for a brief grace period before cleanup.
- Idle close: after 30 minutes of no data flow the session is killed server-side.
Auditing
Every successful RDP ticket creation fires an rdp_session_started event:
- Severity:
informational. - Metadata:
host_id,host_name,user_id. - Reference: the host record.
Route this event type in Notification Routes and Delivery Log if you want a live audit trail of who is signing into Windows hosts from PatchMon.
Server logs include rdp-ticket and rdp session opened lines with the session ID, user ID, host ID, negotiated security posture, and a missing_username_or_password field. Use these to triage incidents; the session ID ties everything together.
Troubleshooting
| Symptom | Response from the server | Likely cause and fix |
|---|---|---|
guacd is not reachable on the PatchMon server. |
503, code: guacd_unavailable |
The sidecar is not running. Check docker compose ps guacd, or install guacd on the host and set GUACD_ADDRESS. |
The PatchMon agent on this host is not connected. |
503, code: agent_disconnected |
Agent is offline. Start / restart the PatchMonAgent service on the host. |
The PatchMon agent did not respond to the RDP proxy request in time. |
504, code: agent_timeout |
The agent is connected but its handler is stuck, or blocked by firewall. Check agent logs for rdp_proxy entries. |
rdp proxy is not enabled (via rdp-proxy-enabled) |
502, code: agent_rdp_disabled |
Set integrations.rdp-proxy-enabled: true in the agent config.yml and restart the agent. |
| invalid host | 502, code: agent_invalid_host |
Proxy host format rejected (reserved for future per-target proxies). |
| connection refused / no route to host on port 3389 | 502, code: rdp_port_unreachable |
RDP is not running on the Windows host, or a local firewall blocks localhost:3389. Enable RDP on the host. |
RDP is only available for Windows hosts |
400 |
Non-Windows host. Use the Web SSH Terminal instead. |
Forbidden: origin not allowed in WebSocket upgrade |
403 |
Your browser's Origin header isn't in PatchMon's CORS_ORIGIN allow-list. Update CORS_ORIGIN (or the dynamic origin resolver) to include your PatchMon URL and restart. |
| Guacamole handshake fails repeatedly with a valid user and password | Check rdp tunnel guacd handshake failed in the server log. This is the 2.0.0 known-issue scenario; consult the release notes and retry. |
Related pages
- Web SSH Terminal
- AI Terminal Assistant
- Installing PatchMon Server on Docker
- Release Notes 2.0.0
Chapter 23: AI Terminal Assistant
Overview
The AI Terminal Assistant is an optional chat panel inside PatchMon's Web SSH Terminal. Operators open it alongside the terminal to ask questions about what they are seeing ("why did apt fail?", "how do I restart this service?", "explain this stack trace") and get answers from an LLM of their choice. The assistant can also turn code snippets in its replies into paste-to-terminal actions, so you stay inside a single window.
The assistant uses PatchMon as a proxy to a supported third-party AI provider (OpenRouter, Anthropic, OpenAI, or Google Gemini). The provider, model, and API key are configured once at the system level; individual operators don't have to set anything up.
Web SSH shipped in 1.4.0, and the AI assistant in the same release.
Supported providers
Four providers are supported in 2.0, each with a curated list of models:
| Provider | Default model | Additional models |
|---|---|---|
| OpenRouter | anthropic/claude-3.5-sonnet |
Claude 3 Haiku, GPT-4o, GPT-4o Mini, Gemini Pro 1.5, Llama 3.1 70B |
| Anthropic | claude-sonnet-4-20250514 |
Claude 3.5 Sonnet, Claude 3.5 Haiku |
| OpenAI | gpt-4o-mini |
GPT-4o, GPT-4 Turbo |
| Google Gemini | gemini-1.5-flash |
Gemini 1.5 Pro, Gemini 2.0 Flash (experimental) |
Pick one provider per PatchMon deployment. To change providers, edit the AI settings. The API key is cleared automatically when you switch, and you'll be asked to enter a new one for the new provider.
Module gate
The AI assistant is part of the ai capability module (also referred to as ai_assist in some settings). If your subscription does not include the AI module, the settings page is visible but cannot be enabled. Ask your account administrator if the AI features are missing entirely from your instance.
Permissions
| Area | Permission |
|---|---|
| Configure AI settings (provider, model, API key) | admin or superadmin only |
| Use the AI assistant in a terminal | Any user who can open the SSH terminal (admin/superadmin, or can_use_remote_access) |
There is no separate per-user toggle. If AI is enabled at the system level and you have terminal access, the assistant is available to you.
Configuring a provider
Go to Settings → AI Terminal Assistant.
1. Pick your provider
Use the Provider dropdown. The Model dropdown below it repopulates with that provider's models and auto-selects the provider's default. Changing the provider immediately clears the stored API key (because keys belong to one provider each).
2. Enter your API key
Each provider issues its own key:
| Provider | Get your key from |
|---|---|
| OpenRouter | openrouter.ai/keys |
| Anthropic | console.anthropic.com/settings/keys |
| OpenAI | platform.openai.com/api-keys |
| Gemini | aistudio.google.com/apikey |
Paste the key into the API Key field and click Save. PatchMon encrypts the key with your instance's SESSION_SECRET before writing it to the database. The key is never returned to the browser after saving; only a boolean "is set" flag is exposed via the API.
API Key Needs to be Re-entered. If PatchMon later fails to decrypt the stored key (for example, because
SESSION_SECRETwas rotated or was inconsistent across restarts), the settings page shows a yellow banner. Re-enter the key to clear it.
3. Test the connection
Click Test Connection. The server sends a one-sentence round-trip to the configured provider and checks the response. A green check plus "AI connection test successful" confirms everything works; a red error means the key is wrong, the model is unavailable, or the provider is unreachable from the PatchMon server.
4. Enable the assistant
Flip the Enable AI Assistant toggle at the top of the page. Until this is on, the chat panel inside the SSH terminal is hidden for everyone.
Using the assistant in a terminal
- Open a web SSH terminal to any host (see Web SSH Terminal).
- Click the robot icon in the terminal toolbar to open the assistant panel on the right.
- Type a question and press Enter. Example questions:
- "The
systemctl status nginxoutput says(code=exited, status=1/FAILURE). What's wrong?" - "How do I check disk usage on this Ubuntu host?"
- "Explain this error message."
- "The
- The assistant replies inline. Code snippets (fenced with triple backticks or tagged as commands) get a Play and Copy button so you can paste the command into the terminal without typing.
The panel is a normal chat. You can keep asking follow-ups and the assistant keeps context.
What data is sent to the provider
Each request to /api/v1/ai/assist includes:
- The system prompt: hardcoded in PatchMon, positions the model as a terminal helper for Linux/Unix administration.
- The terminal context: the last ~3 000 characters of terminal output captured from the browser buffer, wrapped in Markdown fences, so the model can read what you're seeing. The server caps the uploaded context at 10 000 characters as a safety net.
- The conversation history: up to the last 10 messages (user + assistant) from the current chat session, each trimmed to 2 000 characters.
- The question: your current message, 1–2 000 characters.
The question is then proxied to the provider you configured (OpenRouter, Anthropic, OpenAI, or Gemini). PatchMon does not retain the request beyond the normal server access log.
Command-completion requests (when you pause while typing into the terminal, if completion is enabled) send:
- Up to 5 000 characters of context.
- The partial command you're typing (2–500 characters).
- A low-temperature prompt instructing the model to output only the completion.
Privacy considerations
- Terminal output you capture in the buffer is sent to the third-party provider as context. If you've just run a command that shows sensitive data (API keys, secrets, customer data), clear the terminal or don't ask the assistant about it.
- Your provider's terms of service govern what they may do with the request. Review the provider's data-processing policy before enabling on production hosts. OpenRouter, Anthropic, OpenAI, and Gemini all publish policies.
- API key secrecy: keys are encrypted at rest and never echoed back over the API. Admins with database access could still read the encrypted value; rotate
SESSION_SECRETcarefully. - All provider traffic leaves the PatchMon server over HTTPS directly to the provider's endpoint. PatchMon does not route it through any intermediate service.
If these trade-offs are not acceptable for a particular environment, leave the assistant disabled. The normal SSH terminal works fine without it.
Rate limiting
Each user is limited to 30 AI requests per minute across assist and complete combined. The limit is enforced in Redis with a 60-second window. Exceeding the limit returns 429 Rate limit exceeded. Please wait a moment. The panel shows the error inline and you can retry after the window resets.
Rate limiting is per PatchMon user, not per IP. It exists to protect your provider spend, not to throttle normal interactive use. 30/min is plenty of headroom for a single operator, while catching runaway scripts.
Input and response limits
- Questions: 1–2 000 characters. Longer input is rejected with
400. - Context: 10 000 characters max (server trims longer input).
- Conversation history: last 10 messages sent to the provider.
- Per-message trim: 2 000 characters.
- Completion input: 2–500 characters.
- Completion context: 5 000 characters.
max_tokensper assistant reply: 1024.- Assistant
temperature: 0.7 (creative but focused). - Completion
temperature: 0.3 (conservative).
These values match the product defaults in internal/ai/service.go and are not currently configurable via the UI.
Enabling and disabling
- Per-deployment: the admin toggle in Settings → AI Terminal Assistant. Off = panel is hidden for everyone.
- Per-user (soft): any user can simply keep the panel closed. There is no per-user opt-out flag.
- Emergency off: clear the API key in Settings → AI Terminal Assistant. The server-side AI endpoints return
400 AI API key not configuredand the panel surfaces that error.
Troubleshooting
| Symptom | Likely cause |
|---|---|
| AI panel does not appear in the terminal | AI module not included in your subscription, or AI not enabled in settings, or no API key set. |
| "AI assistant is not enabled" in the panel | Toggle is off in settings. |
| "AI API key not configured" | Key field is empty or decryption failed. Re-enter the key. |
| "Rate limit exceeded. Please wait a moment." | 30 requests/minute cap hit for your user. Back off and retry. |
Test connection fails with 401 from provider |
API key is wrong or revoked. Re-issue and re-enter. |
Test connection fails with 404 model not found |
The model listed in PatchMon is not available on your account. Switch to a different model in the dropdown. |
| Replies are truncated mid-sentence | Response hit the 1024-token cap. Ask a narrower follow-up or paste a smaller context. |
Related pages
Chapter 24: Users, Roles, and RBAC
PatchMon uses role-based access control (RBAC) to decide who can see and do what inside the application. Every user has exactly one role, and every role is a collection of permissions. This page covers the built-in roles, the full permission list, and how to manage users and roles from the Settings UI.
Related pages:
- Setting Up OIDC / Single Sign-On: authenticate users against an external IdP
- Setting Up Microsoft Azure Entra ID (SSO) with PatchMon: Entra-specific walkthrough
- Two-Factor Authentication: per-user TOTP and trusted devices
The Built-In Roles
PatchMon ships with five roles. You see these in Settings → Users (in the Role dropdown) and in Settings → Roles (as the matrix columns).
| Role | Default Permissions | Typical Use |
|---|---|---|
Super Admin (superadmin) |
Everything, including managing other superadmins | The very first user, or dedicated platform owners |
Admin (admin) |
Everything except managing other superadmins | Day-to-day platform administrators |
Host Manager (host_manager) |
Monitoring + host/infrastructure management + operations (patching, compliance, alerts, automation, remote access) | NOC / Ops engineers |
User (user) |
Monitoring + data export | Engineers who need to look but not break |
Readonly (readonly) |
Monitoring only | Auditors, read-only dashboards, management |
Two important rules about built-ins:
- Cannot be deleted.
superadmin,admin,host_manager,userandreadonlyare always present. The Delete button does not appear for them. - The core three cannot have their permissions edited.
superadmin,adminanduserare locked: their permission matrix is hardcoded and the Edit button is disabled.host_managerandreadonlycan still be edited if you want to tune them.
First user is always Super Admin. When PatchMon is first installed and has no users, the setup wizard creates the initial account as
superadmin, regardless of what role you type. If OIDC is configured for auto-create before first boot, the very first OIDC login is also promoted tosuperadminautomatically so you cannot lock yourself out.
The Full Permission List
Permissions are grouped into four risk tiers. The colour you see in the Roles matrix corresponds to this risk level.
Monitoring & Visibility (Low risk)
Read-only access to dashboards, hosts, packages, reports, and logs.
| Permission key | Label | What it lets the user do |
|---|---|---|
can_view_dashboard |
View Dashboard | View the main dashboard and its stat panels |
can_view_hosts |
View Hosts | See the host list, host detail pages, and connection status |
can_view_packages |
View Packages | See the package inventory across all hosts |
can_view_reports |
View Reports | See compliance scan results and alert reports |
can_view_notification_logs |
View Notification Logs | See notification delivery history and status |
Host & Infrastructure (Medium risk)
Create, modify and delete hosts, packages, and containers.
| Permission key | Label | What it lets the user do |
|---|---|---|
can_manage_hosts |
Manage Hosts | Create / edit / delete hosts, host groups, repositories and integrations |
can_manage_packages |
Manage Packages | Edit package inventory and metadata |
can_manage_docker |
Manage Docker | Delete Docker containers, images, volumes and networks |
Operations (Medium-High risk)
Day-to-day NOC tasks.
| Permission key | Label | What it lets the user do |
|---|---|---|
can_manage_patching |
Manage Patching | Trigger patches, approve patch runs, manage policies |
can_manage_compliance |
Manage Compliance | Trigger compliance scans, remediate findings, install scanners |
can_manage_alerts |
Manage Alerts | Assign, delete and bulk-action alerts |
can_manage_automation |
Manage Automation | Trigger and manage automation jobs |
can_use_remote_access |
Remote Access | Open SSH and RDP terminals against managed hosts |
Administration (High risk)
Organisation-wide control.
| Permission key | Label | What it lets the user do |
|---|---|---|
can_view_users |
View Users | See the user list and account details |
can_manage_users |
Manage Users | Create, edit and delete user accounts |
can_manage_superusers |
Manage Superusers | Manage superadmin accounts and elevated privileges |
can_manage_settings |
Manage Settings | System configuration, OIDC / SSO, AI, alert config, enrollment tokens |
can_manage_notifications |
Manage Notifications | Configure notification destinations and routing rules |
can_export_data |
Export Data | Download and export data and reports |
Billing: On PatchMon Cloud there is also a
can_manage_billingpermission that governs access to the Billing page. On self-hosted instances this permission exists in the schema but the Billing page is not enabled by default.
Viewing the Role Matrix
- Sign in as a user with
can_manage_settings. - Go to Settings → Roles.
- You'll see a matrix: rows are permissions (grouped by tier), columns are roles. A green tick means the role has that permission.
Each column header also shows an n/N counter showing the number of permissions that role currently holds out of the total 20.
Creating a Custom Role
Custom roles let you tailor the permission set beyond the built-in five.
Availability: The Add Role button is only shown when the
rbac_custommodule is enabled on your PatchMon deployment. On self-hosted installs this module is typically enabled by default; on PatchMon Cloud it depends on your plan. If you don't see Add Role and the URLhttps://patchmon.example.com/settings/rolesshows a "Not Available" screen, the module isn't enabled on your plan.
To create one:
- Go to Settings → Roles.
- Click Add Role in the top-right.
- Fill in the modal:
- Role Name: lowercase, underscores instead of spaces. Examples:
host_manager,compliance_auditor,noc_operator. This is the internal key; it cannot be renamed later. - Preset (optional): four quick-start presets are available:
- Read Only: just the Monitoring & Visibility group
- Operator: everything except the Administration group
- Admin: every permission
- Clear All: start from zero
- Permissions: tick / untick individual permissions, or use the Select all / Deselect all shortcut on each group header.
- Role Name: lowercase, underscores instead of spaces. Examples:
- Watch the counter at the bottom (
n/20 permissions selected) as a sanity check. - Click Create Role.
The new role appears as a new column in the matrix and is selectable when creating or editing users.
Editing a Custom Role
- In the matrix, click the pencil icon in the column header of the role you want to edit.
- An editor panel opens below the matrix with all permissions listed.
- Tick / untick as needed, then click Save.
Changes take effect immediately. Any session held by a user with that role has its in-memory permissions refreshed on their next request.
Deleting a Custom Role
You can only delete a role that is not assigned to any user. If any user holds that role, the delete endpoint rejects the request with "Cannot delete role: users are assigned to it". Reassign those users to a different role first (see Editing a Role for an Existing User).
To delete:
- Click the pencil in the role's column header to open the editor panel.
- Click Delete (appears only for non-built-in roles).
- Confirm.
Creating Users
Go to Settings → Users and click Add User in the top-right.
| Field | Notes |
|---|---|
| Username | Minimum 3 characters. Lowercase recommended |
| Must be a valid email. Used for OIDC account linking and email alerts | |
| First Name / Last Name | Optional |
| Password | Must satisfy the active password policy (configured under Settings → Server Config → Security) |
| Role | Choose from built-in or custom roles |
Click Add User. The account is created immediately and can sign in straight away.
Role escalation protection: You cannot create a user with a role that's more privileged than your own. Only
superadminusers can create newadminorsuperadminaccounts. Non-superadmin accounts that hold thecan_manage_superuserspermission can also create and managesuperadminaccounts.
Self-Service Sign-Up
PatchMon can also let users register themselves rather than having an admin invite them.
- Go to Settings → Users.
- Scroll to User Registration Settings.
- Tick Enable User Self-Registration.
- Pick a Default Role for New Users: the role that self-registered accounts are assigned.
- Click Save Settings.
A sign-up link now appears on the login page. Anyone who can reach the login page can create an account.
Security warning: Only enable self-registration on internal or private-network deployments. If your PatchMon is internet-facing, leave it off and invite users manually, or front it with OIDC SSO (which lets your IdP decide who can log in).
Editing a Role for an Existing User
- Go to Settings → Users.
- Find the user in the table and click the Edit (pencil) icon.
- Change Role in the dropdown and click Save.
Important side effects:
- Sessions are revoked. When a user's role changes, all of their existing JWT sessions are invalidated on the server. They must sign in again. This ensures the old role's privileges cannot be replayed from an existing browser tab.
- You cannot change your own role. The API rejects a self-role change with "Cannot change your own role". This is a deliberate safety net: two admins must cooperate to demote each other.
- You cannot promote a user above yourself. An
admincannot promote a user tosuperadmin. Only asuperadmincan create or promote tosuperadmin, and likewise onlysuperadmincan assign theadminrole.
Resetting a User's Password
- In the users table, click the Reset (key) icon on that user's row.
- Enter a new password.
- Click Reset Password.
After a reset, all of that user's sessions and trusted-device records are revoked. This is the standard post-compromise response. The user must sign in with the new password on every device.
You cannot reset the password of an inactive user. Reactivate them first.
Disabling (Deactivating) a User
Disabling is the safer alternative to deletion. The user record, their history, and their audit trail are preserved, but they cannot log in.
- Go to Settings → Users.
- Click the Edit icon on the user you want to disable.
- Untick the Active checkbox.
- Click Save.
Effects:
- All their sessions are revoked immediately.
- All their trusted devices are revoked (so re-activating them later cannot reuse a "remember this device" cookie that predates the deactivation window).
- The user's row is shown with a red Inactive badge in the users table.
To re-enable: edit and tick Active again.
Deleting a User
Deletion is permanent and removes the user record and their associated dashboard preferences, sessions, trusted devices and notification preferences.
- Click the Delete (trash) icon on the user's row.
- Confirm.
Restrictions:
- You cannot delete your own account.
- You cannot delete the last
superadmin(the API refuses). - You cannot delete the last
adminif there are nosuperadminusers (ensures at least one admin always exists). - You cannot delete a user who holds a role that's more privileged than yours.
How Permissions Are Evaluated
- Admin and Super Admin always have every permission, even if the
role_permissionstable says otherwise. The middleware short-circuits their permission checks. This is a safety net: if someone mis-edits theadminrow (which shouldn't be possible via the UI, but could happen via direct database access), admins don't get locked out. - Every other role (built-in or custom) has its permissions read from the database at each request. Changes made in Settings → Roles take effect on the user's next API call; no restart required.
- Role hierarchy for user management is enforced separately from the permissions above:
superadmin→ rank 100admin→ rank 90host_manager→ rank 50- custom roles → rank 30 (mid-tier)
user→ rank 20readonly→ rank 10
You can only modify, delete, or reset the password of users whose role rank is less than or equal to your own. This is distinct from the permission checks. Even if a custom role were granted can_manage_users, its holder still could not touch admin or superadmin accounts unless they additionally had can_manage_superusers.
When OIDC Role Sync Is Enabled
If Settings → OIDC / SSO → Sync roles from IdP is on, PatchMon stops letting admins manage users and roles from the UI. Instead:
- The Add User and Add Role buttons disappear.
- The Users tab shows a read-only list.
- The Roles tab shows a banner reminding you that group membership in your IdP drives role assignment via environment variables:
OIDC_SUPERADMIN_GROUP,OIDC_ADMIN_GROUP,OIDC_HOST_MANAGER_GROUP,OIDC_USER_GROUP,OIDC_READONLY_GROUP. - Users' roles are re-evaluated on every login based on their current IdP group membership.
If you want to use OIDC for authentication but still manage roles locally in PatchMon, leave Sync roles from IdP off. See Setting Up OIDC / Single Sign-On for the full toggle reference.
Troubleshooting
"You do not have permission to assign the role: admin"
Only a superadmin can create or promote users to admin or superadmin. If you're an admin and try to promote someone to admin, the API refuses. Ask a superadmin to do it.
"Cannot modify built-in role permissions"
The superadmin, admin and user rows are locked against permission edits. If you need a role with tweaked permissions, create a custom role based on a preset and assign users to that instead.
"Cannot delete role: users are assigned to it"
Before a role can be deleted, reassign every user who holds it. Use Settings → Users → Edit to change each user's role, then try the delete again.
"Cannot delete the last superadmin user" / "Cannot delete the last admin user"
At least one superadmin must always exist. If there are no superadmins at all, at least one admin must exist. Create a replacement first (and sign in as them to confirm the login works) before deleting the final one.
User's old role is still in effect after I changed it
Changing a role revokes all existing sessions, but the user's browser may still hold an old JWT cookie that hasn't been rejected yet. Ask them to refresh the page or sign out and back in; the server will reject the stale token and redirect them to login.
"Add User" / "Add Role" button is missing
Three possible causes:
- Your role doesn't have
can_manage_settingsorcan_view_users. Check/settings/users: if the page is empty or you get a Forbidden, your role lacks the view permission. - OIDC role sync is on. See When OIDC Role Sync Is Enabled.
- The
rbac_custommodule is not enabled. This only affects the Add Role button on the Roles tab. Custom role creation is a gated feature. The Add User button on the Users tab is always available when the other two conditions are met.
Chapter 25: Two-Factor Authentication
PatchMon supports time-based one-time password (TOTP) two-factor authentication (2FA, sometimes called MFA) on top of the normal username / password login. Once enabled on a user's account, every sign-in asks for a 6-digit code from an authenticator app, or a one-time backup code.
This page covers enabling 2FA per user, using backup codes, the "Remember Me" trusted-device feature, and how admins recover an account if the user loses their authenticator.
Related pages:
- Users, Roles and RBAC: manage user accounts
- Setting Up OIDC / Single Sign-On: delegate authentication to an external IdP
- PatchMon Environment Variables Reference: the full env-var list
Scope and limitations
- 2FA is opt-in per user. Each user decides whether to turn it on from their own profile.
- 2FA is not available for OIDC accounts. If a user signs in via OIDC / SSO, their IdP is responsible for MFA. The PatchMon TFA tab is hidden on the profile page for OIDC-only accounts, and the setup endpoint refuses with "MFA is managed by your OIDC provider".
- There is no global "require 2FA for all users" flag in the current release. Administrators cannot enforce 2FA for every account from the UI or an environment variable. If you need enforced 2FA, drive authentication through an OIDC provider that enforces MFA (e.g. Authentik, Entra ID) and set
OIDC_DISABLE_LOCAL_AUTH=true. - The first-time setup wizard offers new admins the option to set up 2FA during initial account creation (Step 2 of the wizard). This is voluntary and can be skipped.
Enabling 2FA on Your Account
Each user enables 2FA themselves from their profile. Admins cannot enable it on behalf of another user.
- Sign in to PatchMon with your username and password.
- Click your avatar (top-right) → Profile.
- Open the Multi-Factor Authentication tab.
- Click Enable TFA.
- A QR code appears. Scan it with your authenticator app of choice. Known-good options:
- Authy
- Google Authenticator
- 1Password
- Bitwarden
- Microsoft Authenticator
- Duo Mobile
- If you can't scan the QR code (shared device, desktop-only app), copy the Manual Entry Key instead and paste it into your authenticator.
- Click Continue to Verification.
- Enter the current 6-digit code from your authenticator app.
- Click Verify & Enable.
You are now shown a one-time list of backup codes (see next section). Save them before clicking Done.
From now on, every password-based login will prompt for a 6-digit verification code after the password step.
Backup codes: save these
After enabling 2FA, PatchMon generates a batch of single-use backup codes. These let you sign in if you lose access to your authenticator app (lost phone, wiped device, etc.).
- Each code can be used exactly once. Once used, it is consumed and cannot be reused.
- They are shown only once, in plaintext, immediately after setup or regeneration. PatchMon stores them as bcrypt hashes in the database; neither you nor an admin can recover the plaintext later.
- Treat them like a second password. Store them in a password manager, or print them and lock them away.
- Click Download Codes to save a plain-text file for offline storage.
Regenerating backup codes
If you think your backup codes have leaked, or you've used most of them:
- Go to Profile → Multi-Factor Authentication.
- Scroll to the Backup Codes panel.
- Click Regenerate Codes.
- A new set of codes is generated and shown. The old set is immediately invalidated.
Using a backup code
On the 2FA prompt at login, you enter backup codes in the same field as TOTP codes. There is no separate "use a backup code" button. PatchMon tries the code as a TOTP first; if that fails, it checks whether it matches one of the stored backup-code hashes. If it matches, that backup code is consumed (removed from the stored list) and you are logged in.
Typical workflow if you've lost your phone:
- At the login page, enter your username and password as usual.
- On the "Two-Factor Authentication" screen, type one of your backup codes in the Verification Code field.
- Click Verify.
The code is spent. Your next login cannot use the same backup code again.
"Remember Me": Trusted Devices
When you enter your 2FA code, there's a Remember me on this computer (skip TFA for 30 days) checkbox. If ticked, PatchMon plants a long-lived, HttpOnly patchmon_device_trust cookie on that browser and records a hashed trust token in the database.
On subsequent logins from the same browser:
- You still enter your password.
- PatchMon sees the trust cookie, matches it to the database record, confirms the record belongs to you and hasn't expired, and skips the 2FA prompt.
- A
last_used_attimestamp on the trust record is bumped each time it's used, so you can see when each remembered device last signed in.
How the trust is keyed
- Roaming between Wi-Fi, mobile hotspot, and office network does not invalidate the trust.
- Updating your browser does not invalidate the trust.
- Copying the cookie to a different browser on a different machine would bypass 2FA for that user (standard web cookie security model). Protect your browser profile accordingly.
Trust lifetime
The default lifetime is 30 days, configurable server-wide via the TFA_REMEMBER_ME_EXPIRES_IN environment variable. Accepts duration strings such as 7d, 30d, 90d. See PatchMon Environment Variables Reference for the full list.
There is a hard cap on how many trusted devices a single user can accumulate, controlled by TFA_MAX_REMEMBER_SESSIONS (default 5). When a sixth device is trusted, the oldest existing trust is removed automatically.
Reviewing your trusted devices
- Go to Profile → Trusted Devices.
- You'll see a list with, for each device:
- Label (best-effort device name derived from the user agent)
- User agent
- IP address at the time it was last used
- Created / Last used / Expires timestamps
- A This device badge next to the one you're currently logged in from
Revoking a trusted device
To stop a specific device skipping 2FA (for example, an old laptop you're decommissioning):
- Profile → Trusted Devices.
- Find the device in the list and click Revoke.
- Confirm.
If the device you're revoking is the current browser, its trust cookie is also cleared, so your next login from this browser will require 2FA again.
Revoking every trusted device
Click Forget all trusted devices at the top of the panel. This:
- Removes every trust record for your account.
- Clears the trust cookie on the current browser.
- Forces a full 2FA prompt on every device next time you sign in.
Use this after a suspected account compromise or after losing a device.
Disabling 2FA
To turn 2FA back off on your own account:
- Profile → Multi-Factor Authentication.
- Click Disable TFA.
- Enter your password to confirm.
- Click Disable TFA.
Side effects:
- The TOTP secret is wiped from the database.
- All existing backup codes are invalidated.
- All of your trusted devices are revoked. This is intentional. The only purpose of a trust record is to skip 2FA, so with 2FA off they serve no purpose. If you later re-enable 2FA, old trust cookies will not be resurrected and every device must confirm 2FA again.
You cannot disable 2FA on an OIDC-only account. The API rejects the request with "Cannot disable TFA for accounts without a password". This is because disabling 2FA requires password confirmation, and OIDC-only accounts have no password set.
Failed Attempts and Lockout
To prevent brute-forcing the 6-digit code space, the verify-2FA endpoint is rate-limited per user.
| Env var | Default | What it does |
|---|---|---|
MAX_TFA_ATTEMPTS |
5 |
Consecutive wrong codes allowed before a lockout |
TFA_LOCKOUT_DURATION_MINUTES |
30 |
How long the lockout lasts |
After the cap is hit, the endpoint returns HTTP 429 Too Many Requests with the message "Too many failed TFA attempts. Please try again later." Wait out the lockout, or ask an admin (see below).
Each failure also returns a remainingAttempts counter in the response, so the login UI can tell the user how many tries are left.
First-Time Wizard: Optional 2FA Setup
When you bring up a brand-new PatchMon instance and complete the setup wizard, Step 2 (Multi-Factor Authentication) offers two choices:
- Setup MFA now: scan a QR code and register an authenticator for the brand-new admin account before finishing the wizard. You'll also capture your backup codes.
- Skip for now: the admin account is created without 2FA. You can turn it on later from Profile → Multi-Factor Authentication.
There is no "enforce for everyone" option in the wizard. This decision is always per-user.
Admin Recovery: User Has Lost Their Authenticator
PatchMon does not have a dedicated "admin reset MFA" button. Recovery is handled through the standard account-recovery flow, which implicitly disables 2FA in a safe way:
Option A: User has a backup code
Ask them to sign in with a backup code (see Using a backup code). Once they're in, they can:
- Profile → Multi-Factor Authentication → Disable TFA to remove the old authenticator secret entirely, and then re-enable with the new phone.
- Or Regenerate Codes to get a fresh set of backup codes without touching the authenticator.
Option B: User has no backup codes and no authenticator
An administrator must reset the account:
- Sign in as a user with
can_manage_users(admin, superadmin, or any custom role with that permission). - Go to Settings → Users.
- Find the affected user and click Reset Password.
- Set a new password and communicate it over an out-of-band secure channel.
Password reset alone does not disable 2FA. The user will still be prompted for a TOTP or backup code after their first login with the new password.
If the user still cannot produce a code, you have two further options:
- Deactivate, then reactivate the account. Edit the user, untick Active, save (this also wipes their trusted devices), then tick Active again. 2FA is still enabled on the account, so this alone does not solve the missing-authenticator problem.
- Delete and re-create the user as a last resort. You lose the user's ID, notification preferences, and any artefacts keyed to their account, so prefer the backup-code route wherever possible.
Feature gap: A "wipe 2FA on another user" admin action is on the roadmap. If you hit this frequently, consider moving your deployment to OIDC / SSO so that MFA is managed by the IdP (see Setting Up OIDC / Single Sign-On).
Direct database workaround (self-hosted only)
If you are self-hosting and absolutely need to clear 2FA on a user without backup codes, a DBA can clear the user's tfa_enabled, tfa_secret and tfa_backup_codes columns directly in the users table, then force a password reset from the UI. This is a last resort. Make a backup first, and never do this on PatchMon Cloud (where direct database access is not available).
-- Replace 'alice' with the affected username. Make a backup first.
UPDATE users
SET tfa_enabled = false,
tfa_secret = NULL,
tfa_backup_codes = NULL
WHERE username = 'alice';
After running this the user can sign in with just a password; they should immediately re-enrol in 2FA from their profile.
Environment Variables Reference
All of these are read once at server start. Changes require a restart to take effect. The full table lives in PatchMon Environment Variables Reference; reproduced here for convenience:
| Variable | Default | Description |
|---|---|---|
MAX_TFA_ATTEMPTS |
5 |
Consecutive wrong 2FA codes before the account is temporarily locked |
TFA_LOCKOUT_DURATION_MINUTES |
30 |
How long a 2FA lockout lasts |
TFA_REMEMBER_ME_EXPIRES_IN |
30d |
How long a "Remember me" trusted-device record is valid. Accepts 7d, 30d, 90d, etc. |
TFA_MAX_REMEMBER_SESSIONS |
5 |
Maximum number of trusted devices per user; the oldest is evicted when the limit is reached |
Troubleshooting
"Invalid verification code" when I know the code is correct
- Clock skew. TOTP codes are time-based. If your phone's clock is more than ~30 seconds out of sync with the server, codes will be rejected. Enable automatic date/time on your phone. PatchMon already tolerates a small drift window server-side, but not more than that.
- Using a used code. TOTP codes roll every 30 seconds. If you paste a stale code from 60+ seconds ago it will fail. Wait for a fresh code.
- Used backup code. Backup codes are single-use. If you've already used one, try a different one.
"Too many failed TFA attempts"
You've hit MAX_TFA_ATTEMPTS. Wait TFA_LOCKOUT_DURATION_MINUTES (default 30) and try again. There is no admin "unlock" button; the lockout key in Redis expires automatically. Self-hosters can flush the key by restarting Redis.
I ticked "Remember me" but I'm still being asked for 2FA
Three likely causes:
- The trust record has expired. The default lifetime is 30 days; check
TFA_REMEMBER_ME_EXPIRES_INon your server. - You're signing in on a different browser, or in a private / incognito window, which doesn't have the cookie.
- A password reset was performed on your account. Password resets (whether self-service or admin-initiated) revoke every trusted device as part of the security response. You'll need to tick Remember me again on the next 2FA prompt.
My MFA tab is missing on the profile page
You signed in via OIDC. PatchMon defers MFA to your IdP in that case. Enable MFA in your IdP (Entra ID, Authentik, Keycloak, etc.) if you want it.
I regenerated backup codes but the old ones still work
The old codes are invalidated at the same moment the new batch is displayed. If a stale code still seems to work, make sure you're looking at the right account. Backup codes are not user-transferable.
Chapter 26: Discord Notifications
PatchMon integrates with Discord in two separate, independent ways:
- Discord OAuth2 login: let users sign in to PatchMon with their Discord account, or link an existing PatchMon account to a Discord identity. Configured under Settings → Discord Auth.
- Discord as a notification / alert destination: fire PatchMon alerts and scheduled reports into a Discord channel via an incoming webhook. Configured under Settings → Alert Channels as a
webhookdestination.
You can enable either, both, or neither. They don't depend on each other.
Related pages:
- Users, Roles and RBAC: manage roles and account linking
- Setting Up OIDC / Single Sign-On: an alternative way to delegate login to an external IdP
Part 1: Discord OAuth2 Login
Let users authenticate to PatchMon with their Discord account. PatchMon supports three related flows:
- Sign in with Discord (for users who don't yet exist): auto-creates a PatchMon account if self-registration is enabled.
- Sign in with Discord (for users who do exist): auto-links by matching the verified Discord email to the user's PatchMon email.
- Link Discord to an existing logged-in account: from the Profile page, attach a Discord identity to your PatchMon account without changing your password.
Everything is configured through the Settings UI. No environment variables are required; secrets are stored encrypted in the PatchMon database.
What you'll end up with
- An additional Login with Discord button on the PatchMon login page.
- Optional automatic account creation on first Discord login (driven by the PatchMon signup setting).
- A Discord avatar and username visible on each user's profile.
Before you begin
You need:
| Item | Notes |
|---|---|
| A running PatchMon instance | Reachable at a fixed URL, e.g. https://patchmon.example.com |
| HTTPS on the PatchMon URL | Discord requires https:// redirect URIs in production |
A PatchMon admin account with can_manage_settings |
To reach the Discord Auth settings page |
| A Discord account | To access the Discord Developer Portal |
Step 1: Find your callback URL
The callback is derived from PatchMon's configured server URL and is shown to you on the settings screen, but for reference the canonical path is:
https://patchmon.example.com/api/v1/auth/discord/callback
If PatchMon is showing the wrong hostname (for example http://localhost:3000 when you're running in production), fix your Server URL in Settings → Server Config first. The callback URL is read-only in the Discord settings panel and is rebuilt from the server URL whenever you save.
Step 2: Create a Discord application
-
Go to the Discord Developer Portal.
-
Click New Application and give it a name (e.g.
PatchMon). -
In the left menu, open OAuth2.
-
Under Redirects, click Add Redirect and paste your callback URL:
https://patchmon.example.com/api/v1/auth/discord/callback -
Click Save Changes at the bottom.
-
Copy the Client ID (shown at the top). You'll paste it into PatchMon in the next step.
-
Click Reset Secret (or Copy if the secret is already visible), and save the value. Discord will only show this once. If you lose it, you'll have to reset it again.
You do not need to set up an OAuth2 URL / redirect URL generator in Discord. PatchMon builds the authorisation URL itself. The only field that matters in the Discord UI is the Redirects list.
Step 3: Configure PatchMon
- Sign in to PatchMon as an admin.
- Go to Settings → Discord Auth.
- Fill in the OAuth2 Configuration panel:
- Client ID: the Application ID from Discord's app overview.
- Client Secret: paste the secret from Step 2 into the field and click Save. The Not set badge should flip to Set (green tick). PatchMon encrypts the secret at rest using its configured
SECRET_ENCRYPTION_KEY. - Redirect URI: usually leave blank. PatchMon derives the callback from the server URL automatically. Only override if you're behind a proxy that presents a different public URL.
- Button Text: customise the login button label, e.g.
Sign in with Discord. Defaults toLogin with Discord.
- Click Apply to save the text fields.
- At the top of the panel, flip Enable Discord OAuth to on.
Step 4: Test
- Open PatchMon in a private / incognito browser window.
- On the login page you should now see a Login with Discord (or your custom label) button.
- Click it. Discord will ask you to authorise the
PatchMonapplication. - Accept. You'll be redirected back to PatchMon.
First-login behaviour
- If a PatchMon user with the same email already exists and the Discord email is verified, PatchMon automatically links the accounts. You're logged in.
- If no PatchMon user exists and self-registration is on (Settings → Users → User Registration Settings → Enable User Self-Registration), PatchMon creates a new account with:
- Username: derived from the Discord username, stripped of unsafe characters, with a numeric suffix if the base name collides.
- Email: the Discord email (or
discord_<id>@discord.localif Discord doesn't expose an email). - Role: the Default Role for New Users setting.
- If no PatchMon user exists and self-registration is off, the login flow redirects to
/login?error=User+not+found. An admin must create the account first; next time, the verified-email auto-link kicks in.
Linking Discord to an existing PatchMon account
This is the safer alternative to "Sign in with Discord" for users who already have a PatchMon account. It lets them keep their username / email / password workflow and just adds a Discord badge.
- User signs in to PatchMon as normal.
- Clicks their avatar → Profile.
- Scrolls to the Linked Accounts section and clicks Link Discord.
- PatchMon redirects them to Discord to authorise, then back to the profile page.
- On success, the profile shows the Discord username and avatar, and a small "discord_linked=true" success banner.
Unlinking
Same panel → Unlink Discord. PatchMon refuses to unlink if Discord is the user's only login method (no password set, no OIDC linked), as this would lock the user out. Set a password in the Change Password panel first, then retry the unlink.
Troubleshooting: OAuth login
The "Login with Discord" button doesn't appear on the login page
- Toggle is off. Check Settings → Discord Auth → Enable Discord OAuth.
- Client secret is missing. The badge next to the field should say Set. If it says Not set, paste the secret and click Save.
- Client ID is blank. Check the same panel; the Client ID field must be populated.
Redirect error: "The redirect URI isn't registered"
The URL Discord is being asked to redirect to doesn't match anything in the Discord app's Redirects list.
- In Discord's Developer Portal, open your app → OAuth2 → Redirects and make sure
https://patchmon.example.com/api/v1/auth/discord/callbackis listed exactly. The protocol (https://), host, port, and path must all match. - Don't include a trailing slash; don't include query strings.
- If PatchMon is behind a reverse proxy, make sure PatchMon's Server URL reflects the public URL, not the internal one.
Error: "Discord is not fully configured"
One of Client ID or Client Secret is missing. Fill them both in, then click Apply and Save respectively.
Error: "Already linked" when linking
Someone else in PatchMon is already linked to that Discord account. Only one PatchMon user can hold a given Discord identity at a time.
First-login auto-create didn't happen
Auto-create only runs when Settings → Users → User Registration Settings → Enable User Self-Registration is on. If it's off, pre-create the user (with a matching email) and try again.
Part 2: Discord as a Notification / Alert Destination
PatchMon can push alerts, events and scheduled reports to a Discord channel via an incoming webhook (Discord's built-in mechanism for posting into a channel from an external service). This is handled by the generic "webhook" alert channel. PatchMon detects Discord URLs automatically and formats the message as a Discord embed.
What you'll end up with
- A Discord channel that receives rich embedded messages for every PatchMon event of the type(s) you've subscribed.
- Colour-coded severity (critical = red, error = orange, warning = yellow, informational = blue).
- Structured fields based on the event type (container stops, host down, user role changes, etc.).
- Scheduled reports (daily / weekly / monthly summaries) also delivered as embeds, with a plain-text excerpt and CSV attached where supported.
Step 1: Create a Discord incoming webhook
-
In Discord, open the server (guild) that owns the target channel.
-
Server settings → Integrations → Webhooks → New Webhook.
-
Give the webhook a name (e.g.
PatchMon), pick the target channel, optionally set an avatar. -
Click Copy Webhook URL. You should now have a URL shaped like:
https://discord.com/api/webhooks/1234567890/abcdefgh-ABCDEFGH1234567890Keep it safe. Anyone who holds this URL can post to your channel.
Step 2: Add the webhook to PatchMon
- Sign in to PatchMon with a role that has
can_manage_notifications. - Go to Settings → Alert Channels.
- Click Add Destination.
- Pick Webhook as the channel type.
- Fill in:
- Display Name: e.g.
Ops Discord. Any label that helps you identify the channel later. - Webhook URL: paste the Discord webhook URL from Step 1.
- Display Name: e.g.
- PatchMon detects it is a Discord URL automatically (the UI shows "Discord and Slack URLs are auto-detected for rich formatting"). Nothing else to configure for Discord.
- Click Save.
Heads-up: Anything else that starts with
https://discord.com/api/webhooks/,https://discordapp.com/api/webhooks/, orhttps://www.discord.com/api/webhooks/is treated as Discord and formatted with embeds. Slack URLs are detected similarly. Everything else is sent as a plain JSON{"title":..., "message":..., "severity":...}POST, which you can consume with your own handler.
Step 3: Route alerts to the destination
Creating the destination does not automatically route any events to it. You need at least one routing rule.
- Still on Settings → Alert Channels, scroll to the Routing Rules section.
- Click Add Rule.
- Pick the destination you just created from the dropdown.
- Choose the events / severities you want to send. The recommended starter set:
host_went_downhost_came_upcontainer_stoppedsecurity_updates_availableuser_tfa_disabledaccount_locked
- Save the rule.
Your Discord channel should start receiving notifications on the next matching event. To test quickly, simulate a host-down event by stopping the PatchMon agent on any non-critical host and waiting for the next check-in cycle.
Step 4 (optional): Route scheduled reports
Alongside real-time alerts, PatchMon can send a periodic summary report to the same webhook.
- On the Alert Channels page, scroll to Scheduled Reports.
- Click Add Schedule.
- Configure:
- Destinations: tick your Discord webhook.
- Frequency: daily, weekdays, weekly (pick days), or monthly (pick day or "last day").
- Delivery time: hour and minute in your server's timezone.
- Sections: which report sections to include (Open alerts, Hosts by outstanding updates, Top outdated security packages).
- Save.
For Discord delivery, scheduled reports are rendered as:
- A title with the report subject.
- A short plain-text excerpt of the HTML body (tags stripped).
- A PatchMon footer.
- If a CSV attachment is configured, it is posted as a separate file via Discord's multipart upload.
Message format
Real-time alerts
Each event becomes a Discord embed:
- Title: the event title (e.g.
Host Down: web01.example.com). - Description: the full event message.
- Colour: derived from severity (
criticalred,errororange,warningyellow,informationalblue, everything else grey). - Fields: structured fields per event type (e.g. for
container_stopped: host name, container name, image, old status, new status). - Footer:
PatchMon.
Scheduled reports
- Title: report subject line.
- Description: excerpt of the HTML body, with tags (including
<script>blocks) stripped. - Footer:
PatchMon.
Troubleshooting: Notifications
Webhook URL shows "Webhook URL is required"
The form rejected an empty URL. Paste the full Discord webhook URL you copied in Step 1.
Destination saved but no Discord messages arrive
Walk through this list in order:
-
Did any matching event fire? Check Alerts → Notification Logs. If the log shows no rows for your destination, no events matched your routing rules. Adjust the rules.
-
Does the log show a failure? Filter the log by destination. If the delivery attempt failed, hover over the row to see the error Discord returned. Common ones:
401or404: the webhook has been deleted in Discord. Re-create it and update the URL.429 Too Many Requests: you're hitting Discord's rate limit. Reduce the event volume, or split across multiple webhooks / channels.
-
Did PatchMon even try? Check the PatchMon server logs:
# Docker docker compose logs patchmon-server | grep -i notification -
Is the URL actually Discord? PatchMon only formats as an embed when the URL hostname is
discord.com,discordapp.com, orwww.discord.comand the path contains/api/webhooks/. A typo in the URL (e.g.discord.coor no/api/segment) falls back to the generic JSON POST format, which Discord will reject. Confirm the URL contains/api/webhooks/.
Posts are plain text, not embeds
The URL is not being recognised as Discord. See the last point above and verify the exact hostname and path.
Everything works but messages are posted to the wrong channel
The webhook URL encodes the target channel. In Discord, go to server settings → Integrations → Webhooks, select the webhook, and change Channel. Alternatively, create a new webhook for the correct channel and update PatchMon to use it.
I want to remove the webhook cleanly
- In PatchMon, Settings → Alert Channels, find the destination, click Delete.
- In Discord, server settings → Integrations → Webhooks, find the webhook, click Delete Webhook. This is the reliable way to revoke. Deleting only in PatchMon leaves the URL live; if anyone else captured the URL they can still post to your channel.
Security notes
OAuth login
- The Discord Client Secret is stored encrypted in the PatchMon database using the server's
SECRET_ENCRYPTION_KEY. Make sure that environment variable is set and is not the default value in production. - Account linking by email is only performed when Discord reports the user's email as verified, to prevent account takeover via an unverified email address.
- PatchMon uses PKCE (S256) for Discord OAuth2 code exchange, so the authorisation code can't be replayed even if intercepted.
- The Discord OAuth state is tied to a short-lived (10-minute) session stored in Redis; it's one-time-use and bound to an HttpOnly
discord_statecookie.
Webhooks
- Discord webhook URLs are bearer tokens. Anyone with the URL can post to your channel. Treat the webhook URL like a password.
- PatchMon stores webhook URLs encrypted at rest if a
SECRET_ENCRYPTION_KEYis configured. Without one, URLs are stored in plaintext. Don't skip setting the encryption key. - Do not paste webhook URLs into public GitHub issues, screenshots, or chat channels.
- Consider creating a dedicated Discord channel and webhook per PatchMon environment (prod / staging) so you can revoke them independently.
Quick reference
| Task | Where |
|---|---|
| Create / edit Discord OAuth app | Discord Developer Portal |
| Enable Discord login in PatchMon | Settings → Discord Auth |
| Sign in via Discord | Login page → Login with Discord button |
| Link existing account to Discord | Profile → Linked Accounts → Link Discord |
| Create Discord webhook | Server → Settings → Integrations → Webhooks |
| Add webhook to PatchMon | Settings → Alert Channels → Add Destination → Webhook |
| Route events to Discord | Settings → Alert Channels → Routing Rules |
| Schedule summary reports to Discord | Settings → Alert Channels → Scheduled Reports |
| Check delivery history | Alerts → Notification Logs |
Chapter 27: gethomepage Dashboard Card
PatchMon exposes a dedicated read-only endpoint designed to be consumed by a GetHomepage (formerly Homepage) customapi widget. Drop a PatchMon card into your existing homepage to see total hosts, pending updates, and security updates at a glance.
Related pages:
- Integration API Documentation: the generic scoped API (a different integration type)
- Users, Roles and RBAC: permission required to create the API key
At a glance
- Endpoint:
GET /api/v1/gethomepage/stats - Auth: HTTP Basic, using a PatchMon-issued API key dedicated to the GetHomepage integration
- Widget type:
customapiin GetHomepage - Fields available: 8 core metrics + a top-3 OS breakdown + a full
os_distributionarray - Rate limit: shares the standard API rate limit; GetHomepage polls every 60 seconds, well within the limit
Default widget
Out of the box the widget shows three metrics:
- Total Hosts
- Hosts Needing Updates
- Security Updates
Additional metrics can be added by editing the mappings: in your GetHomepage services.yml. See Configuration options below.
Prerequisites
- A running PatchMon 2.x instance reachable from the machine running GetHomepage.
- GetHomepage already installed and rendering at least one page.
- Network path between GetHomepage and PatchMon on HTTP or HTTPS. HTTPS is strongly recommended.
- PatchMon admin access (you need
can_manage_settingsto create API keys).
Setup
Step 1: Create a GetHomepage API key
- Sign in to PatchMon as an admin.
- Go to Settings → Integrations.
- Open the GetHomepage tab.
- Click New API Key and fill in:
- Token Name: e.g.
GetHomepage dashboard. - Allowed IP Addresses (optional): restrict to the IP of the machine running GetHomepage.
- Expiration Date (optional): set one if this is a temporary key.
- Token Name: e.g.
- Click Create Token.
Step 2: Copy the credentials
A success modal is shown with:
- Token Key: the API username.
- Token Secret: the API password. Shown only once. Save it immediately.
- Base64-encoded credentials: pre-built
Authorization: Basicvalue, ready to paste. - Complete widget configuration: a ready-to-drop-in YAML snippet.
Click Copy Config to copy the full YAML block. The secret is never retrievable again after you close this modal. If you lose it, you have to delete the key and create a new one.
Step 3: Configure GetHomepage
Option A: Paste the copied YAML (quickest)
- Open your GetHomepage
services.yml. - Paste the YAML block that PatchMon gave you.
- Save the file.
- Restart GetHomepage.
The YAML looks like this:
- PatchMon:
href: https://patchmon.example.com
description: PatchMon Statistics
icon: https://patchmon.example.com/assets/favicon.svg
widget:
type: customapi
url: https://patchmon.example.com/api/v1/gethomepage/stats
headers:
Authorization: Basic <base64_encoded_credentials>
mappings:
- field: total_hosts
label: Total Hosts
- field: hosts_needing_updates
label: Needs Updates
- field: security_updates
label: Security Updates
Option B: Build it by hand
-
Encode your credentials:
echo -n "YOUR_TOKEN_KEY:YOUR_TOKEN_SECRET" | base64 -
Paste the widget into
services.yml, replacing<your_base64_credentials>with the result:- PatchMon: href: https://patchmon.example.com description: PatchMon Statistics icon: https://patchmon.example.com/assets/favicon.svg widget: type: customapi url: https://patchmon.example.com/api/v1/gethomepage/stats headers: Authorization: Basic <your_base64_credentials> mappings: - field: total_hosts label: Total Hosts - field: hosts_needing_updates label: Needs Updates - field: security_updates label: Security Updates -
Restart GetHomepage:
docker restart gethomepage # or systemctl restart gethomepage
Configuration options
Customising the fields displayed
The default configuration displays 3 metrics. You can add more. PatchMon returns 8 numeric metrics and the top-3 OS breakdown, and the widget supports 6–8 comfortably before it becomes cluttered.
Each mappings entry has two parts:
field:the JSON key returned by the PatchMon API (case-sensitive, exactly as listed below)label:the human-readable label rendered by GetHomepage
Available fields
| Field | Type | Description | Included by default |
|---|---|---|---|
total_hosts |
Number | Total active hosts in PatchMon | Yes |
hosts_needing_updates |
Number | Hosts with at least one outdated package | Yes |
security_updates |
Number | Total security updates available across all hosts | Yes |
up_to_date_hosts |
Number | Hosts with zero outdated packages | No |
total_outdated_packages |
Number | Sum of all outdated packages across hosts | No |
hosts_with_security_updates |
Number | Hosts requiring at least one security patch | No |
total_repos |
Number | Active repositories being monitored | No |
recent_updates_24h |
Number | Successful updates in the last 24 hours | No |
top_os_1_name |
String | Name of the most common OS (e.g. "Ubuntu") | No (use label instead, see below) |
top_os_1_count |
Number | Count of the most common OS | No |
top_os_2_name |
String | Name of the 2nd most common OS | No |
top_os_2_count |
Number | Count of the 2nd most common OS | No |
top_os_3_name |
String | Name of the 3rd most common OS | No |
top_os_3_count |
Number | Count of the 3rd most common OS | No |
os_distribution |
Array | Full OS breakdown (advanced use only; GetHomepage cannot render arrays directly) | No |
last_updated |
String (ISO 8601) | Timestamp the stats were generated | No |
The
top_os_*_namestring fields render poorly incustomapiwidgets. Use the corresponding_countfields and put the OS name in thelabel:. See Displaying OS distribution.
Quick recipe: add a fourth metric
Before:
mappings:
- field: total_hosts
label: Total Hosts
- field: hosts_needing_updates
label: Needs Updates
- field: security_updates
label: Security Updates
After:
mappings:
- field: total_hosts
label: Total Hosts
- field: hosts_needing_updates
label: Needs Updates
- field: security_updates
label: Security Updates
- field: recent_updates_24h # newly added
label: Updated (24h)
Save, restart GetHomepage, and you've gone from 3 to 4 metrics.
Example widget configurations
All examples assume you've already populated the Authorization header with your encoded credentials.
Security-focused widget
widget:
type: customapi
url: https://patchmon.example.com/api/v1/gethomepage/stats
headers:
Authorization: Basic <credentials>
mappings:
- field: security_updates
label: Security Patches
- field: hosts_with_security_updates
label: Hosts at Risk
- field: hosts_needing_updates
label: Total Pending
Repository / coverage widget
widget:
type: customapi
url: https://patchmon.example.com/api/v1/gethomepage/stats
headers:
Authorization: Basic <credentials>
mappings:
- field: total_repos
label: Repositories
- field: total_hosts
label: Managed Hosts
- field: up_to_date_hosts
label: Up-to-Date
Activity widget
widget:
type: customapi
url: https://patchmon.example.com/api/v1/gethomepage/stats
headers:
Authorization: Basic <credentials>
mappings:
- field: recent_updates_24h
label: Updated (24h)
- field: hosts_needing_updates
label: Pending Updates
- field: up_to_date_hosts
label: Fully Patched
Maximum-information widget (all 8 numeric metrics)
widget:
type: customapi
url: https://patchmon.example.com/api/v1/gethomepage/stats
headers:
Authorization: Basic <credentials>
mappings:
- field: total_hosts
label: Total Hosts
- field: hosts_needing_updates
label: Needs Updates
- field: up_to_date_hosts
label: Up-to-Date
- field: security_updates
label: Security Updates
- field: hosts_with_security_updates
label: Security Hosts
- field: total_outdated_packages
label: Outdated Packages
- field: total_repos
label: Repositories
- field: recent_updates_24h
label: Updated (24h)
Note this widget will be quite tall. Keep it to 3–5 metrics for most layouts.
Multiple environments
# Production - security-focused
- PatchMon Prod:
href: https://patchmon-prod.example.com
description: Production Patches
icon: https://patchmon-prod.example.com/assets/favicon.svg
widget:
type: customapi
url: https://patchmon-prod.example.com/api/v1/gethomepage/stats
headers:
Authorization: Basic <prod_credentials>
mappings:
- field: total_hosts
label: Hosts
- field: security_updates
label: Security
- field: hosts_needing_updates
label: Pending
# Development - package-focused
- PatchMon Dev:
href: https://patchmon-dev.example.com
description: Development Patches
icon: https://patchmon-dev.example.com/assets/favicon.svg
widget:
type: customapi
url: https://patchmon-dev.example.com/api/v1/gethomepage/stats
headers:
Authorization: Basic <dev_credentials>
mappings:
- field: total_hosts
label: Hosts
- field: total_outdated_packages
label: Packages
- field: up_to_date_hosts
label: Updated
Displaying OS distribution
Step 1: Find out your top 3 operating systems
curl -s -H "Authorization: Basic YOUR_BASE64_CREDENTIALS" \
https://patchmon.example.com/api/v1/gethomepage/stats \
| jq '{top_os_1_name, top_os_1_count, top_os_2_name, top_os_2_count, top_os_3_name, top_os_3_count}'
Sample output:
{
"top_os_1_name": "Ubuntu",
"top_os_1_count": 35,
"top_os_2_name": "Debian",
"top_os_2_count": 18,
"top_os_3_name": "Rocky Linux",
"top_os_3_count": 12
}
Step 2: Add the counts to the widget, using the names as labels
mappings:
- field: total_hosts
label: Total Hosts
- field: top_os_1_count
label: Ubuntu # from top_os_1_name
- field: top_os_2_count
label: Debian # from top_os_2_name
- field: top_os_3_count
label: Rocky Linux # from top_os_3_name
Step 3: Restart GetHomepage
docker restart gethomepage
# or
systemctl restart gethomepage
The widget now shows your infrastructure OS breakdown. If your top 3 OSes change over time, update the labels; PatchMon will reorder the counts automatically based on actual host counts.
Custom icon
# PatchMon logo
icon: https://patchmon.example.com/assets/favicon.svg
icon: https://patchmon.example.com/assets/logo_dark.png
icon: https://patchmon.example.com/assets/logo_light.png
# GetHomepage built-in icon
icon: server
# Local icon inside your GetHomepage image / volume
icon: /icons/patchmon.png
API reference
Endpoints
| Method | Path | Description |
|---|---|---|
GET |
/api/v1/gethomepage/stats |
Returns the widget payload described above |
GET |
/api/v1/gethomepage/health |
Simple liveness probe. Returns status: "ok", the current timestamp, and the name of the API key used. |
Authentication
- Type: HTTP Basic Authentication
- Format:
Authorization: Basic <base64(token_key:token_secret)> - Token type:
gethomepage(enforced server-side; a credential created under the API tab won't work here, and vice versa)
Stats response
{
"total_hosts": 42,
"total_outdated_packages": 156,
"total_repos": 12,
"hosts_needing_updates": 15,
"up_to_date_hosts": 27,
"security_updates": 23,
"hosts_with_security_updates": 8,
"recent_updates_24h": 34,
"os_distribution": [
{ "name": "Ubuntu", "count": 20, "os_type": "linux", "os_version": "22.04" },
{ "name": "Debian", "count": 12, "os_type": "linux", "os_version": "12" },
{ "name": "Rocky Linux", "count": 10, "os_type": "linux", "os_version": "9" }
],
"top_os_1_name": "Ubuntu",
"top_os_1_count": 20,
"top_os_2_name": "Debian",
"top_os_2_count": 12,
"top_os_3_name": "Rocky Linux",
"top_os_3_count": 10,
"last_updated": "2026-04-24T12:34:56Z"
}
Health response
{
"status": "ok",
"timestamp": "2026-04-24T12:34:56Z",
"api_key": "GetHomepage dashboard"
}
Managing API keys
Viewing existing keys
Go to Settings → Integrations → GetHomepage. For each key you see:
- Token name
- Creation date
- Last-used timestamp
- Active / Inactive status
- Expiration date (if set)
Disable / Enable / Delete
- Disable / Enable: toggle the button on the row to temporarily block or restore access without deleting the credential.
- Delete: click the trash icon. This is permanent; any widget using that key will start returning 401.
Security features
- IP restrictions: per-key allowlist (CIDRs supported).
- Expiration dates: automatic sunset.
- Last-used tracking: spot keys that have silently stopped working, or suspicious usage.
- One-time secret display: the secret is shown once, at creation. Never again.
Troubleshooting
Error: "Missing or invalid authorization header"
GetHomepage is not sending the Authorization header correctly.
- Verify the
headers:section is properly indented inservices.yml. - Re-encode the credentials; make sure you used
-nwithechoso no trailing newline ends up in the base64. - Confirm you're using
type: customapi, as other widget types ignore arbitrary headers.
Error: "Invalid API key"
The key does not exist in PatchMon.
- Check Settings → Integrations → GetHomepage for the key.
- Re-create the key if it's missing, update the GetHomepage config with the new credentials.
Error: "API key is disabled" / "API key has expired"
Enable the key, or create a new one with a later expiration.
Error: "IP address not allowed"
Your GetHomepage instance's outbound IP is not in the credential's allowlist. Either add it, or remove the allowlist if not needed.
Widget shows nothing
Work through this checklist:
- Can GetHomepage reach PatchMon at all? Test with
curlfrom inside the GetHomepage container:curl -v https://patchmon.example.com/api/v1/gethomepage/health -H "Authorization: Basic ..." - Is the API key active and not expired?
- Is the base64 credential correct?
- Is
services.ymlvalid YAML? (runyamllint services.ymlif unsure) - Has GetHomepage been restarted since the last change?
- Check GetHomepage's container logs for error messages.
Testing the endpoint directly
# Step 1: encode
echo -n "your_key:your_secret" | base64
# Step 2: test
curl -H "Authorization: Basic YOUR_BASE64" \
https://patchmon.example.com/api/v1/gethomepage/stats | jq
Every numeric field in the response (including top_os_*_count) can be used in a widget mapping.
Security best practices
- Always use HTTPS. The credentials are sent on every 60-second poll. Don't put them on the wire in the clear.
- IP-restrict the key to the GetHomepage instance's IP.
- Give the key an expiration and rotate it as part of your normal credential rotation.
- Monitor the last-used timestamp to spot suspicious activity.
- One key per GetHomepage instance if you're running several, to make rotation and revocation easier.
- Store
services.ymlwith appropriate file permissions on the GetHomepage host.
Integration architecture
┌──────────────────┐
│ GetHomepage │
│ Dashboard │
└────────┬─────────┘
│
│ HTTP(S) GET, every 60s
│ Authorization: Basic <base64>
│
▼
┌──────────────────┐
│ PatchMon │
│ API server │
│ │
│ /api/v1/ │
│ gethomepage/ │
│ stats │
└────────┬─────────┘
│
│ Aggregate query
│
▼
┌──────────────────┐
│ PostgreSQL │
│ │
│ - Hosts │
│ - Packages │
│ - Updates │
│ - Repositories │
└──────────────────┘
Rate limiting
The /api/v1/gethomepage/* endpoints are subject to PatchMon's general API rate limit of 100 requests per 15 minutes per IP by default. GetHomepage's default poll interval of 60 seconds sits well within this limit (15 requests per 15 minutes). If you lower GetHomepage's poll interval aggressively, you may start hitting 429 Too Many Requests; stay above 10 seconds.
Support and resources
- PatchMon documentation: docs.patchmon.net
- GetHomepage documentation: gethomepage.dev
- PatchMon Discord: patchmon.net/discord
- GitHub issues: github.com/PatchMon/PatchMon/issues
Chapter 28: Ansible Dynamic Inventory
The patchmon.dynamic_inventory Ansible plugin queries PatchMon's scoped integration API and turns it into a live Ansible inventory. Hosts and their group memberships stay in sync with PatchMon automatically, so you stop hand-editing hosts.ini.
- GitHub repository: github.com/PatchMon/PatchMon-ansible
- Ansible Galaxy namespace:
patchmon.dynamic_inventory - License: AGPL-3.0-or-later
Related pages:
- Integration API Documentation: full reference for the scoped
/api/v1/api/...endpoints the plugin talks to- Auto-Enrolment API Docs: how to create the Basic-Auth credentials this plugin needs
What the plugin does
For each request, the plugin:
- Calls
GET /api/v1/api/hostson your PatchMon instance with HTTP Basic Auth. - Receives a JSON list of active hosts, their IPs, and their PatchMon host-group memberships.
- Builds an Ansible inventory in memory:
- Each PatchMon host becomes an Ansible host, keyed by
hostname. ansible_hostis set to the host'sipfield (so Ansible connects directly to the IP even if DNS is iffy).- Each PatchMon host group becomes an Ansible group, and the host is added as a member.
- Each PatchMon host becomes an Ansible host, keyed by
The result is a fully dynamic ansible-inventory --list tree driven entirely by PatchMon's groupings.
Requirements
| Component | Minimum version |
|---|---|
| Ansible | 2.19.0 |
| Python | 3.6 |
requests |
2.25.1 |
Install the Python dependency on the machine running ansible:
pip install 'requests>=2.25.1'
Installation
From Ansible Galaxy (recommended)
ansible-galaxy collection install patchmon.dynamic_inventory
From source
git clone https://github.com/PatchMon/PatchMon-ansible.git
cd PatchMon-ansible/patchmon/dynamic_inventory
# Build the collection tarball
ansible-galaxy collection build
# Install it locally
ansible-galaxy collection install patchmon-dynamic_inventory-*.tar.gz
# Install Python dependencies
pip install -r requirements.txt
Creating an API Credential in PatchMon
The plugin authenticates as an integration API credential (one of the scoped Basic-Auth tokens managed by PatchMon's integration API). It is not a normal user password.
- Sign in to PatchMon as a user with
can_manage_settings. - Go to Settings → Integrations and select the API tab.
- Click Create API Key and fill in:
- Name: e.g.
Ansible inventory - Scopes: at minimum,
host:read. If you want the plugin to read host stats as well, add the other read scopes. See Integration API Documentation for the full scope list. - Allowed IP addresses (optional): restrict the credential to the public IP of your Ansible controller.
- Expiration (optional): set a date if the credential is temporary.
- Name: e.g.
- Click Create.
- Copy the secret immediately. It is displayed only once. Save both the Token Key (the username) and Token Secret (the password).
The plugin's
api_keyconfig value is PatchMon's Token Key. The plugin'sapi_secretis PatchMon's Token Secret. The labels differ; the meaning is the same.
Configuration
Create an inventory file, e.g. patchmon_inventory.yml:
---
plugin: patchmon.dynamic_inventory
api_url: https://patchmon.example.com/api/v1/api/hosts/
api_key: your_token_key
api_secret: your_token_secret
verify_ssl: true
Configuration options
| Option | Required | Default | Description |
|---|---|---|---|
plugin |
yes | (required) | Must be patchmon.dynamic_inventory |
api_url |
yes | (required) | URL of the PatchMon scoped hosts endpoint. For PatchMon 2.x this is https://<your-patchmon-host>/api/v1/api/hosts/ |
api_key |
yes | (required) | The Token Key from the PatchMon API credential |
api_secret |
yes | (required) | The Token Secret from the PatchMon API credential |
verify_ssl |
no | true |
Whether to verify the PatchMon server's TLS certificate. Only disable on internal dev setups with self-signed certs |
Using environment variables and Ansible Vault
Hard-coding the secret into patchmon_inventory.yml is not recommended. Use Ansible's environment-variable lookup or Ansible Vault instead:
---
plugin: patchmon.dynamic_inventory
api_url: https://patchmon.example.com/api/v1/api/hosts/
api_key: "{{ lookup('env', 'PATCHMON_API_KEY') }}"
api_secret: "{{ lookup('env', 'PATCHMON_API_SECRET') }}"
verify_ssl: true
Then:
export PATCHMON_API_KEY=your_token_key
export PATCHMON_API_SECRET=your_token_secret
ansible-inventory -i patchmon_inventory.yml --list
Making it the default inventory
Add to your ansible.cfg:
[defaults]
inventory = patchmon_inventory.yml
[inventory]
enable_plugins = patchmon.dynamic_inventory.dynamic_inventory
Every ansible / ansible-playbook / ansible-inventory invocation from this directory will now use PatchMon as its source of truth.
Usage
List all hosts
ansible-inventory -i patchmon_inventory.yml --list
Ping every host
ansible all -i patchmon_inventory.yml -m ping
Run a playbook against a PatchMon host group
If your PatchMon host group is named web_servers, the Ansible group name is also web_servers:
ansible-playbook -i patchmon_inventory.yml playbook.yml --limit web_servers
Intersect multiple groups
Standard Ansible group-pattern syntax applies. For example, to target all hosts in both web_servers and production:
ansible-playbook -i patchmon_inventory.yml playbook.yml --limit 'web_servers:&production'
API Response Format
The plugin expects the PatchMon API endpoint to return JSON shaped like this:
{
"hosts": [
{
"hostname": "server1.example.com",
"ip": "192.168.1.10",
"host_groups": [
{ "name": "web_servers" },
{ "name": "production" }
]
},
{
"hostname": "server2.example.com",
"ip": "192.168.1.11",
"host_groups": [
{ "name": "db_servers" },
{ "name": "production" }
]
}
],
"total": 2
}
This matches the shape returned by GET /api/v1/api/hosts in PatchMon 2.x (the host_groups array also contains an id field, which the plugin ignores).
Inventory mapping
- Host name:
hostnamebecomes the Ansible inventory key. - Connection IP:
ipis set as theansible_hostvariable on that host. - Groups: every
{ "name": "...", "id": "..." }inhost_groupsbecomes an Ansible group, and the host is added to it.
Hosts with no entries in host_groups end up in Ansible's built-in ungrouped group.
Examples
List inventory output
ansible-inventory -i patchmon_inventory.yml --list
Example output:
{
"_meta": {
"hostvars": {
"server1.example.com": { "ansible_host": "192.168.1.10" },
"server2.example.com": { "ansible_host": "192.168.1.11" }
}
},
"all": {
"children": ["ungrouped", "web_servers", "db_servers", "production"]
},
"db_servers": { "hosts": ["server2.example.com"] },
"production": { "hosts": ["server1.example.com", "server2.example.com"] },
"web_servers": { "hosts": ["server1.example.com"] }
}
Target specific groups
ansible-playbook -i patchmon_inventory.yml playbook.yml --limit web_servers
ansible-playbook -i patchmon_inventory.yml playbook.yml --limit production
Filtering at the API level
The scoped API /api/v1/api/hosts also accepts a ?hostgroup= query parameter. If you want a plugin invocation that only returns, say, the production group, set:
api_url: https://patchmon.example.com/api/v1/api/hosts/?hostgroup=production
This reduces the payload size and is handy when you have thousands of hosts and only want Ansible to see a subset.
Authentication and SSL
The plugin uses HTTP Basic Authentication. The Authorization header it sends is Basic base64(api_key:api_secret).
SSL certificate verification is on by default (verify_ssl: true). Disable it only when testing against an internal instance with a self-signed certificate, and never in production.
Troubleshooting
Test the API endpoint directly
curl -u "TOKEN_KEY:TOKEN_SECRET" https://patchmon.example.com/api/v1/api/hosts
You should get a JSON document with a hosts array. If not, double-check:
- The URL. PatchMon 2.x exposes the endpoint under
/api/v1/api/hosts(note the double/api/). - The credential. Ensure you're using the Token Key as the username and the Token Secret as the password, not a normal PatchMon user login.
- That the credential has the
host:readscope (or is unscoped). - That any IP allowlist on the credential includes the IP Ansible is calling from.
Debug the inventory
ansible-inventory -i patchmon_inventory.yml --list --debug
ansible-inventory -i patchmon_inventory.yml --list -vvv
Look for 401 Unauthorized (wrong credentials) or 403 Forbidden (missing scope / IP restriction) in the verbose output.
Common issues
| Symptom | Likely cause | Fix |
|---|---|---|
401 Unauthorized |
Token key or secret wrong | Regenerate the credential in Settings → Integrations |
403 Forbidden with "IP address not allowed" |
Allowlist on the credential blocks the controller | Edit the credential and add the controller's public IP, or remove the allowlist |
403 Forbidden with "Insufficient scope" |
Credential lacks host:read |
Edit the credential and tick the host:read scope |
| SSL cert error | Self-signed cert, or verify_ssl: true against an internal PKI |
Install the CA chain on the controller, or temporarily set verify_ssl: false |
| Empty inventory | No hosts in PatchMon, or ?hostgroup= filter matches nothing |
Test with curl first; verify the group name spelling |
| JSON parsing errors | API URL points at the wrong path (e.g. /api/v1/hosts instead of /api/v1/api/hosts) |
Correct the URL. The scoped API is under /api/v1/api/ |
Security best practices
- Create a dedicated credential for Ansible. Don't reuse the same API key across multiple tools. If one is compromised, you want to revoke just that one.
- Scope it tightly.
host:readis enough for inventory; grant no more. - IP-restrict the credential to your Ansible controller(s).
- Set an expiration on the credential and rotate it as part of your normal key rotation.
- Vault the secret. Use
ansible-vault encrypt_stringor an environment variable. Never commit plaintext secrets to git. - Always use HTTPS and
verify_ssl: truein production.
Contributing
Pull requests are welcome on PatchMon-ansible. Issues and feature requests can be filed at PatchMon-ansible/issues.
Chapter 29: Proxmox LXC Auto-Enrollment Guide
Overview
PatchMon's Proxmox Auto-Enrollment feature enables you to automatically discover and enroll LXC containers from your Proxmox hosts into PatchMon for centralized patch management. This eliminates manual host registration and ensures comprehensive coverage of your Proxmox infrastructure.
What It Does
- Automatically discovers running LXC containers on Proxmox hosts
- Bulk enrolls containers into PatchMon without manual intervention
- Installs agents inside each container automatically
- Assigns to host groups based on token configuration
- Tracks enrollment with full audit logging
Key Benefits
- Zero-Touch Enrollment - Run once, enroll all containers
- Secure by Design - Token-based authentication with hashed secrets
- Rate Limited - Prevents abuse with per-day host limits
- IP Restricted - Optional IP whitelisting for enhanced security
- Fully Auditable - Tracks who enrolled what and when
- Safe to Rerun - Already-enrolled containers are automatically skipped
Table of Contents
- How It Works
- Prerequisites
- Quick Start
- Step-by-Step Setup
- Usage Examples
- Configuration Options
- Security Best Practices
- Troubleshooting
- Advanced Usage
- API Reference
How It Works
Architecture Overview
┌─────────────────────┐
│ PatchMon Admin │
│ │
│ 1. Creates Token │
│ 2. Gets Key/Secret │
└──────────┬──────────┘
│
├─────────────────────────────────┐
▼ ▼
┌─────────────────────┐ ┌─────────────────────┐
│ Proxmox Host │ │ PatchMon Server │
│ │ │ │
│ 3. Runs Script ────┼──────────▶ 4. Validates Token │
│ 4. Discovers LXCs │ │ 5. Creates Hosts │
│ 5. Gets Credentials│◀─────────┤ 6. Returns Creds │
│ 6. Installs Agents │ │ │
└──────────┬──────────┘ └─────────────────────┘
│
▼
┌─────────────────────┐
│ LXC Containers │
│ │
│ • curl installed │
│ • Agent installed │
│ • Reporting to PM │
└─────────────────────┘
Enrollment Process (Step by Step)
-
Admin creates auto-enrollment token in PatchMon UI
- Configures rate limits, IP restrictions, host group assignment
- Receives
token_keyandtoken_secret(shown only once!)
-
Admin runs enrollment script on Proxmox host
- Script authenticated with auto-enrollment token
- Discovers all running LXC containers using
pct list
-
For each container, the script:
- Gathers hostname, IP address, OS information, machine ID
- Calls PatchMon API to create host entry
- Receives unique
api_idandapi_keyfor that container - Uses
pct execto enter the container - Installs curl if missing
- Downloads and runs PatchMon agent installer
- Agent authenticates with container-specific credentials
-
Containers appear in PatchMon with full patch tracking enabled
Two-Tier Security Model
1. Auto-Enrollment Token (Script → PatchMon)
- Purpose: Create new host entries
- Scope: Limited to enrollment operations only
- Storage: Secret is hashed in database
- Lifespan: Reusable until revoked/expired
- Security: Rate limits + IP restrictions
2. Host API Credentials (Agent → PatchMon)
- Purpose: Report patches, send data, receive commands
- Scope: Per-host unique credentials
- Storage: API key is hashed (bcrypt) in database
- Lifespan: Permanent for that host
- Security: Host-specific, can be regenerated
Why This Matters:
- Compromised enrollment token ≠ compromised hosts
- Compromised host credential ≠ compromised enrollment
- Revoked enrollment token = no new enrollments (existing hosts unaffected)
- Lost credentials = create new token, don't affect existing infrastructure
Prerequisites
PatchMon Server Requirements
- PatchMon version with auto-enrollment support
- Admin user with "Manage Settings" permission
- Network accessible from Proxmox hosts
Proxmox Host Requirements
- Proxmox VE installed and running
- One or more LXC containers (VMs not supported)
- Root access to Proxmox host
- Network connectivity to PatchMon server
- Required commands:
pct,curl,jq,bash
Container Requirements
- Running state (stopped containers are skipped)
- Debian-based or RPM-based Linux distribution
- Network connectivity to PatchMon server
- Package manager (apt/yum/dnf) functional
Network Requirements
| Source | Destination | Port | Protocol | Purpose |
|---|---|---|---|---|
| Proxmox Host | PatchMon Server | 443 (HTTPS) | TCP | Enrollment API calls |
| LXC Containers | PatchMon Server | 443 (HTTPS) | TCP | Agent installation & reporting |
Firewall Notes:
- Outbound only connections (no inbound ports needed)
- HTTPS recommended (HTTP supported for internal networks)
- Self-signed certificates supported with
-kflag
Quick Start
1. Create Token (In PatchMon UI)
- Go to Settings → Integrations → Auto-Enrollment & API tab
- Click "New Token"
- Configure:
- Name: "Production Proxmox"
- Max Hosts/Day: 100
- Host Group: Select target group
- IP Restriction: Your Proxmox host IP
- Save credentials immediately (shown only once!)
2. One-Line Enrollment (On Proxmox Host)
curl -s "https://patchmon.example.com/api/v1/auto-enrollment/script?type=proxmox-lxc&token_key=YOUR_KEY&token_secret=YOUR_SECRET" | bash
That's it! All running LXC containers will be enrolled and the PatchMon agent installed.
3. Verify in PatchMon
- Go to Hosts page
- See your containers listed with "pending" status
- Agent connects automatically after installation (usually within seconds)
- Status changes to "active" with package data
Step-by-Step Setup
Step 1: Create Auto-Enrollment Token
Via PatchMon Web UI
-
Log in to PatchMon as an administrator
-
Navigate to Settings
Dashboard → Settings → Integrations → Auto-Enrollment & API tab -
Click "New Token" button
-
Fill in token details:
Field Value Required Description Token Name Proxmox ProductionYes Descriptive name for this token Max Hosts Per Day 100Yes Rate limit (1-1000) Default Host Group Proxmox LXCNo Auto-assign enrolled hosts Allowed IP Addresses 192.168.1.10No Comma-separated IPs Expiration Date 2027-01-01No Auto-disable after date -
Click "Create Token"
-
CRITICAL: Save Credentials Now!
You'll see a success modal with:
Token Key: patchmon_ae_a1b2c3d4e5f6... Token Secret: 8f7e6d5c4b3a2f1e0d9c8b7a...Copy both values immediately! They cannot be retrieved later.
Pro Tip: Copy the one-line installation command shown in the modal - it has credentials pre-filled.
Step 2: Prepare Proxmox Host
Install Required Dependencies
# SSH to your Proxmox host
ssh root@proxmox-host
# Install jq (JSON processor)
apt-get update && apt-get install -y jq curl
# Verify installations
which pct jq curl
# Should show paths for all three commands
Download Enrollment Script
Method A: Direct Download from PatchMon (Recommended)
# Download with credentials embedded (copy from PatchMon UI)
curl -s "https://patchmon.example.com/api/v1/auto-enrollment/script?type=proxmox-lxc&token_key=YOUR_KEY&token_secret=YOUR_SECRET" \
-o /root/proxmox_auto_enroll.sh
chmod +x /root/proxmox_auto_enroll.sh
Method B: Manual Configuration
# Download script template
cd /root
wget https://raw.githubusercontent.com/PatchMon/PatchMon/main/agents/proxmox_auto_enroll.sh
chmod +x proxmox_auto_enroll.sh
# Edit configuration
nano proxmox_auto_enroll.sh
# Update these lines:
PATCHMON_URL="https://patchmon.example.com"
AUTO_ENROLLMENT_KEY="patchmon_ae_your_key_here"
AUTO_ENROLLMENT_SECRET="your_secret_here"
Step 3: Test with Dry Run
Always test first!
# Dry run shows what would happen without making changes
DRY_RUN=true ./proxmox_auto_enroll.sh
Expected output:
[INFO] Found 5 LXC container(s)
[INFO] Processing LXC 100: webserver (status: running)
[INFO] [DRY RUN] Would enroll: proxmox-webserver
[INFO] Processing LXC 101: database (status: running)
[INFO] [DRY RUN] Would enroll: proxmox-database
...
[INFO] Successfully Enrolled: 5 (dry run)
Step 4: Run Actual Enrollment
# Enroll all containers
./proxmox_auto_enroll.sh
Monitor the output:
- Green
[SUCCESS]= Container enrolled and agent installed - Yellow
[WARN]= Container skipped (already enrolled or stopped) - Red
[ERROR]= Failure (check troubleshooting section)
Step 5: Verify in PatchMon
- Go to Hosts page in PatchMon UI
- Look for newly enrolled containers (names prefixed with "proxmox-")
- Initial status is "pending" (normal!)
- Agent connects automatically after installation (usually within seconds)
- Status changes to "active" with package data populated
Troubleshooting: If status stays "pending" after a couple of minutes, see Agent Not Reporting section.
Usage Examples
Basic Enrollment
# Enroll all running LXC containers
./proxmox_auto_enroll.sh
Dry Run Mode
# Preview what would be enrolled (no changes made)
DRY_RUN=true ./proxmox_auto_enroll.sh
Debug Mode
# Show detailed logging for troubleshooting
DEBUG=true ./proxmox_auto_enroll.sh
Custom Host Prefix
# Prefix container names (e.g., "prod-webserver" instead of "webserver")
HOST_PREFIX="prod-" ./proxmox_auto_enroll.sh
Include Stopped Containers
# Also process stopped containers (enrollment only, agent install fails)
SKIP_STOPPED=false ./proxmox_auto_enroll.sh
Force Install Mode (Broken Packages)
If containers have broken packages (CloudPanel, WHM, cPanel, etc.) that block apt-get:
# Bypass broken packages during agent installation
FORCE_INSTALL=true ./proxmox_auto_enroll.sh
Or use the force parameter when downloading:
curl -s "https://patchmon.example.com/api/v1/auto-enrollment/script?type=proxmox-lxc&token_key=KEY&token_secret=SECRET&force=true" | bash
What force mode does:
- Skips
apt-get updateif broken packages detected - Only installs missing critical tools (jq, curl, bc)
- Uses
--fix-broken --yesflags safely - Validates installations before proceeding
Scheduled Enrollment (Cron)
Automatically enroll new containers on a schedule. Since cron runs with a minimal environment (limited PATH, no user variables), you need to ensure the crontab has the correct environment set up for the script to find required commands like pct, curl, and jq.
Setting Up the Crontab
Edit the root crontab:
crontab -e
Add the following. The PATH and environment variables at the top are essential - without them the script will fail because cron does not inherit your shell's environment:
# === PatchMon Auto-Enrollment Environment ===
# Cron uses a minimal PATH by default (/usr/bin:/bin). The enrollment script
# requires pct, curl, and jq which may live in /usr/sbin or other paths.
# Set a full PATH so all commands are found.
SHELL=/bin/bash
PATH=/usr/local/sbin:/usr/local/bin:/usr/sbin:/usr/bin:/sbin:/bin
# Enrollment credentials (required by the script)
PATCHMON_URL=https://patchmon.example.com
AUTO_ENROLLMENT_KEY=patchmon_ae_your_key_here
AUTO_ENROLLMENT_SECRET=your_secret_here
# Optional overrides
# HOST_PREFIX=proxmox-
# FORCE_INSTALL=false
# CURL_FLAGS=-sk
# === Schedule ===
# Run daily at 2 AM
0 2 * * * /root/proxmox_auto_enroll.sh >> /var/log/patchmon-enroll.log 2>&1
# Or hourly for dynamic environments where containers are created frequently
# 0 * * * * /root/proxmox_auto_enroll.sh >> /var/log/patchmon-enroll.log 2>&1
Why This Matters
Cron does not load your interactive shell profile (~/.bashrc, ~/.profile, etc.). This means:
| What cron is missing | Impact | Fix |
|---|---|---|
PATH only includes /usr/bin:/bin |
pct not found (lives in /usr/sbin) |
Set PATH at top of crontab |
| No exported variables | PATCHMON_URL, credentials are empty |
Define them in crontab or use a wrapper |
| No TTY | Colour output codes may cause log clutter | Redirect to log file with 2>&1 |
Alternative: Wrapper Script
If you prefer not to put credentials in the crontab, create a wrapper script instead:
cat > /root/patchmon_enroll_cron.sh << 'EOF'
#!/bin/bash
# Wrapper that sets the environment for cron execution
export PATH="/usr/local/sbin:/usr/local/bin:/usr/sbin:/usr/bin:/sbin:/bin"
export PATCHMON_URL="https://patchmon.example.com"
export AUTO_ENROLLMENT_KEY="patchmon_ae_your_key_here"
export AUTO_ENROLLMENT_SECRET="your_secret_here"
# export HOST_PREFIX="proxmox-"
# export CURL_FLAGS="-sk"
/root/proxmox_auto_enroll.sh
EOF
chmod 700 /root/patchmon_enroll_cron.sh
Then reference the wrapper in crontab:
0 2 * * * /root/patchmon_enroll_cron.sh >> /var/log/patchmon-enroll.log 2>&1
Make sure the wrapper script is only readable by root (chmod 700) since it contains secrets.
Log Rotation
For long-running cron schedules, consider adding log rotation to prevent unbounded log growth:
cat > /etc/logrotate.d/patchmon-enroll << 'EOF'
/var/log/patchmon-enroll.log {
weekly
rotate 4
compress
missingok
notifempty
}
EOF
Verifying Cron is Working
# Check the cron job is registered
crontab -l | grep patchmon
# Check recent cron execution logs
grep patchmon /var/log/syslog | tail -n 20
# Check enrollment log output
tail -f /var/log/patchmon-enroll.log
Already-enrolled containers are automatically skipped on each run, so there is no risk of duplicates or errors from repeated execution.
Multi-Environment Setup
# Production environment (uses prod token)
export PATCHMON_URL="https://patchmon.example.com"
export AUTO_ENROLLMENT_KEY="patchmon_ae_prod_..."
export AUTO_ENROLLMENT_SECRET="prod_secret..."
export HOST_PREFIX="prod-"
./proxmox_auto_enroll.sh
# Development environment (uses dev token with different host group)
export AUTO_ENROLLMENT_KEY="patchmon_ae_dev_..."
export AUTO_ENROLLMENT_SECRET="dev_secret..."
export HOST_PREFIX="dev-"
./proxmox_auto_enroll.sh
Configuration Options
Environment Variables
All configuration can be set via environment variables:
| Variable | Default | Description | Example |
|---|---|---|---|
PATCHMON_URL |
Required | PatchMon server URL | https://patchmon.example.com |
AUTO_ENROLLMENT_KEY |
Required | Token key from PatchMon | patchmon_ae_abc123... |
AUTO_ENROLLMENT_SECRET |
Required | Token secret from PatchMon | def456ghi789... |
CURL_FLAGS |
-s |
Curl options | -sk (for self-signed SSL) |
DRY_RUN |
false |
Preview mode (no changes) | true/false |
HOST_PREFIX |
"" |
Prefix for host names | proxmox-, prod-, etc. |
SKIP_STOPPED |
true |
Skip stopped containers | true/false |
FORCE_INSTALL |
false |
Bypass broken packages | true/false |
DEBUG |
false |
Enable debug logging | true/false |
Script Configuration Section
Or edit the script directly:
# ===== CONFIGURATION =====
PATCHMON_URL="${PATCHMON_URL:-https://patchmon.example.com}"
AUTO_ENROLLMENT_KEY="${AUTO_ENROLLMENT_KEY:-your_key_here}"
AUTO_ENROLLMENT_SECRET="${AUTO_ENROLLMENT_SECRET:-your_secret_here}"
CURL_FLAGS="${CURL_FLAGS:--s}"
DRY_RUN="${DRY_RUN:-false}"
HOST_PREFIX="${HOST_PREFIX:-}"
SKIP_STOPPED="${SKIP_STOPPED:-true}"
FORCE_INSTALL="${FORCE_INSTALL:-false}"
Token Configuration (PatchMon UI)
Configure tokens in Settings → Integrations → Auto-Enrollment & API:
General Settings:
- Token Name: Descriptive identifier
- Active Status: Enable/disable without deleting
- Expiration Date: Auto-disable after date
Security Settings:
- Max Hosts Per Day: Rate limit (resets daily at midnight)
- Allowed IP Addresses: Comma-separated IP whitelist
- Default Host Group: Auto-assign enrolled hosts
Usage Statistics:
- Hosts Created Today: Current daily count
- Last Used: Timestamp of most recent enrollment
- Created By: Admin user who created token
- Created At: Token creation timestamp
Security Best Practices
Token Management
-
Store Securely
- Save credentials in password manager (1Password, LastPass, etc.)
- Never commit to version control
- Use environment variables or secure config management (Vault)
-
Principle of Least Privilege
- Create separate tokens for prod/dev/staging
- Use different tokens for different Proxmox clusters
- Set appropriate rate limits per environment
-
Regular Rotation
- Rotate tokens every 90 days
- Disable unused tokens immediately
- Monitor token usage for anomalies
-
IP Restrictions
- Always set
allowed_ip_rangesin production - Update if Proxmox host IPs change
- Use VPN/private network IPs when possible
- Always set
-
Expiration Dates
- Set expiration for temporary/testing tokens
- Review and extend before expiration
- Delete expired tokens to reduce attack surface
Network Security
-
Use HTTPS
- Always use encrypted connections in production
- Use valid SSL certificates (avoid
-kflag) - Self-signed OK for internal/testing environments
-
Network Segmentation
- Run enrollment over private network if possible
- Use proper firewall rules
- Restrict PatchMon server access to known IPs
Access Control
-
Admin Permissions
- Only admins with "Manage Settings" can create tokens
- Regular users cannot see token secrets
- Use role-based access control (RBAC)
-
Audit Logging
- Monitor token creation/deletion in PatchMon logs
- Track enrollment activity per token
- Review host notes for enrollment source
-
Container Security
- Ensure containers have minimal privileges
- Don't run enrollment as unprivileged user
- Use unprivileged containers where possible (enrollment still works)
Incident Response
If a token is compromised:
-
Immediately disable the token in PatchMon UI
- Settings → Integrations → Auto-Enrollment & API → Toggle "Disable"
-
Review recently enrolled hosts
- Check host notes for token name and enrollment date
- Verify all recent enrollments are legitimate
- Delete any suspicious hosts
-
Create new token
- Generate new credentials
- Update Proxmox script with new credentials
- Test enrollment with dry run
-
Investigate root cause
- How were credentials exposed?
- Update procedures to prevent recurrence
- Consider additional security measures
-
Delete old token
- After verifying new token works
- Document incident in change log
Troubleshooting
Common Errors and Solutions
Error: "pct command not found"
Symptom:
[ERROR] This script must run on a Proxmox host (pct command not found)
Cause: Script is running on a non-Proxmox machine
Solution:
# SSH to Proxmox host first
ssh root@proxmox-host
cd /root
./proxmox_auto_enroll.sh
Error: "Auto-enrollment credentials required"
Symptom:
[ERROR] Failed to enroll hostname - HTTP 401
Response: {"error":"Auto-enrollment credentials required"}
Cause: The X-Auto-Enrollment-Key and/or X-Auto-Enrollment-Secret headers are missing from the request
Solution:
- Verify the script has
AUTO_ENROLLMENT_KEYandAUTO_ENROLLMENT_SECRETset - Check for extra spaces/newlines in credentials
- Ensure token_key starts with
patchmon_ae_ - Regenerate token if credentials lost
# Test credentials manually
curl -X POST \
-H "X-Auto-Enrollment-Key: YOUR_KEY" \
-H "X-Auto-Enrollment-Secret: YOUR_SECRET" \
-H "Content-Type: application/json" \
-d '{"friendly_name":"test","machine_id":"test"}' \
https://patchmon.example.com/api/v1/auto-enrollment/enroll
Error: "Invalid or inactive token" / "Invalid token secret"
Symptom:
[ERROR] Failed to enroll hostname - HTTP 401
Response: {"error":"Invalid or inactive token"}
or
[ERROR] Failed to enroll hostname - HTTP 401
Response: {"error":"Invalid token secret"}
Cause: Token key not found or disabled (Invalid or inactive token), or secret doesn't match (Invalid token secret), or token has expired (Token expired)
Solution:
- Check token status in PatchMon UI (Settings → Integrations)
- Enable if disabled
- Extend expiration if expired
- Verify the secret matches the one shown when the token was created
- Create new token if credentials are lost (secrets cannot be retrieved)
Error: "Rate limit exceeded"
Symptom:
[ERROR] Rate limit exceeded - maximum hosts per day reached
Cause: Token's max_hosts_per_day limit reached
Solution:
# Option 1: Wait until tomorrow (limit resets at midnight)
date
# Check current time, wait until 00:00
# Option 2: Increase limit in PatchMon UI
# Settings → Integrations → Edit Token → Max Hosts Per Day: 200
# Option 3: Create additional token for large enrollments
Error: "IP address not authorized"
Symptom:
[ERROR] Failed to enroll hostname - HTTP 403
Response: {"error":"IP address not authorized for this token"}
Cause: Proxmox host IP not in token's allowed_ip_ranges
Solution:
-
Find your Proxmox host IP:
ip addr show | grep 'inet ' | grep -v 127.0.0.1 -
Update token in PatchMon UI:
- Settings → Integrations → Edit Token
- Allowed IP Addresses: Add your IP
-
Or remove IP restriction entirely (not recommended for production)
Error: "jq: command not found"
Symptom:
[ERROR] Required command 'jq' not found. Please install it first.
Cause: Missing dependency
Solution:
# Debian/Ubuntu
apt-get update && apt-get install -y jq
# CentOS/RHEL
yum install -y jq
# Alpine
apk add --no-cache jq
Error: "Failed to install agent in container"
Symptom:
[WARN] Failed to install agent in container-name (exit: 1)
Install output: E: Unable to locate package curl
Cause: Agent installation failed inside LXC container
Solutions:
A. Network connectivity issue:
# Test from Proxmox host
pct exec 100 -- ping -c 3 patchmon.example.com
# Test from inside container
pct enter 100
curl -I https://patchmon.example.com
exit
B. Package manager issue:
# Enter container
pct enter 100
# Update package lists
apt-get update
# or
yum makecache
# Try manual agent install
curl https://patchmon.example.com/api/v1/hosts/install \
-H "X-API-ID: patchmon_xxx" \
-H "X-API-KEY: xxx" | bash
C. Unsupported OS:
- Agent supports: Ubuntu, Debian, CentOS, RHEL, Rocky Linux, AlmaLinux, Alpine
- Check
/etc/os-releasein container - Manually install on other distributions
D. Broken packages (use force mode):
FORCE_INSTALL=true ./proxmox_auto_enroll.sh
Error: SSL Certificate Problems
Symptom:
curl: (60) SSL certificate problem: self signed certificate
Cause: Self-signed certificate on PatchMon server
Solution:
# Use -k flag to skip certificate verification
export CURL_FLAGS="-sk"
./proxmox_auto_enroll.sh
Better solution: Install valid SSL certificate on PatchMon server using Let's Encrypt or corporate CA
Warning: Container Already Enrolled
Symptom:
[INFO] ✓ Host already enrolled and agent ping successful - skipping enrollment
Cause: The script detected an existing agent configuration (/etc/patchmon/config.yml and /etc/patchmon/credentials.yml) inside the container and the agent successfully pinged the PatchMon server.
This is normal! The script safely skips already-enrolled hosts. No action needed.
If you need to re-enroll:
- Delete host from PatchMon UI (Hosts page)
- Remove agent config inside the container:
pct exec <vmid> -- rm -rf /etc/patchmon/ - Rerun enrollment script
Agent Not Reporting
If containers show "pending" status after enrollment:
1. Check agent service is running:
pct enter 100
# For systemd-based containers
systemctl status patchmon-agent.service
# For OpenRC-based containers (Alpine)
rc-service patchmon-agent status
# For containers without init systems (crontab fallback)
ps aux | grep patchmon-agent
2. Check agent files exist:
ls -la /etc/patchmon/
# Should show: config.yml and credentials.yml
ls -la /usr/local/bin/patchmon-agent
# Should show the agent binary
3. Check agent logs:
# Systemd journal logs
journalctl -u patchmon-agent.service --no-pager -n 50
# Or check the agent log file
cat /etc/patchmon/logs/patchmon-agent.log
4. Test agent connectivity:
/usr/local/bin/patchmon-agent ping
# Should show success if credentials and connectivity are valid
5. Verify credentials:
cat /etc/patchmon/credentials.yml
# Should show api_id and api_key
cat /etc/patchmon/config.yml
# Should show patchmon_server URL
6. Restart the agent service:
# Systemd
systemctl restart patchmon-agent.service
# OpenRC
rc-service patchmon-agent restart
Debug Mode
Enable detailed logging:
DEBUG=true ./proxmox_auto_enroll.sh
Debug output includes:
- API request/response bodies
- Container command execution details
- Detailed error messages
- curl verbose output
Getting Help
If issues persist:
-
Check PatchMon server logs:
tail -f /path/to/patchmon/backend/logs/error.log -
Create GitHub issue with:
- PatchMon version
- Proxmox version
- Script output (redact credentials!)
- Debug mode output
- Server logs (if accessible)
-
Join Discord community for real-time support
Advanced Usage
Selective Enrollment
Enroll only specific containers:
# Only enroll containers 100-199
nano proxmox_auto_enroll.sh
# Add after line "while IFS= read -r line; do"
vmid=$(echo "$line" | awk '{print $1}')
if [[ $vmid -lt 100 ]] || [[ $vmid -gt 199 ]]; then
continue
fi
Or use container name filtering:
# Only enroll containers with "prod" in name
if [[ ! "$name" =~ prod ]]; then
continue
fi
Custom Host Naming
Advanced naming strategies:
# Include Proxmox node name
HOST_PREFIX="$(hostname)-"
# Result: proxmox01-webserver, proxmox02-database
# Include datacenter/location
HOST_PREFIX="dc1-"
# Result: dc1-webserver, dc1-database
# Include environment and node
HOST_PREFIX="prod-$(hostname | cut -d. -f1)-"
# Result: prod-px01-webserver
Multi-Node Proxmox Cluster
For Proxmox clusters with multiple nodes:
Option 1: Same token, different prefix per node
# On node 1
HOST_PREFIX="node1-" ./proxmox_auto_enroll.sh
# On node 2
HOST_PREFIX="node2-" ./proxmox_auto_enroll.sh
Option 2: Different tokens per node
- Create token for each node with different default host groups
- Node 1 → "Proxmox Node 1" group
- Node 2 → "Proxmox Node 2" group
Option 3: Centralized automation
#!/bin/bash
# central_enroll.sh
NODES=(
"root@proxmox01.example.com"
"root@proxmox02.example.com"
"root@proxmox03.example.com"
)
for node in "${NODES[@]}"; do
echo "Enrolling containers from $node..."
ssh "$node" "bash /root/proxmox_auto_enroll.sh"
done
Integration with Infrastructure as Code
Ansible Playbook:
---
- name: Enroll Proxmox LXC containers in PatchMon
hosts: proxmox_hosts
become: yes
tasks:
- name: Install dependencies
apt:
name:
- curl
- jq
state: present
- name: Download enrollment script
get_url:
url: "{{ patchmon_url }}/api/v1/auto-enrollment/script?type=proxmox-lxc&token_key={{ token_key }}&token_secret={{ token_secret }}"
dest: /root/proxmox_auto_enroll.sh
mode: '0700'
- name: Run enrollment
command: /root/proxmox_auto_enroll.sh
register: enrollment_output
- name: Show enrollment results
debug:
var: enrollment_output.stdout_lines
Terraform (with null_resource):
resource "null_resource" "patchmon_enrollment" {
triggers = {
cluster_instance_ids = join(",", proxmox_lxc.containers.*.vmid)
}
provisioner "remote-exec" {
connection {
host = var.proxmox_host
user = "root"
private_key = file(var.ssh_key_path)
}
inline = [
"apt-get install -y jq",
"curl -s '${var.patchmon_url}/api/v1/auto-enrollment/script?type=proxmox-lxc&token_key=${var.token_key}&token_secret=${var.token_secret}' | bash"
]
}
}
Bulk API Enrollment
For very large deployments (100+ containers), use the bulk API endpoint directly:
#!/bin/bash
# bulk_enroll.sh
# Gather all container info
containers_json=$(pct list | tail -n +2 | while read -r line; do
vmid=$(echo "$line" | awk '{print $1}')
name=$(echo "$line" | awk '{print $3}')
echo "{\"friendly_name\":\"$name\",\"machine_id\":\"proxmox-lxc-$vmid\"}"
done | jq -s '.')
# Send bulk enrollment request
curl -X POST \
-H "X-Auto-Enrollment-Key: $AUTO_ENROLLMENT_KEY" \
-H "X-Auto-Enrollment-Secret: $AUTO_ENROLLMENT_SECRET" \
-H "Content-Type: application/json" \
-d "{\"hosts\":$containers_json}" \
"$PATCHMON_URL/api/v1/auto-enrollment/enroll/bulk"
Benefits:
- Single API call for all containers
- Faster for 50+ containers
- Partial success supported (individual failures don't block others)
Limitations:
- Max 50 hosts per request
- Does not install agents (must be done separately)
- Less detailed error reporting per host
Webhook-Triggered Enrollment
Trigger enrollment from PatchMon webhook (requires custom setup):
#!/bin/bash
# webhook_listener.sh
# Simple webhook listener
while true; do
# Listen for webhook on port 9000
nc -l -p 9000 -c 'echo -e "HTTP/1.1 200 OK\n\n"; /root/proxmox_auto_enroll.sh'
done
Then configure PatchMon (or monitoring system) to call webhook when conditions are met.
API Reference
Admin Endpoints (Authentication Required)
All admin endpoints require JWT authentication:
Authorization: Bearer <jwt_token>
Create Token
Endpoint: POST /api/v1/auto-enrollment/tokens
Request:
{
"token_name": "Proxmox Production",
"max_hosts_per_day": 100,
"default_host_group_id": "uuid",
"allowed_ip_ranges": ["192.168.1.10", "10.0.0.5"],
"expires_at": "2026-12-31T23:59:59Z",
"metadata": {
"integration_type": "proxmox-lxc",
"environment": "production"
}
}
Response: 201 Created
{
"message": "Auto-enrollment token created successfully",
"token": {
"id": "uuid",
"token_name": "Proxmox Production",
"token_key": "patchmon_ae_abc123...",
"token_secret": "def456...", // Only shown here!
"max_hosts_per_day": 100,
"default_host_group": {
"id": "uuid",
"name": "Proxmox LXC",
"color": "#3B82F6"
},
"created_by": {
"id": "uuid",
"username": "admin",
"first_name": "John",
"last_name": "Doe"
},
"expires_at": "2026-12-31T23:59:59Z"
},
"warning": "Save the token_secret now - it cannot be retrieved later!"
}
List Tokens
Endpoint: GET /api/v1/auto-enrollment/tokens
Response: 200 OK
[
{
"id": "uuid",
"token_name": "Proxmox Production",
"token_key": "patchmon_ae_abc123...",
"is_active": true,
"allowed_ip_ranges": ["192.168.1.10"],
"max_hosts_per_day": 100,
"hosts_created_today": 15,
"last_used_at": "2025-10-11T14:30:00Z",
"expires_at": "2026-12-31T23:59:59Z",
"created_at": "2025-10-01T10:00:00Z",
"default_host_group_id": "uuid",
"metadata": {"integration_type": "proxmox-lxc"},
"host_groups": {
"id": "uuid",
"name": "Proxmox LXC",
"color": "#3B82F6"
},
"users": {
"id": "uuid",
"username": "admin",
"first_name": "John",
"last_name": "Doe"
}
}
]
Get Token Details
Endpoint: GET /api/v1/auto-enrollment/tokens/:tokenId
Response: 200 OK (same structure as single token in list)
Update Token
Endpoint: PATCH /api/v1/auto-enrollment/tokens/:tokenId
Request:
{
"is_active": false,
"max_hosts_per_day": 200,
"allowed_ip_ranges": ["192.168.1.0/24"],
"expires_at": "2027-01-01T00:00:00Z"
}
Response: 200 OK
{
"message": "Token updated successfully",
"token": { /* updated token object */ }
}
Delete Token
Endpoint: DELETE /api/v1/auto-enrollment/tokens/:tokenId
Response: 200 OK
{
"message": "Auto-enrollment token deleted successfully",
"deleted_token": {
"id": "uuid",
"token_name": "Proxmox Production"
}
}
Enrollment Endpoints (Token Authentication)
Authentication via headers:
X-Auto-Enrollment-Key: patchmon_ae_abc123...
X-Auto-Enrollment-Secret: def456...
Download Enrollment Script
Endpoint: GET /api/v1/auto-enrollment/script
Query Parameters:
type(required): Script type (proxmox-lxcordirect-host)token_key(required): Auto-enrollment token keytoken_secret(required): Auto-enrollment token secretforce(optional):trueto enable force install mode
Example:
curl "https://patchmon.example.com/api/v1/auto-enrollment/script?type=proxmox-lxc&token_key=KEY&token_secret=SECRET&force=true"
Response: 200 OK (bash script with credentials injected)
Enroll Single Host
Endpoint: POST /api/v1/auto-enrollment/enroll
Request:
{
"friendly_name": "webserver",
"machine_id": "proxmox-lxc-100-abc123",
"metadata": {
"vmid": "100",
"proxmox_node": "proxmox01",
"ip_address": "10.0.0.10",
"os_info": "Ubuntu 22.04 LTS"
}
}
Response: 201 Created
{
"message": "Host enrolled successfully",
"host": {
"id": "uuid",
"friendly_name": "webserver",
"api_id": "patchmon_abc123",
"api_key": "def456ghi789",
"host_group": {
"id": "uuid",
"name": "Proxmox LXC",
"color": "#3B82F6"
},
"status": "pending"
}
}
Error Responses:
Note: The API does not perform duplicate host checks. Duplicate prevention is handled client-side by the enrollment script, which checks for an existing agent configuration inside each container before calling the API.
429 Too Many Requests - Rate limit exceeded:
{
"error": "Rate limit exceeded",
"message": "Maximum 100 hosts per day allowed for this token"
}
Bulk Enroll Hosts
Endpoint: POST /api/v1/auto-enrollment/enroll/bulk
Request:
{
"hosts": [
{
"friendly_name": "webserver",
"machine_id": "proxmox-lxc-100-abc123"
},
{
"friendly_name": "database",
"machine_id": "proxmox-lxc-101-def456"
}
]
}
Limits:
- Minimum: 1 host
- Maximum: 50 hosts per request
Response: 201 Created
{
"message": "Bulk enrollment completed: 2 succeeded, 0 failed, 0 skipped",
"results": {
"success": [
{
"id": "uuid",
"friendly_name": "webserver",
"api_id": "patchmon_abc123",
"api_key": "def456"
},
{
"id": "uuid",
"friendly_name": "database",
"api_id": "patchmon_ghi789",
"api_key": "jkl012"
}
],
"failed": [],
"skipped": []
}
}
FAQ
General Questions
Q: Can I use the same token for multiple Proxmox hosts?
A: Yes, as long as the combined enrollment count stays within max_hosts_per_day limit. Rate limits are per-token, not per-host.
Q: What happens if I run the script multiple times?
A: Already-enrolled containers are automatically skipped. The script checks for existing agent configuration inside each container and skips those where the agent is already installed and responsive. Safe to rerun!
Q: Can I enroll stopped LXC containers?
A: No, containers must be running. The script needs to execute commands inside the container to install the agent. Start containers before enrolling.
Q: Does this work with Proxmox VMs (QEMU)?
A: No, this script is LXC-specific and uses pct exec to enter containers. VMs require manual enrollment or a different automation approach (SSH-based).
Q: How do I unenroll a host?
A: Go to PatchMon UI → Hosts → Select host → Delete. The agent will stop reporting and the host record is removed from the database.
Q: Can I change the host group after enrollment?
A: Yes! In PatchMon UI → Hosts → Select host → Edit → Change host group.
Q: Can I see which hosts were enrolled by which token?
A: Yes, check the host "Notes" field in PatchMon. It includes the token name and enrollment timestamp.
Q: What if my Proxmox host IP address changes?
A: Update the token's allowed_ip_ranges in PatchMon UI (Settings → Integrations → Edit Token).
Q: Can I have multiple tokens with different host groups?
A: Yes! Create separate tokens for prod/dev/staging with different default host groups. Great for environment segregation.
Q: Is there a way to trigger enrollment from PatchMon GUI?
A: Not currently (would require inbound network access). The script must run on the Proxmox host. Future versions may support webhooks or agent-initiated enrollment.
Security Questions
Q: Are token secrets stored securely?
A: Yes, token secrets are hashed using bcrypt before storage. Only the hash is stored in the database, never the plain text.
Q: What happens if someone steals my auto-enrollment token?
A: They can create new hosts up to the rate limit, but cannot control existing hosts or access host data. Immediately disable the token in PatchMon UI if compromised.
Q: Can I audit who created which tokens?
A: Yes, each token stores the created_by_user_id. View in PatchMon UI or query the database.
Q: How does IP whitelisting work?
A: PatchMon checks the client IP from the HTTP request. If allowed_ip_ranges is configured, the IP must match one of the allowed ranges using CIDR notation (e.g., 192.168.1.0/24). Single IP addresses are also supported (e.g., 192.168.1.10).
Q: Can I use the same credentials for enrollment and agent communication?
A: No, they're separate. Auto-enrollment credentials create hosts. Each host gets unique API credentials for agent communication. This separation limits the blast radius of credential compromise.
Technical Questions
Q: Why does the agent require curl inside the container?
A: The agent script uses curl to communicate with PatchMon. The enrollment script automatically installs curl if missing.
Q: What Linux distributions are supported in containers?
A: Ubuntu, Debian, CentOS, RHEL, Rocky Linux, AlmaLinux, Alpine Linux. Any distribution with apt/yum/dnf/apk package managers.
Q: How much bandwidth does enrollment use?
A: Minimal. The script download is ~15KB, agent installation is ~50-100KB per container. Total: ~1-2MB for 10 containers.
Q: Can I run enrollment in parallel for faster processing?
A: Not recommended. The script processes containers sequentially to avoid overwhelming the PatchMon server. For 100+ containers, consider the bulk API endpoint.
Q: Does enrollment restart containers?
A: No, containers remain running. The agent is installed without reboots or service disruptions.
Q: What if the container doesn't have a hostname?
A: The script uses the container name from Proxmox as a fallback.
Q: Can I customize the agent installation?
A: Yes, modify the install_url in the enrollment script or use the PatchMon agent installation API parameters.
Troubleshooting Questions
Q: Why does enrollment fail with "dpkg was interrupted"?
A: Your container has broken packages. Use FORCE_INSTALL=true to bypass, or manually fix dpkg:
pct enter 100
dpkg --configure -a
apt-get install -f
Q: Why does the agent show "pending" status forever?
A: Agent likely can't reach PatchMon server. Check:
- Container network connectivity:
pct exec 100 -- ping patchmon.example.com - Agent service running:
pct exec 100 -- systemctl status patchmon-agent.service - Agent logs:
pct exec 100 -- journalctl -u patchmon-agent.service
Q: Can I test enrollment without actually creating hosts?
A: Yes, use dry run mode: DRY_RUN=true ./proxmox_auto_enroll.sh
Q: How do I get more verbose output?
A: Use debug mode: DEBUG=true ./proxmox_auto_enroll.sh
Support and Resources
Documentation
- PatchMon Documentation: https://docs.patchmon.net
- API Reference: https://docs.patchmon.net/api
- Agent Documentation: https://docs.patchmon.net/agent
Community
- Discord: https://patchmon.net/discord
- GitHub Issues: https://github.com/PatchMon/PatchMon/issues
- GitHub Discussions: https://github.com/PatchMon/PatchMon/discussions
Professional Support
For enterprise support, training, or custom integrations:
- Email: support@patchmon.net
- Website: https://patchmon.net/support
PatchMon Team
Chapter 30: Auto-Enrollment API Documentation
Overview
PatchMon's auto-enrollment API enables automated device onboarding using tools like Ansible, Terraform, or custom scripts. It covers token management, host enrollment, and agent installation endpoints.
Table of Contents
- API Architecture
- Authentication
- Admin Endpoints
- Enrollment Endpoints
- Host Management Endpoints
- Ansible Integration Examples
- Error Handling
- Rate Limiting
- Security Considerations
API Architecture
Base URL Structure
https://your-patchmon-server.com/api/v1/
The API version is v1 and is fixed in the server.
Endpoint Categories
| Category | Path Prefix | Authentication | Purpose |
|---|---|---|---|
| Admin | /auto-enrollment/tokens/* |
JWT (Bearer token) | Token management (CRUD) |
| Enrollment | /auto-enrollment/* |
Token key + secret (headers) | Host enrollment & script download |
| Host | /hosts/* |
API ID + key (headers) | Agent installation & data reporting |
Two-Tier Security Model
Tier 1: Auto-Enrollment Token
- Purpose: Create new host entries via enrollment
- Scope: Limited to enrollment operations only
- Authentication:
X-Auto-Enrollment-Key+X-Auto-Enrollment-Secretheaders - Rate Limited: Yes (configurable hosts per day per token)
- Storage: Secret is hashed (bcrypt) in the database
Tier 2: Host API Credentials
- Purpose: Agent communication (data reporting, updates, commands)
- Scope: Per-host unique credentials
- Authentication:
X-API-ID+X-API-KEYheaders - Rate Limited: No (per-host)
- Storage: API key is hashed (bcrypt) in the database
Why two tiers?
- Compromised enrollment token does not compromise existing hosts
- Compromised host credential does not compromise enrollment
- Revoking an enrollment token stops new enrollments without affecting existing hosts
Authentication
Admin Endpoints (JWT)
All admin endpoints require a valid JWT Bearer token from an authenticated user with "Manage Settings" permission:
curl -H "Authorization: Bearer <jwt_token>" \
-H "Content-Type: application/json" \
https://your-patchmon-server.com/api/v1/auto-enrollment/tokens
Enrollment Endpoints (Token Key + Secret)
Enrollment endpoints authenticate via custom headers:
curl -H "X-Auto-Enrollment-Key: patchmon_ae_abc123..." \
-H "X-Auto-Enrollment-Secret: def456ghi789..." \
-H "Content-Type: application/json" \
https://your-patchmon-server.com/api/v1/auto-enrollment/enroll
Host Endpoints (API ID + Key)
Host endpoints authenticate via API credential headers:
curl -H "X-API-ID: patchmon_abc123" \
-H "X-API-KEY: def456ghi789" \
https://your-patchmon-server.com/api/v1/hosts/install
Admin Endpoints
All admin endpoints require JWT authentication and "Manage Settings" permission.
Create Auto-Enrollment Token
Endpoint: POST /api/v1/auto-enrollment/tokens
Request Body:
| Field | Type | Required | Default | Description |
|---|---|---|---|---|
token_name |
string | Yes | (required) | Descriptive name (max 255 chars) |
max_hosts_per_day |
integer | No | 100 |
Rate limit (1–1000) |
default_host_group_id |
string | No | null |
UUID of host group to auto-assign |
allowed_ip_ranges |
string[] | No | [] |
IP whitelist (exact IPs or CIDR notation) |
expires_at |
string | No | null |
ISO 8601 expiration date |
metadata |
object | No | {} |
Custom metadata (e.g. integration_type, environment) |
scopes |
object | No | null |
Permission scopes (only for API integration type tokens) |
Example Request:
{
"token_name": "Proxmox Production",
"max_hosts_per_day": 100,
"default_host_group_id": "uuid-of-host-group",
"allowed_ip_ranges": ["192.168.1.10", "10.0.0.0/24"],
"expires_at": "2026-12-31T23:59:59Z",
"metadata": {
"integration_type": "proxmox-lxc",
"environment": "production"
}
}
Response: 201 Created
{
"message": "Auto-enrollment token created successfully",
"token": {
"id": "uuid",
"token_name": "Proxmox Production",
"token_key": "patchmon_ae_abc123...",
"token_secret": "def456ghi789...",
"max_hosts_per_day": 100,
"default_host_group": {
"id": "uuid",
"name": "Proxmox LXC",
"color": "#3B82F6"
},
"created_by": {
"id": "uuid",
"username": "admin",
"first_name": "John",
"last_name": "Doe"
},
"expires_at": "2026-12-31T23:59:59Z",
"scopes": null
},
"warning": "Save the token_secret now - it cannot be retrieved later!"
}
Important: The
token_secretis only returned in this response. It is hashed before storage and cannot be retrieved again.
List Auto-Enrollment Tokens
Endpoint: GET /api/v1/auto-enrollment/tokens
Response: 200 OK
[
{
"id": "uuid",
"token_name": "Proxmox Production",
"token_key": "patchmon_ae_abc123...",
"is_active": true,
"allowed_ip_ranges": ["192.168.1.10"],
"max_hosts_per_day": 100,
"hosts_created_today": 15,
"last_used_at": "2025-10-11T14:30:00Z",
"expires_at": "2026-12-31T23:59:59Z",
"created_at": "2025-10-01T10:00:00Z",
"default_host_group_id": "uuid",
"metadata": { "integration_type": "proxmox-lxc" },
"scopes": null,
"host_groups": {
"id": "uuid",
"name": "Proxmox LXC",
"color": "#3B82F6"
},
"users": {
"id": "uuid",
"username": "admin",
"first_name": "John",
"last_name": "Doe"
}
}
]
Tokens are returned in descending order by creation date. The token_secret is never included in list responses.
Get Token Details
Endpoint: GET /api/v1/auto-enrollment/tokens/{tokenId}
Response: 200 OK. Same structure as a single token in the list response (without token_secret).
Error: 404 Not Found if tokenId does not exist.
Update Token
Endpoint: PATCH /api/v1/auto-enrollment/tokens/{tokenId}
All fields are optional. Only include fields you want to change.
Request Body:
| Field | Type | Description |
|---|---|---|
token_name |
string | Updated name (1–255 chars) |
is_active |
boolean | Enable or disable the token |
max_hosts_per_day |
integer | Updated rate limit (1–1000) |
allowed_ip_ranges |
string[] | Updated IP whitelist |
default_host_group_id |
string | Updated host group (set to empty string to clear) |
expires_at |
string | Updated expiration date (ISO 8601) |
scopes |
object | Updated scopes (API integration type tokens only) |
Example Request:
{
"is_active": false,
"max_hosts_per_day": 200,
"allowed_ip_ranges": ["192.168.1.0/24"]
}
Response: 200 OK
{
"message": "Token updated successfully",
"token": {
"id": "uuid",
"token_name": "Proxmox Production",
"token_key": "patchmon_ae_abc123...",
"is_active": false,
"max_hosts_per_day": 200,
"allowed_ip_ranges": ["192.168.1.0/24"],
"host_groups": { "id": "uuid", "name": "Proxmox LXC", "color": "#3B82F6" },
"users": { "id": "uuid", "username": "admin", "first_name": "John", "last_name": "Doe" }
}
}
Errors:
404 Not Found: Token does not exist400 Bad Request: Host group not found, or scopes update attempted on a non-API token
Delete Token
Endpoint: DELETE /api/v1/auto-enrollment/tokens/{tokenId}
Response: 200 OK
{
"message": "Auto-enrollment token deleted successfully",
"deleted_token": {
"id": "uuid",
"token_name": "Proxmox Production"
}
}
Error: 404 Not Found if tokenId does not exist.
Enrollment Endpoints
Download Enrollment Script
Endpoint: GET /api/v1/auto-enrollment/script
This endpoint validates the token credentials, then serves a bash script with the PatchMon server URL, token credentials, and configuration injected automatically.
Query Parameters:
| Parameter | Required | Description |
|---|---|---|
type |
Yes | Script type: proxmox-lxc or direct-host |
token_key |
Yes | Auto-enrollment token key |
token_secret |
Yes | Auto-enrollment token secret |
force |
No | Set to true to enable force install mode (for broken packages) |
Example:
curl "https://patchmon.example.com/api/v1/auto-enrollment/script?type=proxmox-lxc&token_key=KEY&token_secret=SECRET"
Response: 200 OK. Plain text bash script with credentials injected.
Errors:
400 Bad Request: Missing or invalidtypeparameter401 Unauthorized: Missing credentials, invalid/inactive token, invalid secret, or expired token404 Not Found: Script file not found on server
Enroll Single Host
Endpoint: POST /api/v1/auto-enrollment/enroll
Headers:
X-Auto-Enrollment-Key: patchmon_ae_abc123...
X-Auto-Enrollment-Secret: def456ghi789...
Content-Type: application/json
Request Body:
| Field | Type | Required | Description |
|---|---|---|---|
friendly_name |
string | Yes | Display name for the host (max 255 chars) |
machine_id |
string | No | Unique machine identifier (max 255 chars) |
metadata |
object | No | Additional metadata (vmid, proxmox_node, ip_address, os_info, etc.) |
Example Request:
{
"friendly_name": "webserver",
"machine_id": "proxmox-lxc-100-abc123",
"metadata": {
"vmid": "100",
"proxmox_node": "proxmox01",
"ip_address": "10.0.0.10",
"os_info": "Ubuntu 22.04 LTS"
}
}
Response: 201 Created
{
"message": "Host enrolled successfully",
"host": {
"id": "uuid",
"friendly_name": "webserver",
"api_id": "patchmon_abc123def456",
"api_key": "raw-api-key-value",
"host_group": {
"id": "uuid",
"name": "Proxmox LXC",
"color": "#3B82F6"
},
"status": "pending"
}
}
Note: The
api_keyis only returned in this response (plain text). It is hashed before storage. Thehost_groupisnullif no default host group is configured on the token.
Error Responses:
| Status | Error | Cause |
|---|---|---|
400 |
Validation errors | Missing or invalid friendly_name |
401 |
Auto-enrollment credentials required |
Missing X-Auto-Enrollment-Key or X-Auto-Enrollment-Secret headers |
401 |
Invalid or inactive token |
Token key not found or token is disabled |
401 |
Invalid token secret |
Secret does not match |
401 |
Token expired |
Token has passed its expiration date |
403 |
IP address not authorized for this token |
Client IP not in allowed_ip_ranges |
429 |
Rate limit exceeded |
Token's max_hosts_per_day limit reached |
Duplicate handling: The API does not perform server-side duplicate host checks. Duplicate prevention is handled client-side by the enrollment script, which checks for an existing agent configuration (
/etc/patchmon/config.yml) inside each container before calling the API.
Host Management Endpoints
These endpoints are used by the PatchMon agent (not the enrollment script). They authenticate using the per-host X-API-ID and X-API-KEY credentials returned during enrollment.
Download Agent Installation Script
Endpoint: GET /api/v1/hosts/install
Serves a shell script that bootstraps the PatchMon agent on a host. The script uses a secure bootstrap token mechanism; actual API credentials are not embedded directly in the script.
Headers:
X-API-ID: patchmon_abc123
X-API-KEY: def456ghi789
Query Parameters:
| Parameter | Required | Description |
|---|---|---|
force |
No | Set to true to enable force install mode |
arch |
No | Architecture override (e.g. amd64, arm64); auto-detected if omitted |
Response: 200 OK. Plain text shell script with bootstrap token injected.
Download Agent Binary/Script
Endpoint: GET /api/v1/hosts/agent/download
Downloads the PatchMon agent binary (Go binary for modern agents) or migration script (for legacy bash agents).
Headers:
X-API-ID: patchmon_abc123
X-API-KEY: def456ghi789
Query Parameters:
| Parameter | Required | Description |
|---|---|---|
arch |
No | Architecture (e.g. amd64, arm64) |
force |
No | Set to binary to force binary download |
Response: 200 OK. Binary file or shell script.
Host Data Update
Endpoint: POST /api/v1/hosts/update
Used by the agent to report package data, system information, and hardware details.
Headers:
X-API-ID: patchmon_abc123
X-API-KEY: def456ghi789
Content-Type: application/json
Request Body Fields:
| Field | Type | Required | Description |
|---|---|---|---|
packages |
array | Yes | Array of package objects (max 10,000) |
packages[].name |
string | Yes | Package name |
packages[].currentVersion |
string | Yes | Currently installed version |
packages[].availableVersion |
string | No | Available update version |
packages[].needsUpdate |
boolean | Yes | Whether an update is available |
packages[].isSecurityUpdate |
boolean | No | Whether the update is security-related |
agentVersion |
string | No | Reporting agent version |
osType |
string | No | Operating system type |
osVersion |
string | No | Operating system version |
hostname |
string | No | System hostname |
ip |
string | No | System IP address |
architecture |
string | No | CPU architecture |
cpuModel |
string | No | CPU model name |
cpuCores |
integer | No | Number of CPU cores |
ramInstalled |
float | No | Installed RAM in GB |
swapSize |
float | No | Swap size in GB |
diskDetails |
array | No | Array of disk objects |
gatewayIp |
string | No | Default gateway IP |
dnsServers |
array | No | Array of DNS server IPs |
networkInterfaces |
array | No | Array of network interface objects |
kernelVersion |
string | No | Running kernel version |
installedKernelVersion |
string | No | Installed (on-disk) kernel version |
selinuxStatus |
string | No | SELinux status (enabled, disabled, or permissive) |
systemUptime |
string | No | System uptime |
loadAverage |
array | No | Load average values |
machineId |
string | No | Machine ID |
needsReboot |
boolean | No | Whether a reboot is required |
rebootReason |
string | No | Reason a reboot is required |
repositories |
array | No | Configured package repositories |
executionTime |
string | No | Time taken to gather data |
Example Request:
{
"packages": [
{
"name": "nginx",
"currentVersion": "1.18.0",
"availableVersion": "1.20.0",
"needsUpdate": true,
"isSecurityUpdate": false
}
],
"agentVersion": "1.5.0",
"cpuModel": "Intel Xeon E5-2680 v4",
"cpuCores": 8,
"ramInstalled": 16.0,
"swapSize": 2.0,
"diskDetails": [
{
"device": "/dev/sda1",
"mountPoint": "/",
"size": "50GB",
"used": "25GB",
"available": "25GB"
}
],
"gatewayIp": "192.168.1.1",
"dnsServers": ["8.8.8.8", "8.8.4.4"],
"networkInterfaces": [
{
"name": "eth0",
"ip": "192.168.1.10",
"mac": "00:11:22:33:44:55"
}
],
"kernelVersion": "5.4.0-74-generic",
"selinuxStatus": "disabled"
}
Response: 200 OK
{
"message": "Host updated successfully",
"packagesProcessed": 1,
"updatesAvailable": 1,
"securityUpdates": 0
}
Ansible Integration Examples
Basic Playbook for Proxmox Enrollment
---
- name: Enroll Proxmox LXC containers in PatchMon
hosts: proxmox_hosts
become: yes
vars:
patchmon_url: "https://patchmon.example.com"
token_key: "{{ vault_patchmon_token_key }}"
token_secret: "{{ vault_patchmon_token_secret }}"
host_prefix: "prod-"
tasks:
- name: Install dependencies
apt:
name:
- curl
- jq
state: present
- name: Download enrollment script
get_url:
url: "{{ patchmon_url }}/api/v1/auto-enrollment/script?type=proxmox-lxc&token_key={{ token_key }}&token_secret={{ token_secret }}"
dest: /root/proxmox_auto_enroll.sh
mode: '0700'
- name: Run enrollment
command: /root/proxmox_auto_enroll.sh
environment:
HOST_PREFIX: "{{ host_prefix }}"
DEBUG: "true"
register: enrollment_output
- name: Show enrollment results
debug:
var: enrollment_output.stdout_lines
Advanced Playbook with Token Management
---
- name: Manage PatchMon Proxmox Integration
hosts: localhost
vars:
patchmon_url: "https://patchmon.example.com"
admin_token: "{{ vault_patchmon_admin_token }}"
tasks:
- name: Create Proxmox enrollment token
uri:
url: "{{ patchmon_url }}/api/v1/auto-enrollment/tokens"
method: POST
headers:
Authorization: "Bearer {{ admin_token }}"
Content-Type: "application/json"
body_format: json
body:
token_name: "{{ inventory_hostname }}-proxmox"
max_hosts_per_day: 200
default_host_group_id: "{{ proxmox_host_group_id }}"
allowed_ip_ranges: ["{{ proxmox_host_ip }}"]
expires_at: "2026-12-31T23:59:59Z"
metadata:
integration_type: "proxmox-lxc"
environment: "{{ environment }}"
status_code: 201
register: token_response
- name: Store token credentials
set_fact:
enrollment_token_key: "{{ token_response.json.token.token_key }}"
enrollment_token_secret: "{{ token_response.json.token.token_secret }}"
- name: Deploy enrollment script to Proxmox hosts
include_tasks: deploy_enrollment.yml
vars:
enrollment_token_key: "{{ enrollment_token_key }}"
enrollment_token_secret: "{{ enrollment_token_secret }}"
Ansible Role
# roles/patchmon_proxmox/tasks/main.yml
---
- name: Install PatchMon dependencies
package:
name:
- curl
- jq
state: present
- name: Create PatchMon directory
file:
path: /opt/patchmon
state: directory
mode: '0755'
- name: Download enrollment script
get_url:
url: "{{ patchmon_url }}/api/v1/auto-enrollment/script?type=proxmox-lxc&token_key={{ token_key }}&token_secret={{ token_secret }}&force={{ force_install | default('false') }}"
dest: /opt/patchmon/proxmox_auto_enroll.sh
mode: '0700'
- name: Run enrollment script
command: /opt/patchmon/proxmox_auto_enroll.sh
environment:
PATCHMON_URL: "{{ patchmon_url }}"
AUTO_ENROLLMENT_KEY: "{{ token_key }}"
AUTO_ENROLLMENT_SECRET: "{{ token_secret }}"
HOST_PREFIX: "{{ host_prefix | default('') }}"
DRY_RUN: "{{ dry_run | default('false') }}"
DEBUG: "{{ debug | default('false') }}"
FORCE_INSTALL: "{{ force_install | default('false') }}"
register: enrollment_output
- name: Display enrollment results
debug:
var: enrollment_output.stdout_lines
when: enrollment_output.stdout_lines is defined
- name: Fail if enrollment had errors
fail:
msg: "Enrollment failed with errors"
when: enrollment_output.rc != 0
Ansible Vault for Credentials
# group_vars/all/vault.yml (encrypted with ansible-vault)
---
vault_patchmon_admin_token: "eyJhbGciOiJIUzI1NiIsInR5cCI6IkpXVCJ9..."
vault_patchmon_token_key: "patchmon_ae_abc123..."
vault_patchmon_token_secret: "def456ghi789..."
Playbook with Error Handling and Retries
---
- name: Robust Proxmox enrollment with error handling
hosts: proxmox_hosts
become: yes
vars:
patchmon_url: "https://patchmon.example.com"
token_key: "{{ vault_patchmon_token_key }}"
token_secret: "{{ vault_patchmon_token_secret }}"
max_retries: 3
retry_delay: 30
tasks:
- name: Test PatchMon connectivity
uri:
url: "{{ patchmon_url }}/api/v1/auto-enrollment/tokens"
method: GET
headers:
Authorization: "Bearer {{ vault_patchmon_admin_token }}"
status_code: 200
retries: "{{ max_retries }}"
delay: "{{ retry_delay }}"
- name: Download enrollment script
get_url:
url: "{{ patchmon_url }}/api/v1/auto-enrollment/script?type=proxmox-lxc&token_key={{ token_key }}&token_secret={{ token_secret }}"
dest: /root/proxmox_auto_enroll.sh
mode: '0700'
retries: "{{ max_retries }}"
delay: "{{ retry_delay }}"
- name: Run enrollment with retry logic
shell: |
for i in {1..{{ max_retries }}}; do
echo "Attempt $i of {{ max_retries }}"
if /root/proxmox_auto_enroll.sh; then
echo "Enrollment successful"
exit 0
else
echo "Enrollment failed, retrying in {{ retry_delay }} seconds..."
sleep {{ retry_delay }}
fi
done
echo "All enrollment attempts failed"
exit 1
register: enrollment_result
- name: Handle enrollment failure
fail:
msg: "Proxmox enrollment failed after {{ max_retries }} attempts"
when: enrollment_result.rc != 0
- name: Parse enrollment results
set_fact:
enrolled_count: "{{ enrollment_result.stdout | regex_search('Successfully Enrolled:\\s+(\\d+)', '\\1') | default('0') }}"
failed_count: "{{ enrollment_result.stdout | regex_search('Failed:\\s+(\\d+)', '\\1') | default('0') }}"
- name: Report enrollment statistics
debug:
msg: |
Enrollment completed:
- Successfully enrolled: {{ enrolled_count }} containers
- Failed: {{ failed_count }} containers
Error Handling
HTTP Status Codes
| Code | Meaning | When It Occurs |
|---|---|---|
200 |
OK | Successful read/update operations |
201 |
Created | Token or host created successfully |
400 |
Bad Request | Validation errors, invalid host group, invalid script type |
401 |
Unauthorized | Missing, invalid, or expired credentials |
403 |
Forbidden | IP address not in token's whitelist |
404 |
Not Found | Token or resource not found |
429 |
Too Many Requests | Token's daily host creation limit exceeded |
500 |
Internal Server Error | Unexpected server error |
Error Response Formats
Simple error:
{
"error": "Error message describing what went wrong"
}
Error with detail:
{
"error": "Rate limit exceeded",
"message": "Maximum 100 hosts per day allowed for this token"
}
Validation errors (400):
{
"errors": [
{
"msg": "Token name is required (max 255 characters)",
"param": "token_name",
"location": "body"
}
]
}
Rate Limiting
Token-Based Rate Limits
Each auto-enrollment token has a configurable max_hosts_per_day limit:
- Default: 100 hosts per day per token
- Range: 1–1000 hosts per day
- Reset: Daily (when the first request of a new day is received)
- Scope: Per-token, not per-IP
When the limit is exceeded, the API returns 429 Too Many Requests:
{
"error": "Rate limit exceeded",
"message": "Maximum 100 hosts per day allowed for this token"
}
Global Rate Limiting
The auto-enrollment endpoints are also subject to the server's global authentication rate limiter, which applies to all authentication-related endpoints.
Security Considerations
Token Security
- Secret hashing: Token secrets are hashed with bcrypt (cost factor 10) before storage
- One-time display: Secrets are only returned during token creation
- Rotation: Recommended every 90 days
- Scope limitation: Tokens can only create hosts. They cannot read, modify, or delete existing host data.
IP Restrictions
Tokens support IP whitelisting with both exact IPs and CIDR notation:
{
"allowed_ip_ranges": ["192.168.1.10", "10.0.0.0/24"]
}
IPv4-mapped IPv6 addresses (e.g. ::ffff:192.168.1.10) are automatically handled.
Host API Key Security
- Host API keys (
api_key) are hashed with bcrypt before storage - The installation script uses a bootstrap token mechanism; the actual API credentials are not embedded in the script
- Bootstrap tokens are single-use and expire after 5 minutes
Network Security
- Always use HTTPS in production
- The
ignore_ssl_self_signedserver setting automatically configures curl flags in served scripts - Implement firewall rules to restrict PatchMon server access to known IPs
Audit Trail
All enrollment activity is logged:
- Token name included in host notes (e.g. "Auto-enrolled via Production Proxmox on 2025-10-11T14:30:00Z")
- Token creation tracks
created_by_user_id last_used_attimestamp updated on each enrollment
Complete Endpoint Summary
Admin Endpoints (JWT Authentication)
| Method | Path | Description |
|---|---|---|
POST |
/api/v1/auto-enrollment/tokens |
Create token |
GET |
/api/v1/auto-enrollment/tokens |
List all tokens |
GET |
/api/v1/auto-enrollment/tokens/{tokenId} |
Get single token |
PATCH |
/api/v1/auto-enrollment/tokens/{tokenId} |
Update token |
DELETE |
/api/v1/auto-enrollment/tokens/{tokenId} |
Delete token |
Enrollment Endpoints (Token Authentication)
| Method | Path | Description |
|---|---|---|
GET |
/api/v1/auto-enrollment/script?type=... |
Download enrollment script |
POST |
/api/v1/auto-enrollment/enroll |
Enroll a host |
Host Endpoints (API Credentials)
| Method | Path | Description |
|---|---|---|
GET |
/api/v1/hosts/install |
Download installation script |
GET |
/api/v1/hosts/agent/download |
Download agent binary/script |
POST |
/api/v1/hosts/update |
Report host data |
Quick Reference: curl Examples
Create a token:
curl -X POST \
-H "Authorization: Bearer <jwt_token>" \
-H "Content-Type: application/json" \
-d '{
"token_name": "Production Proxmox",
"max_hosts_per_day": 100,
"default_host_group_id": "uuid",
"allowed_ip_ranges": ["192.168.1.10"]
}' \
https://patchmon.example.com/api/v1/auto-enrollment/tokens
Download and run enrollment script:
curl -s "https://patchmon.example.com/api/v1/auto-enrollment/script?type=proxmox-lxc&token_key=KEY&token_secret=SECRET" | bash
Enroll a host directly:
curl -X POST \
-H "X-Auto-Enrollment-Key: patchmon_ae_abc123..." \
-H "X-Auto-Enrollment-Secret: def456ghi789..." \
-H "Content-Type: application/json" \
-d '{
"friendly_name": "webserver",
"machine_id": "proxmox-lxc-100-abc123"
}' \
https://patchmon.example.com/api/v1/auto-enrollment/enroll
Download agent installation script:
curl -H "X-API-ID: patchmon_abc123" \
-H "X-API-KEY: def456ghi789" \
https://patchmon.example.com/api/v1/hosts/install | bash
Integration Patterns
Pattern 1: Script-Based (Simplest)
# Download and execute in one command (credentials are injected into the script)
curl -s "https://patchmon.example.com/api/v1/auto-enrollment/script?type=proxmox-lxc&token_key=KEY&token_secret=SECRET" | bash
Pattern 2: API-First (Most Control)
# 1. Create token via admin API
# 2. Enroll hosts via enrollment API
# 3. Download agent scripts using per-host API credentials
# 4. Install agents with host-specific credentials
Pattern 3: Hybrid (Recommended for Automation)
# 1. Create token via admin API (or UI)
# 2. Download enrollment script with token embedded
# 3. Distribute and run script on Proxmox hosts
# 4. Script handles both enrollment and agent installation
Chapter 31: Integration API Documentation
Table of Contents
- Overview
- Interactive API Reference (Swagger)
- Creating API Credentials
- Authentication
- Available Scopes & Permissions
- API Endpoints
- Usage Examples
- Security Best Practices
- Troubleshooting
Overview
PatchMon's Integration API provides programmatic access to your PatchMon instance, enabling automation, integration with third-party tools, and custom workflows. API credentials use HTTP Basic Authentication with scoped permissions to control access to specific resources and actions.
Key Features
- Scoped Permissions: Fine-grained control over what each credential can access
- IP Restrictions: Optional IP allowlisting for enhanced security
- Expiration Dates: Set automatic expiration for temporary access
- Basic Authentication: Industry-standard authentication method (RFC 7617)
- Rate Limiting: Built-in protection against abuse
- Audit Trail: Track credential usage with last-used timestamps
Use Cases
- Automation: Integrate PatchMon data into CI/CD pipelines
- Inventory Management: Use with Ansible, Terraform, or other IaC tools
- Monitoring: Feed PatchMon data into monitoring dashboards
- Custom Scripts: Build custom tools that interact with PatchMon
- Third-Party Integrations: Connect PatchMon to other systems
Interactive API Reference (Swagger)
PatchMon includes a built-in interactive API reference powered by Swagger UI. You can explore all available endpoints, view request/response schemas, and test API calls directly from your browser.
To access the Swagger UI:
https://<your-patchmon-url>/api/v1/api-docs
Note: The Swagger UI requires you to be logged in to PatchMon (JWT authentication). Log in to your PatchMon dashboard first, then navigate to the URL above in the same browser session.
The Swagger reference covers all internal and scoped API endpoints. This documentation page focuses specifically on the scoped Integration API that uses Basic Authentication with API credentials.
Creating API Credentials
Step-by-Step Guide
1. Navigate to Settings
- Log in to your PatchMon instance as an administrator
- Go to Settings → Integrations
- You will see the Auto-Enrollment & API tab
2. Click "New Token"
Click the "New Token" button. A modal will appear where you can select the credential type.
3. Select "API" as the Usage Type
In the creation modal, select "API" as the usage type. This configures the credential for programmatic access via Basic Authentication.
4. Configure the Credential
Fill in the following fields:
Required Fields:
| Field | Description | Example |
|---|---|---|
| Token Name | A descriptive name for identification and audit purposes | Ansible Inventory, Monitoring Dashboard |
| Scopes | The permissions this credential should have (at least one required) | host: get |
Optional Fields:
| Field | Description | Example |
|---|---|---|
| Allowed IP Addresses | Comma-separated list of IPs or CIDR ranges that can use this credential. Leave empty for unrestricted access. | 192.168.1.100, 10.0.0.0/24 |
| Expiration Date | Automatic expiration date for the credential. Leave empty for no expiration. | 2026-12-31T23:59:59 |
| Default Host Group | Optionally assign a default host group | Production |
5. Save Your Credentials
CRITICAL: Save these credentials immediately. The secret cannot be retrieved later.
After creation, a success modal displays:
- Token Key: The API key (used as the username in Basic Auth), prefixed with
patchmon_ae_ - Token Secret: The API secret (used as the password). Shown only once.
- Granted Scopes: The permissions assigned
- Usage Examples: Pre-filled cURL commands ready to copy
Copy both the Token Key and Token Secret and store them securely before closing the modal.
Authentication
Basic Authentication
PatchMon API credentials use HTTP Basic Authentication as defined in RFC 7617.
Format
Authorization: Basic <base64(token_key:token_secret)>
How It Works
- Combine your token key and secret with a colon:
token_key:token_secret - Encode the combined string in Base64
- Prepend
Basicto the encoded string - Send it in the
Authorizationheader
Most HTTP clients handle this automatically (for example, cURL's -u flag or Python's HTTPBasicAuth).
Authentication Flow
┌─────────────┐ ┌─────────────┐
│ Client │ │ PatchMon │
│ Application │ │ Server │
└──────┬──────┘ └──────┬──────┘
│ │
│ 1. Send request with Basic Auth │
│ Authorization: Basic <base64> │
│───────────────────────────────────────────────>│
│ │
│ 2. Validate credentials │
│ a. Decode Base64 │
│ b. Find token by key │
│ c. Check is_active │
│ d. Check expiration │
│ e. Verify integration type │
│ f. Verify secret (bcrypt) │
│ g. Check IP restrictions │
│ h. Update last_used_at │
│ │
│ 3. Validate scopes │
│ a. Check resource access │
│ b. Check action permission │
│ │
│ 4. Return response │
│<───────────────────────────────────────────────│
│ 200 OK + Data (if authorised) │
│ 401 Unauthorised (if auth fails) │
│ 403 Forbidden (if scope/IP check fails) │
Validation Steps (In Order)
The server performs these checks sequentially. If any step fails, the request is rejected immediately:
Available Scopes & Permissions
API credentials use a resource–action scope model:
{
"resource": ["action1", "action2"]
}
Host Resource
Resource name: host
| Action | Description |
|---|---|
get |
Read host data (list hosts, view details, stats, packages, network, system, reports, notes, integrations) |
delete |
Delete hosts |
Example scope configurations:
// Read-only access
{ "host": ["get"] }
// Read and delete
{ "host": ["get", "delete"] }
Important Notes
- Scopes are explicit: no inheritance or wildcards. Each action must be explicitly granted.
getdoes not automatically includedeleteor any other action.- At least one action must be granted for at least one resource. Credentials with no scopes will be rejected during creation.
API Endpoints
All endpoints are prefixed with /api/v1/api and require Basic Authentication with a credential that has the appropriate scope.
Endpoints Summary
| Endpoint | Method | Scope | Description |
|---|---|---|---|
/api/v1/api/hosts |
GET | host:get |
List all hosts with IP, groups, and optional stats |
/api/v1/api/hosts/:id/stats |
GET | host:get |
Get host package/repo statistics |
/api/v1/api/hosts/:id/info |
GET | host:get |
Get detailed host information |
/api/v1/api/hosts/:id/network |
GET | host:get |
Get host network configuration |
/api/v1/api/hosts/:id/system |
GET | host:get |
Get host system details |
/api/v1/api/hosts/:id/packages |
GET | host:get |
Get host packages (with optional update filter) |
/api/v1/api/hosts/:id/package_reports |
GET | host:get |
Get package update history |
/api/v1/api/hosts/:id/agent_queue |
GET | host:get |
Get agent queue status and jobs |
/api/v1/api/hosts/:id/notes |
GET | host:get |
Get host notes |
/api/v1/api/hosts/:id/integrations |
GET | host:get |
Get host integration status |
/api/v1/api/hosts/:id |
DELETE | host:delete |
Delete a host and all related data |
List Hosts
Retrieve a list of all hosts with their IP addresses and host group memberships. Optionally include package update statistics inline with each host.
Endpoint:
GET /api/v1/api/hosts
Required Scope: host:get
Query Parameters:
| Parameter | Type | Required | Description |
|---|---|---|---|
hostgroup |
string | No | Filter by host group name(s) or UUID(s). Comma-separated for multiple groups (OR logic). |
include |
string | No | Comma-separated list of additional data to include. Supported values: stats. |
Filtering by Host Groups:
# Filter by group name
GET /api/v1/api/hosts?hostgroup=Production
# Filter by multiple groups (hosts in ANY of the listed groups)
GET /api/v1/api/hosts?hostgroup=Production,Development
# Filter by group UUID
GET /api/v1/api/hosts?hostgroup=550e8400-e29b-41d4-a716-446655440000
# Mix names and UUIDs
GET /api/v1/api/hosts?hostgroup=Production,550e8400-e29b-41d4-a716-446655440000
Including Stats:
Use ?include=stats to add package update counts and additional host metadata to each host in a single request. This is more efficient than making separate /stats calls for every host.
# List all hosts with stats
GET /api/v1/api/hosts?include=stats
# Combine with host group filter
GET /api/v1/api/hosts?hostgroup=Production&include=stats
Note: If your host group names contain spaces, URL-encode them with
%20(e.g.Web%20Servers). Most HTTP clients handle this automatically.
Response (200 OK) without stats:
{
"hosts": [
{
"id": "550e8400-e29b-41d4-a716-446655440000",
"friendly_name": "web-server-01",
"hostname": "web01.example.com",
"ip": "192.168.1.100",
"host_groups": [
{
"id": "660e8400-e29b-41d4-a716-446655440001",
"name": "Production"
}
]
}
],
"total": 1,
"filtered_by_groups": ["Production"]
}
Response (200 OK) with stats (?include=stats):
{
"hosts": [
{
"id": "550e8400-e29b-41d4-a716-446655440000",
"friendly_name": "web-server-01",
"hostname": "web01.example.com",
"ip": "192.168.1.100",
"host_groups": [
{
"id": "660e8400-e29b-41d4-a716-446655440001",
"name": "Production"
}
],
"os_type": "Ubuntu",
"os_version": "24.04 LTS",
"last_update": "2026-02-12T10:30:00.000Z",
"status": "active",
"needs_reboot": false,
"updates_count": 15,
"security_updates_count": 3,
"total_packages": 342
}
],
"total": 1,
"filtered_by_groups": ["Production"]
}
The
filtered_by_groupsfield is only present when ahostgroupfilter is applied.
Response Fields:
| Field | Type | Description |
|---|---|---|
hosts |
array | Array of host objects |
hosts[].id |
string (UUID) | Unique host identifier |
hosts[].friendly_name |
string | Human-readable host name |
hosts[].hostname |
string | System hostname |
hosts[].ip |
string | Primary IP address |
hosts[].host_groups |
array | Groups this host belongs to |
hosts[].os_type |
string | Operating system type (only with include=stats) |
hosts[].os_version |
string | Operating system version (only with include=stats) |
hosts[].last_update |
string (ISO 8601) | Timestamp of last agent update (only with include=stats) |
hosts[].status |
string | Host status, e.g. active, pending (only with include=stats) |
hosts[].needs_reboot |
boolean | Whether a reboot is pending (only with include=stats) |
hosts[].updates_count |
integer | Number of packages needing updates (only with include=stats) |
hosts[].security_updates_count |
integer | Number of security updates available (only with include=stats) |
hosts[].total_packages |
integer | Total installed packages (only with include=stats) |
total |
integer | Total number of hosts returned |
filtered_by_groups |
array | Groups used for filtering (only present when filtering) |
Get Host Statistics
Retrieve package and repository statistics for a specific host.
Endpoint:
GET /api/v1/api/hosts/:id/stats
Required Scope: host:get
Response (200 OK):
{
"host_id": "550e8400-e29b-41d4-a716-446655440000",
"total_installed_packages": 342,
"outdated_packages": 15,
"security_updates": 3,
"total_repos": 8
}
Response Fields:
| Field | Type | Description |
|---|---|---|
host_id |
string (UUID) | The host identifier |
total_installed_packages |
integer | Total packages installed on this host |
outdated_packages |
integer | Packages that need updates |
security_updates |
integer | Packages with security updates available |
total_repos |
integer | Total repositories associated with the host |
Get Host Information
Retrieve detailed information about a specific host including OS details and host groups.
Endpoint:
GET /api/v1/api/hosts/:id/info
Required Scope: host:get
Response (200 OK):
{
"id": "550e8400-e29b-41d4-a716-446655440000",
"machine_id": "abc123def456",
"friendly_name": "web-server-01",
"hostname": "web01.example.com",
"ip": "192.168.1.100",
"os_type": "Ubuntu",
"os_version": "24.04 LTS",
"agent_version": "1.5.0",
"host_groups": [
{
"id": "660e8400-e29b-41d4-a716-446655440001",
"name": "Production"
}
]
}
Get Host Network Information
Retrieve network configuration details for a specific host.
Endpoint:
GET /api/v1/api/hosts/:id/network
Required Scope: host:get
Response (200 OK):
{
"id": "550e8400-e29b-41d4-a716-446655440000",
"ip": "192.168.1.100",
"gateway_ip": "192.168.1.1",
"dns_servers": ["8.8.8.8", "8.8.4.4"],
"network_interfaces": [
{
"name": "eth0",
"ip": "192.168.1.100",
"mac": "00:11:22:33:44:55"
}
]
}
Get Host System Information
Retrieve system-level information for a specific host including hardware, kernel, and reboot status.
Endpoint:
GET /api/v1/api/hosts/:id/system
Required Scope: host:get
Response (200 OK):
{
"id": "550e8400-e29b-41d4-a716-446655440000",
"architecture": "x86_64",
"kernel_version": "6.8.0-45-generic",
"installed_kernel_version": "6.8.0-50-generic",
"selinux_status": "disabled",
"system_uptime": "15 days, 3:22:10",
"cpu_model": "Intel Xeon E5-2680 v4",
"cpu_cores": 4,
"ram_installed": 8192,
"swap_size": 2048,
"load_average": {
"1min": 0.5,
"5min": 0.3,
"15min": 0.2
},
"disk_details": [
{
"filesystem": "/dev/sda1",
"size": "50G",
"used": "22G",
"available": "28G",
"use_percent": "44%",
"mounted_on": "/"
}
],
"needs_reboot": true,
"reboot_reason": "Kernel update pending"
}
Get Host Packages
Retrieve the list of packages installed on a specific host. Use the optional updates_only parameter to return only packages with available updates.
Endpoint:
GET /api/v1/api/hosts/:id/packages
Required Scope: host:get
Query Parameters:
| Parameter | Type | Required | Default | Description |
|---|---|---|---|---|
updates_only |
string | No | (none) | Set to true to return only packages that need updates |
Examples:
# Get all packages for a host
curl -u "patchmon_ae_abc123:your_secret_here" \
https://patchmon.example.com/api/v1/api/hosts/HOST_UUID/packages
# Get only packages with available updates
curl -u "patchmon_ae_abc123:your_secret_here" \
"https://patchmon.example.com/api/v1/api/hosts/HOST_UUID/packages?updates_only=true"
Response (200 OK):
{
"host": {
"id": "550e8400-e29b-41d4-a716-446655440000",
"hostname": "web01.example.com",
"friendly_name": "web-server-01"
},
"packages": [
{
"id": "package-host-uuid",
"name": "nginx",
"description": "High performance web server",
"category": "web",
"current_version": "1.18.0-0ubuntu1.5",
"available_version": "1.24.0-2ubuntu1",
"needs_update": true,
"is_security_update": false,
"last_checked": "2026-02-12T10:30:00.000Z"
},
{
"id": "package-host-uuid-2",
"name": "openssl",
"description": "Secure Sockets Layer toolkit",
"category": "security",
"current_version": "3.0.2-0ubuntu1.14",
"available_version": "3.0.2-0ubuntu1.18",
"needs_update": true,
"is_security_update": true,
"last_checked": "2026-02-12T10:30:00.000Z"
}
],
"total": 2
}
Response Fields:
| Field | Type | Description |
|---|---|---|
host |
object | Basic host identification |
host.id |
string (UUID) | Host identifier |
host.hostname |
string | System hostname |
host.friendly_name |
string | Human-readable host name |
packages |
array | Array of package objects |
packages[].id |
string (UUID) | Host-package record identifier |
packages[].name |
string | Package name |
packages[].description |
string | Package description |
packages[].category |
string | Package category |
packages[].current_version |
string | Currently installed version |
packages[].available_version |
string | null | Available update version (null if up to date) |
packages[].needs_update |
boolean | Whether an update is available |
packages[].is_security_update |
boolean | Whether the available update is security-related |
packages[].last_checked |
string (ISO 8601) | When this package was last checked |
total |
integer | Total number of packages returned |
Tip: Packages are returned sorted by security updates first, then by update availability. This puts the most critical packages at the top.
Get Host Package Reports
Retrieve package update history reports for a specific host.
Endpoint:
GET /api/v1/api/hosts/:id/package_reports
Required Scope: host:get
Query Parameters:
| Parameter | Type | Required | Default | Description |
|---|---|---|---|---|
limit |
integer | No | 10 | Maximum number of reports to return |
Response (200 OK):
{
"host_id": "550e8400-e29b-41d4-a716-446655440000",
"reports": [
{
"id": "report-uuid",
"status": "success",
"date": "2026-02-12T10:30:00.000Z",
"total_packages": 342,
"outdated_packages": 15,
"security_updates": 3,
"payload_kb": 12.5,
"execution_time_seconds": 4.2,
"error_message": null
}
],
"total": 1
}
Get Host Agent Queue
Retrieve agent queue status and job history for a specific host.
Endpoint:
GET /api/v1/api/hosts/:id/agent_queue
Required Scope: host:get
Query Parameters:
| Parameter | Type | Required | Default | Description |
|---|---|---|---|---|
limit |
integer | No | 10 | Maximum number of jobs to return |
Response (200 OK):
{
"host_id": "550e8400-e29b-41d4-a716-446655440000",
"queue_status": {
"waiting": 0,
"active": 1,
"delayed": 0,
"failed": 0
},
"job_history": [
{
"id": "job-history-uuid",
"job_id": "bull-job-id",
"job_name": "package_update",
"status": "completed",
"attempt": 1,
"created_at": "2026-02-12T10:00:00.000Z",
"completed_at": "2026-02-12T10:05:00.000Z",
"error_message": null,
"output": null
}
],
"total_jobs": 1
}
Get Host Notes
Retrieve notes associated with a specific host.
Endpoint:
GET /api/v1/api/hosts/:id/notes
Required Scope: host:get
Response (200 OK):
{
"host_id": "550e8400-e29b-41d4-a716-446655440000",
"notes": "Production web server. Enrolled via Proxmox auto-enrollment on 2026-01-15."
}
Get Host Integrations
Retrieve integration status and details for a specific host (e.g. Docker).
Endpoint:
GET /api/v1/api/hosts/:id/integrations
Required Scope: host:get
Response (200 OK, Docker enabled):
{
"host_id": "550e8400-e29b-41d4-a716-446655440000",
"integrations": {
"docker": {
"enabled": true,
"containers_count": 12,
"volumes_count": 5,
"networks_count": 3,
"description": "Monitor Docker containers, images, volumes, and networks. Collects real-time container status events."
}
}
}
Response (200 OK, Docker not enabled):
{
"host_id": "550e8400-e29b-41d4-a716-446655440000",
"integrations": {
"docker": {
"enabled": false,
"description": "Monitor Docker containers, images, volumes, and networks. Collects real-time container status events."
}
}
}
Delete Host
Delete a specific host and all related data (cascade). This permanently removes the host and its associated packages, repositories, update history, Docker data, job history, and group memberships.
Endpoint:
DELETE /api/v1/api/hosts/:id
Required Scope: host:delete
Path Parameters:
| Parameter | Type | Required | Description |
|---|---|---|---|
id |
string (UUID) | Yes | The unique identifier of the host to delete |
Response (200 OK):
{
"message": "Host deleted successfully",
"deleted": {
"id": "550e8400-e29b-41d4-a716-446655440000",
"friendly_name": "web-server-01",
"hostname": "web01.example.com"
}
}
Response Fields:
| Field | Type | Description |
|---|---|---|
message |
string | Confirmation message |
deleted.id |
string (UUID) | The ID of the deleted host |
deleted.friendly_name |
string | The friendly name of the deleted host |
deleted.hostname |
string | The hostname of the deleted host |
Error Responses:
| HTTP Code | Error | Description |
|---|---|---|
| 400 | Invalid host ID format |
The provided ID is not a valid UUID |
| 403 | Access denied |
Credential does not have host:delete permission |
| 404 | Host not found |
No host exists with the given ID |
| 500 | Failed to delete host |
Unexpected error during host deletion |
Warning: This action is irreversible. All data associated with the host (packages, repositories, update history, Docker containers, job history, group memberships, etc.) will be permanently deleted.
Common Error Responses (All Endpoints)
404 Not Found: Host does not exist (for single-host endpoints):
{
"error": "Host not found"
}
500 Internal Server Error: Unexpected server error:
{
"error": "Failed to fetch hosts"
}
See the Troubleshooting section for authentication and permission errors.
Usage Examples
cURL Examples
List All Hosts
curl -u "patchmon_ae_abc123:your_secret_here" \
https://patchmon.example.com/api/v1/api/hosts
List Hosts with Stats
curl -u "patchmon_ae_abc123:your_secret_here" \
"https://patchmon.example.com/api/v1/api/hosts?include=stats"
Filter by Host Group
curl -u "patchmon_ae_abc123:your_secret_here" \
"https://patchmon.example.com/api/v1/api/hosts?hostgroup=Production"
Filter by Host Group with Stats
curl -u "patchmon_ae_abc123:your_secret_here" \
"https://patchmon.example.com/api/v1/api/hosts?hostgroup=Production&include=stats"
Filter by Multiple Groups
curl -u "patchmon_ae_abc123:your_secret_here" \
"https://patchmon.example.com/api/v1/api/hosts?hostgroup=Production,Development"
Get Host Statistics
curl -u "patchmon_ae_abc123:your_secret_here" \
https://patchmon.example.com/api/v1/api/hosts/HOST_UUID/stats
Get Host System Information
curl -u "patchmon_ae_abc123:your_secret_here" \
https://patchmon.example.com/api/v1/api/hosts/HOST_UUID/system
Get All Packages for a Host
curl -u "patchmon_ae_abc123:your_secret_here" \
https://patchmon.example.com/api/v1/api/hosts/HOST_UUID/packages
Get Only Packages with Available Updates
curl -u "patchmon_ae_abc123:your_secret_here" \
"https://patchmon.example.com/api/v1/api/hosts/HOST_UUID/packages?updates_only=true"
Delete a Host
curl -X DELETE -u "patchmon_ae_abc123:your_secret_here" \
https://patchmon.example.com/api/v1/api/hosts/HOST_UUID
Pretty Print JSON Output
curl -u "patchmon_ae_abc123:your_secret_here" \
https://patchmon.example.com/api/v1/api/hosts | jq .
Python Examples
Using requests Library
import requests
from requests.auth import HTTPBasicAuth
# API credentials
API_KEY = "patchmon_ae_abc123"
API_SECRET = "your_secret_here"
BASE_URL = "https://patchmon.example.com"
# Create session with authentication
session = requests.Session()
session.auth = HTTPBasicAuth(API_KEY, API_SECRET)
# List all hosts
response = session.get(f"{BASE_URL}/api/v1/api/hosts")
if response.status_code == 200:
data = response.json()
print(f"Total hosts: {data['total']}")
for host in data['hosts']:
groups = ', '.join([g['name'] for g in host['host_groups']])
print(f" {host['friendly_name']} ({host['ip']}) - Groups: {groups}")
else:
print(f"Error: {response.status_code} - {response.json()}")
Filter by Host Group
# Filter by group name (requests handles URL encoding automatically)
response = session.get(
f"{BASE_URL}/api/v1/api/hosts",
params={"hostgroup": "Production"}
)
List Hosts with Inline Stats
# Get hosts with stats in a single request (more efficient than per-host /stats calls)
response = session.get(
f"{BASE_URL}/api/v1/api/hosts",
params={"include": "stats"}
)
if response.status_code == 200:
data = response.json()
for host in data['hosts']:
print(f"{host['friendly_name']}: {host['updates_count']} updates, "
f"{host['security_updates_count']} security, "
f"{host['total_packages']} total packages")
Get Host Packages (Updates Only)
# Get only packages that need updates for a specific host
response = session.get(
f"{BASE_URL}/api/v1/api/hosts/{host_id}/packages",
params={"updates_only": "true"}
)
if response.status_code == 200:
data = response.json()
print(f"Host: {data['host']['friendly_name']}")
print(f"Packages needing updates: {data['total']}")
for pkg in data['packages']:
security = " [SECURITY]" if pkg['is_security_update'] else ""
print(f" {pkg['name']}: {pkg['current_version']} → {pkg['available_version']}{security}")
Get Host Details and Stats
# First, get list of hosts
hosts_response = session.get(f"{BASE_URL}/api/v1/api/hosts")
hosts = hosts_response.json()['hosts']
# Then get stats for the first host
if hosts:
host_id = hosts[0]['id']
stats = session.get(f"{BASE_URL}/api/v1/api/hosts/{host_id}/stats").json()
print(f"Installed: {stats['total_installed_packages']}")
print(f"Outdated: {stats['outdated_packages']}")
print(f"Security: {stats['security_updates']}")
info = session.get(f"{BASE_URL}/api/v1/api/hosts/{host_id}/info").json()
print(f"OS: {info['os_type']} {info['os_version']}")
print(f"Agent: {info['agent_version']}")
Delete a Host
# Delete a host by UUID (requires host:delete scope)
host_id = "550e8400-e29b-41d4-a716-446655440000"
response = session.delete(f"{BASE_URL}/api/v1/api/hosts/{host_id}")
if response.status_code == 200:
data = response.json()
print(f"Deleted: {data['deleted']['friendly_name']} ({data['deleted']['hostname']})")
else:
print(f"Error: {response.status_code} - {response.json()}")
Error Handling
def get_hosts(hostgroup=None):
"""Get hosts with error handling."""
try:
params = {"hostgroup": hostgroup} if hostgroup else {}
response = session.get(
f"{BASE_URL}/api/v1/api/hosts",
params=params,
timeout=30
)
response.raise_for_status()
return response.json()
except requests.exceptions.HTTPError as e:
if e.response.status_code == 401:
print("Authentication failed - check credentials")
elif e.response.status_code == 403:
print("Access denied - insufficient permissions")
else:
print(f"HTTP error: {e}")
return None
except requests.exceptions.Timeout:
print("Request timed out")
return None
except requests.exceptions.RequestException as e:
print(f"Request failed: {e}")
return None
Generate Ansible Inventory
import json
import requests
from requests.auth import HTTPBasicAuth
API_KEY = "patchmon_ae_abc123"
API_SECRET = "your_secret_here"
BASE_URL = "https://patchmon.example.com"
def generate_ansible_inventory():
"""Generate Ansible inventory from PatchMon hosts."""
auth = HTTPBasicAuth(API_KEY, API_SECRET)
response = requests.get(f"{BASE_URL}/api/v1/api/hosts", auth=auth, timeout=30)
if response.status_code != 200:
print(f"Error fetching hosts: {response.status_code}")
return
data = response.json()
inventory = {
"_meta": {"hostvars": {}},
"all": {"hosts": [], "children": []}
}
for host in data['hosts']:
hostname = host['friendly_name']
inventory["all"]["hosts"].append(hostname)
inventory["_meta"]["hostvars"][hostname] = {
"ansible_host": host['ip'],
"patchmon_id": host['id'],
"patchmon_hostname": host['hostname']
}
for group in host['host_groups']:
group_name = group['name'].lower().replace(' ', '_')
if group_name not in inventory:
inventory[group_name] = {"hosts": [], "vars": {}}
inventory["all"]["children"].append(group_name)
inventory[group_name]["hosts"].append(hostname)
print(json.dumps(inventory, indent=2))
if __name__ == "__main__":
generate_ansible_inventory()
JavaScript/Node.js Examples
Using Native fetch (Node.js 18+)
const API_KEY = 'patchmon_ae_abc123';
const API_SECRET = 'your_secret_here';
const BASE_URL = 'https://patchmon.example.com';
const authHeader = 'Basic ' + Buffer.from(`${API_KEY}:${API_SECRET}`).toString('base64');
async function getHosts(hostgroup = null) {
const url = new URL('/api/v1/api/hosts', BASE_URL);
if (hostgroup) {
url.searchParams.append('hostgroup', hostgroup);
}
const response = await fetch(url, {
headers: {
'Authorization': authHeader,
'Content-Type': 'application/json'
}
});
if (!response.ok) {
const error = await response.json();
throw new Error(`HTTP ${response.status}: ${error.error}`);
}
return await response.json();
}
// List all hosts
getHosts()
.then(data => {
console.log(`Total: ${data.total}`);
data.hosts.forEach(host => {
console.log(`${host.friendly_name}: ${host.ip}`);
});
})
.catch(error => console.error('Error:', error.message));
Ansible Dynamic Inventory
Save this as patchmon_inventory.py and make it executable (chmod +x):
#!/usr/bin/env python3
"""
PatchMon Dynamic Inventory Script for Ansible.
Usage: ansible-playbook -i patchmon_inventory.py playbook.yml
"""
import json
import os
import sys
import requests
from requests.auth import HTTPBasicAuth
API_KEY = os.environ.get('PATCHMON_API_KEY')
API_SECRET = os.environ.get('PATCHMON_API_SECRET')
BASE_URL = os.environ.get('PATCHMON_URL', 'https://patchmon.example.com')
if not API_KEY or not API_SECRET:
print("Error: PATCHMON_API_KEY and PATCHMON_API_SECRET must be set", file=sys.stderr)
sys.exit(1)
def get_inventory():
auth = HTTPBasicAuth(API_KEY, API_SECRET)
try:
response = requests.get(f"{BASE_URL}/api/v1/api/hosts", auth=auth, timeout=30)
response.raise_for_status()
return response.json()
except requests.exceptions.RequestException as e:
print(f"Error fetching inventory: {e}", file=sys.stderr)
sys.exit(1)
def build_ansible_inventory(patchmon_data):
inventory = {
"_meta": {"hostvars": {}},
"all": {"hosts": []}
}
groups = {}
for host in patchmon_data['hosts']:
hostname = host['friendly_name']
inventory["all"]["hosts"].append(hostname)
inventory["_meta"]["hostvars"][hostname] = {
"ansible_host": host['ip'],
"patchmon_id": host['id'],
"patchmon_hostname": host['hostname']
}
for group in host['host_groups']:
group_name = group['name'].lower().replace(' ', '_').replace('-', '_')
if group_name not in groups:
groups[group_name] = {
"hosts": [],
"vars": {"patchmon_group_id": group['id']}
}
groups[group_name]["hosts"].append(hostname)
inventory.update(groups)
return inventory
def main():
if len(sys.argv) == 2 and sys.argv[1] == '--list':
patchmon_data = get_inventory()
inventory = build_ansible_inventory(patchmon_data)
print(json.dumps(inventory, indent=2))
elif len(sys.argv) == 3 and sys.argv[1] == '--host':
print(json.dumps({}))
else:
print("Usage: patchmon_inventory.py --list", file=sys.stderr)
sys.exit(1)
if __name__ == '__main__':
main()
Usage:
export PATCHMON_API_KEY="patchmon_ae_abc123"
export PATCHMON_API_SECRET="your_secret_here"
export PATCHMON_URL="https://patchmon.example.com"
# Test inventory
./patchmon_inventory.py --list
# Use with ansible
ansible-playbook -i patchmon_inventory.py playbook.yml
ansible -i patchmon_inventory.py all -m ping
Security Best Practices
Credential Management
Do:
- Store credentials in a password manager or secrets vault (e.g. HashiCorp Vault, AWS Secrets Manager)
- Use environment variables for automation scripts
- Set expiration dates (recommended: 90 days)
- Grant only the minimum permissions needed (principle of least privilege)
- Rotate credentials regularly and delete old ones after migration
Don't:
- Hard-code credentials in source code
- Commit credentials to version control
- Share credentials via email or chat
- Store credentials in plain-text files
IP Restrictions
Restrict credentials to known IP addresses whenever possible:
Allowed IPs: 192.168.1.100, 10.0.0.0/24
For dynamic IPs, consider using a VPN with a static exit IP, a cloud NAT gateway, or a proxy server.
Network Security
- Always use HTTPS in production environments
- Verify SSL certificates: only disable verification (
-k) for development/testing - Use firewall rules to restrict PatchMon API access at the network level
Monitoring & Auditing
- Check "Last Used" timestamps regularly in the Integrations settings page
- Investigate credentials that have not been used in 30+ days
- Review all active credentials monthly
- Remove credentials for decommissioned systems
If Credentials Are Compromised
- Immediately disable the credential in PatchMon UI (Settings → Integrations → toggle off)
- Review the "Last Used" timestamp to understand the window of exposure
- Check server logs for any unauthorised access
- Create new credentials with a different scope if needed
- Delete the compromised credential after verification
- Notify your security team if sensitive data may have been accessed
Troubleshooting
Error Reference
| Error Message | HTTP Code | Cause | Solution |
|---|---|---|---|
Missing or invalid authorization header |
401 | No Authorization header, or it doesn't start with Basic |
Use -u key:secret with cURL, or set Authorization: Basic <base64> header |
Invalid credentials format |
401 | Base64-decoded value doesn't contain a colon separator | Check format is key:secret and ensure no extra characters |
Invalid API key |
401 | Token key not found in the database | Verify the credential exists in Settings → Integrations |
API key is disabled |
401 | Credential has been manually deactivated | Re-enable in Settings → Integrations, or create a new credential |
API key has expired |
401 | The expiration date has passed | Create a new credential to replace the expired one |
Invalid API key type |
401 | The credential's integration_type is not "api" |
Ensure you created the credential with the "API" usage type |
Invalid API secret |
401 | Secret doesn't match the stored bcrypt hash | Create a new credential (secrets cannot be retrieved) |
IP address not allowed |
403 | Client IP is not in the credential's allowed_ip_ranges |
Add your IP: curl https://ifconfig.me to find it |
Access denied: does not have permission to {action} {resource} |
403 | Credential is missing the required scope | Edit the credential and add the required permission |
Access denied: does not have access to {resource} |
403 | The resource is not included in the credential's scopes at all | Edit the credential's scopes to include the resource |
Host not found |
404 | The host UUID does not exist | Verify the UUID from the list hosts endpoint |
Invalid host ID format |
400 | The host ID is not a valid UUID (DELETE endpoint) | Ensure the ID is a valid UUID format |
Failed to delete host |
500 | Unexpected error during host deletion | Check PatchMon server logs for details |
Failed to fetch hosts |
500 | Unexpected server error | Check PatchMon server logs for details |
Authentication failed |
500 | Unexpected error during authentication processing | Check PatchMon server logs; may indicate a database issue |
Debug Tips
cURL verbose mode:
curl -v -u "patchmon_ae_abc123:your_secret_here" \
https://patchmon.example.com/api/v1/api/hosts
Python debug logging:
import logging
logging.basicConfig(level=logging.DEBUG)
requests_log = logging.getLogger("requests.packages.urllib3")
requests_log.setLevel(logging.DEBUG)
requests_log.propagate = True
Common Issues
Empty hosts array
- Verify hosts exist in PatchMon UI → Hosts page
- Check the
hostgroupfilter spelling matches exactly (case-sensitive) - Try listing all hosts without filters first to confirm API access works
Connection timeouts
# Test basic connectivity
ping patchmon.example.com
curl -I https://patchmon.example.com/health
SSL certificate errors
For development/testing with self-signed certificates:
curl -k -u "patchmon_ae_abc123:your_secret_here" \
https://patchmon.example.com/api/v1/api/hosts
For production, install a valid SSL certificate (e.g. Let's Encrypt).
Getting Help
If issues persist:
- Check PatchMon server logs for detailed error information
- Use the built-in Swagger UI to test endpoints interactively
- Search or create an issue at github.com/PatchMon/PatchMon
- Join the PatchMon community on Discord
Chapter 32: Metrics and Telemetry
What we collect and why
We collect three pieces of information about PatchMon instances in the field:
- Quantity of installations / live setups
- Quantity of hosts being monitored
- Version number of the instance
This lets us produce a live statistic on patchmon.net showing adoption across the community, and (more importantly) lets us know how many instances are running an older version if a security issue is found.
This was discussed with the community on Discord; the original conversation is pinned in the Security channel.
What we do not collect
- IP addresses. IPs are not written to any log or stored when your instance reaches out to us.
- Host, user, or package data. Only the three fields above, plus a random instance UUID that identifies your install across reports.
How to opt out
Go to Settings → Metrics in the web UI and toggle the schedule off. From that moment, your instance stops sending telemetry.
FAQ
How do I delete the information you have about my instance?
Email support@patchmon.net with your UUID and we will remove your entry from the database. This is the only time we can associate your UUID with your instance, so once it is deleted we have no further link back to you.
What happens if I regenerate my instance ID?
A new instance ID appears in our reports and is counted as a new instance. We have no way to know which instance it replaced. Our website metric counts only instances active in the last 7 days, so old UUIDs drop out after a week.
Can I see the code for this?
Yes, PatchMon is open source. You can inspect the metrics collector in the PatchMon repository.