Installation of the PatchMon Agent
Introduction
The agent installer script authenticates with PatchMon server and proceeds to install the patchmon-agent.sh.
Adding a host:
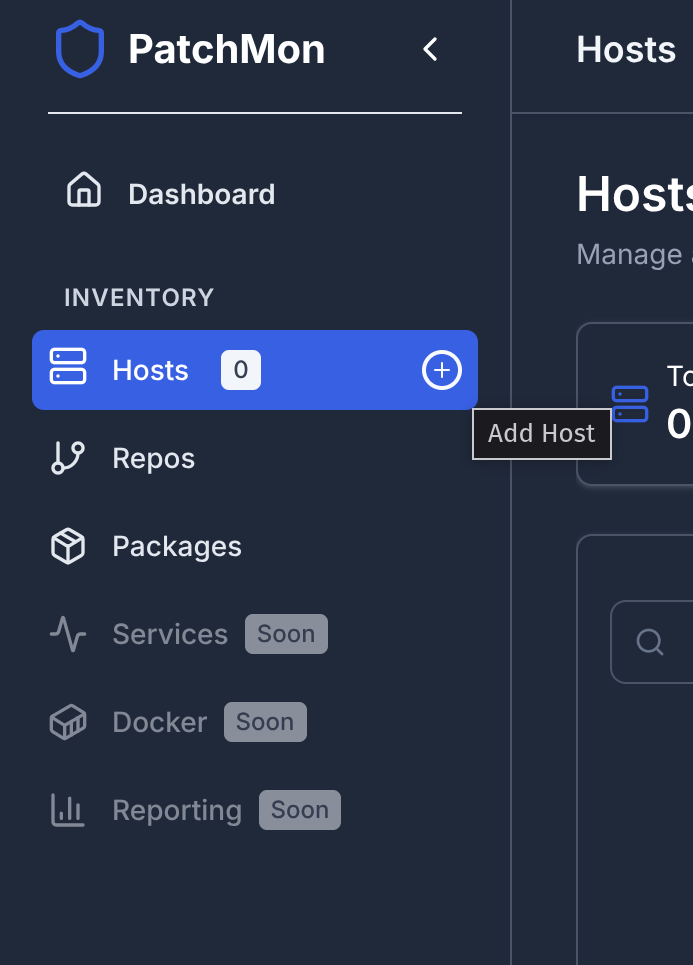
Go to the Hosts page, press Add host:

You will be greeted by this screen where you enter in a friendly name for the server:
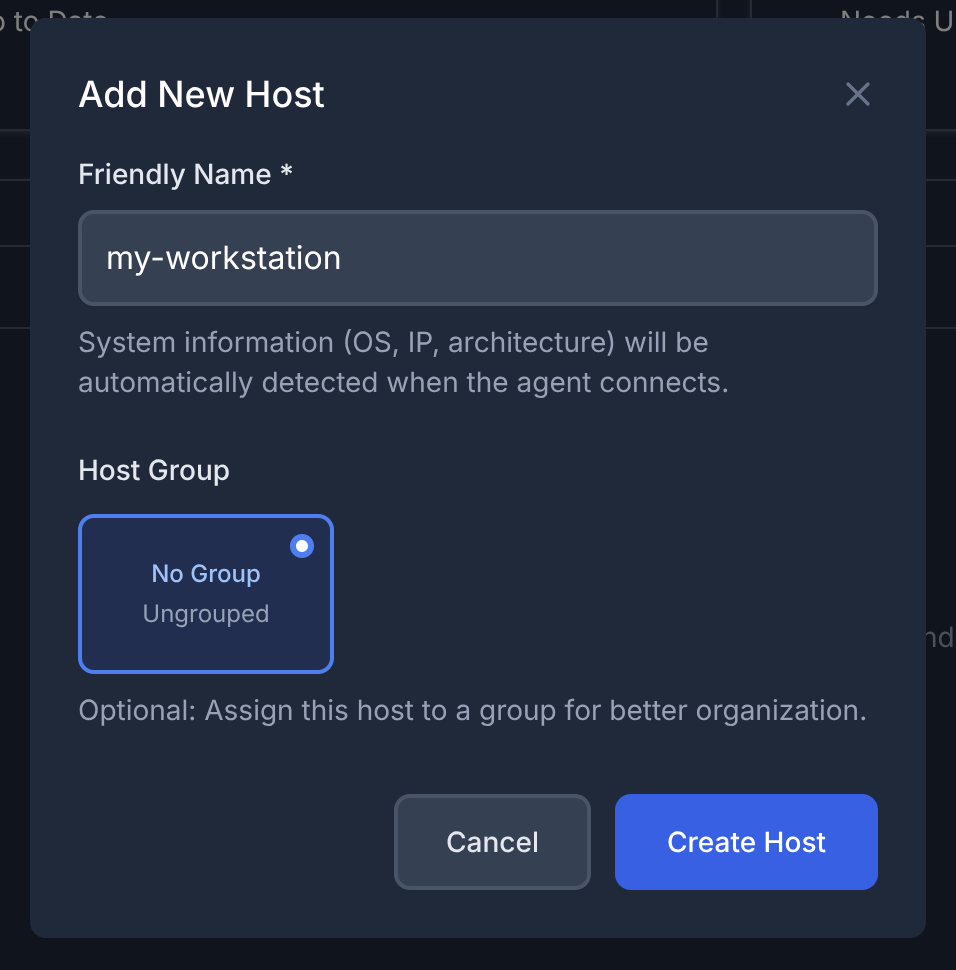
Groups will show empty unless you have added groups already.
Here is how to add groups
As soon as you press "Create Host" it will redirect you to the credentials and deployment script page:
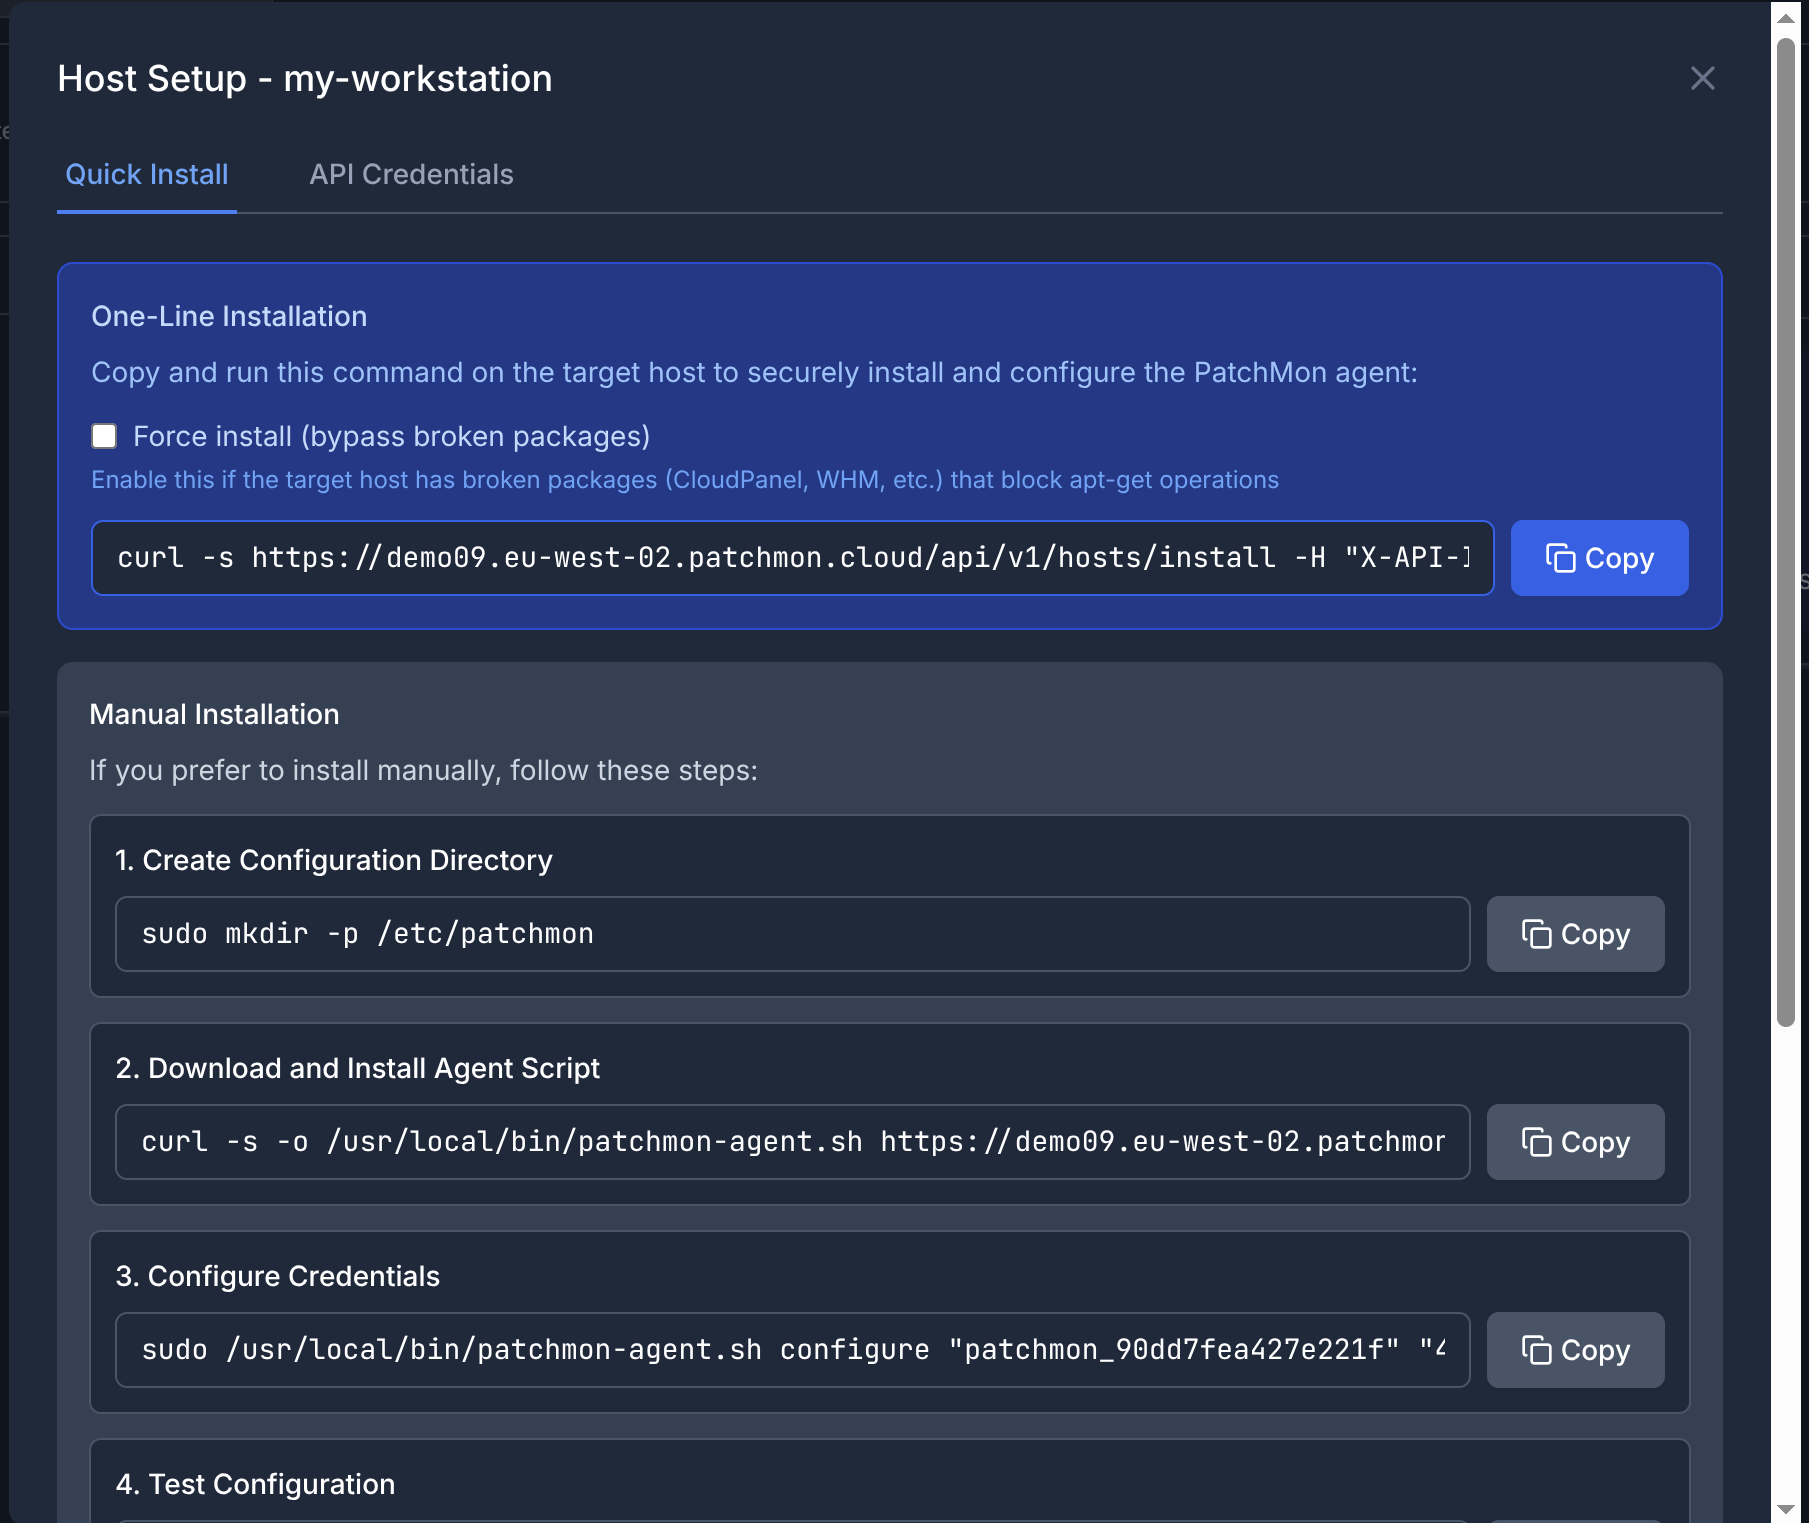
Now we have two ways of installation however we should first take care of a few things:
The first is the checkbox "Force Install (bypass broken packages)"
At times in Linux, certain packages are broken and throw dependency issues when installing software which break the installation script. If you find this is happening then ideally you need to fix your server before you install more software, hoever that's not always possible so by pressing this flag it will bypass package manager issues.
Secondly, at times you may have a self-signed certificate in which this curl command needs an extra flag to go through. This would apply to both the Installation command as well as the agent communication within. Here is how to enable the -k flag installation-wide in settings.
Installing the agent in the Automated way
The one-line command includes the api-id and api-key which is utilized to download the PatchMon agent as well as to populate the credentials.txt file.
SSH into your server, ensure you are root and lets copy and paste this one-line command and see the output:
  🕐 Verifying system datetime and timezone...

📅 Current System Date/Time:
   • Date/Time: Sat Oct  4 07:16:00 PM BST 2025
   • Timezone: Europe/London

⚠️  Non-interactive installation detected

Please verify the date/time shown above is correct.
If the date/time is incorrect, it may cause issues with:
   • Logging timestamps
   • Scheduled updates
   • Data synchronization

✅ Continuing with installation...
✅ ✅ Date/time verification completed (assumed correct)

ℹ️  🚀 Starting PatchMon Agent Installation...
ℹ️  📋 Server: https://demo09.eu-west-02.patchmon.cloud
ℹ️  🔑 API ID: patchmon_90dd7fe...
ℹ️  🆔 Machine ID: a9295dcd387f979b...

🔧 Installation Diagnostics:
   • URL: https://demo09.eu-west-02.patchmon.cloud
   • CURL FLAGS: -s
   • API ID: patchmon_90dd7fe...
   • API Key: 49ff8a6f6b67abf5...

ℹ️  📦 Installing required dependencies...

ℹ️  Detected apt-get (Debian/Ubuntu)

ℹ️  Updating package lists...
Hit:1 https://cli.github.com/packages stable InRelease
Hit:2 https://linux.teamviewer.com/deb stable InRelease
Hit:3 https://download.docker.com/linux/ubuntu jammy InRelease
Hit:4 https://ppa.launchpadcontent.net/damentz/liquorix/ubuntu jammy InRelease
Hit:5 https://deb.nodesource.com/node_20.x nodistro InRelease
Hit:6 https://packages.microsoft.com/ubuntu/20.04/prod focal InRelease
Hit:7 https://packages.microsoft.com/repos/code stable InRelease
Hit:8 http://apt.pop-os.org/proprietary jammy InRelease
Hit:9 http://apt.pop-os.org/release jammy InRelease
Hit:10 https://apt.postgresql.org/pub/repos/apt jammy-pgdg InRelease
Hit:12 https://ngrok-agent.s3.amazonaws.com buster InRelease
Hit:13 http://apt.pop-os.org/ubuntu jammy InRelease
Hit:14 http://apt.pop-os.org/ubuntu jammy-security InRelease
Hit:15 http://apt.pop-os.org/ubuntu jammy-updates InRelease
Hit:11 https://packagecloud.io/slacktechnologies/slack/debian jessie InRelease
Hit:16 http://apt.pop-os.org/ubuntu jammy-backports InRelease
Reading package lists... Done
N: Skipping acquire of configured file 'main/binary-i386/Packages' as repository 'https://apt.postgresql.org/pub/repos/apt jammy-pgdg InRelease' doesn't support architecture 'i386'

ℹ️  Installing jq, curl, and bc...
✅ All required packages are already installed

✅ Dependencies installation completed

ℹ️  📁 Setting up configuration directory...
ℹ️  📁 Creating new configuration directory...
ℹ️  🔐 Creating API credentials file...
ℹ️  📥 Downloading PatchMon agent script...
ℹ️  📋 Agent version: 1.2.7
ℹ️  🔍 Checking if machine is already enrolled...
✅ ✅ Machine not yet enrolled - proceeding with installation
ℹ️  🧪 Testing API credentials and connectivity...
✅ API credentials are valid
✅ ✅ TEST: API credentials are valid and server is reachable
ℹ️  📊 Sending initial package data to server...
ℹ️  Verifying system datetime and timezone...
ℹ️  Collecting system information...
ℹ️  Sending update to PatchMon server...
✅ Update sent successfully (190 packages processed)
ℹ️  Checking crontab configuration...
ℹ️  Updating crontab with current policy...
ℹ️  Setting update interval to 60 minutes
✅ Crontab updated successfully (duplicates removed)
✅ Crontab updated successfully
✅ ✅ UPDATE: Initial package data sent successfully
ℹ️  ✅ Automated updates configured by agent
✅ 🎉 PatchMon Agent installation completed successfully!

📋 Installation Summary:
   • Configuration directory: /etc/patchmon
   • Agent installed: /usr/local/bin/patchmon-agent.sh
   • Dependencies installed: jq, curl, bc
   • Automated updates configured via crontab
   • API credentials configured and tested
   • Update schedule managed by agent

🔧 Management Commands:
   • Test connection: /usr/local/bin/patchmon-agent.sh test
   • Manual update: /usr/local/bin/patchmon-agent.sh update
   • Check status: /usr/local/bin/patchmon-agent.sh diagnostics

✅ ✅ Your system is now being monitored by PatchMon!
Lets go through what this script has done:
- Asked you if the Time is correct, this is for informational purposes and it should be correct if it isn't. It causes issues with logs etc. Set that if it isn't right
- The script wants to install
jq bc curlFor the agent to work properly.
- It will install the credentials file in the location :
/etc/patchmon/credentialsIt's important to note that this credentials file includes the PATCHMON_URL="https://yourinstance.domiain", Ensure this is correct if you have issues connecting to the agent after changing urls or ports
The Agent script location is in the following location:
/usr/local/bin/patchmon-agent.sh
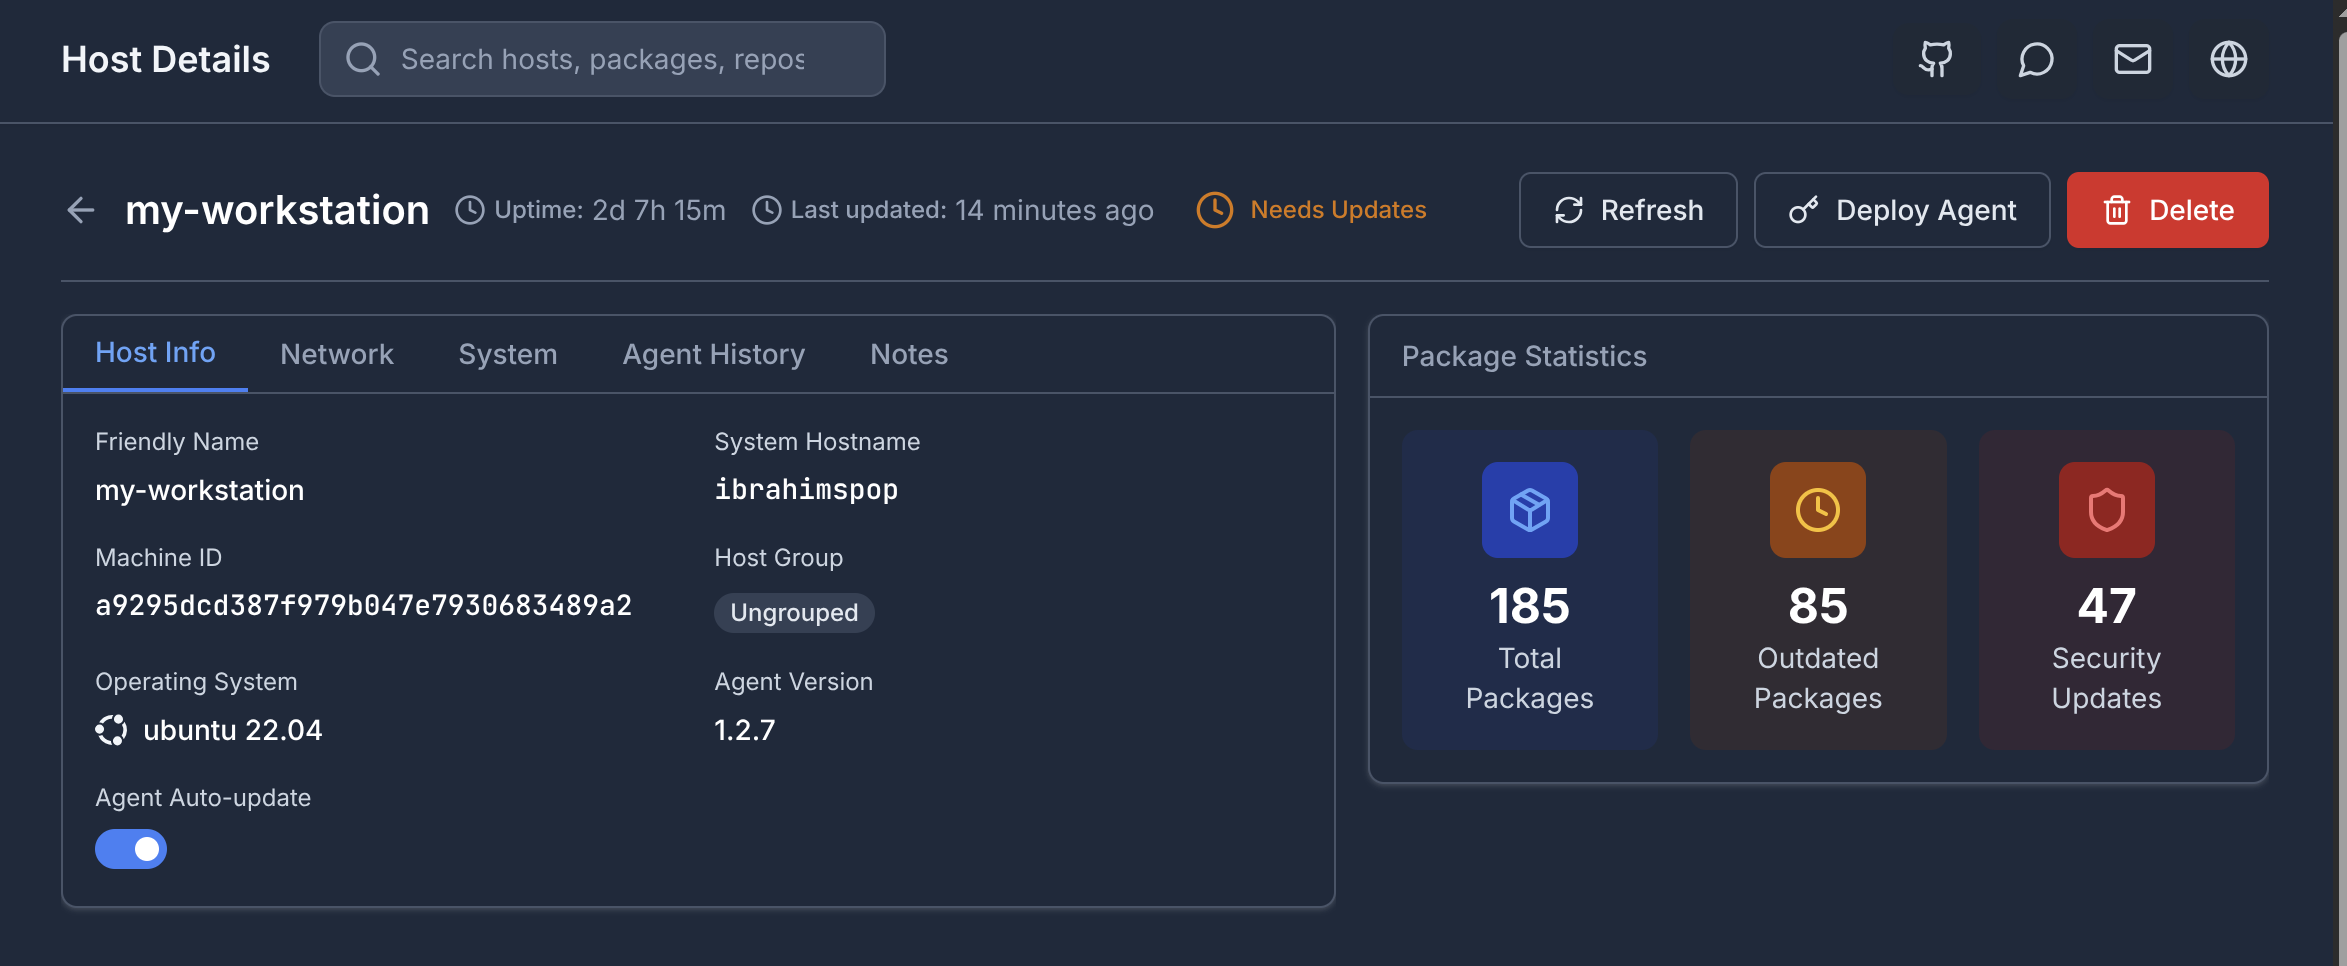
Once the installation is done, Click off the page in PatchMon and refresh the hosts page.
You will see the information of your host now showing along with all the other information: